DROPS Air
DROPS Air
65% Alpaca, 28% Polyamide, 7% Wool
from 4.80 £ /50g
Get the yarn to make this pattern from 33.60£.

The yarn cost is calculated from the pattern’s smallest size and the yarn’s cheapest product type. Looking for an even better price? You might find it on the DROPS Deals!

DROPS SS24

Carly Pullover

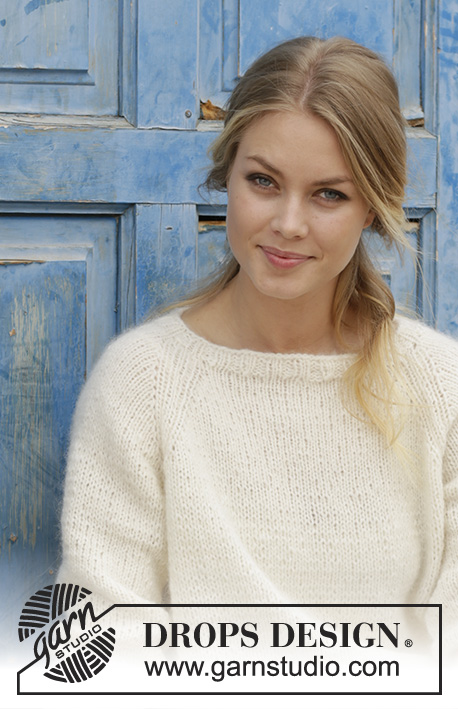
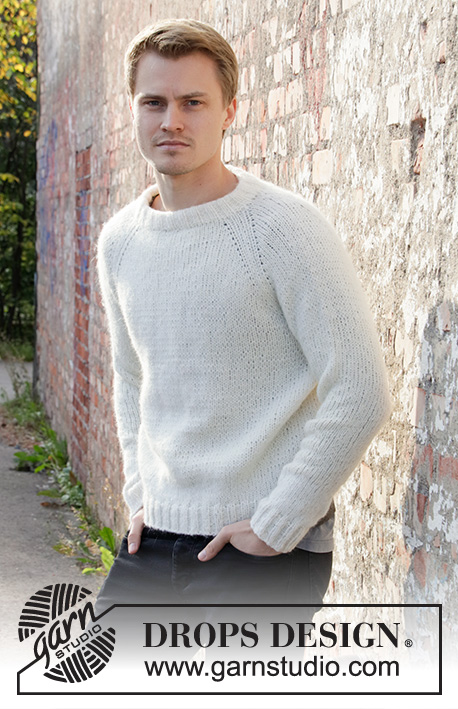
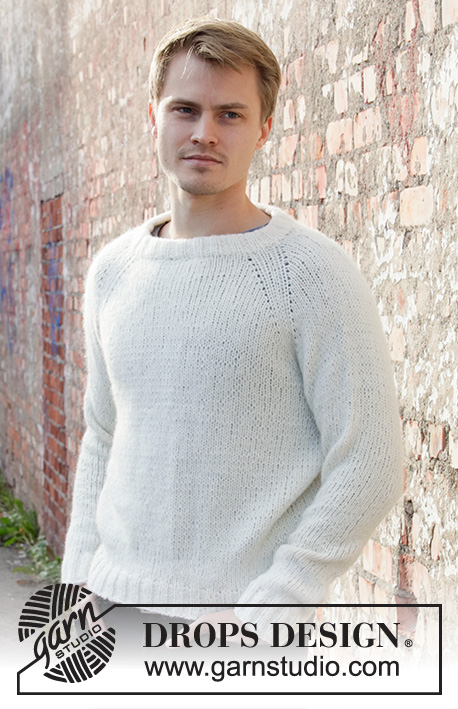
Knitted jumper with raglan for men, worked top down. Sizes S - XXXL. The piece is worked with DROPS Air.

DROPS 208-1
DROPS Design: Pattern no ai-239
Yarn group C or A + A
-----------------------------------------------------------

SIZES: S - M - L - XL - XXL - XXXL

MATERIALS:
DROPS AIR from Garnstudio (belongs to yarn group C)
350-400-400-450-450-500 g colour 01, off white

KNITTING TENSION:
16 stitches in width and 20 rows in height with stocking stitch = 10 x 10 cm.

NEEDLES:
DROPS DOUBLE POINTED NEEDLES SIZES 4.5 AND 5.5 MM.
DROPS CIRCULAR NEEDLES SIZES 4.5 AND 5.5 MM: Length 40 and 80 cm.
Needle size is only a guide. If you get too many stitches on 10 cm, change to a larger needle size. If you get too few stitches on 10 cm, change to a smaller needle size.

-------------------------------------------------------

Alternative Yarn – See how to change yarns here
Yarn Groups A to F – Use the same pattern and change the yarn here
Yarn usage using an alternative yarn – Use our yarn converter here

-------------------------------------------------------

DROPS Air
DROPS Air
65% Alpaca, 28% Polyamide, 7% Wool
from 4.80 £ /50g
Get the yarn to make this pattern from 33.60£.

The yarn cost is calculated from the pattern’s smallest size and the yarn’s cheapest product type. Looking for an even better price? You might find it on the DROPS Deals!

Pattern instructions

NOTE: This pattern is written in British English. All measurements in charts are in cm. For conversion from cm to inches - click here. There are different terms for crocheting in British and American English. If this pattern includes crochet, click for "crochet terms" here. For this pattern in American English, please click here.
-------------------------------------------------------
EXPLANATIONS FOR THE PATTERN:
-------------------------------------------------------

PATTERN:
See diagram A.1. The diagram shows all the rows in the pattern seen from the right side.

RAGLAN:
Increase to raglan on each side of A.1 (= 8 increased stitches per increase-round). Increase by making 1 yarn over; on the next round work the yarn overs twisted to avoid holes.

INCREASE TIP (evenly spaced):
To work out how to increase evenly, count the total number of stitches on the needle (e.g. 168 stitches) and divide by the number of increases to be made (e.g. 24) = 7.
In this example, increase by making 1 yarn over after each 7th stitch. On the next round work the yarn overs twisted to avoid holes.

DECREASE TIP (for sleeves):
Decrease 1 stitch on each side of the marker thread as follows: Work until there are 3 stitches left before the marker thread, slip 1 stitch as if to knit, knit 1 and pass the slipped stitch over, knit 2 (marker thread sits in the middle of these 2 stitches), knit 2 together.

CASTING-OFF TIP:
To avoid the cast-off edge being tight you can cast off with a ½-size larger needle; or cast off with knit over knit and purl over purl and make 1 yarn over after approx. each 4th stitch (yarn overs cast off as normal stitches).

-------------------------------------------------------
START THE PIECE HERE:
-------------------------------------------------------

JUMPER – SHORT OVERVIEW OF THE PIECE:
The neck (and turn-down), yoke and body are worked in the round with circular needle, top down. The sleeves are worked in the round with short circular needle/double pointed needles, top down.
JUMPER:
Cast on 80-84-88-96-96-104 stitches with circular needle size 4.5 mm and Air. Work rib (= knit 2/ purl 2) for 8 cm – the neck will later be folded double towards the wrong side and be 4 cm on the finished garment. Start of round = mid back, insert a marker and measure from here.
Change to circular needle size 5.5 mm and work the next round as follows: Knit 15-16-17-18-18-20 – AT THE SAME TIME as you increase 2-1-2-2-2-3 stitches evenly over these stitches, knit 10-10-10-12-12-12, knit 30-32-34-36-36-40 – AT THE SAME TIME as you increase 4-2-4-4-4-6 stitches evenly over these stitches, knit 10-10-10-12-12-12, knit 15-16-17-18-18-20 – AT THE SAME TIME as you increase 2-1-2-2-2-3 stitches evenly over these stitches = 88-88-96-104-104-116 stitches. REMEMBER THE KNITTING TENSION!

The next round is worked as follows: Knit 14-14-16-17-17-20 (= half back piece), work A.1 (= 6 stitches), knit 4-4-4-6-6-6 (= sleeve), work A.1, knit 28-28-32-34-34-40 (= front piece), work A.1, knit 4-4-4-6-6-6 (= sleeve), work A.1, knit 14-14-16-17-17-20 (= half back piece). Continue this pattern, at the same time increase 1 stitch on each side of each A.1 to RAGLAN – see description above. Increase every 2nd round a total of 20-23-23-26-28-30 times. After all the increases there are 248-272-280-312-328-356 stitches on the needle. Continue with pattern and stocking stitch (without further increases) until the piece measures 21-23-25-27-29-31 from the marker on mid back.
The next round is worked as follows: Work 39-42-43-48-52-57 stitches (= half back piece), place the next 46-52-54-60-60-64 stitches on 1 thread (= sleeve), cast on 6-6-10-8-10-10 new stitches on the needle (= under the sleeve), knit 78-84-86-96-104-114 (= front piece), place the next 46-52-54-60-60-64 stitches on 1 thread (= sleeve), cast on 6-6-10-8-10-10 new stitches on the needle (= under the sleeve) and work the remaining 39-42-43-48-52-57 stitches (= half back piece).

BODY:
= 168-180-192-208-228-248 stitches. Insert 1 marker here. THE PIECE IS NOW MEASURED FROM HERE. Continue in the round with stocking stitch until the piece measures 34-33-34-34-34-34 cm from division. Knit 1 round where you increase 0-0-0-8-4-16 stitches evenly spaced – read INCREASE TIP = 168-180-192-216-232-264 stitches.
Change to circular needle size 4.5 mm and work rib (= knit 2/ purl 2) for 5 cm. Cast off – read CASTING-OFF TIP. The piece measures approx. 64-66-68-70-72-74 cm from the shoulder down.

SLEEVE:
The sleeve is worked with short circular needle/double pointed needles. Place the 46-52-54-60-60-64 stitches from the thread on the one side of the piece on short circular needle/double pointed needles size 5.5 mm and cast on 6-6-10-8-10-10 new stitches mid under the sleeve = 52-58-64-68-70-74 stitches. Insert 1 marker thread in the middle of the new stitches. THE PIECE IS NOW MEASURED FROM HERE. Work stocking stitch in the round.
When the sleeve measures 5-4-3-3-2-2 cm decrease 2 stitches mid under sleeve – read DECREASE TIP. Decrease every 6-4-3-2½-2½-2 cm a total of 6-9-12-13-13-14 times = 40-40-40-42-44-46 stitches.
When the sleeve measures 41-40-38-36-34-33 cm knit 1 round where you increase 0-0-4-2-4-2 stitches evenly spaced = 40-40-44-44-48-48 stitches. Change to double pointed needles size 4.5 mm and work rib (= knit 2/ purl 2) for 6 cm. Cast off – read CASTING-OFF TIP. Work the other sleeve in the same way.

ASSEMBLY:
Sew the openings under the sleeves. Fold the neck double towards the wrong side and sew with elastic stitches.

This pattern has been corrected.

Updated online: 05.05.2020
SLEEVE: XL-decrease every 2½ cm.
...When the sleeve measures 9-8-7-7-6-6 cm decrease 2 stitches mid under sleeve – read DECREASE TIP. Decrease every 4½-3½-3-2½-2½-2½ cm a total of 6-9-12-13-13-14 times = 40-40-40-42-44-46 stitches.
Updated online: 03.03.2021
Sketch updated with new measurements.

New measurements in text:

JUMPER:
... Continue with pattern and stocking stitch (without further increases) until the piece measures 29-31-33-35-37-39 cm from the cast-on edge mid front...

BODY:
... Continue in the round with stocking stitch until the piece measures 30 cm from division...

SLEEVE:
... When the sleeve measures 41-39-38-36-34-33 cm knit 1 round where you increase 0-0-4-2-4-2 stitches evenly spaced = 40-40-44-44-48-48 stitches...
Updated online: 24.05.2023
Correction measurements and chart.
Updated online: 28.09.2023
SLEEVE: When the sleeve measures 5-4-3-3-2-2 cm decrease 2 stitches mid under sleeve – read DECREASE TIP. Decrease every 6-4-3-2½-2½-2 cm a total of 6-9-12-13-13-14 times = 40-40-40-42-44-46 stitches.

Diagram

symbols = knit
symbols = purl
diagram

Each of our patterns has specific tutorial videos to help you.

Do you have a question? See a list of frequently asked questions (FAQ)

Knitting tension is what determines the final measurements of your work, and is usually measured per 10 x 10 cm. It is provided like so: number of stitches in width x number of rows in height - eg: 19 stitches x 26 rows = 10 x 10 cm.

The knitting tension is very individual; some people knit/crochet loosely while others work tightly. You adjust the knitting tension with the needle size, which is why the suggested needle size is only meant as a guide! You need to adjust this (up or down) to ensure that YOUR knitting tension matches the knitting tension provided in the pattern. If you work with a different knitting tension than provided you will have a different yarn consumption, and your work will have different measurements than what the pattern suggests.

The knitting tension also determines which yarns can replace each other. As long as you achieve the same knitting tension you can replace one yarn with another.

See DROPS lesson: How to measure your tension/gauge

See DROPS video: How to make a gauge tension swatch

The required amount of yarn is provided in grams, eg: 450 g. To calculate how many balls you’ll need you first need to know how many grams are in 1 ball (25g, 50g or 100g). This information is available if you click on the individual yarn quality on our pages. Divide the amount required with the amount of each ball. For example, if each ball is 50g (the most common amount), the calculation will be as follows: 450 / 50 = 9 balls.

The important thing when changing from one yarn to another is that the knitting/crochet tension remains the same. This is so that the measurements of the finished piece will be the same as on the sketch provided. It is easier to achieve the same knitting tension using yarns from the same yarn group. It is also possible to work with multiple strands of a thinner yarn to achieve the knitting tension of a thicker one. Please try our yarn converter. We recommend you to always work a test swatch.

Please NOTE: when changing yarn the garment might have a different look and feel to the garment in the photo, due to individual properties and qualities of each yarn.

See DROPS lesson: Can I use a different yarn than the one mentioned in the pattern?

All our yarns are categorised into yarn groups (from A to F) according to thickness and knitting tension – group A contains the thinnest yarns and group F the thickest. This makes it easier for you to find alternative yarns to our patterns, should you wish to switch yarn. All yarns within the same group have a similar knitting tension and can easily replace each other. However, different yarn qualities have different structures and properties which will give the finished work a unique look and feel.

Click here for an overview of the yarns in each yarn group

At the top of all our patterns you’ll find a link to our yarn calculator, which is a helpful tool should you wish to use a different yarn than suggested. By filling in the yarn quality you wish to replace, the amount (in your size) and number of strands, the calculator will present good alternative yarns with the same knitting tension. Additionally it will tell you how much you’ll require in the new qualities and whether you’ll need to work with multiple strands. Most skeins are 50g (some are 25g or 100g).

If the pattern is worked with multiple colours, every colour will have to be calculated separately. Similarly, if the pattern is worked with several strands of different yarns (for example 1 strand Alpaca and 1 strand Kid-Silk) you will have to find alternatives for each, individually.

Click here to see our yarn calculator

Since different yarns have different qualities and textures we have chosen to keep the original yarn in our patterns. However, you can easily find options among our available qualities by using our yarn calculator, or simply pick a yarn from the same yarn group.

It is possible that some retailers still have discontinued yarns in stock, or that someone has a few skeins at home that they would like to find patterns for.

The yarn calculator will provide both alternative yarn as well as required amount in the new quality.

If you think it's hard to decide what size to make, it can be a good idea to measure a garment you own already and like the size of. Then you can pick the size by comparing those measures with the ones available in the pattern's size chart.

You'll find the size chart at the bottom of the pattern.

See DROPS lesson: How to read size chart

The needle size provided in the pattern serves only as a guide, the important thing is to follow the knitting tension. And since knitting tension is very individual, you will have to adjust the needle size to ensure that YOUR tension is the same as in the pattern – maybe you’ll have to adjust 1, or even 2 needle sizes, up or down to achieve the correct tension. For this, we recommend that you work test swatches.

Should you work with a different knitting tension than the one provided, the measurements of the finished garment might deviate from the measurement sketch.

See DROPS lesson: How to measure your tension/gauge

See DROPS video: How to make a tension/gauge swatch

Working a garment top-down provides more flexibility and room for personal adjustment. For example it is easier to try the garment on while working, as well as making adjustments to length of yoke and shoulder caps.

The instructions are carefully explaining every step, in the correct order. Diagrams are adjusted to the knitting direction and are worked as usual.

The diagram depicts all rows/rounds, and every stitch seen from the right side. It is read from bottom to top, from right to left. 1 square = 1 stitch.

When working back and forth, every other row is worked from the right side and every other row is worked from the wrong side. When working from the wrong side, the diagram will have to be worked reversed: from left to right, knit stitches are purled, purl stitches are knit etc.

When working in the round every round is worked from the right side and the diagram are worked from right to left on all rounds.

See DROPS lesson: How to read knitting diagrams

The diagram depicts all rows/rounds, and every stitch seen from the right side. It is worked from bottom to top, from right to left.

When working back and forth every other row is worked from the right side: from right to left and every other row is worked from the wrong side: from left to right.

When working in the round, every row in the diagram are worked from the right side, from right to left.

When working a circular diagram you start in the middle and work your way outwards, counter clockwise, row by row.

The rows usually start with a given number of chain stitches (equivalent to the height of the following stitch), this will either be depicted in the diagram or explained in the pattern.

See DROPS lesson: How to read crochet diagrams

Instructions for working several diagrams after each other on the same row/round, will often be written like so: “work A.1, A.2, A.3 a total of 0-0-2-3-4 times". This means you work A.1 once, then A.2 is worked once, and A.3 is repeated (in width) the number of times provided for your size – in this case like so: S = 0 times, M = 0 times, L=2 times, XL= 3 times and XXL = 4 times.

The diagrams are worked as usual: begin with the first row in A.1, then work the first row in A.2 etc.

See DROPS lesson: How to read knitting diagrams

See DROPS lesson: How to read crochet diagrams

The total width of the garment (from wrist-to-wrist) will be larger in the larger sizes, despite the actual sleeves being shorter. The larger sizes have longer sleeve caps and wider shoulders, so there will be a good fit in all sizes.

The measurement sketch/schematic drawing provides information regarding the full length of the garment. If it’s a jumper or a jacket the length is measured from the highest point on the shoulder closest to the neckline, and straight down to the bottom of the garment. It is NOT measured from the tip of shoulder. Similarly, the length of yoke is measured from the highest point on the shoulder and down to where yoke is split into body and sleeves.

On a jacket measures are never taken along bands, unless specifically stated. Always measure inside band stitches when measuring the length.

See DROPS lesson: How to read a schematic drawing

Diagrams are often repeated on the round or in height. 1 repeat is the diagram the way it appears in the pattern. If it says to work 5 repeats of A.1 in the round, then you work A.1 a total of 5 times after/next to each other in the round. If it says to work 2 repeats of A.1 vertically/in height you work the entire diagram once, then begin again at the start and work the entire diagram one more time.

Chain stitches are slightly narrower than other stitches and to avoid working the cast-on edge too tight, we simply chain more stitches to begin with. The stitch count will be adjusted on the following row to fit the pattern and measurement sketch.

The rib edge is more elastic and will contract slightly compared to, for example, stocking stitch. By increasing before the rib edge, you avoid a visible difference in width between the rib edge and the rest of the body.

It’s very easy to cast off too tightly, and by making yarn overs while casting off (and simultaneously casting these off) you avoid a too tight cast off edge.

See DROPS video: How to bind off with yarn overs (yo)

To achieve an even increase (or decrease) you can increase on, for example: every 3rd and 4th row alternately, like so: work 2 rows and increase on the 3rd row, work 3 rows and increase on the 4th. Repeat this until the increase is complete.

See DROPS lesson: Increase or decrease 1 st on every 3rd and 4th row alternately

Should you prefer to work in the round instead of back and forth, you may of course adjust the pattern. You’ll need to add steeks mid-front (usually 5 stitches), and follow the instructions. When you would normally turn and work from the wrong side, simply work across the steek and continue in the round. At the end you’ll cut the piece open, pick up stitches to work bands, and cover the cut edges.

See DROPS video: How to knit steeks and cut open

Should you prefer to work back and forth instead of in the round, you may of course adjust the pattern so you work the pieces separately and then assemble them at the end. Divide the stitches for the body in 2, add 1 edge stitch in each side (for sewing) and work the front and back pieces separately.

See DROPS lesson: Can I adapt a pattern for circular needles into straight needles?

Pattern repeats can vary slightly in the different sizes, in order to get the correct proportions. If you’re not working the exact same size as the garment in the photo, yours might deviate slightly. This has been carefully developed and adjusted so that the complete impression of the garment is the same in all sizes.

Make sure to follow instructions and diagrams for your size!

If you have found a pattern you like which is available in women’s size it’s not very difficult to convert it to men’s size. The biggest difference will be the length of sleeves and body. Start working on the women size that you think would fit across the chest. The additional length will be worked right before you cast off for the armhole/sleeve cap. If the pattern is worked top-down you can add the length right after the armhole or before the first decrease on sleeve.

Regarding additional yarn amount, this will depend on how much length you add, but it is better with a skein too many than too few.

All yarns will have excess fibres (from production) that might come off as lint or shedding. Brushed yarns (ie hairier yarns) have more of these loose, excess fibres, causing more shedding.

Shedding also depends on what is worn under or over the garment, and whether this pulls at the yarn fibres. It’s therefore not possible to guarantee that there will be no shedding

Below are some tips on how to get the best result when working with hairier yarns:

1. When the garment is finished (before you wash it) shake it vigorously so the looser hairs come off. NOTE: do NOT use a lint roller, brush or any method that pulls at the yarn.

2. Place the garment in a plastic bag and put it in your freezer - the temperature will cause the fibres to become less attached to each other, and excess fibres will come off easier.

3. Leave in the freezer for a few hours before taking it out and shaking it again.

4. Wash the garment according to the instructions on the yarn label.

Pilling is a natural process that happens to even the most exclusive of fibers. It's a natural sign of wear and tear that is hard to avoid, and that is most visible in high friction areas of your garment like a sweater's arms and cuffs.

You can make your garment look as new by removing the pilling, using a fabric comb or a pill/lint remover.

Still can't find the answer you need? Then scroll down and leave your question so one of our experts can try to help you. This will be done normally within 5 to 10 working days.
In the meantime, you can read the questions and answers that others have left to this pattern or join the DROPS Workshop on Facebook to get help from fellow knitters/crocheters!

You might also like...

Carly Pullover

Cora, Germany

For paul

JoannaHF, United Kingdom

208-1 Carly Pullover

Leabrook, United States

Sly Pull Alpaca

OdLp, France

Post a comment to pattern DROPS 208-1

We would love to hear what you have to say about this pattern!

If you want to leave a question, please make sure you select the correct category in the form below, to speed up the answering process. Required fields are marked *.

Comments / Questions (87)

country flag Evelien Challis wrote:

In het patroon staat: Ga verder in patroon en tricotsteek (zonder verdere meerderingen) tot het werk 21-23-25-27-29-31 cm meet vanaf de markeerdraad midden achter. Er is een correctie van 3-03-2021 waar staat: Ga verder in patroon en tricotsteek (zonder verdere meerderingen) tot het werk 29-31-33-35-37-39 cm meet vanaf de opzetrand midden voor. Meet ik vanaf de opzetrand of vanaf de markeerdraad? voor of achter?

19.03.2024 - 11:31

country flag Evelien Challis wrote:

In de correctie van 03-03-2021 staat: TRUI: ...Ga verder in patroon en tricotsteek (zonder verdere meerderingen) tot het werk 29-31-33-35-37-39 cm meet vanaf de opzetrand midden voor. In het patroon stond: Ga verder in patroon en tricotsteek (zonder verdere meerderingen) tot het werk 21-23-25-27-29-31 cm meet vanaf de markeerdraad midden achter.\r\nwaar meet ik nu vandaf? Van de markeerdraad achter of de opzetrand voor?

19.03.2024 - 11:27

DROPS Design answered:

Dag Evelien,

De correctie is al doorgevoerd in het online patroon en het moet dus 21-23-25-27-29-31 zijn. Kan het zijn dat je een afdruk hebt van voor de correctiedatum?

20.03.2024 - 10:49

country flag Nonnie Ingrid Elisabet Borg wrote:

Får man ett pappersmönster till när man köper garn till en herrtröja.

22.11.2023 - 11:33

DROPS Design answered:

Hej. Det beror på vilken av våra återförsäljare du köper av, vissa av våra återförsäljare erbjuder detta. Ta kontakt med en av våra återförsäljare för hjälp. Mvh DROPS Design

22.11.2023 - 13:59

country flag Emma Emrich wrote:

How would I convert this pattern to a child or infant size? Thank you.

06.11.2023 - 17:55

country flag Emma Emrich wrote:

How do I convert patter to a child or infant sized sweater?

06.11.2023 - 17:55

DROPS Design answered:

Dear Mrs Emrich, you will find all our jumpers for children here - add filters if needed, this can then help you finding the best matching pattern in the correct size. Happy knitting!

07.11.2023 - 08:10

country flag Stacey wrote:

For a size L, the instructions for the sleeve say to knit for 7cm, then commence decreases every 3cm, 12 times. This together equals 43cm. However, the instructions say that you should be done with the decreases after 38cm and then you basically move onto the cuff. The math ain’t mathing 🤔

13.08.2023 - 07:59

DROPS Design answered:

Dear Stacey, thanks for your feeback, pattern has now been edited. Happy knitting!

28.09.2023 - 09:30

country flag Gabriella wrote:

Non capisco come dopo gli aumenti del raglan per il dietro eo il davanti indicate 84 maglie. Seguendo le vostre indicazioni per il dietro o il davanti si parte con 42 maglie, se a queste aggiungo 23 x2 m di aumenti arrivo a 74 .

10.08.2023 - 20:31

DROPS Design answered:

Buonasera Gabriella, a quale parte del lavoro sta facendo riferimento? Per gli aumenti del raglan, per la taglia S si parte ad esempio da 88 maglie e si lavorano 20 volte gli aumenti del raglan (8 aumenti per giro), per un totale di 160 maglie aumentate che porta il numero di maglie a 248. E così via per le altre taglie. Buon lavoro!

11.08.2023 - 21:31

country flag Joëlle wrote:

Bonjour, merci pour tous ces modèles. Pouvez vous m'indiquer quelle est l'aisance prévue pour ce modèle. En d'autres termes, quelle taille choisir pour un jeune homme qui fait 123cm de tour de poitrine mesurés sur le corps? Merci de votre réponse !

27.04.2023 - 20:39

DROPS Design answered:

Bonjour Joëlle, nous n'utilisons pas cette notion "d'aisance"; pour trouver la taille idéale, mesurez un pull similaire que le jeune homme aime bien et comparez ces mesures à celles du schéma, ce sera la façon la plus simple de trouver la taille idéale. Retrouvez plus d'infos ici. Bon tricot!

28.04.2023 - 10:10

country flag Remata wrote:

Dzień dobry, Czy oczka reglanowe (a1) wliczając się do rękawów czy przodu i tyłu? Robię rozmiar M i bez reglanow rękaw ma po 52 oczka .... ilość oczek w sumie jest zgodna . Pozdrawiam.

21.02.2023 - 17:09

DROPS Design answered:

Witaj Renato, jeżeli po dodaniu oczek na reglan ogólna liczba oczek zgadza się, to wszystko jest ok. Teraz zaczynając od markera na początku okrążenia (tutaj środek tyłu) odliczasz oczka i dzielisz robótkę zgodnie z opisem. W tym konkretnym przypadku, w rozmiarze M oczka reglanów należą do przodu i tyłu. Pozdrawiamy!

22.02.2023 - 09:17

country flag Ileana Fossati wrote:

Buonasera. Sto proseguendo con il modello Carly Pullover per una taglia XL. Non mi è chiaro se la misura di 35 cm si intende dall'inizio del lavoro o da dopo la lavorazione del collo quando dice: "Continuare con il motivo e a maglia rasata (senza ulteriori aumenti) fino a quando il lavoro misura 29-31-33-35-37-39 cm dal bordo di avvio al centro davanti." Grazie mille!

07.02.2023 - 20:39

DROPS Design answered:

Buonasera Ileana, le misure si intendono dal bordo di avvio come indicato. Buon lavoro!

10.02.2023 - 16:11