
Popular categories
Looking for a yarn?


|
||||||||||||||||
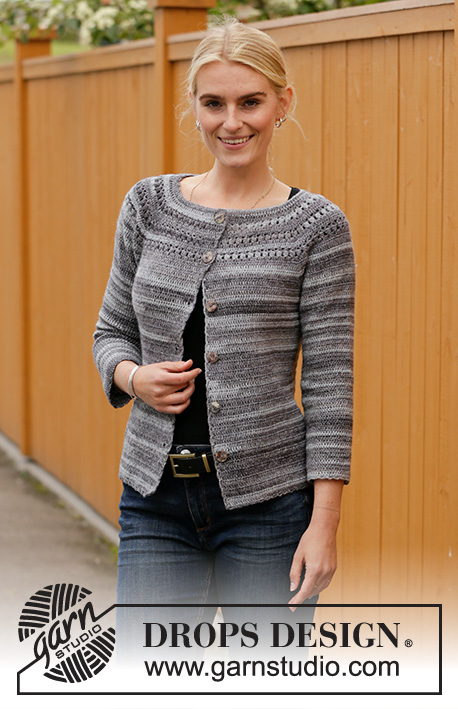
Cracked Pepper Jacket |
||||||||||||||||
 |
 |
|||||||||||||||
Crocheted jacket in DROPS Fabel. Piece is crocheted top down with lace pattern and raglan. Size: S - XXXL
DROPS 207-45 |
||||||||||||||||
|
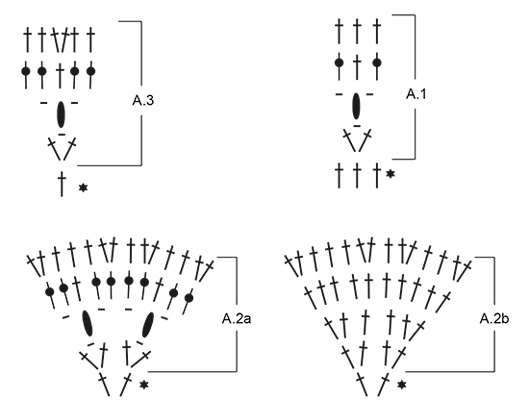
---------------------------------------------------------- EXPLANATION FOR THE PATTERN: ---------------------------------------------------------- CROCHET INFO: Begin every row with treble crochet with 3 chain stitches (replaces first treble crochet). PATTERN: Diagrams A.1 to A.5. CHAIN STITCH: If you work at the end of crochet hook the chain stitch will often be too tight 1 chain stitch should be just as long as 1 double crochet is wide. INCREASE/DECREASE TIP: To calculate how to increase/decrease evenly, use the total number of stitches to be increased/decreased over (e.g. 24 stitches) and divide stitches by number of increases/decreases to be done (e.g. 3) = 8. To increase evenly in this example work 2 treble crochets in every 8th treble crochet. To decrease evenly in this example work every 7th and 8th treble crochet together. Decrease 1 treble crochet by working the next 2 treble crochet together as follows: Work 1 treble crochet in/around first stitch, but wait with last pull through, work 1 treble crochet in/around next treble crochet/stitch, but on last pull through pull yarn through all 3 loops on hook. ---------------------------------------------------------- START THE PIECE HERE: ---------------------------------------------------------- JACKET: Yoke and body are worked back and forth from mid front, top down. Work sleeves in the round, top-down. Work neck edge back and forth. Finally work an edge around the entire opening of jacket. YOKE: Work 132-141-144-153-153-159 chain stitches on hook size 3.5 mm with Fabel (including 3 chain stitches to turn with) – read CHAIN STITCH in explanation above. READ CROCHET INFO and work 1 treble crochet in every chain stitch the entire row = 130-139-142-151-151-157 treble crochets. Work first row from wrong side as follows: Work 1 treble crochet in each of the first 22-25-25-28-28-28 treble crochets, * work 2 treble crochets in next treble crochet, 1 treble crochet in next treble crochet *, repeat from *-* over the next 22 treble crochets (= total 11 treble crochets increased), 1 treble crochet in each of the next 42-45-48-51-51-57 treble crochets, repeat from *-* over the next 22 treble crochets (= 11 treble crochets increased), 1 treble crochet in each of the last 22-25-25-28-28-28 treble crochets = 152-161-164-173-173-179 treble crochets. On next row insert marker threads in piece, while working move the marker threads updated to make it easier to see where every repetition begins and ends. Work as follows from right side: Work 1 treble crochet in the first 5 treble crochets (= band), A.1 over the next 21-24-24-27-27-27 treble crochets (= 7-8-8-9-9-9 repetitions) (= left front piece). Insert 1 marker thread and work A.2a over the next 2 treble crochets (= 1 repetition) and insert 1 marker thread. Work A.1 over the next 12 treble crochets (= 4 repetitions). Insert 1 marker thread and work A.3 over 1 treble crochet (= 1 repetition) and insert 1 marker thread here. Work A.1 over the next 12 treble crochets (= 4 repetitions). Insert 1 marker thread and work A.2a over the next 2 treble crochets (= 1 repetition) and insert 1 marker thread (= left sleeve). Work A.1 over the next 42-45-48-51-51-57 treble crochets (= 14-15-16-17-17-19 repetitions) (= back piece). Insert 1 marker thread and work A.2a over the next 2 treble crochets (= 1 repetition) and insert 1 marker thread. Work A.1 over the next 12 treble crochets (= 4 repetitions). Insert 1 marker thread and work A.3 over 1 treble crochet (= 1 repetition) and insert 1 marker thread. Work A.1 over the next 12 treble crochets (= 4 repetitions). Insert 1 marker thread and work A.2a over the next 2 treble crochets (= 1 repetition) and insert 1 marker thread (= left sleeve). Work A.1 over the next 21-24-24-27-27-27 treble crochets (= 7-8-8-9-9-9 repetitions) and 1 treble crochet in each of the last 5 treble crochets (= band) (= right front piece). REMEMBER THE CROCHET TENSION! SIZE S AND M: When A.1 to A.3 have been worked 1 time vertically, there are 210-219 treble crochets on row. SIZE L, XL AND XXL: On last row in A.1 to A.3 increase 3-3-3 treble crochets evenly over stitches in diagram A.1 on each front piece – read INCREASE/DECREASE TIP and 6-0-12 treble crochets evenly over stitches in diagram A.1 on back piece (= 12-6-18 treble crochets increased in total). When A.1-A.3 have been worked 1 time vertically, there are 234-237-249 treble crochets on row. SIZE XXXL: On last row in A.1 to A.3 increase 3 treble crochets evenly over stitches in diagram A.1 on back piece – read INCREASE/DECREASE TIP. When A.1 to A.3 have been worked 1 time vertically, there are 240 treble crochets on row. ALL SIZES: There are 210-219-234-237-249-240 treble crochets in total after last row in diagrams and piece measures approx. 5 cm in all sizes. SIZE L, XL, XXL AND XXXL: Work 5 band stiches in each side and A.1 as before, but work as follows over A.2a and A.3: Work diagram A.2a over the 2 middle treble crochets in every repetition of A.2a 1-1-2-2 more times vertically (i.e. A.2a is worked 2-2-3-3 times in total vertically), over the remaining stitches work A.1 (i.e. work 2 repetitions of A.1 over every A.3 on sleeves and work 2 repetitions of A.1 on each side of A.2a). When A.2a is done there are 282-285-345-336 treble crochets on last row. Piece measures approx. 8-8-12-12 cm. SIZE XXXL: Work diagram A.2b over the middle 2 treble crochets in every repetition of A.2a 1 time in total vertically, work treble crochets over the remaining stitches. When A.2b has been worked, there are 384 treble crochets on last row. Piece measures approx. 15 cm. ALL SIZES: There 210-219-282-285-345-384 treble crochets in total on row and piece measures approx. 5-5-8-8-12-15 cm. SIZE S, M, L AND XL: Work 5 band stitches in each side and work A.1 as before but now work A.4a over the middle 2 treble crochets in every repetition of A.2 a total of 2-2-1-1 times vertically, work the remaining stitches in A.1. I.e. over every A.2 work as follows: Work A.1 over 6 treble crochets (= 2 repetitions), A.4a over 2 treble crochets (= 1 repetition) and A.1 over 6 treble crochets (= 2 repetitions). Every time A.4a is repeated vertically work 8 more repetitions of A.1 on row. SIZE M, L AND XL: Work diagram A.4b over the middle 2 treble crochets in every repetition of A.4a a total of 1-1-2 times vertically, work treble crochets over the remaining stitches. SIZE XXL AND XXXL: Work diagram A.4b over the middle 2 treble crochets in every repetition of A.2 a total of 2-2 times vertically, work treble crochets over the remaining stitches. ALL SIZES: When A.4 is done there are 258-291-330-357-393-432 treble crochets on row. Piece measures approx. 12-15-15-18-19-22 cm. Work diagram A.5 over the middle 2 treble crochets in every repetition of A.4 1 time in total vertically, work treble crochets over the remaining stitches. I.e. over every A.4 work as follows: Work 3 treble crochets, A.5 over the next 2 treble crochets (= 1 repetition) and 3 treble crochets. When A.5 is done there are 286-319-358-385-421-460 treble crochets on row. Piece measures approx. 15-18-18-21-22-25 cm. Continue with treble crochets over all stitch until piece measures 17-19-20-22-24-26 cm in total. Now divide for body and sleeves as follows: Work 1 treble crochet in each of the first 44-50-53-59-65-71 stitches (= front piece), skip the next 57-66-75-81-84-90 treble crochets (= sleeve), work 12 chain stitches (= under sleeve), work 1 treble crochet in each of the next 84-87-102-105-123-138 stitches (= back piece), skip the next 57-66-75-81-84-90 treble crochets (= sleeve), work 12 chain stitches (= under sleeve), work 1 treble crochet in each of the next 44-50-53-59-65-71 (= front piece). BODY: = 196-211-232-247-277-304 stitches. From here continue with 1 treble crochet in every treble crochet/chain stitch until finished measurements. When piece measures 3.5 cm from where body was divided from sleeves, decrease on every 4th row as follows: Decrease 6 treble crochets evenly 3-3-3-2-2-2 times in total (do not decrease over band stitches) and then 3 treble crochets 0-0-1-0-1-1 time in total = 178-193-211-235-262-289 stitches. When piece measures 14 cm from where sleeve was divided from body, increase on every 4th row follows: 15 treble crochets evenly 0-0-1-1-0-0 times in total, 9 treble crochets evenly 3-3-3-2-4-3 times in total, and 6 treble crochets evenly 1-1-0-1-0-1 time in total = 211-226-253-274-298-322 stitches. Continue by working treble crochets until piece measures 34-34-35-35-35-35 cm from where body was divided from sleeves. Piece measures approx. 51-53-55-57-59-61 cm from neck edge. Fasten off. SLEEVE: Sleeve is worked in the round, top down. Beg by working mid under sleeve as follows: Begin round in the 6th chain stitch of the 12 chain stitches worked under sleeve on body, then work 1 treble crochet in every chain stitch/treble crochet the entire round = 69-78-87-93-96-102 treble crochets. Continue to work treble crochets in the round. When sleeve measures 3.5 cm, decrease evenly on every 4th round as follows: Decrease 6 treble crochets 0-1-3-5-6-6 times in total and 3 treble crochets 5-6-4-2-0-0 times in total = 54-54-57-57-60-66 treble crochets. Continue with treble crochets until piece measures 38-36-35-34-32-30 cm from where sleeve was divided from body (shorter measurements in the larger sizes because of wider neck and longer yoke). Then work an edge around the sleeve edge as follows: Work 1 chain stitch, * 1 double crochet in first/next treble crochet, 4 chain stitches, skip approx. 1 cm *, work from *-* around the entire sleeve and finish with 1 slip stitch in first double crochet at beginning of round. Cut and fasten the yarn. Work the other sleeve the same way. NECK EDGE: Work back and forth over chain stitch row in neck as follows: ROW 1 (= from right side): Begin over band, fasten strand to piece with 1 slip stitch in first band stitch, work 1 half treble crochet between every treble crochet over chain stitch row in neck (replace first half treble crochet with 2 chain stitches) = approx. 130-139-142-151-151-157 half treble crochets. ROW 2: Work 1 double crochet in every half treble crochet (first double crochet on row replaced with 1 chain stitch) = approx. 130-139-142-151-151-157 double crochets. Cut and fasten the yarn. EDGES: Work an edge around the entire opening on jacket as follows: Begin from right side and at the bottom of left band (when garment is worn). Fasten strand with 1 slip stitch in corner, * work 4 chain stitches, skip approx. 1 cm and work 1 double crochet in next treble crochet *, work from *-* along the entire edge until right band. Adjust to finish with 1 double crochet in last treble crochet. Now continue up along the band on right side (when garment is worn) as follows: Work 3 chain stitches, skip until first row along band and work 1 double crochet around the outermost treble crochet. ** Work 3 chain stitches, skip 1 row and work 1 double crochet around outermost treble crochet on next row **, work from **-** up along the entire band. Adjust to finish with 1 double crochet in the upper row. Work from *-* along the entire neck edge until left band. Adjust to finish with 1 double crochet in last treble crochet. Work from **-** down along left band and adjust so that round is finished in first stitch on round. Cut and fasten the yarn. ASSEMBLY: Sew the buttons on to left front piece as follows: Sew first button approx. 1½-2 cm down from neck edge, then fasten the remaining 5-5-5-6-6-6 buttons approx. 8-9 cm apart. Button through treble crochets on right band. |
||||||||||||||||
Diagram explanations |
||||||||||||||||
|
||||||||||||||||
|
||||||||||||||||

|
||||||||||||||||

|
||||||||||||||||
|
Have you made this or any other of our designs? Tag your pictures in social media with #dropsdesign so we can see them! Do you need help with this pattern?You'll find tutorial videos, a Comments/Questions area and more by visiting the pattern on garnstudio.com. © 1982-2024 DROPS Design A/S. We reserve all rights. This document, including all its sub-sections, has copyrights. Read more about what you can do with our patterns at the bottom of each pattern on our site. |
||||||||||||||||


With over 40 years in knitting and crochet design, DROPS Design offers one of the most extensive collections of free patterns on the internet - translated to 17 languages. As of today we count 304 catalogues and 11422 patterns - 11422 of which are translated into English (UK/cm).
We work hard to bring you the best knitting and crochet have to offer, inspiration and advice as well as great quality yarns at incredible prices! Would you like to use our patterns for other than personal use? You can read what you are allowed to do in the Copyright text at the bottom of all our patterns. Happy crafting!
Comments / Questions (50)
Buongiorno, sto iniziando lo sprone taglia M e ho completato la prima riga dei diagrammi. Non mi è chiaro però perché nelle spiegazioni si dice di lavorare in verticale solo il diagramma A 1 e A 3, senza il diagramma A2a, che è stato comunque impostato. Forse si da' per scontato? Grazie!
31.08.2022 - 07:48DROPS Design answered:
Buonasera Anna Paola, deve lavorare i diagrammi da A.1 ad A.3. Buon lavoro!
31.08.2022 - 09:41Teen koon XL ohjeen mukaan kaarroketta. Siihen saakka, kun pylväitä on 237 homma toimii.Tästä eteenpäin en ilmeisesti ymmärrä. "Toista piirroksen A.2a jokaisen mallikerran 2 keskimmäisen pylvään kohdalla piirroksen A.2a mallikerta vielä 1-1-2-2...." Olen purkanut jo kolmesti ja silmukkaluku on kuvion lopussa aivan liian suuri. Kuvaa miten tuo kahden keskimmäisen pylvään keskelle tehtävä A2a tehdään. Yli 300 pylvästä sain työhön. En jaksa purkaa enää.
14.07.2022 - 21:55I have given up on the Cracked Pepper Cardigan. It was the only pattern I could find anywhere for the yarn I bought locally. I am an experienced crocheter from America and I find your chart system VERY complicated. There isn’t one question to ask as one leads to many. Also found the stitch counts off after the first pattern repeat. I have done the whole beginning twice and recounted everything about 4 times. Just can’t come up with your count. Sooo disappointed!
13.07.2022 - 23:03Vielen Dank für die schnelle Hilfe :-)
07.06.2022 - 12:59Hallo Danke für diese Anleitung, ich häkle sie in grösse L. Ich komme beim Passe aber schon nicht weiter... Bei der zweiten Diagrmmrunde komne ich am Schluss auf nur 273 Stäbchen anstatt 282. Ich komne einfach nicht auf meinen Fehler. Ich habe über A3 der vorrunde A1 gehäkelt. Ist das richtig? Vier mal A2a (über den A2a der vorrunde) den Rest A1. Sonns mache ich bis zum Rückenteil nochmals auf und nehme dort gleichmässig 9 Stäbchen dazu....
06.06.2022 - 22:59DROPS Design answered:
Liebe Barbara, so bekommen Sie die 282 Maschen: 5 Blende-Maschen, 33 Maschen A.1, 2 (dann 14) Maschen A.2a, 18 Maschen A.1, 1 (dann 6) Maschen A.3, 18 Maschen A.1, 2 (dann 14) maschen A.2a, 66 Maschen A.1, 2 (dann 14) Maschen A.2a, 18 Maschen A., 1 (dann 6) maschen A.3, 18 Maschen A.1, 2 (dann 14) Maschen A.2a, 33 Maschen A.1 und 5 Blenden-Maschen = 5+33+14+18+6+18+14+66+14+18+6+18+14+33+5=282 Maschen. Viel Spaß beim häkeln!
07.06.2022 - 10:25Hola quisiera que me pudieran explicar como se llega a los 258 puntos, en la talla s. Alguien tiene el Diagrama . Gracias .
23.05.2022 - 15:02DROPS Design answered:
Hola Yean, cuál es el punto en el que tienes dudas, para que podamos ofrecerte ayuda más personalizada? 258 puntos son los puntos después de trabajar el diagrama A.4 (que puedes encontrar debajo e incluye ya los aumentos).
25.05.2022 - 20:25Trouble with yoke: After 1st round of yoke A -A3 diagram, I have 219 stitches (M). Next instructions are all sizes and do not add anything new (219), then another all sizes still 219. The next instructions for M change A2 to A4a and then A4a to A4b, ending with 319. In picture it looks like 3 "rounds" with 4 double-crochet clusters, but I only see instruction for 2 rounds. Was I supposed to repeat the A1-A3 a 2nd time when there were no changes for M size? Or are there only 2 rounds?
05.11.2021 - 16:51DROPS Design answered:
Dear Natasha, first time, you work A.1- A.3 once (1st round with the clusters) Then you work A.4a twice ( both rounds with clusters). Happy crocheting!
07.11.2021 - 14:32Ik ga xxl maken en moet 151 lossen opzetten er staat inclusief 3 keer lossen maar volgens mij moet ik die nog extra opzetten anders kan ik namelijk volgens mij geen 151 stokjes meer maken. Dus in totaal 154 lossen haken en dan in de vierde losse eerste stokje haken. Concreet dus de vraag 151 of 154 lossen haken bij opzetten? Dank alvast
11.10.2021 - 19:03DROPS Design answered:
Dag Saskia,
Het lijkt er inderdaad op dat het aantal op te zetten lossen niet klopt. Ik heb het nagekeken en er zouden dan 2 lossen extra opgezet moeten worden, voor jouw maat is dat 153 in plaats van 151. Dit heb ik even doorgegeven aan de ontwerpafdeling om te controleren, zodat er een correctie op het patroon kan komen.
13.10.2021 - 08:41I am working the A4 section and it is not working out by the count provided of 330 at the end of A4a & A4b. I added things up this way before I started. Says to do 4 - A4a chart where A2a markers are 282 + 32= 314 then it says do 4 - A4b chart once where A2a markers were 314+32= 346 not 330. The only way to get 330 is to do A4a chart on all 4 A2a markers and then only 2 of the A2b chart on the next round to get 330. If that is the case then should I do those on the front or back of the piece?
11.05.2021 - 02:42DROPS Design answered:
Dear Mrs Guill, before A.4 you have 282 sts, then you work A.4a (= 6 sts increased in each A.4a = +24 sts) and work A.4b (= 6 sts increased in each A.4b = + 24 sts). 282+24+24=330 sts. Hope this will help. Happy crocheting!
11.05.2021 - 09:49Kan det passe eller læser jeg diagram forkert F.eks A1 -1 lm (4 stm)stm gruppe 1lm = 19m (der skal være 27) Skal diagrammet ikke læses sådan: start,1lm,stangmaskegruppe ,1lm,1lm ,stangmaskegruppe osv.=27m Næste række: stm om maske,stm i maske,stm om maske =19: stm om maske ,stm i maske, stm om maske,stm om maske =27m eller ? Eller hvordan skal diagrammet læses , det skal jo gentages
07.05.2021 - 18:32DROPS Design answered:
Hei Eva. Når du skal hekle etter diagram hekler du starten av første rad slik: 1 stav i de 5 første maskene (1. stav = 3 luftmasker), deretter hekler du A.1 slik: hopp over 1 maske, i neste maske hekles det 1 stav+1 luftmaske+1 stav, hopp over 1 maske. Hekle A.1 over de neste 21-24-24-27-27-27 stavene (= 7-8-8-9-9-9 rapporter) = venstre forstykke. Følg deretter oppskriften hvordan resten av raden hekles. mvh DROPS design
10.05.2021 - 10:18