
Popular categories
Looking for a yarn?


|
|||||||||||||||||||||||||
Blue Nostalgia |
|||||||||||||||||||||||||
 |
 |
||||||||||||||||||||||||
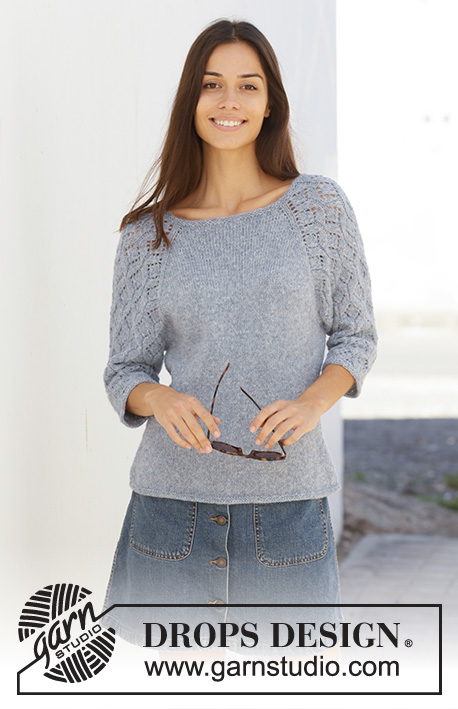
Knitted sweater with raglan in DROPS Sky. The piece is worked top down with lace pattern on sleeves. Sizes S – XXXL.
DROPS 199-3 |
|||||||||||||||||||||||||
|
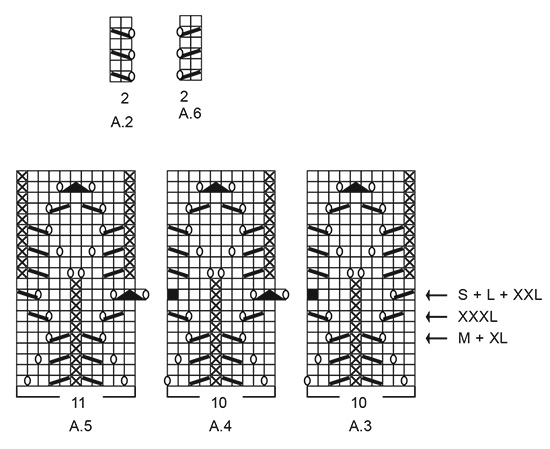
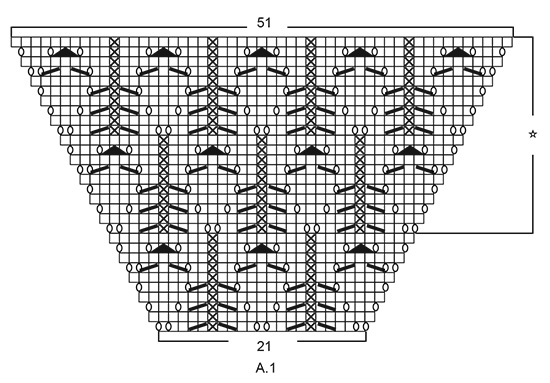
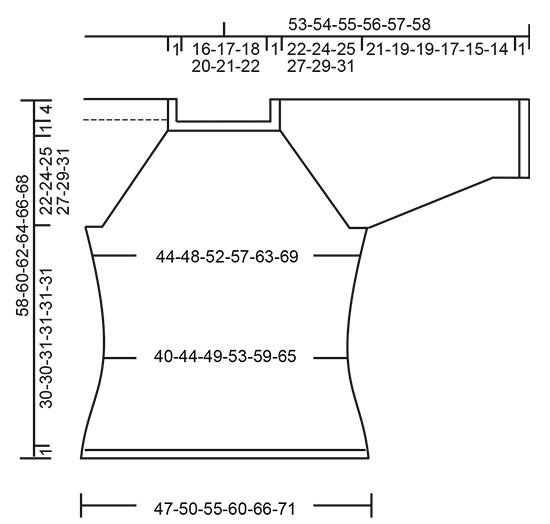
------------------------------------------------------- EXPLANATIONS FOR THE PATTERN: ------------------------------------------------------- RIDGE/GARTER STITCH (worked in the round): 1 ridge in height = 2 rounds; knit 1 round and purl 1 round. INCREASE TIP-1 (evenly spaced): To work out how to increase evenly, count the total number of stitches on the needle (e.g. 100 stitches), and divide by the number of increases to be made (e.g. 10) = 10. In this example, increase by making 1 yarn over after each 10th stitch. On the next round work the yarn overs twisted to avoid holes. PATTERN: See diagrams A.1 to A.6. Find your size in the diagrams (applies to A.3 to A.5). The diagrams show all rows in the pattern seen from the right side. DECREASE TIP (for sides of body and sleeves): Work until there are 3 stitches left before marker thread, knit 2 together, knit 2 (marker thread sits between these stitches), slip 1 stitch, knit 1 and pass the slipped stitch over the knitted stitch. INCREASE TIP-2 (for sides of body): Work until there are 2 stitches left before marker thread, 1 yarn over, knit 4 (marker thread sits in the middle of these stitches), 1 yarn over. On the next round work the yarn overs twisted to avoid holes. Then work the new stitches in stockinette stitch. ------------------------------------------------------- START THE PIECE HERE: ------------------------------------------------------- SWEATER - SHORT OVERVIEW OF THE PIECE: Yoke and body are worked in the round with circular needle from mid back, top down. Sleeves are worked in the round with short circular needle/double pointed needles, top down. YOKE: Cast on 100-106-110-116-120-126 stitches with circular needle size 3.5 mm = US 4 and Sky. Work 2 RIDGES – read description above. Knit 1 round where you increase 10-8-8-10-10-8 stitches evenly spaced – read INCREASE TIP-1 = 110-114-118-126-130-134 stitches. Change to circular needle size 4 mm = US 6. Knit 1 round. The next round is worked as follows: Work stockinette stitch over the first 15-16-17-19-20-21 stitches (= half back piece), 1 yarn over, 2 stitches in stockinette stitch, work A.1 over 21 stitches (= sleeve), 2 stitches in stockinette stitch, 1 yarn over, work 30-32-34-38-40-42 stitches in stockinette stitch (= front piece), 1 yarn over, 2 stitches stockinette stitch, work A.1 over 21 stitches (= sleeve), 2 stitches in stockinette stitch, 1 yarn over, work stockinette stitch over the last 15-16-17-19-20-21 stitches (= half back piece). There are now 118-122-126-134-138-142 stitches on the needle. Continue this pattern onwards; i.e. on the sleeves increase on each side as shown in A.1. On the next round knit the yarn overs (= holes) and the increased stitches are worked into the pattern as you go as shown in A.1. On front and back pieces increase with yarn overs before/after the 2 stitches in stockinette stitch in each side (there will be 2 stitches stockinette stitch between each raglan increase). On the next round knit the yarn overs twisted (= no holes) and the increased stitches are worked in stockinette stitch. Increase like this every 2nd round. You increase a total of 8 stitches on each increase-round (= 4 yarn overs + 4 stitches increased in A.1). REMEMBER THE KNITTING GAUGE! When A.1 has been worked 1 time in height there are 230-234-238-246-250-254 stitches on the needle. Continue this pattern onwards, i.e. the pattern repeats itself as shown in A.1. Each time you have worked 20 rounds there will be room for 1 more repeat of lace pattern in width on each sleeve. When you have increased a total of 24-27-29-32-34-38 times there are 302-330-350-382-402-438 stitches on the needle and the piece measures 18-20-22-24-25-28 cm = 7"-8"-8¾"-9½"-9¾"-11" from the cast-on edge mid front. Continue with stockinette stitch and pattern as before, but without increasing; i.e. the 69-75-79-85-89-97 stitches in A.1 are worked as follows: Work A.2 (= 2 stitches), 2-0-2-0-2-1 stitches in stockinette stitch, starting on the round marked with an arrow for your size work A.3 (= 10 stitches), A.4 over the next 40-50-50-60-60-70 stitches (= 4-5-5-6-6-7 reports of 10 stitches), A.5 (= 11 stitches), 2-0-2-0-2-1 stitches in stockinette stitch and A.6 (= 2 stitches). Continue until the piece measures approx. 23-25-26-28-30-32 cm = 9"-9¾"-10¼"-11"-11¾"-12½" from the cast-on edge mid front. The next round is worked as follows: Work 41-45-49-54-59-65 stitches in stockinette stitch (= half back piece), place the next 69-75-77-83-83-89 stitches on 1 thread for sleeve, cast on 10-10-12-12-14-14 new stitches on the needle (= in side under sleeve), work 82-90-98-108-118-130 stitches stockinette stitch (= front piece), place the next 69-75-77-83-83-89 stitches on 1 thread for sleeve, cast on 10-10-12-12-14-14 new stitches on the needle (= in side under sleeve) and work the remaining 41-45-49-54-59-65 stitches in stockinette stitch (= half back piece). Body and sleeves are finished separately. THE PIECE IS NOW MEASURED FROM HERE! BODY: = 184-200-220-240-264-288 stitches. Insert 1 marker thread on each side in the middle of the 10-10-12-12-14-14 stitches cast on under each sleeve. Allow them to follow your work onwards; they will be used a little later when decreasing/increasing. Work stockinette stitch. When the piece measures 2 cm = ¾" from the division decrease 1 stitch on each side of both marker threads - read DECREASE TIP = 4 stitches decreased. Decrease like this every 3 cm = 1⅛" a total of 4 times = 168-184-204-224-248-272 stitches. Continue working until the piece measures 14 cm = 5½" from the division. Now increase 1 stitch on each side of both marker threads – read INCREASE TIP-2 = 4 stitches increased. Increase like this every 2 cm = ¾" a total of 7 times = 196-212-232-252-276-300 stitches. Continue working until the piece measures 30-30-31-31-31-31 cm = 11¾"-11¾"-12¼"-12¼"-12¼"-12¼" from the division. Change to circular needle size 3.5 mm = US 4 and work 2 ridges. Loosely bind off, but to avoid the bind-off edge being tight you can bind off with needle size 4 mm = US 6. The sweater measures approx. 58-60-62-64-66-68 cm = 22¾"-23⅝"-24⅜"-25¼"-26"-26¾" from the shoulder down. SLEEVE: Place the 69-75-77-83-83-89 stitches from the thread on the one side of the piece on short circular needle/double pointed needles size 4 mm = US 6 and knit up 1 stitch in each of the 10-10-12-12-14-14 stitches cast on under the sleeve = 79-85-89-95-97-103 stitches. Insert 1 marker thread in the middle of the 10-10-12-12-14-14 stitches cast on under the sleeve and allow it to follow your work onwards; it will be used a little later when decreasing. Start the round at the marker thread. Start on the correct round in the diagrams so that the pattern continues from the yoke and work as follows: Work 4-2-4-2-3-1 stitches in stockinette stitch, A.3 (= 10 stitches), A.4 over the next 50-60-60-70-70-80 stitches (= 5-6-6-7-7-8 repeats of 10 stitches), A.5 (= 11 stitches) and 4-2-4-2-3-1 stitches in stockinette stitch. Continue this pattern. When the piece measures 2 cm = ¾" from the division, decrease 2 stitches mid under sleeve – remember DECREASE TIP. Decrease like this every 3rd-3rd-3rd-2nd-2nd-2nd round a total of 14-15-15-16-15-16 times = 51-55-59-63-67-71 stitches. The stitches which do not fit into the pattern as you decrease are worked in stockinette stitch, but make sure that if decreases are in the pattern you also make a yarn over. Continue working until the piece measures 21-19-19-17-15-14 cm = 8¼"-7½"-7½"-6¾"-6"-5½" from the division (shorter measurements in larger sizes due to longer yoke). Change to double pointed needles size 3.5 mm = US 4 and work 2 ridges. Loosely bind off, but to avoid the bind-off edge being tight you can bind off with needle size 4 mm = US 6. Sleeve measures approx. 22-20-20-18-16-15 cm = 8¾"-8"-8"-7"-6¼"-6" from the division. Work the other sleeve in the same way. |
|||||||||||||||||||||||||
Diagram explanations |
|||||||||||||||||||||||||
|
|||||||||||||||||||||||||
|
|||||||||||||||||||||||||
|
|||||||||||||||||||||||||
|
|||||||||||||||||||||||||
|
Have you made this or any other of our designs? Tag your pictures in social media with #dropsdesign so we can see them! Do you need help with this pattern?You'll find tutorial videos, a Comments/Questions area and more by visiting the pattern on garnstudio.com. © 1982-2024 DROPS Design A/S. We reserve all rights. This document, including all its sub-sections, has copyrights. Read more about what you can do with our patterns at the bottom of each pattern on our site. |
|||||||||||||||||||||||||


With over 40 years in knitting and crochet design, DROPS Design offers one of the most extensive collections of free patterns on the internet - translated to 17 languages. As of today we count 304 catalogs and 11422 patterns - 11417 of which are translated into English (US/in).
We work hard to bring you the best knitting and crochet have to offer, inspiration and advice as well as great quality yarns at incredible prices! Would you like to use our patterns for other than personal use? You can read what you are allowed to do in the Copyright text at the bottom of all our patterns. Happy crafting!
Comments / Questions (119)
I have a little problem with the sleeve instructions. first row You say knit up 1 stitch in each of the extra stitches. then place the SM in the middle and start working from there. My extra stitches are 12 i.e half would be 6 but you only K4 so how am I to pick up the 2 new stitches and K2Tog ? thank you for your help.
27.03.2023 - 15:49DROPS Design answered:
Dear Concita, when you divide th estitches of the yoke, you are casting on 10-10-12-12-14-14 stitches under the arms. Starting the sleeves, you knit one stitch into each of these stitches. For the pattern you start with 4-2-4-2-3-1 stotckinett stitches, and then knitthe A.3 pattern , so it starts a few stitch under the arms. then knit he A.4 and finish it with the A.5, that also goes a few stitches under the arm, and 4 stockinett stitch. Happy Knitting!
28.03.2023 - 07:43Hej, stickar just nu Blue Nostalgia. När man kommer till den del där man slutar med ökningar, så står det i beskrivn att man stickar över A1 - sticka A2(=2 maskor), 2 maskor slätstickn i min storl. Därefter sticka A3, A4, A5, 2 mask slätst o A6. Maskantalet stämmer inte med mönstret när jag stickar vidare. Får ju mindre maskor i början o slutet. Ska jag göra ett omslag som det var i början på arbetet.
10.02.2023 - 14:03DROPS Design answered:
Hei Eva. Vi skal hjelpe deg så godt vi kan, men hvilken str. strikker du? mvh DROPS Design
13.02.2023 - 10:37Schritt für Schritt geht es weiter: XL Ich habe 382 Maschen, stricke A2, und starte dann an der Runde XL 3Maschen..... Dann gehe ich zu A4 . Beginne ich dann auf gleicher Höhe, sprich 3Maschen....und stricke ich den Rapport dann hoch und starte wieder unten von A4?
04.02.2023 - 08:56DROPS Design answered:
Liebe Frau Veith, dann stricken Sie die 85 Maschen A.1 wie folgt: A.2 (2 Maschen), A.3 (=10 Maschen), A.4 (6 Mal 10 Maschen = über 60 Maschen), A.5 (11 Maschen) und A.6 (= 2 Maschen) so sind es: 2+10+60+11+2=85. Diagramme A.3, A.4 und A.5 beginnen Sie bei der Reihe mit dem Pfeil (damit das Muster wie zuvor forsetzt). Viel Spaß beim stricken!
06.02.2023 - 15:42Ich stricke den Pullover in XL: Hatte 246 Maschen, habe jetzt die Sternchenreichen gestrickt (20R) und habe nun 326 Maschen. Ich soll aber ingesamt 32 x zunehmen, d.h. doch 12 weitere Runden x 8 Maschen -= 48 dazu. Dann komme ich auf 374 und nicht auf 382 - wo ist mein Denkfehler?
01.02.2023 - 15:25DROPS Design answered:
Liebe Frau Veith, es sind insgesamt 32 Mal zugenommen, dh es waren 126 Maschen am Anfang der Passe + (8 Maschen x 32 Mal) = 382 Maschen. Nach A.1 ist einmal in der Höhe gestrickt, sollen Sie noch 17 weitere Mal zunehmen (246 + (8x17)=382) Viel Spaß beim stricken!
01.02.2023 - 17:04Danke für alle Hilfe! Nun geht es weiter. XL: ich habe 246Maschen auf der Nadel, soll nun 32x 8 Maschen zunehmen. Da komme ich dann aber nicht auf 382 Maschen?
30.01.2023 - 12:29DROPS Design answered:
Liebe Frau Veith, wenn A.1 fertig in der Höhe ist, wiederholen Sie die Reihen mit dem Sternchen - dh am Anfang der Ärmel wie am Anfang von A.1 zunehmen und die Maschen so stricken bis Ende der Ärmel (also mehr als im Diagram da es mehr Maschen gibt) und Ärmel wie am Ende vom Diagram enden (mit Maschen und Zunahmen). So bis alle Zunahmen gestrickt sind. Viel Spaß beim stricken!
30.01.2023 - 15:54Aber A1 starte doch mit Umschlag, rechte Masche, Umschlag , oder?
27.01.2023 - 15:07DROPS Design answered:
Liebe Frau Veith, ja genau, die Umschläge habe ich auch unten beschrieben (vor A.1 und nach A.1), die kommen dazu, so sind es 23 Maschen in A.1 nach dieser 1. Runde. viel Spaß beim stricken!
27.01.2023 - 15:10Ich zähle bei A1 nur 20.... Sind es zwei Luftmaschen hintereinander?
26.01.2023 - 21:14DROPS Design answered:
Liebe Frau Veith, so stricken Sie A.1 über 21 Maschen (Umschlag = Zunahme), 1 M re, 1 Umschlag, 2 M re, 1 M abheben, 1 M re, die abgehobene Masche über die gestrickte ziehen, 1 M li, 2 M re zs, 2 M re, 1 Umschlag, 1 M re, 1 umschlag, 2 M re, 1 M abheben, 1 M re, die abgehobene Masche über die gestrickte ziehen, 1 M li, 2 M re zs, 2 M re, 1 Umschlag, 1 M re (1 Umschlag = Zunahme). Viel Spaß beim stricken!
27.01.2023 - 08:45Hei😊kan noen forklare meg hvordan man raglanfeller på denne genseren, steg for steg. Den strikkes ovenfra og ned. Takksom for svar😊
26.01.2023 - 14:59DROPS Design answered:
Hei Bente. På denne modellen øker du på annenhver omgang til raglan. Du strikker A.1 over hvert erme og i diagram A.1 vises økningene, så hver gang du strikker A.1 økes det med 4 masker. Samtidig økes det også med 1 kast før eller etter de to maskene som strikkes i glattstrikk = 4 økte masker. Så du øker med 8 masker annenhver omgang til du har det maskeantallet du skal ha i den str. du strikker. For en bedre oversikt kan du sette 4 maskemarkør i arbeidet, mellom de 2 glattstrikkede maskene før og etter A.1. Da vet du at du skal øke med kast 1 maske før merket og 1 kast 1 maske etter maskemarkøren = 8 økninger på omgangen. mvh DROPS Design
30.01.2023 - 11:51Hallo liebe Helferin, ich habe problemlos 34 x zugenommen( gr. XXL)und bin jetzt bei folgender Anleitung —Weiter glatt rechts und im Muster wie zuvor stricken, jedoch ohne Zunahmen. — diesen Satz habe ich noch verstanden, aber was danach kommt habe ich auch nach mehrmaligen lesen nicht verstanden. Ich hoffe, dass sie den Knoten in meinem Kopf lösen können. Liebe Grüße Uschi
08.11.2022 - 21:16DROPS Design answered:
Liebe Uschi, nach allen Raglanzunahmen sind es 89 Maschen für jede Ärmel, diese 89 Maschen stricken Sie jetzt so: A.2 (= 2 Maschen), 2 Masche glatt rechts, mit der mit einem Pfeil für die gewünschte Größe markierten Runde beginnen und A.3 stricken (= 10 Maschen), A.4 über die nächsten 60 Maschen (= 6 Rapporte à 10 Maschen), A.5 (= 11 Maschen), 2 Maschen glatt rechts und A.6 (= 2 Maschen) =2+2+10+60+11+2+2=89 Maschen; die anderen Maschen stricken Sie wie zuvor. Viel Spaß beim stricken!
09.11.2022 - 08:25Liebes Drops Team Ich habe eine Frage zu den Aermeln: Es heisst man soll die Aermelmaschen auf ein Nadelspiel nehmen und zusätzlich 10 Maschen aufnehmen, der Rundenbeginn sei in der Mitte der 10 Maschen beim Markierungsfaden. Wo beginne ich mit dem aufnehmen der 10 Maschen? In der Mitte? Also 5 Maschen aufnehmen, dann die Maschen auf dem Nadelspiel abstricken und dann wieder fünf Maschen aufnehmen? Oder alle 10 Maschen auf einmal aufnehmen und in der Mitte anfangen? Vielen Dank!
04.10.2022 - 10:16DROPS Design answered:
Liebe Franziska, Sie können entweder in der Mitte von den 10 Maschen beginnen, oder die 10 Maschen auffassen und dann die Runden in der Mitte dieser 10 Maschen beginnen. Dieses Video zeigt ab ca 9:40, wie man die Maschen der Ärmel auffasst. Viel Spaß beim stricken!
04.10.2022 - 13:23