
Popular categories
Looking for a yarn?


|
||||
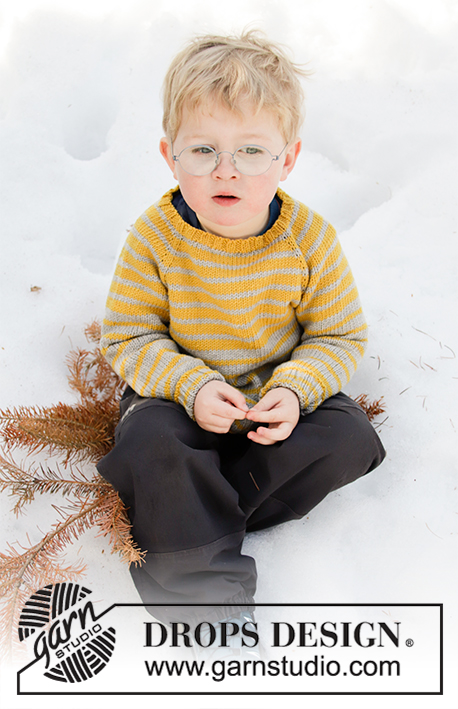
Sunny Day Stripes |
||||
 |
 |
|||
Knitted jumper for children with raglan in DROPS Lima or DROPS Muskat. The piece is worked top down with stripes. Sizes 2 – 12 years.
DROPS Children 32-13 |
||||
|
EXPLANATIONS FOR THE PATTERN: ------------------------------------------------------- STRIPES: The piece is worked in stripes, with different stripes on yoke and body/sleeves. Do not cut the strand after each stripe - allow it to follow your work onwards. Stripes on yoke: Work * 4 rounds with goldenrod, 2 rounds with light grey / light grey *, work from *-* until the yoke is finished. Adjust so that you finish with 4 rounds of goldenrod / vanilla yellow (in other words you may need to divide the piece for body and sleeves and continue the yoke-stripes until you have worked 4 rounds with goldenrod / vanilla yellow). Then continue with stripes on body and sleeves as follows: Work * 4 rounds with light grey / light grey, 2 rounds with goldenrod / vanilla yellow *, work from *-* until body/sleeves are finished. INCREASE TIP-1 (for raglan): Work until there is 1 stitch left before the marker thread, 1 yarn over (= 1 stitch increased), knit 2 (the marker sits between these 2 stitches), 1 yarn over (= 1 stitch increased). Increase like this at all marker threads (= a total of 8 stitches increased). The yarn overs are worked twisted on the next round to avoid holes. INCREASE TIP-2 (evenly spaced): To work out how to increase evenly, count the total number of stitches on the needle (e.g. 128 stitches) and divide by the number of increases to be made (e.g. 30) = 4.3. In this example increase by making 1 yarn over after approx. each 4th stitch. On the next round work the yarn overs twisted to avoid holes. DECREASE TIP (for sleeves): Decrease 1 stitch on each side of the marker thread as follows: Work until there are 3 stitches left before the marker thread, knit 2 together, knit 2 (the marker thread sits between these 2 stitches), slip 1 stitch as if to knit, knit 1 and pass the slipped stitch over the knitted stitch. ------------------------------------------------------- START THE PIECE HERE: ------------------------------------------------------- JUMPER - SHORT OVERVIEW OF THE PIECE: The piece is worked in the round, top down. The yoke is worked first, starting mid back and then divided for body and sleeves. The body is continued in the round with circular needle. The sleeves are worked in the round with double pointed needles. YOKE: Cast on 76-80-84-88-92-96 stitches with double pointed needles/short circular needle size 3 mm and goldenrod / vanilla yellow (in the 2 smallest sizes you need to cast on and work with double pointed needles until you have enough stitches to use a circular needle; the other sizes can be cast on and worked with circular needle). The piece is worked in STRIPES – read description above. Work rib (= knit 2 / purl 2). When you have worked 4 rounds change to double pointed needles/short circular needle size 4 mm. Now continue with stocking stitch and insert 4 marker threads for raglan on the next round as follows: Work 13-13-13-13-17-17 stitches, insert 1 marker, work 12 stitches AT THE SAME TIME as you increase 4 stitches evenly over these stitches, insert 1 marker, work 24-28-30-32-32-36 stitches, insert 1 marker, work 12 stitches AT THE SAME TIME as you increase 4 stitches evenly over these stitches, insert 1 marker and work 15-15-17-19-19-19 stitches = 84-88-92-96-100-104 stitches. Knit 1 round. On the next round start to increase to raglan. Increase 1 stitch on each side of each marker – read INCREASE TIP-1, every 2nd round a total of 15-16-17-18-19-20 times = 204-216-228-240-252-264 stitches. Continue with stocking stitch and stripes as before until the piece measures 13-14-15-16-17-18 cm from the cast-on edge. On the next round divide the piece for body and sleeves as follows: Work 28-30-31-32-36-38 stitches in stocking stitch, place the next 44-46-48-50-52-54 stitches on a thread for sleeve and cast on 6 stitches under the sleeve, 58-62-66-70-74-78 stitches in stocking stitch, place the next 44-46-48-50-52-54 stitches on a thread for sleeve, cast on 6 stitches under the sleeve and finish with 30-32-35-38-38-40 stitches in stocking stitch = 128-136-144-152-160-168 stitches. BODY: Continue working in stocking stitch and stripes. When the piece measures 15-17-20-23-26-29 cm from where body and sleeves were divided, increase 28-32-32-36-40-40 stitches evenly on next round – read INCREASE TIP-2 = 156-168-176-188-200-208 stitches. Change to circular needle size 3 mm. Work rib (= knit 2 / purl 2). Cast off with knit when the piece measures 17-19-22-25-28-31 cm from where body and sleeves were divided; make sure the cast-off edge is not tight - you can use a size larger needle if this is a problem when casting off. The jumper measures approx. 33-36-40-44-48-52 cm, measured from shoulder down. SLEEVE: Place the 44-46-48-50-52-54 stitches from the thread on the one side of the body on double pointed needles size 4 mm and knit up 1 stitch in each of the 6 stitches cast on under the sleeve = 50-52-54-56-58-60 stitches. Continue with stripes as on the body, in stocking stitch and in the round. Insert 1 marker thread mid under sleeve. When the sleeve measures 2 cm from where body and sleeve were divided, decrease 1 stitch on each side of the marker thread (= 2 stitches decreased) – read DECREASE TIP. Decrease like this every 4-4-5-5-7-6 cm a total of 5-6-5-6-5-6 times = 40-40-44-44-48-48 stitches. When the piece measures 19-23-27-31-35-38 cm from where body and sleeve were divided, change to double pointed needles size 3 mm and work rib over all stitches (= knit 2 / purl 2) for 4 cm. Cast off with knit. The sleeve measures a total of approx. 23-27-31-35-39-42 cm from where body and sleeve were divided. Work the other sleeve in the same way. |
||||
Diagram explanations |
||||
|
||||

|
||||
|
Have you made this or any other of our designs? Tag your pictures in social media with #dropsdesign so we can see them! Do you need help with this pattern?You'll find tutorial videos, a Comments/Questions area and more by visiting the pattern on garnstudio.com. © 1982-2024 DROPS Design A/S. We reserve all rights. This document, including all its sub-sections, has copyrights. Read more about what you can do with our patterns at the bottom of each pattern on our site. |
||||


With over 40 years in knitting and crochet design, DROPS Design offers one of the most extensive collections of free patterns on the internet - translated to 17 languages. As of today we count 304 catalogues and 11422 patterns - 11422 of which are translated into English (UK/cm).
We work hard to bring you the best knitting and crochet have to offer, inspiration and advice as well as great quality yarns at incredible prices! Would you like to use our patterns for other than personal use? You can read what you are allowed to do in the Copyright text at the bottom of all our patterns. Happy crafting!
Comments / Questions (18)
Tycker att uppdateringen på det här mönstret i storlek 5-6 år är svår att förstå. Jag får inte antalet maskor som ska ökas att stämma. Med vänlig hälsning
18.03.2020 - 21:33DROPS Design answered:
Hej Texten i mönstret är uppdaterad med rättelsen så du behöver bara följa mönstret som det står. Du börjar med 84 m och sedan ökas det 4+4 m på varvet där du sätter markörer = 92 m. Efter det ökar du till raglan där du ökar 8 m på vartannat varv totalt 17 gånger. 8 x 17 = 136 maskor ökade totalt till raglan. 92+136 = 228 m. Lycka till!
19.03.2020 - 11:38Waarom moet je 30 steken meerderen als je de boord van het lijf gaat breien. Lijkt me zoveel, maar begrijp het ook niet wat de bedoeling hiervan is.
27.03.2019 - 14:10DROPS Design answered:
Dag Nynke,
Dit is bedoeld om de boord wijder te maken dan de rest van het pand, omdat de boordsteek vaak wat samentrekt. Soms is de boord juist wat strakker om deze op het lijf aan te laten sluiten, maar bij dit ontwerp is dat juist niet de bedoeling.
28.03.2019 - 12:37Hallo, bezieht sich die Maschenprobe auf die Nadeln der Stärke 3 oder 4? Mit 4 bin ich zu gross in der Maschenprobe. Muss ich dann beide Nadeln eine Nummer kleiner nehmen? Danke und Grüsse
14.12.2018 - 19:54DROPS Design answered:
Liebe Melanie H, die Maschenprobe wird mit den größeren Nadeln gestrickt, dh für das glatt rechts Teil im Pullover. Viel Spaß beim stricken!
17.12.2018 - 09:08Hallo, bezieht sich die Maschenprobe auf die Nadeln der Stärke 3 oder 4?\r\nMit 4 bin ich zu gross in der Maschenprobe.\r\n\r\nMuss ich dann beide Nadeln eine Nummer kleiner nehmen?\r\n\r\nDanke und Grüsse
14.12.2018 - 19:52Merci de votre réponse. Je suis à 14 cm sur les indications initiales, auriez-vous un conseil pour me permettre de corriger l‘erreur discrètement sans devoir tout reprendre, svp ? Grand merci, bonne journée.
22.11.2018 - 10:24DROPS Design answered:
Bonjour Manoa, je ne suis pas certaine de pouvoir vous aider, à titre personnel, je reprendrai au début pour être certaine du résultat. N'hésitez pas à demander à votre magasin, on pourra peut être vous suggérer une idée. Bon tricot!
23.11.2018 - 11:20Bonjour,je comprends que pour le dos/devant, ce sera le même nombre de mailles (66 en 5-6ans). Alors je ne comprends pas pourquoi pour les premières augmentations 1- en raglan (jusqu’a 15cm), on n’a pas le même nombre de mailles entre le devant et le dos (66/50/62/50 pour atteindre 228 mailles). Pouvez-vous m’aider, svp? Merci à vous, bonne Journée. Manoa
21.11.2018 - 14:24DROPS Design answered:
Bonjour Manoa, le nombre de mailles va être corrigé dans cette taille, on doit avoir dès le début 30 m pour le devant et donc 17 m pour le demi-dos en fin de rang. Merci pour votre retour. Bon tricot!
22.11.2018 - 08:49Bonjour, J'adore ce modèle. Avez-vous une version au point de riz? Merci!
10.11.2018 - 22:27DROPS Design answered:
Bonjour Mme Jaulin, seule une version jersey rayée existe pour ce modèle. Bon tricot!
12.11.2018 - 09:37Bonjour, Je voudrais faire ce pull pour mon fils mais j'ai dû tricoter l'échantillon avec des aiguilles de 3,5 au lieu de 4 pour avoir le bon nombre de mailles. Puis-je quand même utiliser des aiguilles de 3 pour les côtes? Il est très difficile de trouver des aiguilles de 2,5 près de chez moi... Merci!
30.10.2018 - 14:57DROPS Design answered:
Bonjour Fabienne! Bien sur que tu peux utiliser des aiguilles de 3 pour les côtes. Bon tricot!
30.10.2018 - 15:40