
Looking for a yarn?


Comments / Questions (8)
![]() Beatriz Rodríguez Romero wrote:
Beatriz Rodríguez Romero wrote:
¡Hola! No entiendo exactamente qué significa MP en este párrafo: Fila 3: Trabajar 1 p.a. en cada pt de la fila anterior - ver información para la realización del trabajo = 31-37-43 p.a. Insertar 1 MP en el p.a. central y moverlo hacia arriba según se avanza con la labor. Es decir, ¿hay que hacer un medio punto alto a la mitad de la copya y es justo ahí donde luego va el aumento? ¡Gracias!
25.06.2024 - 11:36DROPS Design answered:
Hola Beatriz, MP = marcapuntos. Insertar un marcapuntos/ hilo marcador y lo mueves con la labor.
07.07.2024 - 23:30
![]() Jeanette Rosengren wrote:
Jeanette Rosengren wrote:
Jeg kunne godt tænke mig at lave en small men med lidt mere “stof” til siderne. Kan jeg ikke bare lave lidt flere masker ude i siderne så den ikke er symmetrisk?
20.01.2024 - 17:29DROPS Design answered:
Hei Jeanette. Det kan du fint prøve deg på. Bare husk at da går det mer garn. mvh DROPS Design
29.01.2024 - 11:29
![]() Anne Marit Nilsen wrote:
Anne Marit Nilsen wrote:
Hei, hvordan festes stroppene oppe?
31.07.2023 - 08:16DROPS Design answered:
Hei Anne Marit, Stroppene er knyttet bak nakken. God fornøyelse!
02.08.2023 - 06:57
![]() Greet wrote:
Greet wrote:
In de Nederlandse versie wordt er met vasten gehaakt. In de Engelse versie wordt er met stokjes gehaakt. Welke versie moet ik aanhouden?
23.06.2023 - 14:15
![]() Aartje Broens wrote:
Aartje Broens wrote:
Zou ik het patroon van de gratis bikini's patroon in mijn emailadres kunnen ontvangen dan kan ik het makkelijker volgen Ik moet voor het uitlezen vergroten en heb geen printer Alvast bedank
11.08.2021 - 16:05DROPS Design answered:
Hallo Aartje . Er is geen mogelijkheid om per e-mail te verzenden. U kunt deze als pdf downloaden via de printknop. De knop vereist geen printer, maar de computer of telefoon zelf geeft je de mogelijkheid om het bestand als pdf op te slaan in het geval dat er geen printer wordt gedetecteerd.
11.08.2021 - 16:27
![]() Henriette wrote:
Henriette wrote:
Jeg forstår simpelthen ikke, hvordan man fører farverne med op, og synes ikke det fremgår af videoen med farveskift. Farveskift forstår jeg godt, men kan ikke se, hvordan man kan føre farven med op, når der er 5 farver?
27.04.2021 - 20:02DROPS Design answered:
Hej Henriette, jeg tror ikke vi trækker tråden med så langt op. Se her hvordan du kan gøre: Hvordan feste tråde...
29.04.2021 - 07:44
![]() Margarita wrote:
Margarita wrote:
"Ahora comenzar las dism en el centro de la labor. En la primera fila saltar el p.a. del MP, en las sig filas saltar 2 p.a. y continuar de la misma manera hasta que queden 4 p.a" Esto quiere decir que sigo disminuyendo de a 2 puntos por vuelta? O que salgo 1 y luego 2 y repito 1-2-1-2....
26.09.2019 - 16:22DROPS Design answered:
Hola Margarita. Para disminuir en este modelo dejamos puntos sin trabajar ( tantos puntos sin trabajar como puntos que se van a disminuir), es decir, en la primera fila disminuimos 1 punto y en las siguientes 2 puntos en cada una de las filas hasta llegar a tener 4 puntos.
01.10.2019 - 00:02
![]() Tanya wrote:
Tanya wrote:
As I follow the pattern for row 1: ch 46 for small ok......1st row: 1 sc in the 3rd ch from the hook, I get this...but what is (*skip ch 1,) mean: I do not end with 31 sc at all...I would love to finish this piece but the beginning is not clear. thank you for your time
18.07.2019 - 18:39DROPS Design answered:
Dear Tanya, after you have worked the first sc in the 3rd ch from hook, you will now simply skip the next chain (= this will not be worked), and then crochet 1 sc in each of the next 2 chains, repeat this all the row to get the 31 sc. Read more here. Happy crocheting!
19.07.2019 - 07:45
|
|
Sand Stripes |
|
 |
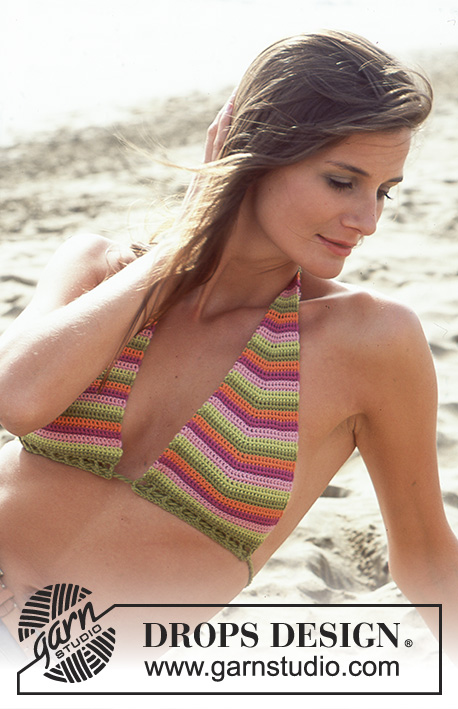 |
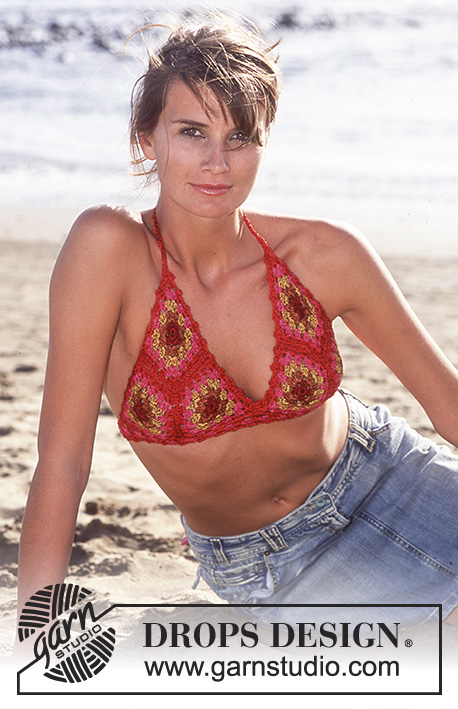
DROPS Crochet bikini top with stripes and ties in Safran. Sizes: S - L
DROPS 95-39 |
|
|
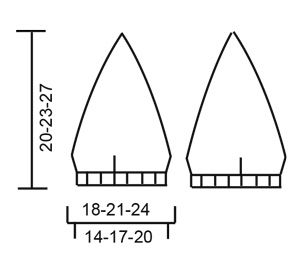
Crochet info: Turn the piece with 3 ch. Increasing tips: Inc 2 dc by crocheting 3 dc in dc by marking thread. Stripes: Each stripe = 1 row of dc. Crochet stripes in the following order: pistachio, rose, heather, orange, olive. CUP Crochet each cup separately from bottom up. Ch 46-55-64 using hook size 3 mm / C and olive. 1st row: 1 sc in the 3rd ch from the hook, *skip ch 1, 1 sc in each of the next 2 ch*, repeat from *-* and finish with 1 sc in the last ch = 31-37-43 sc (the first sc = 2 ch). Turn the piece. 2nd row: ch 5, skip 1 sc, 1 dc in next st, *1 ch, skip 1 sc, 1 dc in next st*, repeat from *-* = 15-18-21 ch spaces. Turn the piece. 3rd row: Crochet 1 dc in each st from previous row – see Crochet info = 31-37-43 dc. Insert a marker in the middle dc and let the marker follow the piece as you progress. Next rows: Change to pistachio and crochet stripes as described above. Crochet 1 dc in each dc, at the same time inc 2 dc in the middle of the piece – see Increasing tips above – on the next 4-4-5 rows = 39-45-53 dc. Now start decreasing in the middle of the piece. On first row skip 1 dc by marker, on the following rows skip 2 dc and continue until there are 4 dc left - the piece now measures approx 20-23-27 cm / 8"-9"-10½". Change to olive and crochet tie-string over the top 4 dc, 1 dc in each dc until string measures approx 40 cm / 15¾". Cut the thread. Crochet one more cup. Twisted string: Cut 5 strands of olive each measuring 3 meters/ 3.2 yds. Twist them and fold them double, let the 2 ends twist together and tie a knot each end. Insert string through holes at lower bikini edge. |
|
|
|
Have you finished this pattern?Tag your pictures with #dropspattern or submit them to the #dropsfan gallery. Do you need help with this pattern?You'll find 9 tutorial videos, a Comments/Questions area and more by visiting the pattern on garnstudio.com. © 1982-2025 DROPS Design A/S. We reserve all rights. This document, including all its sub-sections, has copyrights. Read more about what you can do with our patterns at the bottom of each pattern on our site. |
|


With over 40 years in knitting and crochet design, DROPS Design offers one of the most extensive collections of free patterns on the internet - translated to 17 languages. As of today we count 314 catalogs and 11822 patterns - 11812 of which are translated into English (US/in).
We work hard to bring you the best knitting and crochet have to offer, inspiration and advice as well as great quality yarns at incredible prices! Would you like to use our patterns for other than personal use? You can read what you are allowed to do in the Copyright text at the bottom of all our patterns. Happy crafting!
Post a comment to pattern DROPS 95-39
We would love to hear what you have to say about this pattern!
If you want to leave a question, please make sure you select the correct category in the form below, to speed up the answering process. Required fields are marked *.