
Popular categories
Looking for a yarn?


Comments / Questions (21)
![]() Fontaine wrote:
Fontaine wrote:
Bonjour, je ne comprends pas comment assembler les carrés au crochet malgré les explications. Auriez-vous une vidéo qui pourrait m’éclairer ? D’avance merci, Corinne
23.03.2025 - 10:05DROPS Design answered:
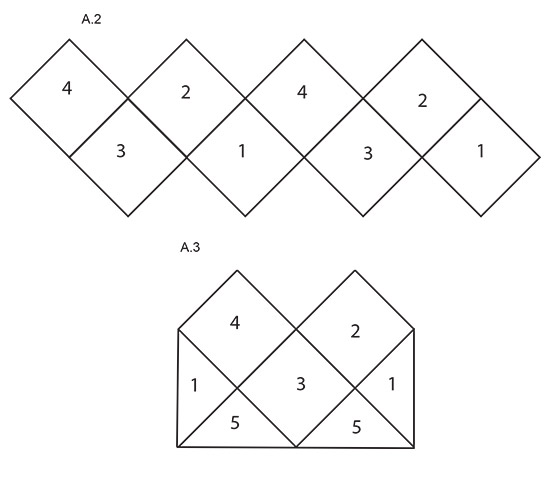
Bonjour Mme Fontaine, les carrés sont assemblés entre eux en mailles serrées, dans les coins, vous crochetez 2 mailles serrées autour de l'arceau du coin de 2 carrés, puis, vous crochetez 2 mailles serrées dans chaque arceau (en piquant dans les arceaux des 2 carrés) et 1 maille serrée dans chaque maille serrée en piquant dans les 2 épaisseurs) tout du long. Crochetez les carrés entre eux d'abord comme dans le schéma A.2 puis comme dans A.3. Bon assemblage!
24.03.2025 - 09:09
![]() Soledad wrote:
Soledad wrote:
Me gustaría saber la medida de los grannis.gracias
14.05.2024 - 20:14DROPS Design answered:
Hola Soledad, deberían medir aprox. 17x17cm.
19.05.2024 - 23:06
![]() Bénérice wrote:
Bénérice wrote:
Bonjour, faut-il bloquer le modèle, crocheté en Drops Paris, une fois fini ?
28.04.2024 - 06:12DROPS Design answered:
Bonjour Bérénice, tout est question de choix et/ou d'habitude, certaines bloquent tout, d'autres jamais. N'hésitez pas à demander conseil à votre magasin, même par mail ou téléphone, si besoin. Bon crochet!
29.04.2024 - 10:17
![]() Zila wrote:
Zila wrote:
Amei os Ebooks é um presente entanto e de muito valor. de muito bom gosto e bem elaborado. Obrigada
15.03.2024 - 06:52
![]() Karen wrote:
Karen wrote:
Is there a written pattern for this bag, as I can’t follow the diagram
16.06.2023 - 22:31DROPS Design answered:
Dear Karen, the format online is the only available format of this pattern. You can read the following lesson to better understand our charts: https://www.garnstudio.com/lesson.php?id=69&cid=19. Happy crocheting!
17.06.2023 - 16:40
![]() Luna Rose wrote:
Luna Rose wrote:
Der er et symbol, som betyder “ stangmaske mellem to stangmasker”. det forstår jeg ikke helt? hvordan hækler man mellem? er der video instruktion på det?
10.10.2022 - 09:32DROPS Design answered:
Hei Luna. Da hekler du 1 stavmaske mellom / om 2 staver fra forrige omgang. Du bare hekler mellom / om 2 staver og ikke i selve staven.mvh DROPS Design
10.10.2022 - 14:22
![]() Luna Klostergaard wrote:
Luna Klostergaard wrote:
Hej, hvad mener i med “stangmasker mellem 2 stangmasker”? er der en video torturial til den? Venlig hilsen Luna
09.10.2022 - 18:56
![]() ÁNGELA wrote:
ÁNGELA wrote:
Este bolso queda precioso y es muy cómodo. estoy encantada con el resultado.
16.05.2022 - 14:33
![]() Carolina wrote:
Carolina wrote:
,No entiendo bien cómo se realiza esta parte del orilllo\"trabajar 1 punto bajo + 3 puntos de cadena + 1 punto bajo alrededor del arco\". Y cuando miro las fotos para que me sirvan de guía no veo esa parte. Gracias por vuestra atención
24.04.2022 - 13:43DROPS Design answered:
Hola Carolina, trabajas todo esto en el mismo arco: 1 punto bajo, 3 puntos de cadeneta y 1 punto bajo. Debería quedar como una argolla. Puedes mirar el diagrama a ganchillo, en la vuelta 5, como debería quedar esto.
24.04.2022 - 22:56
![]() ÁNGELA wrote:
ÁNGELA wrote:
Cuando empieza la tercera vuelta, en el gráfico 7º se dice \"extraer el hilo a través de todos los 5 bucles en la aguja de ganchillo\", pero creo que hay un error, pues en esta primera figura sólo quedan 4 bucles.
24.03.2022 - 10:14DROPS Design answered:
Hola Ángela, sí, parece que hay una errata, serían 4 bucles en el ganchillo (todos los bucles). Muchas gracias.
26.03.2022 - 19:16
|
||||||||||||||||||||||||||||||||||||||||
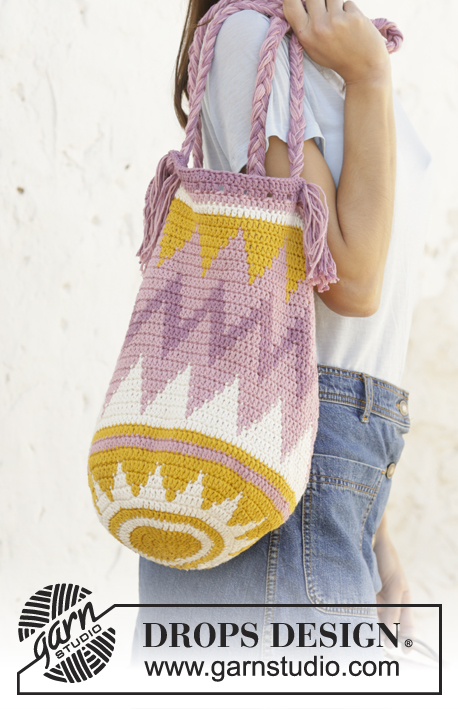
Carry Me Home#carrymehomebag |
||||||||||||||||||||||||||||||||||||||||
 |
 |
|||||||||||||||||||||||||||||||||||||||
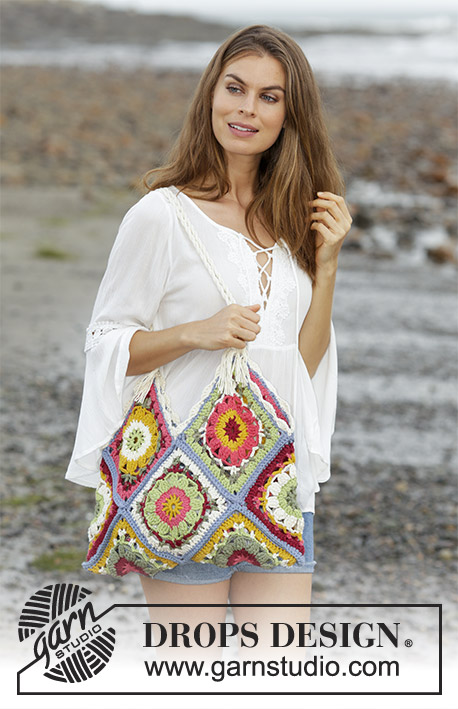
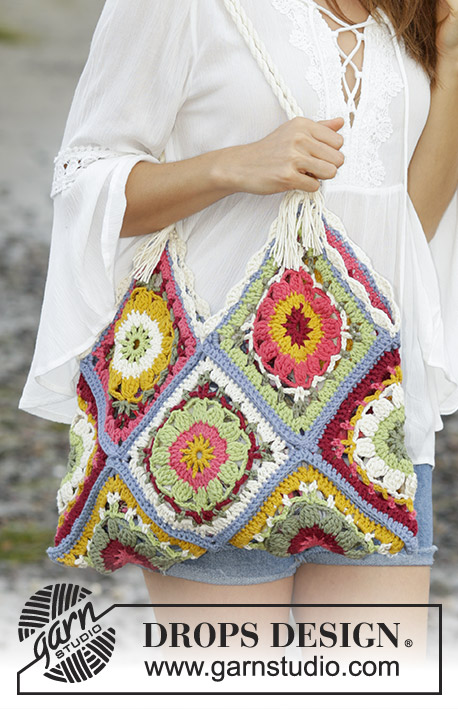
Crocheted bag with squares in various colours. The piece is worked in DROPS Paris.
DROPS 187-35 |
||||||||||||||||||||||||||||||||||||||||
|
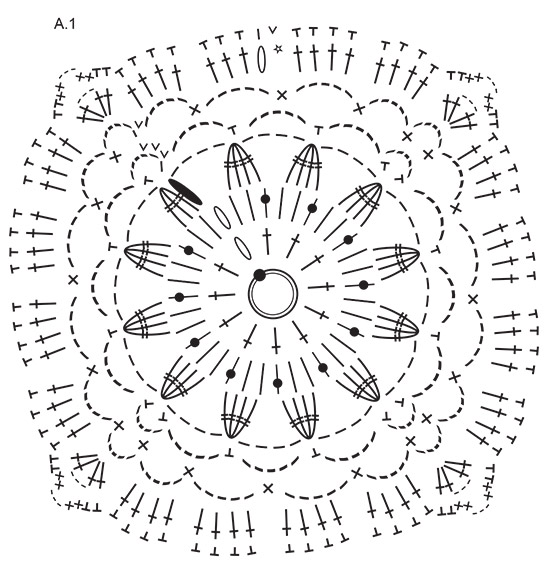
INFORMATION FOR THE PATTERN: PATTERN: Crochet according to diagram A.1. A.2 and A.3 show how the squares are worked together. COLOUR COMBINATIONS: SQUARE 1: CHAIN-STITCH RING + ROUND 1: Moss green ROUND 2: Pistachio ROUND 3: Off white ROUND 4: Mustard ROUND 5: Raspberry ROUND 6: Rusty red ROUND 7: Grey blue SQUARE 2: CHAIN-STITCH RING + ROUND 1: Rusty red ROUND 2: Mustard ROUND 3: Raspberry ROUND 4. : Off white ROUND 5: Moss green ROUND 6: Pistachio ROUND 7: Grey blue SQUARE 3: CHAIN-STITCH RING + ROUND 1: Mustard ROUND 2: Raspberry ROUND 3: Pistachio ROUND 4: Rusty red ROUND 5: Moss green ROUND 6: Off white ROUND 7: Grey blue SQUARE 4: CHAIN-STITCH RING + ROUND 1: Pistachio ROUND 2: Off white ROUND 3: Mustard ROUND 4: Moss green ROUND 5: Rusty red ROUND 6: Raspberry ROUND 7: Grey blue SQUARE 5: CHAIN-STITCH RING + ROUND 1: Raspberry ROUND 2: Rusty red ROUND 3: Moss green ROUND 4: Pistachio ROUND 5: Off white ROUND 6: Mustard ROUND 7: Grey blue COLOUR CHANGE: To get a neat transition when changing colours, work the last slip stitch of the round with the new colour as follows: Insert the hook in the last chain stitch from the beginning of the round, pick up the new strand, make a yarn over with the new strand and pull it through the stitch on the hook. ---------------------------------------------------------- BAG: The bag is made up of 10 squares with different colour combinations. Work 2 squares of each COLOUR COMBINATION – see description above. Work according to A.1 and start as follows: Work 7 chain stitches with hook size 4.5 mm and Paris and form them into a ring with 1 slip stitch in the first chain stitch. Continue according to diagram A.1, changing colour on each round – read COLOUR CHANGE. NOTE! Round 6 does not start in the corner of the square, but in the middle of one of the sides of the square. ASSEMBLY: The bag is worked together with grey blue and hook size 4.5 mm. Lay out 8 of the squares (squares in colour combinations 1 to 4) as shown in A.2. Start on the right side and lay squares 1 and 2 wrong side to wrong side. Start in the chain-space in the corner and work 2 double crochets around both chain-spaces. Continue with 1 double crochet in each double crochet on both squares, finish with 2 double crochets around both chain-spaces in the corner. Lay square 3 with wrong side towards square 2, work 2 double crochets around both chain-spaces in the corner, continue with 1 double crochet in each double crochet from both squares and finish with 2 double crochets around both chain-spaces in the corner. Continue like this until the 8 squares have been worked together. Then work square 4 at the end of A.2 together with square 1 at the beginning of A.2, so that the bag is joined in both sides, finish with a slip stitch in the first double crochet worked on squares 1 and 2. Cut and fasten the strand. Now work the last two squares to the bottom of the bag as shown in A.3. Start at the bottom right corner, lay square 5 with wrong side to square 1, work 2 double crochets around both chain-spaces, work 1 double crochet in each double crochet from both squares, finish with 2 double crochets around both chain-spaces in the corner. Lay the next side of square 5 with wrong side towards square 3, work 2 double crochets around both chain-spaces, work 1 double crochet in each double crochet from both squares, finish with 2 double crochets around both chain-spaces in the corner. Continue until the last 2 squares have been worked to the bottom of the bag and finish with 1 slip stitch in the first double crochet. Cut and fasten the strand. CROCHET EDGE: Crochet an edge around the opening on the bag. Work with off white and hook size 4.5 mm as follows: Work 1 double crochet in the join between the 2 middle squares on the bag (squares 2 and 4 in A.3), *skip 2 double crochets from square 4, work 5 treble crochets in the next double crochet, skip 2 double crochets, work 1 double crochet in the next double crochet *, repeat from *-* 3 more times, work 1 double crochet + 3 chain stitches + 1 double crochet around the chain-space, * work 1 double crochet in the next double crochet, skip 2 double crochets, work 5 treble crochets in the next double crochet, skip 2 double crochets *, repeat from *-* 3 more times and finish with 1 double crochet in the join between the next 2 squares. Continue like this around the whole opening on the bag, finish with 1 slip stitch in the first double crochet. TWISTED CORD: Cut 8 strands off-white of 4 metres in length. Twist them together until they begin to resist, fold the cord double and it will continue to twist. Tie a knot in each end. Fasten the cord through the chain-space from the crochet edge on the top of one of the squares and the other end in the top of another square on the same side of the bag. Leave approx. 8 cm as a fringe after the knots. Repeat on the other side of the bag. |
||||||||||||||||||||||||||||||||||||||||
Diagram explanations |
||||||||||||||||||||||||||||||||||||||||
|
||||||||||||||||||||||||||||||||||||||||
 |
||||||||||||||||||||||||||||||||||||||||
 |
||||||||||||||||||||||||||||||||||||||||
Have you finished this pattern?Tag your pictures with #dropspattern #carrymehomebag or submit them to the #dropsfan gallery. Do you need help with this pattern?You'll find 13 tutorial videos, a Comments/Questions area and more by visiting the pattern on garnstudio.com. © 1982-2026 DROPS Design A/S. We reserve all rights. This document, including all its sub-sections, has copyrights. Read more about what you can do with our patterns at the bottom of each pattern on our site. |
||||||||||||||||||||||||||||||||||||||||


With over 40 years in knitting and crochet design, DROPS Design offers one of the most extensive collections of free patterns on the internet - translated to 17 languages. As of today we count 325 catalogues and 12298 patterns translated into English (UK/cm).
We work hard to bring you the best knitting and crochet have to offer, inspiration and advice as well as great quality yarns at incredible prices! Would you like to use our patterns for other than personal use? You can read what you are allowed to do in the Copyright text at the bottom of all our patterns. Happy crafting!
Post a comment to pattern DROPS 187-35
We would love to hear what you have to say about this pattern!
If you want to leave a question, please make sure you select the correct category in the form below, to speed up the answering process. Required fields are marked *.