
Popular categories
Looking for a yarn?


Comments / Questions (9)
![]() Lucia wrote:
Lucia wrote:
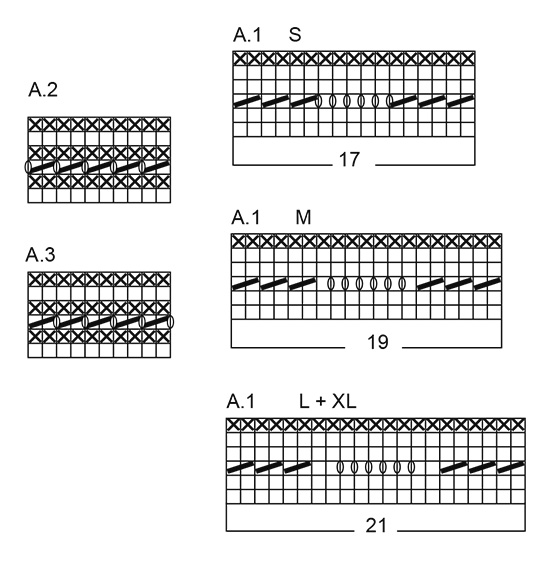
Nello schema A2 il quadretto vuoto corrisponde a 1 maglia diritto dal diritto del lavoro, 1 maglia rovescio dal rovescio del lavoro mentre il quadretto con x corrisponde a 1 maglia diritto dal diritto del lavoro. Tra l'altro i quadretti con x si trovano sui ferri pari, quindi sul rovescio del lavoro. Può darsi che ci sia un errore e che il quadretto con x sia da intendersi = 1 maglia rovescia dal diritto del lavoro, 1 maglia diritta dal rovescio del lavoro? Grazie❣
05.02.2022 - 15:29DROPS Design answered:
Buonasera Lucia, abbiamo corretto la legenda: il simbolo con la X corrisponde a 1 maglia diritto dal rovescio del lavoro. Buon lavoro!
05.02.2022 - 21:06
![]() Forest Call Drops 187-33 wrote:
Forest Call Drops 187-33 wrote:
Was bedeutet denn: die Arbeit wird ab dem vorderen Rand gestrickt? Also was genau ist der "vordere Rand"?
21.03.2021 - 14:25DROPS Design answered:
Hallo! Die Jacke wird von unten nach oben gestrickt, der Rumpfteil wird in einem Teil bis zum Armoch gestrickt, dh die Hinreihen beginnen bei dem rechten Vorderteil und enden mit dem linken Vorderteil. Viel Spaß beim stricken!
22.03.2021 - 08:17
![]() Leen wrote:
Leen wrote:
Beste, tot nu toe waren alle patronen in small perfect voor mijn maat, maar ik vermoed dat er hier een fout in het patroon gelopen is. Als ik de stekenverhouding van het proeflapje gebruik, dan wordt mijn vest minstens 133 cm breed (achterpand + 2 zijpanden voor), wat waanzinnig breed is voor mijn maat. Zeker wanneer je kijkt naar het patroonfotootje waarop staat dat het achterpand 52 cm zou moeten zijn. Is het mogelijk om een aanpassing door te geven zodat het er uit ziet zoals op de foto’s?
18.03.2020 - 15:45DROPS Design answered:
Dag Leen,
Het komt door het golfpatroon dat het nodig is om meer steken op te zetten en dit trekt dus bij zodra je gaat breien. (Het proeflapje is aangegeven in tricotsteek.)
18.03.2020 - 18:09
![]() Elisabeth wrote:
Elisabeth wrote:
Hallo Antje, beim drucken einfach die Einstellung überprüfen und dem Drucker "sagen", dass nur die Seiten gedruckt werden sollen, die Sie benötigen. Sie drücken auf "Anleitung drucken", dann erscheint Ihr Drucker, dort ist meistens ein Punkt bei "alle Seiten" (hier 7 mit Werbung) angeklickt. Sie schreiben in das Feld drunter 1-6 und verzichten somit auf die letzte Seite.
29.06.2018 - 14:04
![]() Antje wrote:
Antje wrote:
Hallo, die Anleitungen gefallen mir , aber beim ausdrucken habe ich das Problem, das immer zum Schluss 1 Seite mit Werbung ausgedruckt wird. Wie kann ich das vermeiden?
17.05.2018 - 14:04
![]() Samira wrote:
Samira wrote:
Forest Call... 192.168.0.1
15.05.2018 - 09:57
![]() Elke Tan wrote:
Elke Tan wrote:
For a name I suggest "Fairy woods" :)
16.01.2018 - 22:47
![]() Gabriele wrote:
Gabriele wrote:
Eine schöne Jacke für den Übergang.
15.12.2017 - 19:08
![]() Heidi wrote:
Heidi wrote:
Walk in the forest
14.12.2017 - 12:06
|
|||||||||||||
Forest Call#forestcallcardigan |
|||||||||||||
 |
 |
||||||||||||
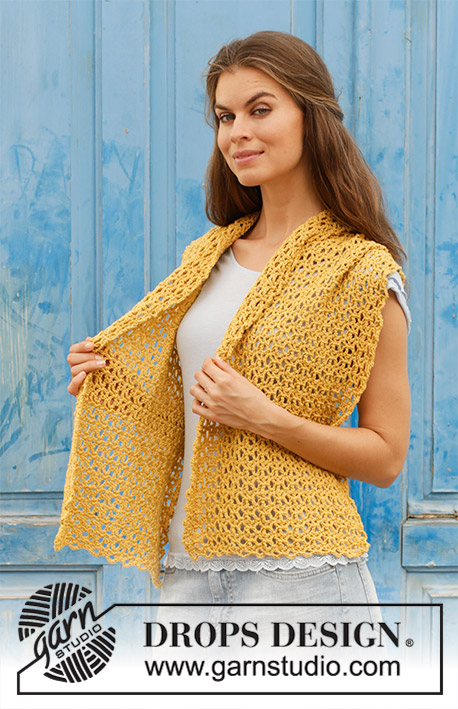
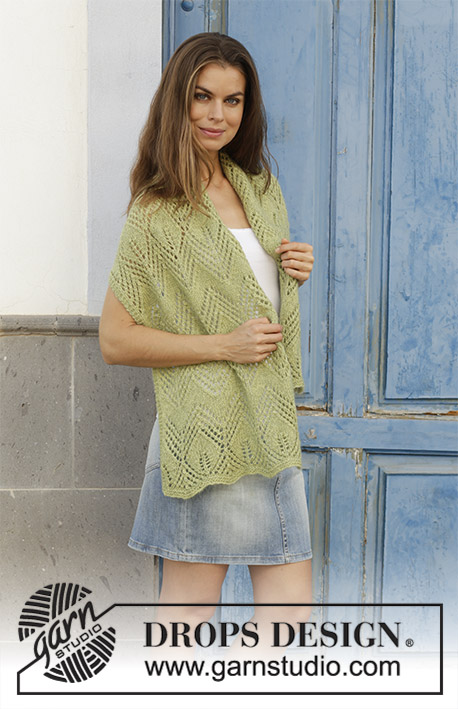
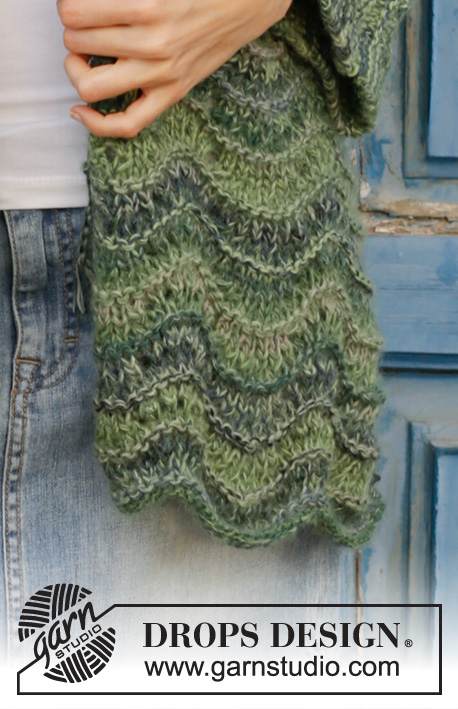
Knitted jacket with kimono sleeves, wave pattern and shawl collar. Sizes S - XXXL. The piece is worked in DROPS Delight and DROPS Kid-Silk.
DROPS 187-33 |
|||||||||||||
|
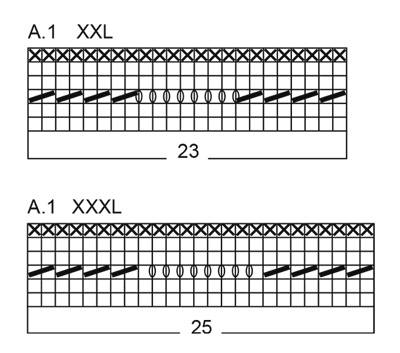
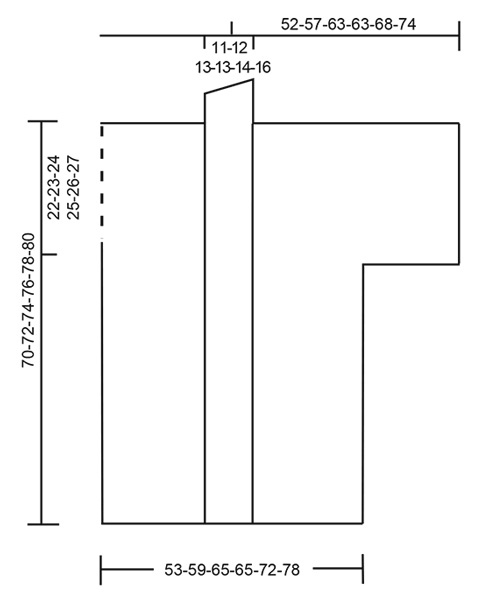
INFORMATION FOR THE PATTERN: RIDGE/GARTER STITCH (worked back and forth): 1 ridge = Knit 2 rows. PATTERN: See diagrams A.1, A.2 and A.3. Choose diagram for your size in A.1. The diagram shows all the rows in the pattern seen from the right side. ---------------------------------------------------------- JACKET: The piece is worked back and forth with circular needle from mid front. Piece is divided by the armholes where new stitches for the sleeves are cast on. Then the front and back pieces are finished separately, back and forth on needle. BODY: Cast on 173-191-209-209-227-245 stitches with circular needle size 7 mm and 1 strand of each colour of Delight and 1 strand Kid-Silk (= 3 strands). Work 1 RIDGE – see description above, then work as follows – from the right side: A.2 (10 stitches = band), A.1 over the next 153-171-189-189-207-225 stitches (= 9 repeats of A.1 in width – see diagram for your size), finish with A.3 (10 stitches = band). Continue like this until the piece measures 48-49-50-51-52-53 cm. Now place the first and last 44-48-52-52-56-60 stitches on a thread, continue working over the 85-95-105-105-115-125 stitches on back piece. BACK PIECE: Cast on 40-44-48-48-52-56 new stitches in each side = 165-183-201-201-219-237 stitches. Then work as follows – from the right side: 6 stitches garter stitch, A.1 over the next 153-171-189-189-207-225 stitches (= 9 repeats of A.1 in width), finish with 6 stitches garter stitch. Continue this pattern until the piece measures 68-70-72-74-76-78 cm (= 20-21-22-23-24-25 cm from separation of front and back pieces). Now cast off the middle 17-19-21-21-23-25 stitches on the needle = 74-82-90-90-98-106 stitches left on each shoulder/sleeve. Continue until the piece measures 70-72-74-76-78-80 cm, then cast off. Work the other shoulder in the same way. RIGHT FRONT PIECE: Place the stitches from the right front piece back on the needle = 44-48-52-52-56-60 stitches. Cast on 40-44-48-48-52-56 new stitches at the end of the first row from the right side = 84-92-100-100-108-116 stitches. Work as follows (from the wrong side): 6 stitches garter stitch, A.1 over the next 68-76-84-84-92-100 stitches (= 4 repeats of A.1 in width), finish with A.2. Continue the pattern until the piece measures 70-72-74-76-78-80 cm (= 22-23-24-25-26-27 cm from separation of front and back pieces). Cast off the first 74-82-90-90-98-106 stitches on the next row from the wrong side, work to end of row (= 10 stitches left on the needle (= band)). Turn the piece and work short rows and garter stitch over the band as follows: Start from the right side and * work over the first 5 stitches, turn and work back, turn, work over all stitches, turn and work back *, repeat from *-* until the collar measures 8-9-10-10-11-12 cm on the shortest side. Cast off. LEFT FRONT PIECE: Place the last 44-48-52-52-56-60 stitches back on the needle. Cast on 40-44-48-48-52-56 new stitches at the end of the first row from the wrong side = 84-92-100-100-108-116 stitches. Work as follows (from the right side): 6 stitches garter stitch, A.1 over the next 68-76-84-84-92-100 stitches (= 4 repeats of A.1 in width), finish with A.3. Continue this pattern until the piece measures 70-72-74-76-78-80 cm (= 22-23-24-25-26-27 cm from separation of front and back pieces). Cast off the first 74-82-90-90-98-106 stitches on the next row from the right side (= 10 stitches left on the needle (= band)). Turn the piece and work short rows and garter stitch on band as follows: Start from the wrong side and * work over the first 5 stitches, turn and work back, turn, work over all stitches, turn and work back *, repeat from *-* until the collar measures 8-9-10-10-11-12 cm on the shortest side. Cast off. ASSEMBLY: Sew seams under sleeves and shoulder seams. Sew the collar together mid back and sew onto neckline. TWISTED CORD: Cut 3 strands of 2 metres (= 1 strand of each colour of Delight and 1 strand Kid-Silk). Twist them together until they begin to resist, thread the cord through one of the holes in the band, approx. 33 cm from the bottom edge, fold the cord double and it will continue to twist. Tie a knot in the end. Do the same on the other band. |
|||||||||||||
Diagram explanations |
|||||||||||||
|
|||||||||||||
|
|||||||||||||
|
|||||||||||||
|
|||||||||||||
Have you finished this pattern?Tag your pictures with #dropspattern #forestcallcardigan or submit them to the #dropsfan gallery. Do you need help with this pattern?You'll find 24 tutorial videos, a Comments/Questions area and more by visiting the pattern on garnstudio.com. © 1982-2025 DROPS Design A/S. We reserve all rights. This document, including all its sub-sections, has copyrights. Read more about what you can do with our patterns at the bottom of each pattern on our site. |
|||||||||||||


With over 40 years in knitting and crochet design, DROPS Design offers one of the most extensive collections of free patterns on the internet - translated to 17 languages. As of today we count 314 catalogues and 11821 patterns translated into English (UK/cm).
We work hard to bring you the best knitting and crochet have to offer, inspiration and advice as well as great quality yarns at incredible prices! Would you like to use our patterns for other than personal use? You can read what you are allowed to do in the Copyright text at the bottom of all our patterns. Happy crafting!
Post a comment to pattern DROPS 187-33
We would love to hear what you have to say about this pattern!
If you want to leave a question, please make sure you select the correct category in the form below, to speed up the answering process. Required fields are marked *.