
Popular categories
Looking for a yarn?


Comments / Questions (13)
![]() VALENTINA wrote:
VALENTINA wrote:
Esiste una versione con per uncinetto?
21.05.2024 - 15:23DROPS Design answered:
Buonasera Valentina, questo modello è lavorato a maglia: se naviga sul nostro sito può trovare altri modelli all'uncinetto. Buon lavoro!
22.05.2024 - 23:28
![]() Lilli Saranpää wrote:
Lilli Saranpää wrote:
Tack för svaret. Jag förklarade otydligt. När det är 169 maskor på varje sida ska man börja med framstycket. när 4 rapporter finns på höjden, räknat från armhålet. Nu har jag redan 179 maskor på varje sida och saknar ännu fjärde rapporten. Jag har alltså inte ännu börjat med framochtillbaka- skedet. Jag har gjort alla hoptagningar. Annars skulle ju mönstret inte stämma. Vet inte hur jag ska fortsätta.
20.04.2023 - 18:27DROPS Design answered:
Hej Lilli, har lidt svært ved at forstå nøjagtig hvor du er... men har du hoppet over omslagene i A.2 og A.4? Du bør kun have 169 masker når du fortsætter med A.5,A.6,A.7 som er helt uden udtagninger.
25.04.2023 - 15:42
![]() Lilli Saranpää wrote:
Lilli Saranpää wrote:
Hej Det ska stickas 4 rapporter av A3 efter armhålet. Avkastning på två sidor och stickning på två sidor. Nu har jag redan 179 maskor på varje sida fast jag inte har rapporterna färdiga. Vad gör jag fel?
16.04.2023 - 11:39DROPS Design answered:
Det ska ökas 14 maskor i varje rapport med A.2/A.4. Kontrollera noggrannt att du gjort alla minskningar i diagrammen. Rutorna med svarta cirklar ska stickas avigt från rätsidan och räta från avigsidan.
20.04.2023 - 17:04
![]() Julie wrote:
Julie wrote:
Bonjour, Je n’arrive pas à trouver le single qui donne cette consigne dans le patron. faire 1 jeté entre 2 mailles, au rang suivant tricoter le jeté torse pour éviter un trou
07.11.2022 - 02:06DROPS Design answered:
Bonjour Julie, vous retrouvez ce symbole au tout premier rang de A.1: vous tricotez ainsi: *1 m end, 1 jeté, 1 m end, 1 jeté*, et répétez de *-*; au tour suivant, (tricotez les jetés torse. Bon tricot!
07.11.2022 - 09:55
![]() Sabine wrote:
Sabine wrote:
Would you be so kind putting this pattern in the Ravelry database? (somehow it was forgotten in this issue...)
15.11.2020 - 11:36DROPS Design answered:
Dear Sabine, thanks for noticing! you will now find this pattern in Ravelry here. Happy knitting!
16.11.2020 - 10:31
![]() Joubert Patricia wrote:
Joubert Patricia wrote:
Bonsoir ! merci pour votre réponse ; mais impossible d'enlever des favoris . J'ai suivi vos conseils , rien ne marche ! ce n'est pas grave . Merci encore .
11.09.2019 - 23:14
![]() Joubert Patricia wrote:
Joubert Patricia wrote:
Bonjour ! j'ai réussi à ajouter dans mes favoris , bien que ce soit 1 carré et non 1 cœur à côté de "imprimer " ; mais je ne vois pas de croix sur les photos des favoris ???? Merci pour vos explications .
06.09.2019 - 20:33DROPS Design answered:
Bonjour Mme Joubert, en fonction du fond de la photo, il est possible que cette croix soit moins visible, car cette croix est légèrement grisée, en cliquant dans le coin à droite de la photo, vous pouvez le supprimez, n'hésitez pas à essayer sur un modèle avec un fond plus clair. Bon crochet!
09.09.2019 - 08:04
![]() Joubert Patricia wrote:
Joubert Patricia wrote:
Bonjour ! comment ajouter 1 modèle dans mes favoris , et comment retirer 1 favori ? Merci pour tous vos jolis tricots .
06.09.2019 - 03:12DROPS Design answered:
Bonjour Mme Joubert, pour ajouter un modèle à vos favoris, cliquez sur le petit coeur à droite de l'icône pour imprimer, indiquez votre adresse mail, et "envoyer", vous verrez la liste de vos favoris s'afficher. Pour retirer un modèle de vos favoris, cliquez sur la croix en haut à droite de la photo dans la liste de vos favoris. Bon tricot!
06.09.2019 - 08:29
![]() Maria Carlsson wrote:
Maria Carlsson wrote:
Hej! Jag igen, jag har läst igenom beskrivningen och blir inte klok. Fastnat i meningen ”När rutan mäter ca 36 cm *36 cm osv maskas det av för ärmhål” Det jag inte förstår är hur jag ska mäta rutan, hur, var mäter jag rutan? Antal maskor på varvet är 352 st, 20 m är 10cm, så varvet borde vara ca 176cm, hittar inga rutor att mäta, bara trianglar möjligtvis? Hoppas på hjälp, klarhet.
19.04.2019 - 16:16DROPS Design answered:
Hej, arb får formen av en fyrkant. Du ska mäta längs fyrkantens raka sidor.
23.04.2019 - 14:30
![]() Maria Carlsson wrote:
Maria Carlsson wrote:
Hej! Jag får inte ihop antal maskor med mönsterbeskrivningen. Det står att jag ska lägga upp 8-8-8-8 m dvs 32 maskor. diagram A1 börjar med två maskor, när jag sedan räknar alla ökningar, så blir bara ökningarna 120 m står att det ska bli 128m i slutet så vore mest logiskt att lägga upp 2-2-2-2 eller hur är det tänkt att jag ska göra, blir inte klok...
26.02.2019 - 09:19DROPS Design answered:
Hej, du ska börja med att lägga upp 8 maskor i din storlek, sedan ökas det enligt diagram A.1 som upprepas totalt 4 gånger på varvet.
27.02.2019 - 14:29
|
||||||||||||||||||||||||||||
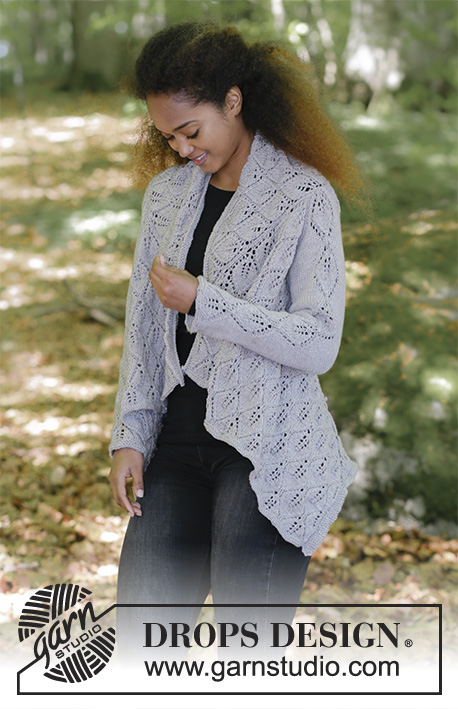
Don't Leaf Me Behind#dontleafmebehindjacket |
||||||||||||||||||||||||||||
 |
 |
|||||||||||||||||||||||||||
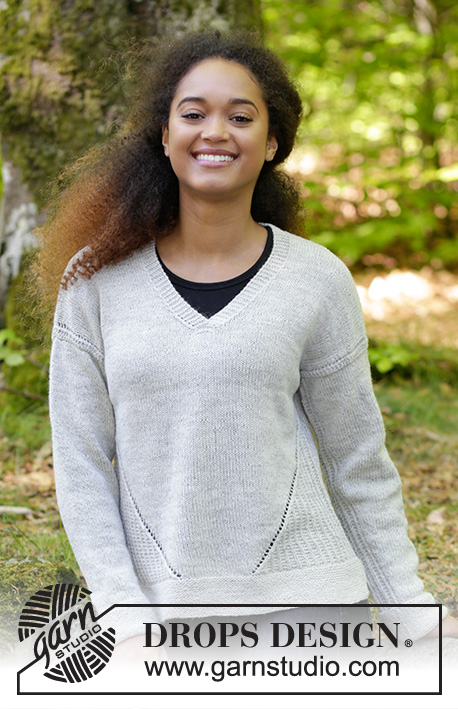
Knitted square jacket with lace pattern. Sizes S - XXXL. The piece is worked in DROPS Cotton Merino.
DROPS 184-32 |
||||||||||||||||||||||||||||
|
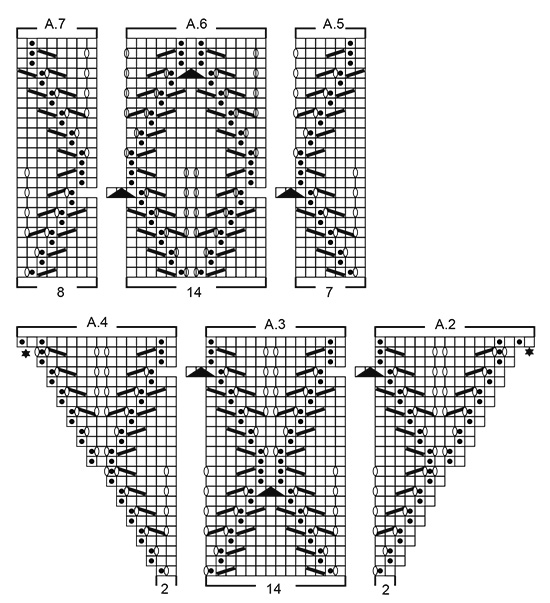
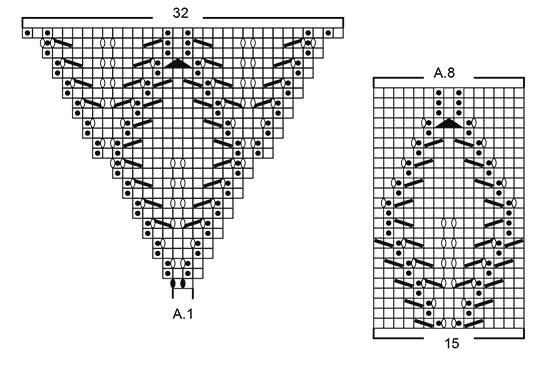
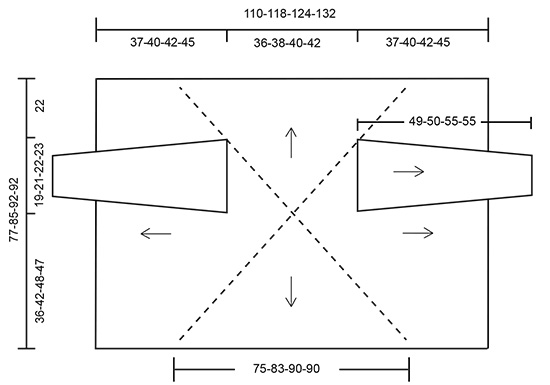
INFORMATION FOR THE PATTERN: RIDGE/GARTER STITCH (worked in the round): 1 ridge = 2 rounds. Knit 1 round and purl 1 round. RIDGE/GARTER STITCH (worked back and forth): 1 ridge = Knit 2 rows. PATTERN: See diagrams A.1 to A.8. The diagrams show all the rows in the pattern seen from the right side. DECREASE TIP (for sleeve): Decrease 1 stitch on each side of the marker thread as follows: Work until there are 2 stitches left before the marker thread, knit 2 together, (marker thread), slip 1 stitch as if to knit, knit 1, pass the slipped stitch over the knitted stitch. CASTING OFF TIP: To avoid the cast-off edge being tight you can cast off using a ½ needle size larger. ---------------------------------------------------------- JACKET: The piece is worked in the round into a square with double pointed needles/circular needle starting from mid back. Cast off for the armholes, then continue the square to finished length. Then work back and forth, out to each side towards mid front of the jacket, but without increasing. The sleeves are worked in the round with double pointed needles, top down. Cast on 8-8-8-8 stitches with double pointed needles size 4.5 mm and Cotton Merino. Work pattern in the round according to diagram A.1 a total of 4 times on the round - read PATTERN above. Change to circular needle when necessary. REMEMBER THE KNITTING TENSION! When the whole of diagram A.1 has been completed there are 128 stitches on the round. Insert 4 markers without working the stitches as follows: insert the first marker at the beginning of the round, the second marker after the next 32 stitches, the third after 32 stitches and the fourth after 32 stitches; allow the markers to follow your work onwards. Now work pattern as follows: Work * A.2 (= 2 stitches), A.3 over the next 28 stitches (= 2 repeats of 14 stitches) and A.4 (= 2 stitches) *, work from *-* a total of 4 times on the round. When A.2/A.3/A.4 have been completed in height there are 60 stitches between each marker (= 240 stitches on the round). Now work pattern as follows: Work * A.2 (= 2 stitches), A.3 over the next 56 stitches (= 4 repeats of 14 stitches) and A.4 (= 2 stitches) *, work from *-* a total of 4 times on the round. When A.2/A.3/A.4 have been completed in height there are 88 stitches between each marker (= 352 stitches on the round). Continue pattern in this way - each time the diagrams are repeated in height, work 2 more repeats of A.3 between A.2 and A.4 (= 8 increased repeats on the round). When the square measures approx. 36-38-40-42 x 36-38-40-42 cm (adjust so that the next round is without yarn overs) cast off for the armholes as follows: Cast off the first 38-42-44-46 stitches for armhole, work until there are 38-42-44-46 stitches left before the fourth marker, cast off the next 38-42-44-46 stitches for armhole, work as far as the first marker. On the next round cast on 38-42-44-46 stitches over the armholes; the stitches are then worked into the pattern. Continue the pattern until A.3 has been completed a total of 3-4-4-4 times in height (there is now 1-½-1-1 repeat left in height before finished measurement of square). Now work the first 22-10-22-22 rounds as before. Work the next round in the diagrams, but skip the first 2 yarn overs in A.2 and skip the last yarn over in A.4. The next round in the pattern is worked as follows: NOTE: Skip the first 2 squares in A.2 and skip the last square in A.4 - Work from the first to the second marker and place these 141-155-169-169 stitches on 1 thread (= left front piece), work to the third marker and place these 141-155-169-169 stitches on 1 thread (= bottom edge), work to the fourth marker and place these 141-155-169-169 stitches on1 thread (= right front piece), work to the first marker = 141-155-169-169 stitches left on needle (= neckline). Change to circular needle size 4 mm and work 2 RIDGES back and forth - see description above, over these stitches. Loosely cast off - read CASTING OFF TIP above. Place the 141-155-169-169 stitches from the bottom edge on circular needle size 4 mm and work 2 ridges back and forth over these stitches, loosely cast off. LEFT FRONT PIECE: The piece is worked back and forth. Place the 141-155-169-169 stitches on circular needle size 4.5 mm. Start from the right side and work as follows: Knit up 3 stitches in the side of the ridges from the neckline, work A.5 (= 7 stitches) - read PATTERN above, work A.6 (= 14 stitches) a total of 9-9-11-11 times in width, work A.7 (= 8 stitches) and knit up 3 stitches in the side of the ridges from the bottom edge = 147-161-175-175 stitches. The 3 stitches in each side are continued in garter stitch. Continue this pattern until A.5/A.6/A.7 have been completed 2-2-2-2 times in height, then work the first 0-0-0-12 rows in the pattern. Change to circular needle size 4 mm and work 2 ridges, loosely cast off. RIGHT FRONT PIECE: The piece is worked back and forth. Place the 141-155-169-169 stitches on circular needle size 4.5 mm. Work as for left front piece, but the first row starts with knitting up stitches in the side of the ridges from the bottom edge and finishes with knitting up stitches in the side of the ridges from the neckline. SLEEVE: The piece is worked in the round with double pointed needles, top down. Cast on 75-85-89-93 stitches with double pointed needles size 4.5 mm and Cotton Merino. Insert 1 marker at the start of the round, allow the marker to follow your work onwards = mid under sleeve. Work the next round as follows: Knit 30-35-37-39 stitches, diagram A.8 (= 15 stitches), knit 30-35-37-39 stitches. Continue this pattern. When the piece measures 2 cm decrease 1 stitch on each side of the marker - read DECREASE TIP above. Decrease in this way every 3-2½-2½-2½ cm a total of 14-17-18-19 times = 47-51-53-55 stitches. When the piece measures 48-49-54-54 cm - adjust to after the 12th or 24th round in the pattern, change to double pointed needles size 4 mm and work 2 RIDGES - see description above. Loosely cast off. Work one more sleeve in the same way. ASSEMBLY: Sew in the sleeves. Close the hole from the cast on edge mid-back by basting up and down, then tighten and fasten the thread. |
||||||||||||||||||||||||||||
Diagram explanations |
||||||||||||||||||||||||||||
|
||||||||||||||||||||||||||||
|
||||||||||||||||||||||||||||
|
||||||||||||||||||||||||||||
|
||||||||||||||||||||||||||||
Have you finished this pattern?Tag your pictures with #dropspattern #dontleafmebehindjacket or submit them to the #dropsfan gallery. Do you need help with this pattern?You'll find 28 tutorial videos, a Comments/Questions area and more by visiting the pattern on garnstudio.com. © 1982-2025 DROPS Design A/S. We reserve all rights. This document, including all its sub-sections, has copyrights. Read more about what you can do with our patterns at the bottom of each pattern on our site. |
||||||||||||||||||||||||||||


With over 40 years in knitting and crochet design, DROPS Design offers one of the most extensive collections of free patterns on the internet - translated to 17 languages. As of today we count 314 catalogues and 11822 patterns translated into English (UK/cm).
We work hard to bring you the best knitting and crochet have to offer, inspiration and advice as well as great quality yarns at incredible prices! Would you like to use our patterns for other than personal use? You can read what you are allowed to do in the Copyright text at the bottom of all our patterns. Happy crafting!
Post a comment to pattern DROPS 184-32
We would love to hear what you have to say about this pattern!
If you want to leave a question, please make sure you select the correct category in the form below, to speed up the answering process. Required fields are marked *.