Clicking the ORDER button will redirect you to Wool Warehouse Direct Ltd website
The yarn cost is calculated from the pattern’s smallest size and the yarn’s cheapest product type. Looking for an even better price? You might find it on the DROPS Deals!
-------------------------------------------------------
Alternative Yarn – See how to change yarns here
Yarn Groups A to F – Use the same pattern and change the yarn here
Yarn usage using an alternative yarn – Use our yarn converter here
-------------------------------------------------------
Clicking the ORDER button will redirect you to Wool Warehouse Direct Ltd website
The yarn cost is calculated from the pattern’s smallest size and the yarn’s cheapest product type. Looking for an even better price? You might find it on the DROPS Deals!
This pattern has been corrected. Click here to see the correction/s.
= knit | |
= purl | |
= place 3 stitches on cable needle in front of the piece, knit 3 stitches, knit 3 stitches from cable needle | |
= place 3 stitches on cable needle behind the piece, knit 3 stitches, knit 3 stitches from cable needle | |
= place 1 stitch on cable needle in front of the piece, knit 1, knit 1 from cable needle | |
= place 1 stitch on cable needle behind the piece, knit 1, knit 1 from cable needle |
Each of our patterns has specific tutorial videos to help you.
These step-by-step tutorials might also help you:
Why is the knitting/crochet tension so important?
Knitting tension is what determines the final measurements of your work, and is usually measured per 10 x 10 cm. It is provided like so: number of stitches in width x number of rows in height - eg: 19 stitches x 26 rows = 10 x 10 cm.
The knitting tension is very individual; some people knit/crochet loosely while others work tightly. You adjust the knitting tension with the needle size, which is why the suggested needle size is only meant as a guide! You need to adjust this (up or down) to ensure that YOUR knitting tension matches the knitting tension provided in the pattern. If you work with a different knitting tension than provided you will have a different yarn consumption, and your work will have different measurements than what the pattern suggests.
The knitting tension also determines which yarns can replace each other. As long as you achieve the same knitting tension you can replace one yarn with another.
See DROPS lesson: How to measure your tension/gauge
See DROPS video: How to make a gauge tension swatch
How do I know how many balls of yarn I need?
The required amount of yarn is provided in grams, eg: 450 g. To calculate how many balls you’ll need you first need to know how many grams are in 1 ball (25g, 50g or 100g). This information is available if you click on the individual yarn quality on our pages. Divide the amount required with the amount of each ball. For example, if each ball is 50g (the most common amount), the calculation will be as follows: 450 / 50 = 9 balls.
Can I use a different yarn than what the pattern suggests?
The important thing when changing from one yarn to another is that the knitting/crochet tension remains the same. This is so that the measurements of the finished piece will be the same as on the sketch provided. It is easier to achieve the same knitting tension using yarns from the same yarn group. It is also possible to work with multiple strands of a thinner yarn to achieve the knitting tension of a thicker one. Please try our yarn converter. We recommend you to always work a test swatch.
Please NOTE: when changing yarn the garment might have a different look and feel to the garment in the photo, due to individual properties and qualities of each yarn.
See DROPS lesson: Can I use a different yarn than the one mentioned in the pattern?
What are the yarn groups?
All our yarns are categorised into yarn groups (from A to F) according to thickness and knitting tension – group A contains the thinnest yarns and group F the thickest. This makes it easier for you to find alternative yarns to our patterns, should you wish to switch yarn. All yarns within the same group have a similar knitting tension and can easily replace each other. However, different yarn qualities have different structures and properties which will give the finished work a unique look and feel.
How do I use the yarn calculator?
At the top of all our patterns you’ll find a link to our yarn calculator, which is a helpful tool should you wish to use a different yarn than suggested. By filling in the yarn quality you wish to replace, the amount (in your size) and number of strands, the calculator will present good alternative yarns with the same knitting tension. Additionally it will tell you how much you’ll require in the new qualities and whether you’ll need to work with multiple strands. Most skeins are 50g (some are 25g or 100g).
If the pattern is worked with multiple colours, every colour will have to be calculated separately. Similarly, if the pattern is worked with several strands of different yarns (for example 1 strand Alpaca and 1 strand Kid-Silk) you will have to find alternatives for each, individually.
Why do you show discontinued yarns in the patterns?
Since different yarns have different qualities and textures we have chosen to keep the original yarn in our patterns. However, you can easily find options among our available qualities by using our yarn calculator, or simply pick a yarn from the same yarn group.
It is possible that some retailers still have discontinued yarns in stock, or that someone has a few skeins at home that they would like to find patterns for.
The yarn calculator will provide both alternative yarn as well as required amount in the new quality.
What size should I knit?
If you think it's hard to decide what size to make, it can be a good idea to measure a garment you own already and like the size of. Then you can pick the size by comparing those measures with the ones available in the pattern's size chart.
You'll find the size chart at the bottom of the pattern.
See DROPS lesson: How to read size chart
Why do I get the wrong knitting tension with the suggested needle size?
The needle size provided in the pattern serves only as a guide, the important thing is to follow the knitting tension. And since knitting tension is very individual, you will have to adjust the needle size to ensure that YOUR tension is the same as in the pattern – maybe you’ll have to adjust 1, or even 2 needle sizes, up or down to achieve the correct tension. For this, we recommend that you work test swatches.
Should you work with a different knitting tension than the one provided, the measurements of the finished garment might deviate from the measurement sketch.
See DROPS lesson: How to measure your tension/gauge
See DROPS video: How to make a tension/gauge swatch
Why is the pattern worked top-down?
Working a garment top-down provides more flexibility and room for personal adjustment. For example it is easier to try the garment on while working, as well as making adjustments to length of yoke and shoulder caps.
The instructions are carefully explaining every step, in the correct order. Diagrams are adjusted to the knitting direction and are worked as usual.
How do I work according to a knitting diagram?
The diagram depicts all rows/rounds, and every stitch seen from the right side. It is read from bottom to top, from right to left. 1 square = 1 stitch.
When working back and forth, every other row is worked from the right side and every other row is worked from the wrong side. When working from the wrong side, the diagram will have to be worked reversed: from left to right, knit stitches are purled, purl stitches are knit etc.
When working in the round every round is worked from the right side and the diagram are worked from right to left on all rounds.
See DROPS lesson: How to read knitting diagrams
How do I work according to a crochet diagram?
The diagram depicts all rows/rounds, and every stitch seen from the right side. It is worked from bottom to top, from right to left.
When working back and forth every other row is worked from the right side: from right to left and every other row is worked from the wrong side: from left to right.
When working in the round, every row in the diagram are worked from the right side, from right to left.
When working a circular diagram you start in the middle and work your way outwards, counter clockwise, row by row.
The rows usually start with a given number of chain stitches (equivalent to the height of the following stitch), this will either be depicted in the diagram or explained in the pattern.
See DROPS lesson: How to read crochet diagrams
How do I work several diagrams simultaneously on the same row/round?
Instructions for working several diagrams after each other on the same row/round, will often be written like so: “work A.1, A.2, A.3 a total of 0-0-2-3-4 times". This means you work A.1 once, then A.2 is worked once, and A.3 is repeated (in width) the number of times provided for your size – in this case like so: S = 0 times, M = 0 times, L=2 times, XL= 3 times and XXL = 4 times.
The diagrams are worked as usual: begin with the first row in A.1, then work the first row in A.2 etc.
See DROPS lesson: How to read knitting diagrams
See DROPS lesson: How to read crochet diagrams
Why are the sleeves shorter in larger sizes?
The total width of the garment (from wrist-to-wrist) will be larger in the larger sizes, despite the actual sleeves being shorter. The larger sizes have longer sleeve caps and wider shoulders, so there will be a good fit in all sizes.
Where on the garment is the length measured?
The measurement sketch/schematic drawing provides information regarding the full length of the garment. If it’s a jumper or a jacket the length is measured from the highest point on the shoulder closest to the neckline, and straight down to the bottom of the garment. It is NOT measured from the tip of shoulder. Similarly, the length of yoke is measured from the highest point on the shoulder and down to where yoke is split into body and sleeves.
On a jacket measures are never taken along bands, unless specifically stated. Always measure inside band stitches when measuring the length.
See DROPS lesson: How to read a schematic drawing
What is a repeat?
Diagrams are often repeated on the round or in height. 1 repeat is the diagram the way it appears in the pattern. If it says to work 5 repeats of A.1 in the round, then you work A.1 a total of 5 times after/next to each other in the round. If it says to work 2 repeats of A.1 vertically/in height you work the entire diagram once, then begin again at the start and work the entire diagram one more time.
Why does the piece start with more chain stitches than it’s worked with?
Chain stitches are slightly narrower than other stitches and to avoid working the cast-on edge too tight, we simply chain more stitches to begin with. The stitch count will be adjusted on the following row to fit the pattern and measurement sketch.
Why increase before the rib edge when the piece is worked top-down?
The rib edge is more elastic and will contract slightly compared to, for example, stocking stitch. By increasing before the rib edge, you avoid a visible difference in width between the rib edge and the rest of the body.
Why increase in the cast-off edge?
It’s very easy to cast off too tightly, and by making yarn overs while casting off (and simultaneously casting these off) you avoid a too tight cast off edge.
See DROPS video: How to bind off with yarn overs (yo)
How do I increase/decrease on every 3rd and 4th row/round alternately?
To achieve an even increase (or decrease) you can increase on, for example: every 3rd and 4th row alternately, like so: work 2 rows and increase on the 3rd row, work 3 rows and increase on the 4th. Repeat this until the increase is complete.
See DROPS lesson: Increase or decrease 1 st on every 3rd and 4th row alternately
How can I work a jacket in the round instead of back and forth?
Should you prefer to work in the round instead of back and forth, you may of course adjust the pattern. You’ll need to add steeks mid-front (usually 5 stitches), and follow the instructions. When you would normally turn and work from the wrong side, simply work across the steek and continue in the round. At the end you’ll cut the piece open, pick up stitches to work bands, and cover the cut edges.
See DROPS video: How to knit steeks and cut open
Can I work a jumper back and forth instead of in the round?
Should you prefer to work back and forth instead of in the round, you may of course adjust the pattern so you work the pieces separately and then assemble them at the end. Divide the stitches for the body in 2, add 1 edge stitch in each side (for sewing) and work the front and back pieces separately.
See DROPS lesson: Can I adapt a pattern for circular needles into straight needles?
Why is the pattern slightly different than what I see in the photo?
Pattern repeats can vary slightly in the different sizes, in order to get the correct proportions. If you’re not working the exact same size as the garment in the photo, yours might deviate slightly. This has been carefully developed and adjusted so that the complete impression of the garment is the same in all sizes.
Make sure to follow instructions and diagrams for your size!
How do I make a women’s size garment into a men’s size one?
If you have found a pattern you like which is available in women’s size it’s not very difficult to convert it to men’s size. The biggest difference will be the length of sleeves and body. Start working on the women size that you think would fit across the chest. The additional length will be worked right before you cast off for the armhole/sleeve cap. If the pattern is worked top-down you can add the length right after the armhole or before the first decrease on sleeve.
Regarding additional yarn amount, this will depend on how much length you add, but it is better with a skein too many than too few.
How do I prevent a hairy garment from shedding?
All yarns will have excess fibres (from production) that might come off as lint or shedding. Brushed yarns (ie hairier yarns) have more of these loose, excess fibres, causing more shedding.
Shedding also depends on what is worn under or over the garment, and whether this pulls at the yarn fibres. It’s therefore not possible to guarantee that there will be no shedding
Below are some tips on how to get the best result when working with hairier yarns:
1. When the garment is finished (before you wash it) shake it vigorously so the looser hairs come off. NOTE: do NOT use a lint roller, brush or any method that pulls at the yarn.
2. Place the garment in a plastic bag and put it in your freezer - the temperature will cause the fibres to become less attached to each other, and excess fibres will come off easier.
3. Leave in the freezer for a few hours before taking it out and shaking it again.
4. Wash the garment according to the instructions on the yarn label.
Why does my garment pill?
Pilling is a natural process that happens to even the most exclusive of fibers. It's a natural sign of wear and tear that is hard to avoid, and that is most visible in high friction areas of your garment like a sweater's arms and cuffs.
You can make your garment look as new by removing the pilling, using a fabric comb or a pill/lint remover.
Arendal |
|||||||||||||||||||
|
|
||||||||||||||||||
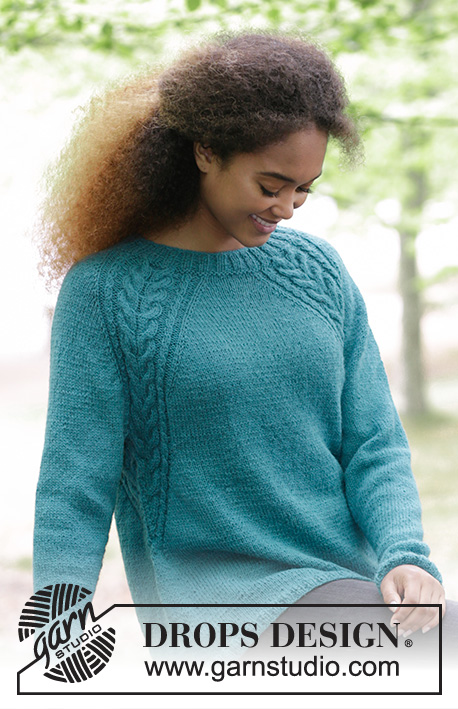
Knitted jumper with cables and raglan, worked top down. Sizes S - XXXL. The piece is worked in DROPS Puna.
DROPS 181-7 |
|||||||||||||||||||
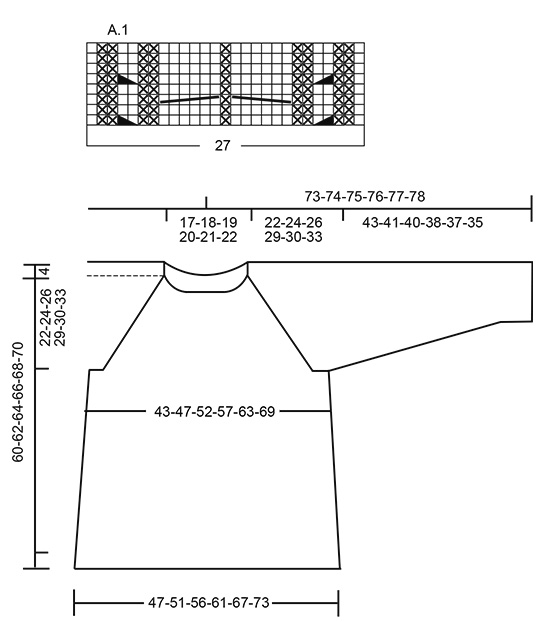
INFORMATION FOR THE PATTERN: RIDGE/GARTER STITCH (worked in the round): 1 ridge = 2 rounds. Knit 1 round and purl 1 round. PATTERN: See diagram A.1. The diagram shows all the rows in the pattern seen from the right side. RAGLAN: Increase to raglan on each side of A.1. Increase 1 stitch on each side of A.1 as follows (= 8 new stitches each time you increase). Work to A.1, 1 yarn over, work A.1, 1 yarn over. On the next round knit the yarn overs twisted to prevent holes. INCREASE TIP (for the sides): Work until there are 2 stitches left before the marker thread in the side. Make 1 yarn over, knit 2 stitches (the marker thread sits between these) and make 1 yarn over. On the next round, knit the yarn overs twisted to prevent holes. DECREASE TIP (for the sleeves): Decrease 1 stitch on each side of the marker thread as follows: Work until there are 3 stitches left before the marker thread, slip 1 stitch as if to knit, knit 1, pass the slipped stitch over, knit 2 stitches (the marker thread sits between these stitches), knit the next 2 stitches together. ---------------------------------------------------------- The jumper is worked in the round with circular needle, from mid back and top down. JUMPER: Cast on 112-120-124-128-136-136 stitches with circular needle size 4 mm and Puna. Knit 1 round, then work rib, knit 2/ purl 2. Continue with rib in this way for 4 cm. Change to circular needle size 4.5 mm. Work 1 RIDGE – see description above, on the first round, decrease 4 stitches evenly on round = 108-116-120-124-132-132 stitches. Continue working as follows: Knit 11-12-13-15-16-18, *1 yarn over, knit 1 *, repeat from *-* a total of 3 times, knit 1, * 1 yarn over, knit 1 *, repeat from *-* a total of 3 times (= these 7 stitches become 13 stitches), knit 18-20-20-18-20-16, *1 yarn over, knit 1 *, repeat from *-* a total of 3 times, knit 1, * 1 yarn over, knit 1 *, repeat from *-* a total of 3 times, knit 22-24-26-30-32-36, * 1 yarn over, knit 1 *, repeat from *-* a total of 3 times, knit 1, * 1 yarn over, knit 1 *, repeat from *-* a total of 3 times, knit 18-20-20-18-20-16, *1 yarn over, knit 1 *, repeat from *-* a total of 3 times, knit 1, * 1 yarn over, knit 1 *, repeat from *-* a total of 3 times and knit 11-12-13-15-16-18 = 132-140-144-148-156-156 stitches. Knit 1 round, the yarn overs are knitted twisted to prevent holes. Continue working as follows: Knit 4-5-6-8-9-11 (= half back piece), A.1 (= 27 stitches), knit 4-6-6-4-6-2 (=sleeve), A.1, knit 8-10-12-16-18-22 (= front piece), A1, knit 4-6-6-4-6-2 (= sleeve), A.1, knit 4-5-6-8-9-11 (= half back piece). READ THE WHOLE OF THE NEXT SECTION BEFORE CONTINUING! Continue this pattern, at the same time increase on each side of A.1 to RAGLAN – see description above. Increase every 2nd round 21-24-27-30-32-35 times. REMEMBER THE KNITTING TENSION! After all the increases, there are 300-332-360-388-412-436 stitches on the needle. Continue the pattern as before (without increases) until the piece measures 22-24-26-29-30-33 cm from the cast-on edge mid front. The next round is worked as follows: Work 45-49-53-58-63-68 stitches (= half back piece), place the next 60-68-74-78-80-82 stitches on 1 thread (= sleeve), cast on 8-8-10-10-12-14 new stitches on the needle (= under the sleeve), work 90-98-106-116-126-136 stitches (= front piece), place the next 60-68-74-78-80-82 stitches on 1 thread (= sleeve), cast on 8-8-10-10-12-14 new stitches on the needle (= under the sleeve) and work the remaining 45-49-53-58-63-68 stitches (= half back piece). BODY: = 196-212-232-252-276-300 stitches. THE PIECE IS NOW MEASURED FROM HERE! Insert a marker thread in each side, in the middle of the new stitches that where cast on. Continue A.1 over the 20-20-20-20-22-22 stitches in the pattern which remain on the front and back piece, but on every 2nd round, make 1 yarn over on the outside of each A.1 (= towards mid front and mid back) and knit 2 stitches together on each side of marker thread in the side. The yarn overs are knitted twisted on the next round. The number of stitches is the same, but the stitches in A.1 will gradually be decreased towards the sides of the jumper and there will be more and more stitches in stocking stitch. When there are not enough stitches in A.1 to work 6-stitch cables, work these stitches in stocking stitch, AT THE SAME TIME as you decrease 3 stitches evenly over the cable, do not decrease over the cables with 2 stitches (remember to increase on the outsides of A.1 and decrease on each side of the marker threads). When all of A.1 has been decreased there are 172-188-208-228-252-276 stitches on the round. Continue with stocking stitch. When the piece measures 15-15-15-15-15-15 cm increase 1 stitch on each side of the marker threads (= 4 stitches increased) – READ INCREASE TIP! Increase every 5 cm a total of 4 times = 188-204-224-244-268-292 stitches. When the piece measures 34-34-34-34-34-34 cm increase 40-44-48-52-56-60 stitches evenly on round = 228-248-272-296-324-352 stitches. Change to circular needle size 4 mm. Work rib, knit 2/ purl 2. Work rib for 2 cm, cast off with knit over knit and purl over purl. The jumper measures approx. 60-62-64-66-68-70 cm from the shoulder. SLEEVE: The piece is worked in the round with circular needle/double pointed needles. Place the 60-68-74-78-80-82 stitches from the thread in the one side of the piece on a short circular needle size 4.5 mm. In addition, cast on 8-8-10-10-12-14 new stitches mid under the sleeve = 68-76-84-88-92-96 stitches on the needle. Insert a marker thread in the middle of these new stitches – The piece is now measured from here! Work stocking stitch in the round. When the piece measures 2-2-2-2-2-4 cm decrease 2 stitches mid under the sleeve – READ DECREASE TIP. Decrease every 3-2-1½ -1½-1½-1 cm a total of 12-15-18-19-20-21 times = 44-46-48-50-52-54 stitches. When the sleeve measures 38-36-35-33-32-30 cm increase 4-6-8-6-8-10 stitches evenly on round = 48-52-56-56-60-64 stitches. Change to double pointed needles size 4 mm and work rib, knit 2/ purl 2 over all stitches. Cast off when the sleeve measures 43-41-40-38-37-35 cm. Work the other sleeve in the same way. ASSEMBLY: Sew the openings under the sleeves. |
|||||||||||||||||||
Diagram explanations |
|||||||||||||||||||
|
|||||||||||||||||||
Have you made this or any other of our designs? Tag your pictures in social media with #dropsdesign so we can see them! Do you need help with this pattern?You'll find tutorial videos, a Comments/Questions area and more by visiting the pattern on garnstudio.com. © 1982-2024 DROPS Design A/S. We reserve all rights. This document, including all its sub-sections, has copyrights. Read more about what you can do with our patterns at the bottom of each pattern on our site. |
With over 40 years in knitting and crochet design, DROPS Design offers one of the most extensive collections of free patterns on the internet - translated to 17 languages. As of today we count 304 catalogues and 11422 patterns - 11422 of which are translated into English (UK/cm).
We work hard to bring you the best knitting and crochet have to offer, inspiration and advice as well as great quality yarns at incredible prices! Would you like to use our patterns for other than personal use? You can read what you are allowed to do in the Copyright text at the bottom of all our patterns. Happy crafting!
Comments / Questions (97)
Manon wrote:
Question sur model 181-7 Pour le debut du le raglan, on dit de faire aug.au 2 rangs et continuer ensuite sans aug. On doit continuer le model a artir de quel point svp ? Merci d'apporter les precision section pull
25.06.2021 - 07:07DROPS Design answered:
Bonjour Manon, vous continuer à tricoter les mailles comme avant: en jersey et en suivant les diagrammes A.1. Bon tricot!
25.06.2021 - 07:29Adrienne wrote:
Just to confirm your suggestion - in order to decrease 24 across the 6-stitch cable - you recommend take out the rounds I have knit - back to almost the underarm cast ons. I assume I will decrease 3 (knit 2 together x3) across the 6-stitch cable when the next round will not allow this. This will be done on the section closest to the underarm marker? Then later on, I will decrease the remaining 12 stitches when the cable section closest to the center front-back has 6 stitches left?
20.04.2021 - 00:56DROPS Design answered:
Dear Adrienne, when there are not enough stitches to work the cable in A.1 mid under arm, decrease by K2 tog across each of the 6-sts-cable (= 4 repeats, 2 cables, 3 sts decreased in each cable= 24 sts decreased). Then work these remaining stitches in stocking stitch and continue decrease/increase as before until all stitches A.1 have been decreased, then work stocking stitch over all stitches. Happy knitting!
20.04.2021 - 07:31Adrienne wrote:
My question re Body - dec 3 st across 6 st cable - I have gone beyond this point. 14 rounds. Should I take out these 14 rounds and then knit two together 3 times for each 6-st cable or continue as I am going on 196 stitches. (I am at the point where I have: yo {A.1: K1; P2; K1; K2tog; MARKER; K2tog; K1; P2; K1} yo.....What should I do now?
18.04.2021 - 15:30DROPS Design answered:
Dear Adrienne, the pattern says, that when you don't have anough stitches to knit the full cable, knit decrease those stitches. If you gone beyond this point it is best to frog back to this point, otherwise the piece will be somewhat wider, than it should be, and it will fan out whene you stipped the cables. If that change does not bother you, leave it as it is, and continue, but do not forget to account for those extra stitches. Happy Knitting!
18.04.2021 - 22:22Adrienne wrote:
Is there a way to see all the comments translated into English or the sender's language? I'm sure you are answering the same questions in multiple languages!? Thanks!
18.04.2021 - 14:07DROPS Design answered:
Dear Adrienne, we deal with many hundreds of questions each month, and it would be quite impossible to translate each of them to all the languages our site is available in. Happy Knitting!
18.04.2021 - 14:36Adrienne wrote:
BODY: dec 3 at same time as dec either side of underarm marker and inc (yo) before and after A.1. I am confused as to when I needed to decrease 3 and exactly HOW to decrease the 3 st. I am 14 rounds beyond the round where I didn't have enough st for a 6-st cable. Should I take out these rounds? Exactly when was I supposed to decrease the 3 st and exactly HOW do I do this? What would happen if I just continued with 196 stitches?
18.04.2021 - 14:05DROPS Design answered:
Dear Adrienne, the decreases are don, because a cabled pattern pullsin the knitted fabric. The decreases are done to balance this pulling in effect and if yo contibued without decreases, the piece would "fan out" and distort the final shape. The decrease can be done, by knitting 2 stitches together, enevly on the stitches of the cable pattern. Happy Knitting!
18.04.2021 - 14:33Claudine wrote:
Bonjour, Dos & Devant grandeur large nous avons 232 mailles. Lorsque sommes rendu à diminuer dans les torsades de 6 mailles (donc 3 mailles/torsade) 4 fois pour un total de 12 mailles et nous répétons encore une fois rendu au 2e groupe de torsades de 6 mailles pour un total de 24 mailles. Il est indiqué que nous devons avoir 208 mailles mais vous ne tenez pas compte,peiner qu'on a quand même augmenter avant et après A1. Donc dim. 12 mailles et aug. 4 mailles (2fois) 232-24+8=216
01.04.2021 - 01:37DROPS Design answered:
Bonjour Claudine, vous n'avez pas augmenté le nombre de mailles, vous avez décalé les motifs au milieu sous la manche (on fait bien 4 jetés mais on diminue 4 m de chaque côté du fil marqueur sur les côtés, au même tour), d'où probablement votre différence de mailles. Bon tricot!
06.04.2021 - 11:16Светлана wrote:
Очень простая и красивая модель! Буду вязать!
31.03.2021 - 14:28Roselyne wrote:
Je n'arrive pas à lire la liaison entre la fin de la page 3 et le début de la page 4, la coupure entre les deux pages est illisible pour moi, pourriez-vous me donner la ligne manquante ? merci de votre réponse
01.03.2021 - 13:37DROPS Design answered:
Bonjour Roselyne, vous devriez pouvoir retrouver ce texte manquant dans la version en ligne, n'étant pas certaine de l'endroit précis concerné, je vous invite à vérifier la version affichée sur le site, vous serez ainsi davantage sûre de retrouver la partie qui vous manque. Bon tricot!
01.03.2021 - 13:40Ella wrote:
I really don't understand what is meant by "Continue A.1 over the 20-20-20-20-22-22 stitches in the pattern which remain on the front and back piece". There are 27 stitches in A.1. And what is meant by "Which remain on the front and back piece"?
19.02.2021 - 22:56DROPS Design answered:
Dear Ella, when dividing piece for sleeves there are some stitches for the raglan that still belong to the body, these stitches are worked following A.1 as before - this means you have either 20 or 22 (see size) in the pattern from yoke. Hope this helps. Happy knitting!
22.02.2021 - 07:31Lara wrote:
Buongiorno, un’altra domanda: nel davanti e dietro le 2 maglie insieme a diritto da ciascun lato del segno ai lati, si fa al centro delle nuove maglie per la manica? Grazie mille!
13.02.2021 - 13:27DROPS Design answered:
Buonasera Lara, le 2 maglie insieme a diritto vanno lavorate a livello dei segnapunti ai lati. Buon lavoro!
13.02.2021 - 18:59