
Popular categories
Looking for a yarn?


Comments / Questions (22)
![]() Martine Lind Krebs wrote:
Martine Lind Krebs wrote:
Der er altså noget galt med denne opskrift. Prøv lige at regne efter. Jeg strikker str. 7-8. Jeg skal begynde indtagninger ved 13 cm. Herefter skal jeg tage ind yderligere 6 gange på hver 6. cm. Dvs at arbejdet nu er 13 + (6x6) =49 cm. Men hulraden skal være ved 45 cm. Jeg vil også vove at påstå, at man ikke kan tage 75 m ind på en pind, når man ikke skal tage ind over omslagene. Ikke med mindre man strikker 3 m sammen. Ellers en fin kjole. Martine
15.07.2025 - 22:21
![]() Merli Špitsmeister wrote:
Merli Špitsmeister wrote:
Hello! I don´t understand how the dress is connected at the back, as it is knitted not around but back and forth and also the buttons are only for visual effect
24.05.2025 - 13:57DROPS Design answered:
Dear Merli, the dress is closed with the buttons; there is a buttonband and you work buttonholes all along the back, so you should be able to use the buttons. However, once closed, you may not need to open and close the dress at different times; you can keep the dress buttoned and simply slip into it to wear it. In this case, the buttons would be decorative. However, you can also open and close it at will, with the buttons and they wouldn't be just decorative. In that case, the silk ribbon would have to be used differently. Happy knitting!
25.05.2025 - 19:01
![]() Elva Borg Meldal wrote:
Elva Borg Meldal wrote:
Góðan daginn, ég er búin með fyrstu umferð af úrtökum og útaukningu (-6+6), frá byrjun til enda og allt stemmdi. Nú í annarri umferð þá er ég með 4 í byrjun og í enda. Hvernig er næsta umferð prjónuð með tilliti til þessara 4. í byrjun og í enda? Bestu kveðjur Elva Borg Meldal
05.04.2024 - 19:15DROPS Design answered:
Blessuð Elva. Þú ert alltaf með 5 lykkjur garðaprjón í hvorri hlið allan tímann = 10 lykkjur. Setur 2 merkiþræði í stykkið og telur ekki kantlykkjur með 46-48-50-52-54-56 lykkjur inn frá hvorri hlið ( framstykki = 82-86-90-94-98-102 lykkjur). Þegar stykkið mælist 13 cm er fækkað um 1 lykkju hvoru megin við merkiþræðina (= 4 lykkjur færri). Endurtakið úrtöku með 4-5-6-6½-7-7½ cm millibili 6 sinnum til viðbótar = alls 7 sinnum, þetta eru alls 28 lykkjur. Gangi þér vel.
06.04.2024 - 13:25
![]() Damarys wrote:
Damarys wrote:
En este tramo del canesu ( y, AL MISMO TIEMPO, disminuir 1 pt en el lado izquierdo de cada marcapuntos (= 9 pts disminuidos). Repetir las disminuciones a cada 4ª hilera 11-12-13-14-15-16 veces más, disminuir alternadamente en el lado derecho y en el lado izquierdo de los marcapuntos (= 12-13-14-15-16-17 veces en total) = 102-107-110-115-120-123 pts) No entiendo si además de las primeras 11 disminuciones tengo que realizar otras 12. Podría aclarármelo por favor. Gracias.
23.12.2023 - 12:00DROPS Design answered:
Hola Damarys, quiere decir que has hecho la disminución 1 vez (cuando se ha explicado entera) y luego has repetido 11 veces más. Por lo tanto, en total has disminuido 1 +11 = 12 veces.
28.12.2023 - 19:09
![]() A-S Steffie Östlund wrote:
A-S Steffie Östlund wrote:
Hur ska armarna stickas in i mönstret. Får ej till det?
21.04.2022 - 20:50DROPS Design answered:
Hej, her ser du hvordan du strikker ærmerne ind på samme rundpind, så du får en rundt bærestykke: sæt ærmet ind på samme rundpind
22.04.2022 - 10:13
![]() Tanja wrote:
Tanja wrote:
Ich bin gerade mit den 8 Musterfolgen fertig und hänge bei den ersten Abnahmen fest. Wenn ich über den Bereichen mit Umschlägen nicht abnehmen darf, komme ich auf höchstens 41 möglichen Abnahmen in einer Reihe. Zwischen den einzelnen Mustern kann ich gerade mal aus 6 Maschen 3 Maschen machen und an jeweiligen Ende nochmal 2 Maschen. Das macht bei 14 Musterfolgen 13x 3 Maschen + 2 Maschen = 41 Maschen. Wie soll ich auf 74 Abnahmen kommen? Danke schon jetzt für eine Antwort.
01.05.2021 - 10:44DROPS Design answered:
Liebe Tanja, stricken Sie 2 M re zs über die Abanhmen von A.1 (nicht über die mittleren Maschen, wo es die Umschläge gibt), z.B. können Sie 5 Maschen in je 10 Rapporte von A.1 und 6 Maschen in je 4 Rapporte von A.1 abnehmen = 5 + (17-5 x 10) + (17-6 x4) + 5) = 174 Maschen. Viel Spaß beim stricken!
03.05.2021 - 10:02
![]() Anja wrote:
Anja wrote:
Hallo! Meine Frage ist eigentlich eine allgemeine. Sind die Maßangaben bei den Schemazeichnungen in cm? Und sind diese einfach genommen? Die Angabe "40" bei der Brust bedeutet die, 40 cm flach - also 80 cm umfang?
06.02.2021 - 21:59DROPS Design answered:
Liebe Anja, alle Maßangaben in der Skizze sind in cm und flach gemessen - hier lesen Sie mehr über die Maßskizze. Viel Spaß beim stricken!
08.02.2021 - 08:53
![]() Letizia wrote:
Letizia wrote:
Salve, nella parte davanti e dietro dopo il motivo a onde nel primo ferro a maglia rasata bisogna diminuire in modo uniforme 74 maglie , facendo attenzione a non diminuire dove ci sono i gettati. Io non riesco a diminuire in modo uguale solo su un ferro. Posso farlo su più Ferri?
21.01.2021 - 07:52DROPS Design answered:
Buonasera Letizia, può provare a diminuire sulle diminuzioni di A.1. Buon lavoro!
21.01.2021 - 20:16
![]() Sonia Graff wrote:
Sonia Graff wrote:
Bonjour,empiecement:une maille à gauche de chaque marqueur,soit 9 diminutions , 15 fois au total ,alternativement à droite et à gauche des marqueurs tous les 4 rangs . est ce à dire 1er rang une diminution à gauche du marqueur puis ,4em rang une diminution à droite du marqueur ou sur le meme rang diminuer 1 fois à gauche au premier marqueur et une fois à droite du marqueur suivant et cela tous les quatre rangs merci
29.07.2020 - 13:06DROPS Design answered:
Bonjour Mme Graff, on diminue 9 mailles à chaque tour de diminutions, autrement dit la 1ère fois, on diminue à gauche de chaque marqueur (=après chaque marqueur), la fois suivante à droite (= avant chaque marqueur) et on continue ainsi. Bon tricot!
29.07.2020 - 17:07
![]() Nanna Tamara Jensen wrote:
Nanna Tamara Jensen wrote:
Jeg vil så gerne strikke denne , men kan simpelthen ikke regne opskriften ud. Strikkes underdelen slet ikke rundt på rundpinden og kun frem og tilbage? Er der så knapper bagpå hele vejen nedefra og op? Kunne virkelig godt bruge et billede eller en tegning af hvordan det skal fungere...på forhånd tak
21.05.2020 - 21:42DROPS Design answered:
Hej Nanna, Ja det stemmer, du strikker den frem og tilbage og knappekanten er midt bagpå :)
22.05.2020 - 14:38
|
||||||||||||||||
Bright Smile#brightsmiledress |
||||||||||||||||
 |
 |
|||||||||||||||
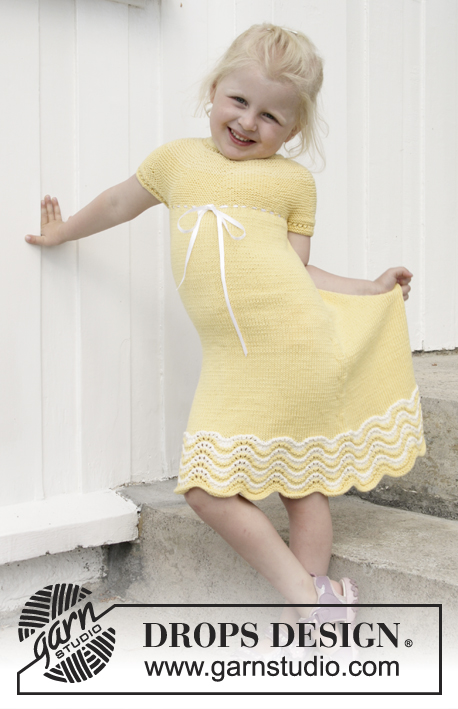
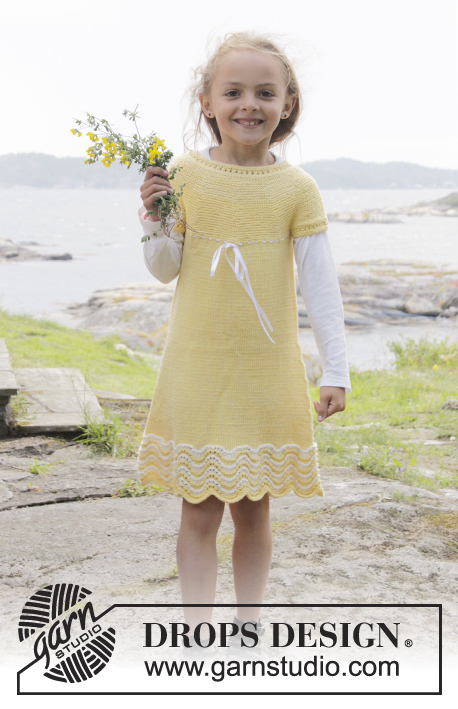
Knitted dress in garter st with wave pattern, round yoke and buttons in the back, in DROPS Cotton Merino. Size children 3 - 14 years
DROPS Children 28-1 |
||||||||||||||||
|
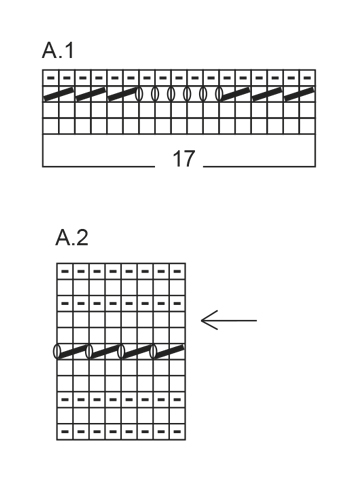
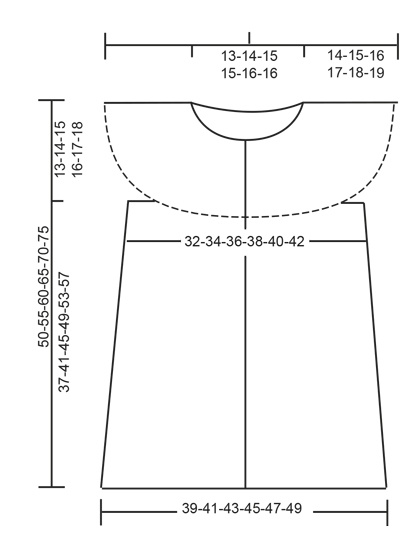
GARTER ST (back and forth): K all rows. 1 ridge = 2 rows K. PATTERN: See diagrams A.1 and A.2. The diagrams show all rows in pattern seen from RS. STRIPES: When working according to A.1 work stripes as follows: Switch colour every time A.1 has been worked 1 time vertically. 1st repetition of A.1: vanilla 2nd repetition of A.1: off white Repeat stripes 3 more times vertically (A.1 is worked 8 times in total vertically). DECREASE TIP: Dec in the sides, beg 3 sts before marker: K 2 tog, K 2 (marker is between these sts), slip 1 st as if to K, K 1, psso. BUTTONHOLES: Dec for buttonholes on right band (= mid back). 1 buttonhole = K tog third and fourth st from edge, 1 YO. Dec for buttonholes when piece measures: SIZE 3/4: 18, 23, 28, 33, 38, 43 and 48 cm SIZE 5/6: 18, 24, 30, 36, 42, 47 and 53 cm SIZE 7/8: 22, 28, 34, 40, 46, 52 and 58 cm SIZE 9/10: 20, 27, 34, 41, 48, 55 and 63 cm SIZE 11/12: 19, 26, 33, 40, 47, 54, 61 and 68 cm SIZE 13/14: 18, 26, 34, 42, 50, 58, 65 and 73 cm ---------------------------------------------------------- BODY: Worked back and forth on circular needle, button band is mid back. Cast on 248-248-265-265-282-299 sts on circular needle size 4 mm with vanilla. K 1 row from WS, K 1 row from RS and K 1 row from WS. Then work as follows from RS: 5 sts in GARTER ST - see explanation above, A.1 over the next 238-238-255-255-272-289 sts (= 14-14-15-15-16-17 repetitions of A.1), finish with 5 sts in garter st. Continue with A.1, garter st and STRIPES – see explanation above. 5 sts in garter st in each side are band and are worked in garter st until finished measurements. REMEMBER THE KNITTING TENSION When A.1 has been worked 8 times vertically, continue with vanilla and in stocking st (band in garter st), AT THE SAME TIME on first row with stocking st dec 74-66-75-67-76-85 sts evenly – NOTE! Make sure to dec over dec in A.1 and not over sts where there are YOs in A.1, and do not dec over bands = 174-182-190-198-206-214 sts. Insert 2 markers in the piece; 46-48-50-52-54-56 sts in from each side (front piece = 82-86-90-94-98-102 sts). When piece measures 13 cm, dec 1 st on each side of both markers (= 4 sts dec) - READ DECREASE TIP! Repeat dec every 4-5-6-6½-7-7½ cm 6 more times = 146-154-162-170-178-186 sts. When piece measures 37-41-45-49-53-57 cm, work next row as follows from RS: 5 sts in garter st, * K 2 tog, 1 YO *, repeat from *-* and finish with 5 sts in garter st. Work next row as follows from WS (P YOs to make holes): Work 36-38-40-42-44-46 sts as before (= right back piece), cast off 6 sts for armhole, work 62-66-70-74-78-82 sts as before (= front piece), cast off 6 sts for armhole and work the last 36-38-40-42-44-46 sts (= left back piece). Put piece aside and knit the sleeve edges. SLEEVE EDGE: Worked in the round on double pointed needles. Cast on 44-47-49-52-55-57 sts on double pointed needles size 3 mm with vanilla. Work A.2 (finish round with 0-1-1-0-1-1 st K when working YOs), on last round in diagram cast off 6 sts mid under sleeve = 38-41-43-46-49-51 sts remain on needle. Put piece aside and knit another sleeve edge. YOKE: Slip sleeve edges on to same circular needle as body where sts for armholes were cast off = 210-224-236-250-264-276 sts. Switch to circular needle size 3 mm. Insert 9 markers in piece as follows (without working): 1st marker after 21-24-26-25-28-30 sts, then insert 8 marker in piece 21-22-23-25-26-27 sts apart (after last marker 21-24-26-25-28-30 sts remain). Work in garter st over all sts, AT THE SAME TIME dec 1 st on left side of each marker (= 9 sts dec). Repeat dec every 4th row 11-12-13-14-15-16 more times, dec alternately on right and left side of markers (= 12-13-14-15-16-17 times in total) = 102-107-110-115-120-123 sts. After all dec are done work as follows - from RS: 5 sts in garter st, A.2, finish with 0-1-0-1-0-1 st K and 5 sts in garter st. On 8th round in A.2 (see arrow in diagram), dec 18 sts evenly = 84-89-92-97-102-105 sts. Finish A.2. Piece measures approx. 50-55-60-65-70-75 cm up to shoulder. ASSEMBLY: Sew the openings under the sleeves. Sew the buttons on to the left band. Thread silk ribbon up and down through the eyelet holes before yoke. Button band at the back is only for decoration but if the dress is unbuttoned the silk ribbon must be cut in two and fastened on each side of band. |
||||||||||||||||
Diagram explanations |
||||||||||||||||
|
||||||||||||||||
|
||||||||||||||||
|
||||||||||||||||
Have you finished this pattern?Tag your pictures with #dropspattern #brightsmiledress or submit them to the #dropsfan gallery. Do you need help with this pattern?You'll find 28 tutorial videos, a Comments/Questions area and more by visiting the pattern on garnstudio.com. © 1982-2025 DROPS Design A/S. We reserve all rights. This document, including all its sub-sections, has copyrights. Read more about what you can do with our patterns at the bottom of each pattern on our site. |
||||||||||||||||


With over 40 years in knitting and crochet design, DROPS Design offers one of the most extensive collections of free patterns on the internet - translated to 17 languages. As of today we count 314 catalogues and 11821 patterns translated into English (UK/cm).
We work hard to bring you the best knitting and crochet have to offer, inspiration and advice as well as great quality yarns at incredible prices! Would you like to use our patterns for other than personal use? You can read what you are allowed to do in the Copyright text at the bottom of all our patterns. Happy crafting!
Post a comment to pattern DROPS Children 28-1
We would love to hear what you have to say about this pattern!
If you want to leave a question, please make sure you select the correct category in the form below, to speed up the answering process. Required fields are marked *.