DROPS Melody
DROPS Melody
71% Alpaca, 25% Wool, 4% Polyamide
from 6.35 $ /50g
Get the yarn to make this pattern from 38.10$.

The yarn cost is calculated from the pattern’s smallest size and the yarn’s cheapest product type. Looking for an even better price? You might find it on the DROPS Deals!

DROPS SS24

Candied Almonds

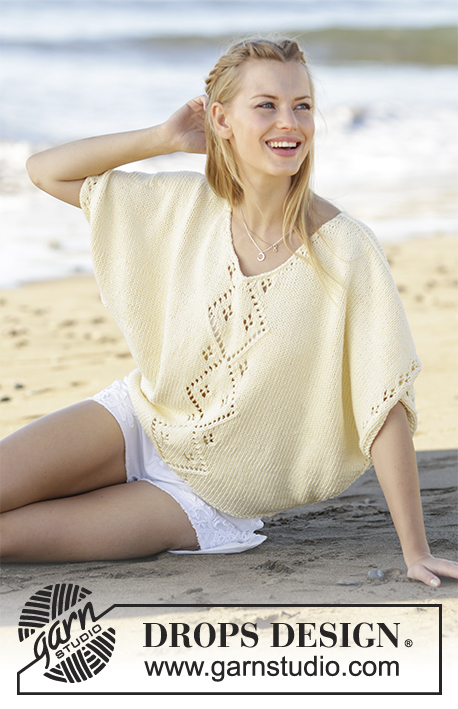
Knitted jumper with lace pattern and bobbles in DROPS Melody. Size: S - XXXL

DROPS 176-11
DROPS design: Pattern ml-022
Yarn group D or A + A + A
----------------------------------------------------------
Size: S - M - L - XL - XXL - XXXL
Materials:
DROPS MELODY from Garnstudio (belongs to yarn group D)
300-300-350-400-400-450 g color 06, powder pink

DROPS DOUBLE POINTED NEEDLES AND CIRCULAR NEEDLE (40 + 80 cm / 16" + 32") size 8 mm / US 11 – or size needed to get 12 stitches and 14 rows in stockinette stitch = width 10 cm / 4" and 10 cm / 4" vertically.
DROPS DOUBLE POINTED NEEDLES and CIRCULAR NEEDLE (40 + 80 cm / 16" + 32") size 7 mm / US 10.75 - for rib

-------------------------------------------------------

Alternative Yarn – See how to change yarns here
Yarn Groups A to F – Use the same pattern and change the yarn here
Yarn usage using an alternative yarn – Use our yarn converter here

-------------------------------------------------------

DROPS Melody
DROPS Melody
71% Alpaca, 25% Wool, 4% Polyamide
from 6.35 $ /50g
Get the yarn to make this pattern from 38.10$.

The yarn cost is calculated from the pattern’s smallest size and the yarn’s cheapest product type. Looking for an even better price? You might find it on the DROPS Deals!

Pattern instructions

NOTE: This pattern is written in American English. All measurements in charts are in cm. For conversion from inches to cm - click here. There are different terms for crocheting in American and British English. If this pattern includes crochet, click for "crochet terms" here. For this pattern in British English, please click here.
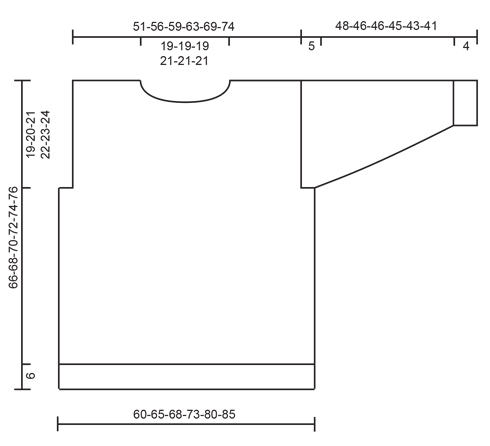
PATTERN:
See diagrams A.1 and A.2. Diagrams show all rows in pattern seen from the right side.

DECREASE TIP:
To calculate how to decrease evenly, use the total number of stitches on row (e.g. 175 stitches) and divide stitches by number of decreases to be done (e.g. 31) = 5.6. In this example work alternately approx. every 4th and 5th stitch and every 5th and 6th stitch together.

INCREASE TIP (applies to mid under sleeve):
Work until 1 stitch remain before marker thread, make 1 yarn over, knit 2 (marker thread is in the middle of these 2 stitches), make 1 yarn over (= 2 stitches increased). On next round knit yarn over twisted to avoid holes.
----------------------------------------------------------

JUMPER:
Worked in the round on circular needle up to armholes, then work front and back piece back and forth on circular needle until finished measurements. Work sleeves in the round on double pointed needles/a short circular needle.

BODY:
Cast on 175-190-200-210-230-245 stitches on circular needle size 7 mm / US 10.75 with Melody. Knit 1 round. Then work rib in the round = knit 1/ purl 4. When piece measures 6 cm / 2⅜", knit 1 round while at the same time decreasing 31-34-36-34-38-41 stitches evenly - READ DECREASE TIP= 144-156-164-176-192-204 stitches. Switch to circular needle size 8 mm / US 11. Insert 1 marker thread in first stitch on round and 1 marker thread in 73rd-79th-83rd-89th-97th-103rd stitch on round (= 71-77-81-87-95-101 stitches between stitches with marker threads on front and back piece). Work next round as follows:
Size: S + XXL: Work A.1 in the round (= 6-8 repetitions of 24 stitches).
Size: M + L + XL + XXXL: Work 3-5-8-3 stitches in stockinette stitch, A.1 over the next 72-72-72-96 stitches, A.2 (= 1 stitch), 5-9-15-5 stitches in stockinette stitch, A.1 over the next 72-72-72-96 stitches, A.2 (= 1 stitch), finish with 2-4-7-2 stitches in stockinette stitch.
Continue pattern like this. REMEMBER THE KNITTING GAUGE When piece measures approx. 47-48-49-50-51-52 cm / 18½"-19"-19¼"-19¾"-20"-20½" – adjust so that next round is a row with uneven number in diagram, bind off 11-11-11-13-13-13 stitches in each side for armholes (stitch with marker thread + 5-5-5-6-6-6 stitch on each side of this). Finish front and back piece separately.

BACK PIECE:
= 61-67-71-75-83-89 stitches. Begin from wrong side and continue pattern back and forth as before with 1 edge stitch in garter stitch in each side – work the stitches that do not fit the pattern in stockinette stitch. When piece measures 64-66-68-70-72-74 cm / 25¼"-26"-26¾"-27½"-28⅜"-29⅛", bind off the middle 19-19-19-21-21-21 stitches for neck and finish each shoulder separately. Bind off 2 stitches on next row from neck = 19-22-24-25-29-32 stitches remain on the shoulder. Work until 1 row remain before piece measures 66-68-70-72-74-76 cm / 26"-26¾"-27½"-28⅜"-29⅛"-30". Knit 1 row from wrong side and bind off by knitting from right side (it is important to avoid a tight bind-off edge). Work the other shoulder the same way.

FRONT PIECE:
= 61-67-71-75-83-89 stitches. Continue back and forth the same way as on back piece until piece measures 60-62-64-66-68-70 cm / 23⅝"-24⅜"-25¼"-26"-26¾"-27½". Now slip the middle 17-17-17-19-19-19 stitches on 1 stitch holder for neck and finish each shoulder separately. Continue to bind off for neck at beginning of every row from neck as follows: 2 stitches 1 time and 1 stitch 1 time = 19-22-24-25-29-32 stitches remain for shoulder. Work until 1 row remain before piece measures 66-68-70-72-74-76 cm / 26"-26¾"-27½"-28⅜"-29⅛"-30". Knit 1 row from wrong side and bind off by knitting from right side. Work the other shoulder the same way.

SLEEVE:
Cast on 30-30-30-30-35-35 stitches on double pointed needles size 7 mm / US 10.75 with Melody. Knit 1 round. Then work rib in the round = knit 1/ purl 4. When piece measures 4 cm / 1½", knit 1 round while at the same time decreasing 3-3-1-1-4-4 stitches evenly = 27-27-29-29-31-31 stitches. Switch to double pointed needles size 8 mm / US 11. Insert 1 marker thread at beginning of round (= mid under sleeve). Work next round as follows: 1-1-2-2-3-3 stitches in stockinette stitch, A.1 (= 24 stitches), A.2 (= 1 stitch), 1-1-2-2-3-3 stitches in stockinette stitch. Continue pattern like this. When piece measures 8-6-6-6-8-8 cm / 3"-2½"-2½"-2½"-3"-3", increase 2 stitches mid under sleeve - READ INCREASE TIP. Increase like this every 4-3½-3½-3-2½-2 cm / 1½"-1¼"-1¼"-1⅛"-⅞"-¾" 9-10-10-11-12-13 times in total = 45-47-49-51-55-57 stitches. Continue until piece measures approx. 43-41-41-40-38-36 cm / 17"-16"-16"-15¾"-15"-14¼" (shorter measurements in the larger sizes because of wider shoulders) - adjust so that next row is an even numbered row in diagram. Insert 1 marker in the piece. Begin from wrong side and continue pattern back and forth on circular needle from mid under sleeve. When piece measures 4 cm / 1½" from marker, work 2 rows while binding off 5 stitches at beginning of every row. Bind off the remaining stitches. Piece measures approx. 48-46-46-45-43-41 cm / 19"-18"-18"-17¾"-17"-16" from top and down. Make another sleeve the same way.

ASSEMBLY:
Sew shoulder seams inside bind-off edge so that there are 2 ridges on top of shoulder. Sew in sleeves inside 1 edge stitch in garter stitch - marker mid under sleeve should fit armhole.

NECK EDGE:
Pick up from right side approx. 56 to 62 stitches around the neck (including stitches on stitch holder at the front) on a short circular needle size 7 mm / US 10.75. Purl 1 round, knit 1 round, purl 1 round, knit 1 round and purl 1 round. Then LOOSELY bind off by knitting.

Diagram

All measurements in charts are in cm.

symbols = knit from the right side, purl from the wrong side
symbols = purl from the right side, knit from the wrong side
symbols = between 2 stitches make 1 yarn over
symbols = from right side: Purl 2 together
symbols = BOBBLE: Knit 1 in front and back loop of same stitch until there are 4 stitches, turn and purl 1 row from wrong side over these 4 stitches, turn and knit 1 row from right side. Use left needle and pass second stitch on right needle over first stitch and off the needle, pass third stitch over first stitch and then fourth stitch over first stitch (= 1 stitch remains)
diagram
diagram

Each of our patterns has specific tutorial videos to help you.

Do you have a question? See a list of frequently asked questions (FAQ)

Knitting tension is what determines the final measurements of your work, and is usually measured per 10 x 10 cm. It is provided like so: number of stitches in width x number of rows in height - eg: 19 stitches x 26 rows = 10 x 10 cm.

The knitting tension is very individual; some people knit/crochet loosely while others work tightly. You adjust the knitting tension with the needle size, which is why the suggested needle size only serve as a guide! You need to adjust this (up or down) to ensure that YOUR knitting tension matches the knitting tension provided in the pattern. If you work with a different knitting tension than provided you will have a different yarn consumption, and your work will have different measurements than what the pattern suggests.

The knitting tension also determines which yarns can replace each other. As long as you achieve the same knitting tension you can replace one yarn with another.

See DROPS lesson: How to measure your tension/gauge

See DROPS video: How to make a gauge tension swatch

The required amount of yarn is provided in grams, eg: 450 g. To calculate how many balls you’ll need you first need to know how many grams are in 1 ball (25g, 50g or 100g). This information is available if you click on the individual yarn quality on our pages. Divide the amount required with the amount of each ball. For example, if each ball is 50g (the most common amount), the calculation will be as follows: 450 / 50 = 9 balls.

The important thing when changing from one yarn to another is that the knitting/crochet tension remains the same. This is so that the measurements of the finished piece will be the same as on the sketch provided. It is easier to achieve the same knitting tension using yarns from the same yarn group. It is also possible to work with multiple strands of a thinner yarn to achieve the knitting tension of a thicker one. Please try our yarn converter. We recommend you to always work a test swatch.

Please NOTE: when changing yarn the garment might have a different look and feel to the garment in the photo, due to individual properties and qualities of each yarn.

See DROPS lesson: Can I use a different yarn than the one mentioned in the pattern?

All our yarns are categorised into yarn groups (from A to F) according to thickness and knitting tension – group A contains the thinnest yarns and group F the thickest. This makes it easier for you to find alternative yarns to our patterns, should you wish to switch yarn. All yarns within the same group have a similar knitting tension and can easily replace each other. However, different yarn qualities have different structures and properties which will give the finished work a unique look and feel.

Click here for an overview of the yarns in each yarn group

At the top of all our patterns you’ll find a link to our yarn converter, which is a helpful tool should you wish to use a different yarn than suggested. By filling in the yarn quality you wish to replace, the amount (in your size) and number of strands, the converter will present good alternative yarns with the same knitting tension. Additionally it will tell you how much you’ll require in the new qualities and whether you’ll need to work with multiple strands. Most skeins are 50g (some are 25g or 100g).

If the pattern is worked with multiple colours, every colour will have to be converted separately. Similarly, if the pattern is worked with several strands of different yarns (for example 1 strand Alpaca and 1 strand Kid-Silk) you will have to find alternatives for each, individually.

Click here to see our yarn converter

Since different yarns have different qualities and textures we have chosen to keep the original yarn in our patterns. However, you can easily find options among our available qualities by using our yarn converter, or simply pick a yarn from the same yarn group.

It is possible that some retailers still have discontinued yarns in stock, or that someone has a few skeins at home that they would like to find patterns for.

The yarn converter will provide both alternative yarn as well as required amount in the new quality.

If you think it's hard to decide what size to make, it can be a good idea to measure a garment you own already and like the size of. Then you can pick the size by comparing those measures with the ones available in the pattern's size chart.

You'll find the size chart at the bottom of the pattern.

See DROPS lesson: How to read size chart

The needle size provided in the pattern serves only as a guide, the important thing is to follow the knitting tension. And since knitting tension is very individual, you will have to adjust the needle size to ensure that YOUR tension is the same as in the pattern – maybe you’ll have to adjust 1, or even 2 needle sizes, up or down to achieve the correct tension. For this, we recommend that you work test swatches.

Should you work with a different knitting tension than the one provided, the measurements of the finished garment might deviate from the measurement sketch.

See DROPS lesson: How to measure your tension/gauge

See DROPS video: How to make a gauge tension swatch

Working a garment top-down provides more flexibility and room for personal adjustment. For example it is easier to try the garment on while working, as well as making adjustments to length of yoke and shoulder caps.

The instructions are carefully explaining every step, in the correct order. Diagrams are adjusted to the knitting direction and are worked as usual.

The diagram depicts all rows/rounds, and every stitch seen from the right side. It is read from bottom to top, from right to left. 1 square = 1 stitch.

When working back and forth, every other row is worked from the right side and every other row is worked from the wrong side. When working from the wrong side, the diagram will have to be worked reversed: from left to right, knit stitches are purled, purl stitches are knit etc.

When working in the round every round is worked from the right side and the diagram are worked from right to left on all rounds.

See DROPS lesson: How to read knitting diagrams

The diagram depicts all rows/rounds, and every stitch seen from the right side. It is worked from bottom to top, from right to left.

When working back and forth every other row is worked from the right side: from right to left and every other row is worked from the wrong side: from left to right.

When working in the round, every row in the diagram are worked from the right side, from right to left.

When working a circular diagram you start in the middle and work your way outwards, counter clockwise, row by row.

The rows usually start with a given number of chain stitches (equivalent to the height of the following stitch), this will either be depicted in the diagram or explained in the pattern.

See DROPS lesson: How to read crochet diagrams

Instructions for working several diagrams after each other on the same row/round, will often be written like so: “work A.1, A.2, A.3 a total of 0-0-2-3-4 times". This means you work A.1 once, then A.2 is worked once, and A.3 is repeated (in width) the number of times provided for your size – in this case like so: S = 0 times, M = 0 times, L=2 times, XL= 3 times and XXL = 4 times.

The diagrams are worked as usual: begin with the first row in A.1, then work the first row in A.2 etc.

See DROPS lesson: How to read knitting diagrams

See DROPS lesson: How to read crochet diagrams

The total width of the garment (from wrist-to-wrist) will be larger in the larger sizes, despite the actual sleeves being shorter. The larger sizes have longer sleeve caps and wider shoulders, so there will be a good fit in all sizes.

The measurement sketch/schematic drawing provides information regarding the full length of the garment. If it’s a jumper or a jacket the length is measured from the highest point on the shoulder (usually closest to the neckline), and straight down to the bottom of the garment. It is NOT measured from the tip of shoulder. Similarly, the length of yoke is measured from the highest point on the shoulder and down to where yoke is split into body and sleeves.

See DROPS lesson: How to read a schematic drawing

Diagrams are often repeated on the round or in height. 1 repeat is the diagram the way it appears in the pattern. If it says to work 5 repeats of A.1 in the round, then you work A.1 a total of 5 times after/next to each other in the round. If it says to work 2 repeats of A.1 vertically/in height you work the entire diagram once, then begin again at the start and work the entire diagram one more time.

Chain stitches are slightly narrower than other stitches and to avoid working the cast-on edge too tight, we simply chain more stitches to begin with. The stitch count will be adjusted on the following row to fit the pattern and measurement sketch.

The rib edge is more elastic and will contract slightly compared to, for example, stocking stitch. By increasing before the rib edge, you avoid a visible difference in width between the rib edge and the rest of the body.

It’s very easy to cast off too tightly, and by making yarn overs while casting off (and simultaneously casting these off) you avoid a too tight cast off edge.

See DROPS video: How to bind off with yarn overs (yo)

To achieve an even increase (or decrease) you can increase on, for example: every 3rd and 4th row alternately, like so: work 2 rows and increase on the 3rd row, work 3 rows and increase on the 4th. Repeat this until the increase is complete.

See DROPS lesson: Increase or decrease 1 st on every 3rd and 4th row alternately

Should you prefer to work in the round instead of back and forth, you may of course adjust the pattern. You’ll need to add steeks mid-front (usually 5 stitches), and follow the instructions. When you would normally turn and work from the wrong side, simply work across the steek and continue in the round. At the end you’ll cut the piece open, pick up stitches to work bands, and cover the cut edges.

See DROPS video: How to knit steeks and cut open

Should you prefer to work back and forth instead of in the round, you may of course adjust the pattern so you work the pieces separately and then assemble them at the end. Divide the stitches for the body in 2, add 1 edge stitch in each side (for sewing) and work the front and back pieces separately.

See DROPS lesson: Can I adapt a pattern for circular needles into straight needles?

Pattern repeats can vary slightly in the different sizes, in order to get the correct proportions. If you’re not working the exact same size as the garment in the photo, yours might deviate slightly. This has been carefully developed and adjusted so that the complete impression of the garment is the same in all sizes.

Make sure to follow instructions and diagrams for your size!

If you have found a pattern you like which is available in women’s size it’s not very difficult to convert it to men’s size. The biggest difference will be the length of sleeves and body. Start working on the women size that you think would fit across the chest. The additional length will be worked right before you cast off for the armhole/sleeve cap. If the pattern is worked top-down you can add the length right after the armhole or before the first decrease on sleeve.

Regarding additional yarn amount, this will depend on how much length you add, but it is better with a skein too many than too few.

All yarns will have excess fibres (from production) that might come off as lint or shedding. Brushed yarns (ie hairier yarns) have more of these loose, excess fibres, causing more shedding.

Shedding also depends on what is worn under or over the garment, and whether this pulls at the yarn fibres. It’s therefore not possible to guarantee that there will be no shedding

Below are some tips on how to get the best result when working with hairier yarns:

1. When the garment is finished (before you wash it) shake it vigorously so the looser hairs come off. NOTE: do NOT use a lint roller, brush or any method that pulls at the yarn.

2. Place the garment in a plastic bag and put it in your freezer - the temperature will cause the fibres to become less attached to each other, and excess fibres will come off easier.

3. Leave in the freezer for a few hours before taking it out and shaking it again.

4. Wash the garment according to the instructions on the yarn label.

Pilling is a natural process that happens to even the most exclusive of fibers. It's a natural sign of wear and tear that is hard to avoid, and that is most visible in high friction areas of your garment like a sweater's arms and cuffs.

You can make your garment look as new by removing the pilling, using a fabric comb or a pill/lint remover.

Still can't find the answer you need? Then scroll down and leave your question so one of our experts can try to help you. This will be done normally within 5 to 10 working days.
In the meantime, you can read the questions and answers that others have left to this pattern or join the DROPS Workshop on Facebook to get help from fellow knitters/crocheters!

You might also like...

Post a comment to pattern DROPS 176-11

We would love to hear what you have to say about this pattern!

If you want to leave a question, please make sure you select the correct category in the form below, to speed up the answering process. Required fields are marked *.

Comments / Questions (47)

country flag Caroline wrote:

Bonjour, J'ai fait ce pull aux aiguilles droites, les dimensions correspondent bien à la taille L mais il est vraiment très grand, par contre au lieu d'utiliser 7 pelotes comme indiqué, je n'en ai utilisé que 5... Je souhaiterais aussi faire un pull avec de l'alpaca et brushed alpaca silk tricotés ensemble, mais je ne trouve pas de modèle avec ces 2 laines. Merci pour votre réponse

15.01.2020 - 13:46

DROPS Design answered:

Bonjour Caroline, merci pour votre retour. Ce modèle est effectivement très large (classé parmi les "oversize"), comme le montrent les mesures du schéma. Pour un modèle à tricoter avec 1 fil Alpaca (groupe A) + 1 fil Brushed Alpaca Silk (groupe C), vous pouvez regarder les modèles du groupe D ou ceux à tricoter avec le même nombre de mailles qu'un groupe D, ex Snow Scents (= 1 fil Nord + 1 fil Brushed Alpaca Silk). Bon tricot!

15.01.2020 - 15:18

country flag Cilia wrote:

Sorry, niet goed gekeken het klopt toch.

06.01.2020 - 17:34

country flag Cilia wrote:

Hallo, ik ben dit patroon in mt M aan het breien en ik denk dat bij het lijf moet zijn: 3 steken tricot, A1 over de 72 volgende steken, A2 over 1 steek,5 steken tricot,72 steken A1, 1 steek A2 eindig met 2 steken tricot. Dan heb ik 156 steken en anders kom ik op 164 steken. Met vriendelijke groet , Cilia Snepvangers

03.01.2020 - 20:49

DROPS Design answered:

Dag Cilia,

In maat M zet je 190 steken op, dan brei je boordsteek en na de boordsteek minder je naar 156 steken. Je breit vervolgens over deze 156 steken: 3 steken tricot, A.1 over 72 steken, A.2 (= 1 steek) 5 steken tricot, A.1 over 72 steken, A.2 (1st) en 2 steken tricot.

08.01.2020 - 09:25

country flag Caroline wrote:

Merci, entretemps je suis tombée dessus, mais j'ai un soucis avec ce modèle vous dites qu'il faut diviser par 2 le nombre total de mailles dos/devant pour obtenir un dos ou un devant mais ici il faut monter entre 175 et 245 mailles suivant les tailles (ce qui me semble énorme pour ce numéro d'aiguilles) et quand on arrive aux explications du dos ou devant cela indique 61/89 mailles. Là, je ne comprends plus rien...

29.11.2019 - 08:46

DROPS Design answered:

Bonjour Caroline, pour le bas du pull, on a besoin de 175-245 m, on tricote ensuite en côtes (avec les aiguilles 7) ce qui va resserrer l'ouvrage. On doit ensuite diminuer 31-41 m = il ne reste plus que 144-204 m et on rabattra 11-13 m sur les côtés du pull pour les emmanchures = 61-89 m pour le devant et autant pour le dos. Bon tricot!

29.11.2019 - 08:50

country flag Caroline E wrote:

Bonsoir Peut on faire ce modèle aux aiguilles droites? Si oui comment ?

28.11.2019 - 23:25

DROPS Design answered:

Bonjour Caroline E, vous trouverez ici des informations utiles sur l'adaptation d'un modèle sur circulaire pour des aiguilles droites. Bon tricot!

29.11.2019 - 08:34

country flag Jeanette wrote:

Heisann 🙂 Det skal strikkes bobble i denna oppskriften men klarer ikke finne ut av hvor i rapporten bobble skal strikkes? Mangler det? Ser bobble skal strikkes i liten svart forkant men er bare store svart firkant i rapporten 🤔

09.10.2019 - 21:31

DROPS Design answered:

Hej Jeanette, firkanterne du ser i diagrammer = bobler ;)

10.10.2019 - 14:50

country flag Agneta wrote:

Måste denna tröja stickas på rundsticka? Tycker det är svårt. Kan man inte bara lägga till kantmaska?

18.03.2019 - 12:23

DROPS Design answered:

Hej. Det bör inte vara några problem att göra det, du kan läsa mer om detta här. Lycka till!

19.03.2019 - 10:42

country flag Maud wrote:

Bonjour, j’ai repéré une erreur dans le diagramme A1 au rang 45 après la jeté, c’est une end, une env et pas 2 end. Comme le rang 21.

26.01.2019 - 12:14

DROPS Design answered:

Bonjour Maud et merci, nos stylistes vont vérifier et corriger le diagramme. Bon tricot!

28.01.2019 - 12:55

country flag Katalin wrote:

Danke für die Antwort. Ich habe es geschafft, aber ich möchte hinzufügen , wenn jemand lange Arme hat wie ich, wird 43 cm nicht langen. Das ist viel zu kurz. Eigentlich stimmt das Bild auf der letzten Seite. 4 cm für Bündchen, 48 cm für die Ärmel, danach kommt 4 cm hin und zurück stricken und fertig. Die Beschreibung finde ich ziemlich verwirrend.

06.12.2018 - 16:36

country flag Katalin wrote:

Liebe Drops Design, Ich möchte nachfragen wie ich mit den Ärmel weiterstricken muss wenn ich 43 cm erreicht habe?! Soll ich die verbleibende Maschen halbieren und so hin und her weiterstricken, als ob die Ärmel Vor- und Rückseite hätten oder muss man alle 45 Maschen( bei Grösse S) auf Rundstricknadel behalten und in dieser Weise Hin-und Rückreihen noch in Höhe von 4 cm weiterstricken?! Danke füd die Antwort! Grüsse

04.12.2018 - 17:15

DROPS Design answered:

Liebe Katalin, wenn die Ärmel 43 cm misst (= nach einer ungeraden Zahl im Diagram anpassen), stricken Sie jetzt nich mehr in der Runde sondern Hin und Zurück, das heisst, am Ende der letzten ungerade Reihe, Wenden und jetzt hin und zurück stricken = die nächste gerade Zahl/Reihe von Diagram wird von der Rückseite über alle Maschen gestrickt, am Ende dieser Reihe, wenden Sie und die nächste Reihe über alle Maschen von der Vorderseite stricken. So weiter stricken, dh hin und zurück bis die Arbeit 4 cm von der Markierer stricken. Viel Spaß beim stricken!

05.12.2018 - 08:07