
Popular categories
Looking for a yarn?


|
|||||||||||||||||||
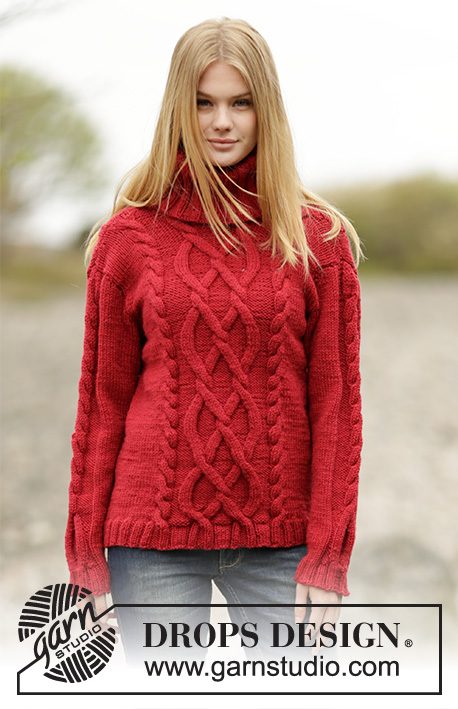
Winter Flame |
|||||||||||||||||||
 |
 |
||||||||||||||||||
Knitted DROPS jumper with cables and high collar in ”Alaska”.
DROPS 164-46 |
|||||||||||||||||||
|
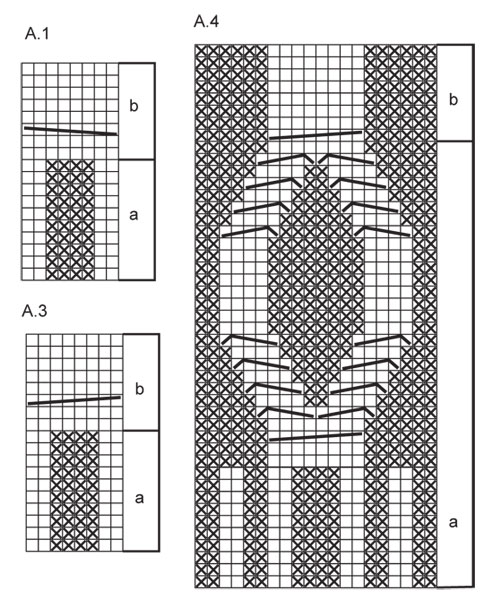
BODY: Worked in the round on circular needle. Cast on 180-196-212-228-252-268 sts on circular needle size 4.5 mm with Alaska. Beg round = side. Work as follows: Size S-M-L-XL: P 1, * K 2, P 2 *, repeat from *-* over the next 16-20-24-28 sts, A.3 a (= 8 sts), A.2 a (= 40 sts), A.1 a (= 8 sts), * P 2, K 2 *, repeat from *-* over the next 32-40-48-56 sts, P 2, A.3 a, A.2 a, A.1 a, * P 2, K 2 * over the next 16-20-24-28 sts, finish with P 1. Size XXL-XXXL: K 1, P 2, * K 2, P 2 *, repeat from *-* over the next 32-36 sts, A.3 a (= 8 sts), A.2 a (= 40 sts), A.1 a (= 8 sts), * P 2, K 2 *, repeat from *-* over the next 68-76 sts, P 2, A.3 a, A.2 a, A.1 a, * P 2, K 2 * over the next 32-36 sts, finish with P 2, K 1. When A.3 a, A.2 a and A.1 a have been worked 1 time vertically, work as follows (switch to circular needle size 5 mm): Stocking st over the first 17-21-25-29-35-39 sts, A.3 b, A.2 b, A.1 b, stocking st over the next 34-42-50-58-70-78 sts, A.3 b, A.2 b, A.1 b, stocking st over the last 17-21-25-29-35-39 sts. Continue pattern like this. REMEMBER THE KNITTING TENSION Insert 1 marker in each side; 1 at the beg of round and one after 90-98-106-114-126-134 sts (= sides). When piece measures 43-44-45-46-47-48 cm, cast off 3 sts on each side of each marker in each side, then finish front and back piece separately. BACK PIECE: = 84-92-100-108-120-128 sts. Continue pattern as before. Cast off for armholes at beg of every row in each side as follows: 3 sts 0-0-0-1-1-1 time, 2 sts 1-2-3-3-5-6 times and 1 sts 1-2-3-3-4-5 times = 78-80-82-84-86-88 sts. When piece measures 60-62-64-66-68-70 cm, dec 8 sts evenly over A.2, on next row cast off the middle 30 sts for neck and finish each shoulder separately. Continue to dec 1 st on next row from neck = 19-20-21-22-23-24 sts remain on the shoulder. When piece measures 61-63-65-67-69-71 cm, dec 4 sts evenly over A.1/A.3 = 15-16-17-18-19-20 sts remain on shoulder. Cast off when piece measures 62-64-66-68-70-72 cm. FRONT PIECE: Continue cast off and dec for armhole as on back piece = 78-80-82-84-86-88 sts. When piece measures 56-58-60-62-64-66 cm, slip the middle 28 sts on a stitch holder for neck and finish each side separately. Continue dec towards the neck every other row: 2 sts 2 times and 1 st 2 times. After all dec are done, 19-20-21-22-23-24 sts remain on needle. When piece measures 61-63-65-67-69-71 cm, dec 4 sts evenly over A.1/A.3 = 15-16-17-18-19-20 sts remain on shoulder. Cast off when piece measures 62-64-66-68-70-72 cm. SLEEVE: Worked in the round on double pointed needles. Cast on 46-46-50-50-54-54 sts on double pointed needle size 4.5 mm with Alaska. Insert 1 marker at beg of round = mid under sleeve. Work as follows: Size S-M-XXL-XXXL: K 1, * P 2/K 2 *, repeat from *-* 3-3-4-4 times, A.4 a (= 20 sts), * K 2/P 2 *, repeat from *-* 3-3-4-4 times, finish with K 1. Size L-XL: P 1, K 2, * P 2/K 2 *, repeat from *-* 3-3 times, A.4 a (= 20 sts), * K 2/P 2 *, repeat from *-* 3-3 times, finish with K 2, P 1. When the first 10 rounds of A.4 have been worked, switch to double pointed needles size 5 mm and work as follows: 13-13-15-15-17-17 sts in stocking st, A.4 a, 13-13-15-15-17-17 sts in stocking st. When A.4 a has been worked one time vertically, work A.4 b over sts in A.4 a, continue with stocking st over the remaining sts. Now repeat A.4 b vertically. AT THE SAME TIME when piece measures 8 cm, inc 1 st on each side of marker, repeat inc every 4-3-3-2½-2½-2 cm 8-11-11-13-13-16 more times (= inc 9-12-12-14-14-17 times in total) = 64-70-74-78-82-88 sts. When piece measures 47-46-46-45-44-42 cm (shorter measurements in the larger sizes because of longer sleeve cap and wider shoulders), cast off 6 sts mid under sleeve (= 3 sts on each side of marker) and work sleeve back and forth on circular needle until finished measurements. NB! Cast of in row 2, 4 or 6 after last cable, to ensure that following cables will be on RS. Cast off for sleeve cap at beg of every row in each side: Cast off 2 sts 3 times and 1 st 1-2-3-4-6-9 times, then cast off 2 sts in each side until piece measures 54-54-55-55-56-56 cm, then cast off 3 sts 1 time in each side and dec 8 sts evenly over sts in A.4. Cast off the remaining sts, piece measures approx. 55-55-56-56-57-57 cm. Knit another sleeve. ASSEMBLY: Sew the shoulder seams. Sew in sleeves. NECK: Pick up 92-92-96-96-100-100 sts around the neck (incl sts on stitch holder mid front) on circular needle size 4.5 mm. P 1 round while dec 8 sts evenly = 84-84-88-88-92-92 sts. Work rib K 2/P 2 in the round. When piece measures 10 cm, inc all K 2 to K 3 = 105-105-110-110-115-115 sts. When piece measures 20 cm, inc all K 3 to K 4 = 126-126-132-132-138-138 sts. When neck measures 26 cm, cast off K over K and P over P. |
|||||||||||||||||||
Diagram explanations |
|||||||||||||||||||
|
|||||||||||||||||||
|
|||||||||||||||||||

|
|||||||||||||||||||

|
|||||||||||||||||||
|
Have you made this or any other of our designs? Tag your pictures in social media with #dropsdesign so we can see them! Do you need help with this pattern?You'll find tutorial videos, a Comments/Questions area and more by visiting the pattern on garnstudio.com. © 1982-2024 DROPS Design A/S. We reserve all rights. This document, including all its sub-sections, has copyrights. Read more about what you can do with our patterns at the bottom of each pattern on our site. |
|||||||||||||||||||


With over 40 years in knitting and crochet design, DROPS Design offers one of the most extensive collections of free patterns on the internet - translated to 17 languages. As of today we count 304 catalogues and 11422 patterns - 11422 of which are translated into English (UK/cm).
We work hard to bring you the best knitting and crochet have to offer, inspiration and advice as well as great quality yarns at incredible prices! Would you like to use our patterns for other than personal use? You can read what you are allowed to do in the Copyright text at the bottom of all our patterns. Happy crafting!
Comments / Questions (50)
Bonjour, Dans le diagramme A2b, dans la partie haute du diagramme (à partir du 18ème rang de A2b), les torsades se font sur les rangs pairs (soit l'envers si nous tricotions en aller/retour) alors qu'habituellement, les torsades se font sur l'endroit du travail. Cela ne va-t-il pas poser de problème lorsque nous reprendrons le devant et le dos séparément? Merci pour votre aide, Cordialement
22.12.2015 - 14:47DROPS Design answered:
Bonjour Mme Trinh, veillez bien, au moment de la division de l'ouvrage, à ajuster pour que les torsades soient ensuite faites sur un rang sur l'endroit. Bon tricot!
22.12.2015 - 19:11Ben deze trui aan het breien en nu ik de afkantingen voor de mouwen heb gedaan moet ik het voor-en achterpand apart verder breien. Nu komen de kabels niet meer uit als ik het patroon volgt. Betekent dat ik moet kabelen op de averechtse kant i.p.v. de voor kant. Beetje jammer
17.12.2015 - 16:25DROPS Design answered:
Hoi Ankie. Ik heb de vraag neergelegd bij ons Design Team. Ik denk dat er een nld minder moet zijn tussen nld 22-31 in A.4A. Ik kom terug zodra ik meer weet.
18.12.2015 - 15:48Hej Drops! Ett väldigt fint mönster! Jag har problem med att tyda avsnittet "när arb mäter 43-44-45-46-47-48 cm minskas det m på varje sida av varje markör i varje sida". På andra språk står det att man istället ska maska av 3 maskor på varje sida av varje markör. Stämmer det? /Anna
10.12.2015 - 15:23DROPS Design answered:
Hej Anna, det stämmer, det skal stå maska av 3 maskor på varje sida av varje markör. Det skall vi få ändrat i mönstret. Tack för info!
10.12.2015 - 15:42Het telpatroon van A.1 b en A.3 b loopt over 8 nld. Ik zou verwachten dat het telpatroon van A.2 b over een veelvoud van 8 nld loopt, maar dit is niet het geval. Ik tel 8 + 8 + 8 + 7 nld. Mist er een naald in het telpatroon van A.2 b? Of gaat het ritme van de draaiingen van de kabels uit elkaar lopen?
25.10.2015 - 20:05DROPS Design answered:
Hoi Marloes. Nee, het is correct, de kabels komen niet op zelfde hoogte, maar je mag natuurlijk wel een naald extra breien als je dat zelf mooier vindt.
09.12.2015 - 14:13Me gusta basta. He empezado ya y veo que las explicaciones no son muy claras. Yo utilizo 2 agujas en lugar de la circular, y el recuento de vueltas es distinto a la hora de hacer los ochos y trenzados. Se me queda perdida una vuelta y he tenido que rectificarlo por mi cuenta. Cuando termine volveré a comentar.Muchas gracias por sus patrones y explicaciones. Hay mucho donde elegir.
19.10.2015 - 14:06Goedemorgen, is het inderdaad zo dat ik breinaalden zonder knop, 60 cm lang moet gebruiken voor 5 mm en 40 cm lang voor 4,5 cm? Deze maat verkoopt Wolplein nl. niet. Of lees ik het verkeerd? zie onderstaande.... Het betreft Drops 164-46 DROPS BREINLD ZONDER KNOP EN RONDBREINLD (60 of 80 cm) 5 mm - of de maat die u nodig hebt voor een stekenverhouding van 17 st x 22 nld in tricotst = 10 x 10 cm. DROPS BREINLD ZONDER KNOP en RONDBREINLD (40 en 80 cm) 4,5 mm - voor de boordsteek.
07.09.2015 - 09:58DROPS Design answered:
Hoi Joke. Je kan rondbreinaald 5 mm 80 OF 60 cm gebruiken (voor de panden en mouwen en ook breinaalden zonder knop 4,5 en 5 (ook voor de mouwen en pand. Je kan de magic loop techniek gebruiken en alles breien op een rondbreinaald (bijvoorbeeld dan alleen 4,5 en 5 mm 80 cm). Zie hoe dat werkt hier:
07.09.2015 - 14:16Bonjour! Il y a une erreur dès le début des explications: 1m env, *2m end, 2m env*, répéter de *-* sur les 16-20-24-28m suivantes, il faut lire les 12-16-20-24m suivantes, et pareil plus loin quand ce motif se répète il faut enlever 4m à chaque fois. Peut-être est-ce une erreur de traduction! Bon tricot
07.09.2015 - 01:50DROPS Design answered:
Bonjour Magali, on tricote en fait en côtes 2m end/2 m env au-dessus des 16-20-24-28 m indiquées. Bon tricot!
07.09.2015 - 12:16Es ideal, en color rojo, perfecto.
25.06.2015 - 10:54Pour des vacances d'hiver à la montagne il sera parfait
16.06.2015 - 10:59Heerlijk comfortabel model. Ideaal voor wandelingen langs strand en door het bos. Heel mooi kabelpatroon.
13.06.2015 - 16:30