
Popular categories
Looking for a yarn?


|
|
Twist & Shout |
|
|
|
|
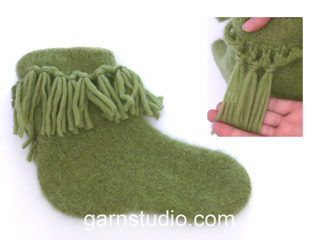
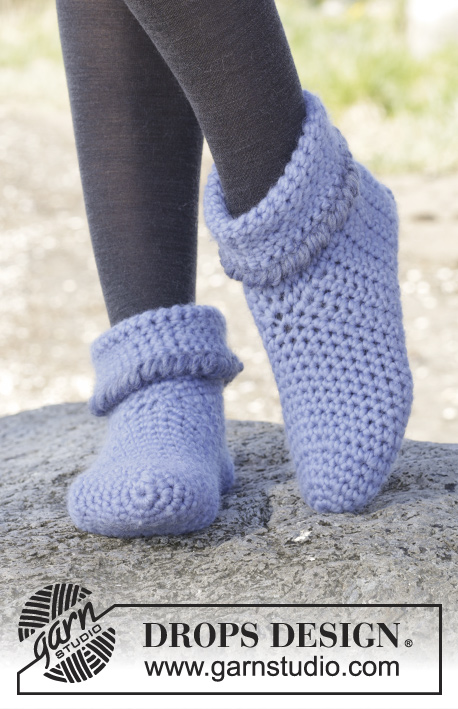
Felted DROPS slippers with fringes in "Snow" Size 35 - 44
DROPS 166-29 |
|
|
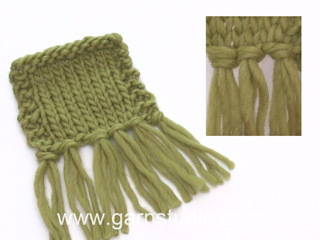
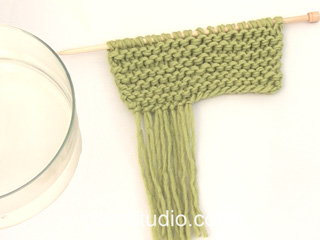
ANKLE ELEVATION: From RS: * Work 6-6-7-7 sts, turn - READ KNITTING TIP - and work 6-6-7-7 sts. Work 10-10-12-12 sts, turn and work 10-10-12-12 sts. Work 6-6-7-7 sts, turn and work 6-6-7-7 sts *. Work 1 row over all sts, repeat from *-* in opposite side, beg from WS. Then work 1 row back over all sts from WS. KNITTING TIP: When turning mid piece slip first st. Tighten yarn and continue as before. There might be a small hole in piece but this will even out after felting. FRINGE TIP: To make the fringes hang nicely they should be moistened, shaken and dried before they are tied on. ---------------------------------------------------------- SLIPPER: The slipper is worked back and forth on needle. Beg at the top of the leg and finish with the toe. Cast on 38-42-44-44 sts on needle size 9 mm with Snow. K 1 row from WS (1st row = from WS), 7 rows in stocking st, K 1 row from WS (work loops in this row later). REMEMBER THE KNITTING TENSION Then work in stocking st until finished measurements. Work as follows (next row = from RS): K 2 tog, K 34-38-40-40, K 2 tog = 36-40-42-42 sts. Work next row as follows (= from WS): P 2 tog, P 32-36-38-38, P 2 tog = 34-38-40-40 sts. Work next row as follows (from RS): Work ANKEL ELEVATION over the outermost sts in each side – see explanation above! Work 6 rows in stocking st over all sts, AT THE SAME TIME on 1st row dec 4-4-4-2 sts evenly = 30-34-36-38 sts. NOW INC FOR HEEL AS FOLLOWS: From RS: * Work 10-10-11-12 sts, turn and work 9-9-10-11 sts, work 2 sts in last st on needle. Work 6-6-7-7 sts, turn and work 5-5-6-6 sts, work 2 sts in last st on needle. Work 1 row over all sts *, repeat from *-* in opposite side, beg from WS. Repeat from *-* 2 more times in each side (= 3 times in total in each side) = 42-46-48-50 sts. NOW DEC FOR HEEL AS FOLLOWS: From RS: * Work 10-10-11-12 sts, turn and work 8-8-9-10 sts, work last 2 sts tog. Work 6-6-7-7 sts, turn and work 4-4-5-5 sts, work last 2 sts tog. Work 1 row over all sts *, repeat from *-* in opposite side, beg from WS. Repeat from *-* 2 more times in each side (= 3 times in total in each side) = 30-34-36-38 sts. NOW WORK THE FOOT AS FOLLOWS: Insert 1 marker in the outermost st on one side, NOW MEASURE PIECE FROM HERE. Then dec from RS on top of foot like this: Work 8-8-9-10 sts, K the next 2 sts tog, work until 10-10-11-12 sts remain, K 2 tog, work remaining sts on row, repeat the dec on every row from RS a total of 3-3-4-4 times = 24-28-28-30 sts. Continue in stocking st without dec until piece measures approx. 18-21-25-29 cm, measured from marker. DEC FOR TOE AS FOLLOWS: Dec 3-4-4-4 sts evenly on next row from RS, repeat the dec on every row from RS 4-4-4-4 times in total = 12-12-12-14 sts on needle. On next row from RS K sts tog the entire row 2 by 2 = 6-6-6-7 sts. Cut the yarn and pull it through the remaining sts, tighten tog and fasten. LOOPS: Crochet loops to fasten fringes in. Work in P sts (i.e. 9th row from cast-on edge). Work on hook size 7 mm with Snow as follows from RS: Work 1 dc in first st, * 2 ch (= loop), skip 1 st, 1 dc in next P-st *, repeat from *-* the entire row. Fasten off. ASSEMBLY: Sew tog mid under foot and up to cast-on row, sew edge to edge in outer loops of edge sts to avoid a chunky seam. Knit another slipper. FELTING: Cut 1 leg of a nylon stocking in 2 (along side). Thread stocking up and down through loops to avoid them felting tog, tie tog the ends of stocking. Place the slippers in the washing machine with a detergent without enzymes and optical bleach. Wash at 40 degrees with normal spin but no pre-wash. After wash shape the slippers to the right size while still wet and leave to dry flat. At subsequent wash, wash the slippers at regular wool programme. FRINGES: Fasten 1 fringe in each loop after felting - READ FRINGE TIP. 1 fringe = cut 2 lengths of 20 cm each. Fold them double, thread the loop through the loop on the slipper and pull ends through the fringe. Cut fringes to a length of approx. 7 cm. AFTER FELTING: If the piece is not felted enough and is too big: Wash the piece one more time in the washing machine while it is still wet add a terry towel that measures approx. 50 x 70 cm - NOTE: Do not use a short program. If the piece has been felted too much and is too small: While the piece is still wet stretch it to the correct measurements, if the piece is dry, make sure to soak it first. Remember: All subsequent washes are as a normal wool garment. |
|
|
Have you made this or any other of our designs? Tag your pictures in social media with #dropsdesign so we can see them! Do you need help with this pattern?You'll find tutorial videos, a Comments/Questions area and more by visiting the pattern on garnstudio.com. © 1982-2024 DROPS Design A/S. We reserve all rights. This document, including all its sub-sections, has copyrights. Read more about what you can do with our patterns at the bottom of each pattern on our site. |


With over 40 years in knitting and crochet design, DROPS Design offers one of the most extensive collections of free patterns on the internet - translated to 17 languages. As of today we count 304 catalogues and 11422 patterns - 11422 of which are translated into English (UK/cm).
We work hard to bring you the best knitting and crochet have to offer, inspiration and advice as well as great quality yarns at incredible prices! Would you like to use our patterns for other than personal use? You can read what you are allowed to do in the Copyright text at the bottom of all our patterns. Happy crafting!
Comments / Questions (33)
Scusate, per queste pantofole si devono usare ferri a doppia punta?
29.10.2020 - 15:03DROPS Design answered:
Buongiorno Cinzia, per questo modello può utilizzare i ferri dritti. Buon lavoro!
31.10.2020 - 14:11I opskriften står der arbejde strikkes i glatstrik til færdig mål. Men jeg kan simpelthen ikke finde de færdige mål? Er det mig der misforstår noget i opskriften?
16.10.2020 - 17:23Hei! Jeg skulle gjerne visst hvor mange cm tøffelen skal måle før toving i de respektive størrelsene. Altså fra hæl til tå. Jeg skal nemlig prøve å lage en str. større, og trenger det for sammenlikningens skyld.
09.03.2020 - 18:47DROPS Design answered:
Hej Mari, du kan bruge målene til de store størrelser her: House Elves God fornøjelse!
10.03.2020 - 10:55Hallo, ich habe ein Paar gestrickt und gefilzt. Die Maschenprobe stimmte. Nach dem Filzen ist der Hausschuh eher ein grosses 42, ich brauche jedoch ein 40-41...habe die Angaben 40/42 gestrickt. Frage: kann ich den Hauschuh noch ein zweites Mal filzen oder riskiere ich da, dass er zu klein wird? Vielen Dank im voraus Nima
20.12.2019 - 13:22DROPS Design answered:
Liebe Frau Guenin, hier lesen Sie mehr über Filzen - gerne wird Ihnen Ihr DROPS Laden noch weiterhelfen - auch telefonisch oder per E-Mail. Viel Spaß beim stricken!
20.12.2019 - 16:25Hej! Jag undrar om det står rätt antal maskor i början då man stickar ihop maskor. Tycker inte jag får det att stämma vilket påverkar resten av mönstret. Det hoppar från 34 till 36 till 32 till 34 även om man ska sticka ihop två m för varje gång. Ska jag låta bli att titta på antalet maskor och bara följa det som står i texten? Kommer det då att stämma på slutet? Tack på förhand. MVh Annette
14.10.2019 - 21:17DROPS Design answered:
Hej Annette, du börjar med 38, minskar 1 i varje sida = 36, minskar 1 i varje sida igen = 34, sedan minskas det 4 maskor jämt fördelat. ... Lycka till :)
16.10.2019 - 15:12How many stitches are cast on
06.11.2018 - 19:08DROPS Design answered:
Dear Jan! You have to cast on 38-42-44-44 sts, choose the number according to your size (ex. in size 35/37 you have to cast on 38 sts). Happy knitting!
06.11.2018 - 21:04Linda Haverkamp wrote:
Pattern states: "Then work in stocking st until finished measurements." What is the finished measurement before continuing with the ankle elevation?
03.11.2018 - 19:59DROPS Design answered:
Dear Mrs Haverkamp, you work now in stocking stitch until the slipper has been completed, ie to the end of the slipper. Happy knitting!
05.11.2018 - 09:12Kann man die Hausschuhe nicht wie "normale" Socken stricken und dann filzen.?
17.03.2018 - 14:00DROPS Design answered:
Liebe Frau Aksoy, dafür haben wir keine Erfahrung, am besten folgen Sie die Anleitung dieser Hausschuhen wie sie erklärt wurde. Leider können wir keine individuellen Umrechnungen vornehmen, wenden Sie sich mit diesem Wunsch bitte an den Laden, in dem Sie die Wolle kaufen. Vielen Dank für Ihr Verständnis.
19.03.2018 - 09:31Czy przerabiając piętę, również należy po przerobieniu pierwszych oczek i obróceniu pierwsze oczko zdjąć z drutu i zacisnąć nitkę (jak wg WSKAZÓWKI przy robieniu kostki)?
20.10.2017 - 12:39DROPS Design answered:
Witaj Ireno, dokładnie tak: zawsze gdy zawracamy w środku rzędu, zdjąć 1-sze o., zacisnąć nitkę i dalej przer. jak wcześniej. Może pojawić się dziurka, która zniknie po filcowaniu. Miłej pracy!
20.10.2017 - 18:01Ich habe Grösse 40/42 gestrickt (brauche Grösse 37). Nach dem Waschen habe ich eine Fusslänge von 20 cm!
21.08.2017 - 16:23DROPS Design answered:
Liebe Frau Breinlinger, hatten Sie die richtige Maschenprobe? Gerne können Sie Ihre Erfahrung Ihrem DROPS Laden mitteilen.
29.08.2017 - 12:10