DROPS Cotton Merino
DROPS Cotton Merino
50% Wool, 50% Cotton
from 4.45 $ /50g
Get the yarn to make this pattern from 22.25$.

The yarn cost is calculated from the pattern’s smallest size and the yarn’s cheapest product type. Looking for an even better price? You might find it on the DROPS Deals!

DROPS Super Sale

Wendy Darling

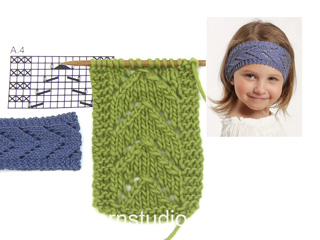
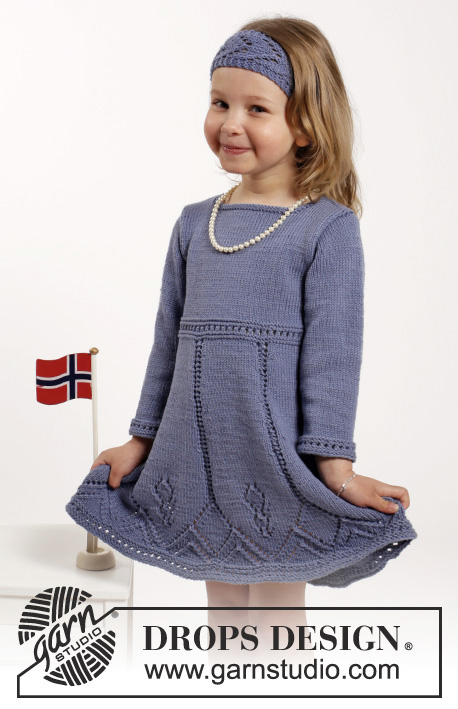
Knitted dress and hair band with lace pattern in DROPS Cotton Merino. Size children 2 - 10 years

DROPS Children 26-6
DROPS design: Pattern no cm-003-bn
Yarn group B
----------------------------------------------------------
DRESS:
Size: 2 - 3/4 - 5/6 - 7/8 - 9/10 years
All measurements in chart in cm.

Materials:
DROPS COTTON MERINO from Garnstudio
250-300-350-400-450 g color no 16, denim blue

HAIR BAND:
Size: 2/4 - 5/6 - 7/8 - 9/10 years
Head circumference: 48/50 - 50/52 - 52/53 - 54/55 cm / 19¼"-20"-20¾"-21½"
Materials:
DROPS COTTON MERINO from Garnstudio
50 g for all sizes in color no 16, denim blue

DROPS DOUBLE POINTED NEEDLES and CIRCULAR NEEDLE (60 cm / 24") SIZE 3.5 mm/US 4 - or size needed to get 22 sts x 30 rows in stockinette st = 4" x 4" (10 x 10 cm).
DROPS BUTTON: ARCHED (white), NO 521: 2 pieces for all sizes for dress.

-------------------------------------------------------

Alternative Yarn – See how to change yarns here
Yarn Groups A to F – Use the same pattern and change the yarn here
Yarn usage using an alternative yarn – Use our yarn converter here

-------------------------------------------------------

DROPS Cotton Merino
DROPS Cotton Merino
50% Wool, 50% Cotton
from 4.45 $ /50g
Get the yarn to make this pattern from 22.25$.

The yarn cost is calculated from the pattern’s smallest size and the yarn’s cheapest product type. Looking for an even better price? You might find it on the DROPS Deals!

Pattern instructions

NOTE: This pattern is written in American English. All measurements in charts are in cm. For conversion from inches to cm - click here. There are different terms for crocheting in American and British English. If this pattern includes crochet, click for "crochet terms" here. For this pattern in British English, please click here.
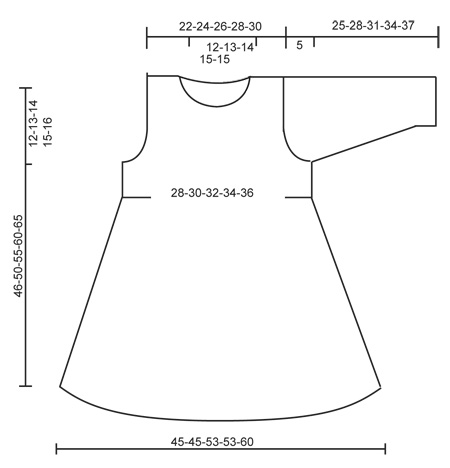
PATTERN: See diagrams A.1 to A.4.

DECREASE TIP:
Dec as follows before A.3: K 2 tog.
Dec as follows after A.3: Slip 1 st as if to K, K 1, psso

BUTTONHOLES:
Dec for buttonholes on left back piece. Dec by working second and third st tog from mid back, then make a YO.
Dec for buttonholes when band measures 2 and 4 cm / ¾" and 1½".

GARTER ST (back and forth):
K all rows. 1 ridge = K2 rows.
----------------------------------------------------------

DRESS:
Worked in the round on circular needle from bottom up.
Cast on 192-192-224-224-256 sts on circular needle size 3.5 mm / US 4 with Cotton Merino. Work A.1. Then work A.2 (= 6-6-7-7-8 repetitions in width). When A.2 has been worked 1 time vertically, work as follows - beg 1 st before first st on round: * A.3 (= 3 sts), 29 sts in stockinette st *, repeat from *-* 6-6-7-7-8 times. AT THE SAME TIME when piece measures 15 cm / 6", dec 1 st before every A.3 – READ DECREASE TIP (= 6-6-7-7-8 sts dec). Repeat dec alternately before and after A.3 every every 1-1½-1½-2-2 cm / ⅜"-½"-½"-¾"-¾" a total of 12-10-12-10-12 times = 120-132-140-154-160 sts. Continue in stockinette st and A.3 until piece measures 27-29-32-35-37 cm / 10½"-11½"-12½"-13¾"-14½". Now work A.1 over all sts, on first row in A.1 adjust no of sts to 124-132-140-148-160. Insert 2 markers in the piece; one at the beg of round and 1 after 62-66-70-74-80 sts = sides.
Continue in stockinette st over all sts. When piece measures 34-37-41-45-49 cm / 13½"-14½"-16"-17¾"-19¼", bind off 6 sts in each side for armholes (i.e. 3 sts on both sides of every marker) and finish each piece separately.

BACK PIECE:
= 56-60-64-68-74 sts. Continue bind off for armholes in each side at beg of every row as follows: 2 sts 1 time and 1 st 2-2-1-1-2 times = 48-52-58-62-66 sts. When piece measures 38-42-47-52-57 cm / 15"-16½"-18½"-20½"-22½", slip the first 22-24-27-29-31 sts (from RS) on 1 stitch holder for right shoulder (work them first) and finish each shoulder separately.

LEFT SHOULDER:
= 26-28-31-33-35 sts. Continue in stockinette st but work the first 4 sts on needle (towards middle) in garter st (= button band). Dec for BUTTONHOLES - see explanation above. When piece measures 44-48-53-58-63 cm / 17¼"-19"-21"-22¾"-24¾", slip the first 4 sts on a stitch holder (work them first), then bind off the next 10-11-12-13-13 sts for neck. Then bind off 1 st on next row towards the neck = 11-12-14-15-17 sts remain on the shoulder. Bind off when piece measures 46-50-55-60-65 cm / 18"-19¾"-21½"-23½"-25½".

RIGHT SHOULDER:
Slip the 22-24-27-29-31 sts from stitch holder back on needle and cast on 4 new sts at the end of first row from RS (= button band) = 26-28-31-33-35 sts. Work as left shoulder but reversed, do not dec for buttonholes.

FRONT PIECE:
= 56-60-64-68-74 sts. Bind off for armhole in the sides as on back piece = 48-52-58-62-66 sts. When piece measures 41-45-50-55-60 cm / 16"-17¾"-19¾"-21½"-23½", slip the middle 18-20-22-24-24 sts on a stitch holder for neck and finish each shoulder separately. Then bind off on every row towards neck: 2 sts 1 time and 1 st 2 times = 11-12-14-15-17 sts remain on shoulder. Bind off when piece measures 46-50-55-60-65 cm / 18"-19¾"-21½"-23½"-25½".

SLEEVE:
Worked in the round on double pointed needles. Cast on 40-42-44-46-48 sts on double pointed needles size 3.5 mm / US 4 with Cotton Merino. Work A.1 over all sts, then work in stockinette st. Insert 1 marker at beg of round = mid under sleeve. When piece measures 6 cm / 2⅜", inc 1 st on each side of marker. Inc every 6-3½-3-3-3 cm / 2½"-1¼"-1"-1"-1" 2-4-6-7-8 more times = 46-52-58-62-66 sts. When piece measures 20-23-26-29-32 cm / 8"-9"-10¼"-11½"-12½", bind off 6 sts mid under sleeve for sleeve cap. Then work sleeve back and forth while AT THE SAME TIME dec for sleeve cap in each side as follows: Dec 2 sts in each side until piece measures 24-27-30-33-36 cm / 9½"-10½"-11¾"-13"-14¼". Bind off 3 sts in each side, then bind off the remaining sts. Piece measures approx. 25-28-31-34-37 cm / 9¾"-11"-12¼"-13½"-14½".

ASSEMBLY:
Sew the shoulder seams. Sew in sleeves. Sew the buttons on to right band. Then place the 4 sts from right back piece behind the 4 sts on the left back piece and fasten with small sts.


NECK EDGE: Pick up approx. 72 to 88 sts (includes sts on stitch holders) around the neck on circular needle size 3.5 mm / US 4. Work 2 ridges. Bind off.
----------------------------------------------------------

HAIR BAND:
Cast on 15 sts on needle size 3.5 mm / US 4 with Cotton Merino. Work 1 ridge in GARTER ST - see explanation above, then work A.4 over all sts. Continue with A.4 until piece measures 41-42-43-44 cm / 16"-16½"-17"-17¼" (lightly pull piece when measuring), work a ridge, bind off. Sew cast-on and bind-off edge tog with grafting/kitchener stitches.

Diagram

All measurements in charts are in cm.

symbols = K from RS, P from WS
symbols = P from RS, K from WS
symbols = 1 YO between 2 sts
symbols = slip 1 st as if to K, K 1, psso
symbols = K 2 tog
symbols = slip 1 st as if to K, K 2 tog, psso
diagram
diagram

Each of our patterns has specific tutorial videos to help you.

Do you have a question? See a list of frequently asked questions (FAQ)

Knitting tension is what determines the final measurements of your work, and is usually measured per 10 x 10 cm. It is provided like so: number of stitches in width x number of rows in height - eg: 19 stitches x 26 rows = 10 x 10 cm.

The knitting tension is very individual; some people knit/crochet loosely while others work tightly. You adjust the knitting tension with the needle size, which is why the suggested needle size only serve as a guide! You need to adjust this (up or down) to ensure that YOUR knitting tension matches the knitting tension provided in the pattern. If you work with a different knitting tension than provided you will have a different yarn consumption, and your work will have different measurements than what the pattern suggests.

The knitting tension also determines which yarns can replace each other. As long as you achieve the same knitting tension you can replace one yarn with another.

See DROPS lesson: How to measure your tension/gauge

See DROPS video: How to make a gauge tension swatch

The required amount of yarn is provided in grams, eg: 450 g. To calculate how many balls you’ll need you first need to know how many grams are in 1 ball (25g, 50g or 100g). This information is available if you click on the individual yarn quality on our pages. Divide the amount required with the amount of each ball. For example, if each ball is 50g (the most common amount), the calculation will be as follows: 450 / 50 = 9 balls.

The important thing when changing from one yarn to another is that the knitting/crochet tension remains the same. This is so that the measurements of the finished piece will be the same as on the sketch provided. It is easier to achieve the same knitting tension using yarns from the same yarn group. It is also possible to work with multiple strands of a thinner yarn to achieve the knitting tension of a thicker one. Please try our yarn converter. We recommend you to always work a test swatch.

Please NOTE: when changing yarn the garment might have a different look and feel to the garment in the photo, due to individual properties and qualities of each yarn.

See DROPS lesson: Can I use a different yarn than the one mentioned in the pattern?

All our yarns are categorised into yarn groups (from A to F) according to thickness and knitting tension – group A contains the thinnest yarns and group F the thickest. This makes it easier for you to find alternative yarns to our patterns, should you wish to switch yarn. All yarns within the same group have a similar knitting tension and can easily replace each other. However, different yarn qualities have different structures and properties which will give the finished work a unique look and feel.

Click here for an overview of the yarns in each yarn group

At the top of all our patterns you’ll find a link to our yarn converter, which is a helpful tool should you wish to use a different yarn than suggested. By filling in the yarn quality you wish to replace, the amount (in your size) and number of strands, the converter will present good alternative yarns with the same knitting tension. Additionally it will tell you how much you’ll require in the new qualities and whether you’ll need to work with multiple strands. Most skeins are 50g (some are 25g or 100g).

If the pattern is worked with multiple colours, every colour will have to be converted separately. Similarly, if the pattern is worked with several strands of different yarns (for example 1 strand Alpaca and 1 strand Kid-Silk) you will have to find alternatives for each, individually.

Click here to see our yarn converter

Since different yarns have different qualities and textures we have chosen to keep the original yarn in our patterns. However, you can easily find options among our available qualities by using our yarn converter, or simply pick a yarn from the same yarn group.

It is possible that some retailers still have discontinued yarns in stock, or that someone has a few skeins at home that they would like to find patterns for.

The yarn converter will provide both alternative yarn as well as required amount in the new quality.

If you think it's hard to decide what size to make, it can be a good idea to measure a garment you own already and like the size of. Then you can pick the size by comparing those measures with the ones available in the pattern's size chart.

You'll find the size chart at the bottom of the pattern.

See DROPS lesson: How to read size chart

The needle size provided in the pattern serves only as a guide, the important thing is to follow the knitting tension. And since knitting tension is very individual, you will have to adjust the needle size to ensure that YOUR tension is the same as in the pattern – maybe you’ll have to adjust 1, or even 2 needle sizes, up or down to achieve the correct tension. For this, we recommend that you work test swatches.

Should you work with a different knitting tension than the one provided, the measurements of the finished garment might deviate from the measurement sketch.

See DROPS lesson: How to measure your tension/gauge

See DROPS video: How to make a gauge tension swatch

Working a garment top-down provides more flexibility and room for personal adjustment. For example it is easier to try the garment on while working, as well as making adjustments to length of yoke and shoulder caps.

The instructions are carefully explaining every step, in the correct order. Diagrams are adjusted to the knitting direction and are worked as usual.

The diagram depicts all rows/rounds, and every stitch seen from the right side. It is read from bottom to top, from right to left. 1 square = 1 stitch.

When working back and forth, every other row is worked from the right side and every other row is worked from the wrong side. When working from the wrong side, the diagram will have to be worked reversed: from left to right, knit stitches are purled, purl stitches are knit etc.

When working in the round every round is worked from the right side and the diagram are worked from right to left on all rounds.

See DROPS lesson: How to read knitting diagrams

The diagram depicts all rows/rounds, and every stitch seen from the right side. It is worked from bottom to top, from right to left.

When working back and forth every other row is worked from the right side: from right to left and every other row is worked from the wrong side: from left to right.

When working in the round, every row in the diagram are worked from the right side, from right to left.

When working a circular diagram you start in the middle and work your way outwards, counter clockwise, row by row.

The rows usually start with a given number of chain stitches (equivalent to the height of the following stitch), this will either be depicted in the diagram or explained in the pattern.

See DROPS lesson: How to read crochet diagrams

Instructions for working several diagrams after each other on the same row/round, will often be written like so: “work A.1, A.2, A.3 a total of 0-0-2-3-4 times". This means you work A.1 once, then A.2 is worked once, and A.3 is repeated (in width) the number of times provided for your size – in this case like so: S = 0 times, M = 0 times, L=2 times, XL= 3 times and XXL = 4 times.

The diagrams are worked as usual: begin with the first row in A.1, then work the first row in A.2 etc.

See DROPS lesson: How to read knitting diagrams

See DROPS lesson: How to read crochet diagrams

The total width of the garment (from wrist-to-wrist) will be larger in the larger sizes, despite the actual sleeves being shorter. The larger sizes have longer sleeve caps and wider shoulders, so there will be a good fit in all sizes.

The measurement sketch/schematic drawing provides information regarding the full length of the garment. If it’s a jumper or a jacket the length is measured from the highest point on the shoulder (usually closest to the neckline), and straight down to the bottom of the garment. It is NOT measured from the tip of shoulder. Similarly, the length of yoke is measured from the highest point on the shoulder and down to where yoke is split into body and sleeves.

See DROPS lesson: How to read a schematic drawing

Diagrams are often repeated on the round or in height. 1 repeat is the diagram the way it appears in the pattern. If it says to work 5 repeats of A.1 in the round, then you work A.1 a total of 5 times after/next to each other in the round. If it says to work 2 repeats of A.1 vertically/in height you work the entire diagram once, then begin again at the start and work the entire diagram one more time.

Chain stitches are slightly narrower than other stitches and to avoid working the cast-on edge too tight, we simply chain more stitches to begin with. The stitch count will be adjusted on the following row to fit the pattern and measurement sketch.

The rib edge is more elastic and will contract slightly compared to, for example, stocking stitch. By increasing before the rib edge, you avoid a visible difference in width between the rib edge and the rest of the body.

It’s very easy to cast off too tightly, and by making yarn overs while casting off (and simultaneously casting these off) you avoid a too tight cast off edge.

See DROPS video: How to bind off with yarn overs (yo)

To achieve an even increase (or decrease) you can increase on, for example: every 3rd and 4th row alternately, like so: work 2 rows and increase on the 3rd row, work 3 rows and increase on the 4th. Repeat this until the increase is complete.

See DROPS lesson: Increase or decrease 1 st on every 3rd and 4th row alternately

Should you prefer to work in the round instead of back and forth, you may of course adjust the pattern. You’ll need to add steeks mid-front (usually 5 stitches), and follow the instructions. When you would normally turn and work from the wrong side, simply work across the steek and continue in the round. At the end you’ll cut the piece open, pick up stitches to work bands, and cover the cut edges.

See DROPS video: How to knit steeks and cut open

Should you prefer to work back and forth instead of in the round, you may of course adjust the pattern so you work the pieces separately and then assemble them at the end. Divide the stitches for the body in 2, add 1 edge stitch in each side (for sewing) and work the front and back pieces separately.

See DROPS lesson: Can I adapt a pattern for circular needles into straight needles?

Pattern repeats can vary slightly in the different sizes, in order to get the correct proportions. If you’re not working the exact same size as the garment in the photo, yours might deviate slightly. This has been carefully developed and adjusted so that the complete impression of the garment is the same in all sizes.

Make sure to follow instructions and diagrams for your size!

If you have found a pattern you like which is available in women’s size it’s not very difficult to convert it to men’s size. The biggest difference will be the length of sleeves and body. Start working on the women size that you think would fit across the chest. The additional length will be worked right before you cast off for the armhole/sleeve cap. If the pattern is worked top-down you can add the length right after the armhole or before the first decrease on sleeve.

Regarding additional yarn amount, this will depend on how much length you add, but it is better with a skein too many than too few.

All yarns will have excess fibres (from production) that might come off as lint or shedding. Brushed yarns (ie hairier yarns) have more of these loose, excess fibres, causing more shedding.

Shedding also depends on what is worn under or over the garment, and whether this pulls at the yarn fibres. It’s therefore not possible to guarantee that there will be no shedding

Below are some tips on how to get the best result when working with hairier yarns:

1. When the garment is finished (before you wash it) shake it vigorously so the looser hairs come off. NOTE: do NOT use a lint roller, brush or any method that pulls at the yarn.

2. Place the garment in a plastic bag and put it in your freezer - the temperature will cause the fibres to become less attached to each other, and excess fibres will come off easier.

3. Leave in the freezer for a few hours before taking it out and shaking it again.

4. Wash the garment according to the instructions on the yarn label.

Pilling is a natural process that happens to even the most exclusive of fibers. It's a natural sign of wear and tear that is hard to avoid, and that is most visible in high friction areas of your garment like a sweater's arms and cuffs.

You can make your garment look as new by removing the pilling, using a fabric comb or a pill/lint remover.

Still can't find the answer you need? Then scroll down and leave your question so one of our experts can try to help you. This will be done normally within 5 to 10 working days.
In the meantime, you can read the questions and answers that others have left to this pattern or join the DROPS Workshop on Facebook to get help from fellow knitters/crocheters!

You might also like...

Post a comment to pattern DROPS Children 26-6

We would love to hear what you have to say about this pattern!

If you want to leave a question, please make sure you select the correct category in the form below, to speed up the answering process. Required fields are marked *.

Comments / Questions (115)

Judy Poleg wrote:

Hi, I have finally reached the neck edge and am picking up (with difficulty) the stitches to work the 2 ridges around the neck. Is the neck a closed circle or do I leave it open at the back where the button/buttonhole bands are? Thanks in advance. Judy

13.08.2018 - 23:02

DROPS Design answered:

Dear Mrs Poleg, the neck is worked back and forth from mid back - the dress is buttonned in the back piece. Happy knitting!

14.08.2018 - 07:47

Judith Poleg wrote:

I just finished the first sleeve and the opening is much smaller than the opening in the dress bodice. After casting off 6 sts mid under sleeve I cast off 2 sts on each side on every row (= 4sts per row) until I reached 30 cm. Please advise what I did wrong and how I should proceed.

17.07.2018 - 16:50

DROPS Design answered:

Dear Mrs Poleg, you should have cast 2 sts per row (= 2 sts at the beg of each row both from RS and from WS) until sleeve measures 30 cm. Then it should be right, you will then sew the cast off sts on sleeve along armholes, this edge should be longer than the width of sleeve. Happy knitting!

17.07.2018 - 17:02

country flag Tiina Kaljumäe wrote:

Väga ilus kleit ja lihtne kududa. Vaid antud silmade arvu järgi tuli minul number suurem, Kasutasin Drops cotton merino lõnga ja vardaid nr.3 Aitäh toredate ideede eest, olen teie suur fänn

27.06.2018 - 23:38

country flag Nadia wrote:

Bonjour, je commence ce modèle en 5/6 ans et je me questionne : \r\nPuisque le modèle est tricoté en rond sur aiguilles circulaires, ne faut-il pas pour le schéma A2 tout tricoter en endroit pour avoir le jersey correspondant au modèle ? ou faut-il tricoter un rang sur deux à l\'envers comme indiquer dans la légende du diagramme ?\r\nMerci pour votre retour et belle journée\r\nNadia

07.06.2018 - 10:04

DROPS Design answered:

Bonjour Nadia, si le bas de la robe se tricote en rond, on tricote ensuite le dos et le devant (après les emmanchures) en allers et retours, ainsi, les diagrammes vont se lire de droite à gauche tous les rangs sur l'endroit et tous les tours quand on tricote en rond, et tous les rangs sur l'envers se liront de gauche à droite. A.2 se tricote effectivement en rond, commencez en bas à droite et lisez tous les tours de droite à gauche (= en jersey ajouré soit tous les tours à l'endroit). Bon tricot!

07.06.2018 - 10:58

Judy Poleg wrote:

Hi, I am enjoying knitting this beautiful pattern, but have a question. I have just finished A2 and have arrived at the instructions for decreasing. Do I decrease before and after A3 on every row, or decrease before A3's on one row and after A3's on the following row. (I wasn't sure exactly what the alternately before and after A3 meant). Many thanks in advance. Best regards, Judy Poleg

17.04.2018 - 16:47

DROPS Design answered:

Dear Mrs Poleg, on first dec round you will dec before all A.3 then on next dec round you will dec after all A.3 and repeat these dec: alternately before and after A.3. Happy knitting!

18.04.2018 - 09:01

country flag Christine wrote:

Hi ! Once A2 has been worked, when you say beg one st before the first st on round, do you mean that the A3 first yo has to be done at the end of the last row, just before the marker ? Thanks

12.04.2018 - 16:56

DROPS Design answered:

Dear Christine, keep the last st on round on the left needle, move the marker for beg of round there then start working A.3 (= 1 YO, slip the next st (= previous last st on round), K2 tog, YO), K29, and then repeat (A.3, K29). Happy knitting!

13.04.2018 - 08:00

country flag Iris wrote:

Leider fehlen mir die Zeichen vor dem Diagramm wo bekomm ich sie her

09.04.2018 - 11:09

DROPS Design answered:

Liebe Iris, die können Sie unter "Diagram" sehen. Viel Spaß beim stricken!

09.04.2018 - 13:03

country flag Thouvenin wrote:

Bonjour, Merci pour vos modèles... je suis en train de terminer la première manche en 7-8 ans. Et je ne comprends pas : J'ai bien 15 cm aux emmanchures de la robe, mais j'ai une hauteur de 11 cm avec 66 mailles comme indiqué donc des manches qui ne vont pas avec les emmanchures. Merci pour vos indications M Thouvenin

08.04.2018 - 13:32

DROPS Design answered:

Bonjour Mme Thouvenin, à 32 cm (dernière taille), vous avez 66 m et formez l'arrondi de la manche ainsi: rabattez d'abord 6 m au milieu sous la manche puis continuez en rangs en rabattant au début de chaque rang de chaque côté (sur l'endroit et sur l'envers): 2 mailles jusqu'à ce que la manche mesure 36 cm, puis rabattez 1 x 3 m de chaque côté et enfin les mailles restantes. Épinglez si besoin l'arrondi de la manche le long de l'emmanchure avant de faire la couture. Bon tricot!

09.04.2018 - 10:28

country flag Maddalena Palma wrote:

Salve, io ho più di 15 cm quando finisco di lavorare A2, quindi devo iniziare subito a lavorare diminuzioni oppure lavorare da adesso 15 cm e poi diminuire? E, in generale, quando la descrizione dice “dopo tot cm” si intende sempre dall’inizio del lavoro o dal momento che si è iniziati a fare quel motivo? Grazie

31.03.2018 - 17:45

DROPS Design answered:

Buonasera Maddalena. A 15 cm inizia a diminuire. Le misure vengono di solito prese dall'inizio del lavoro, salvo diversamente indicato . Buon lavoro!

31.03.2018 - 22:27

Ria Erlina Sari wrote:

Hi.. im working this pattern in around.. it means that i should join around with purl stitch.. and after finishing one round, 2 round will begin with a knit stitch? still can't understand the pattern briefly.. so the pattern actually for knitting around, isn't it? huhu.. thank u

30.03.2018 - 06:21

DROPS Design answered:

Dear Mrs Sari, when working A.1 in the round at the bottom of the dress, you will P 1 round, K 1 round, P 1 round, K1 round, then work next round (K2 tog,YO) and so on. Happy knitting!

30.03.2018 - 12:26