
Popular categories
Looking for a yarn?


|
|||||||||||||||||||
Le Marais |
|||||||||||||||||||
 |
 |
||||||||||||||||||
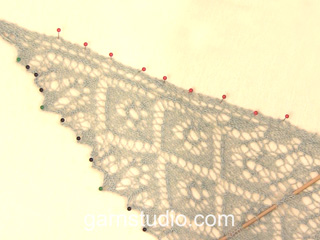
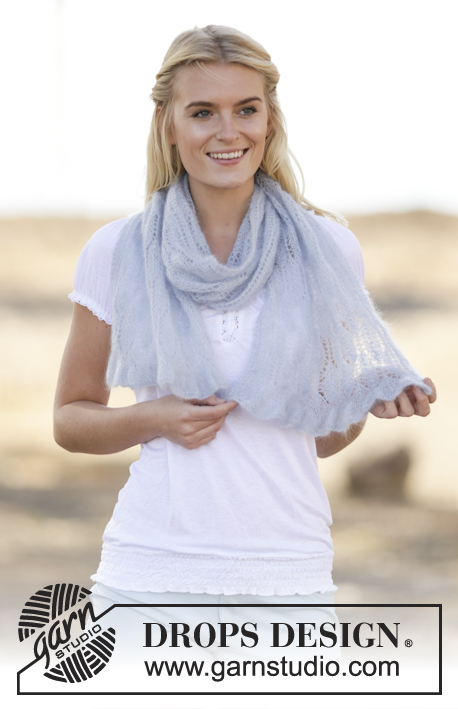
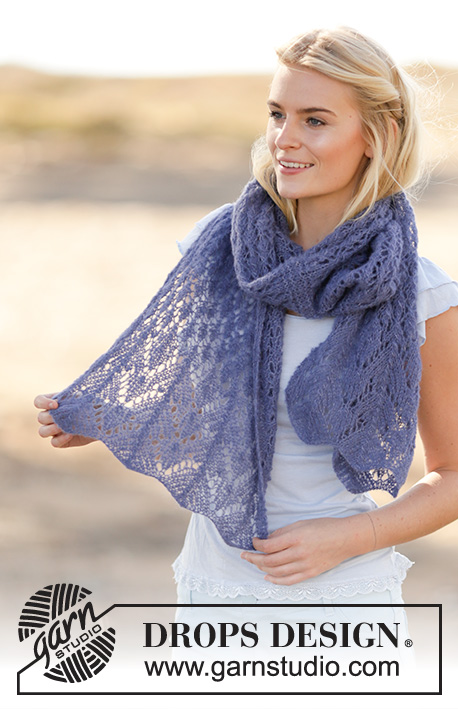
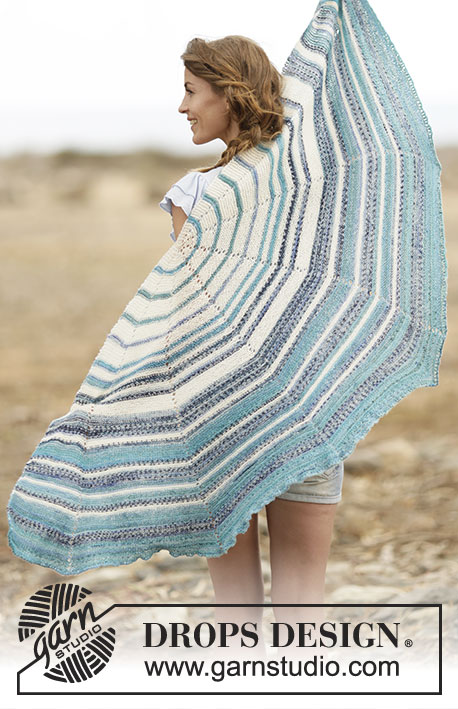
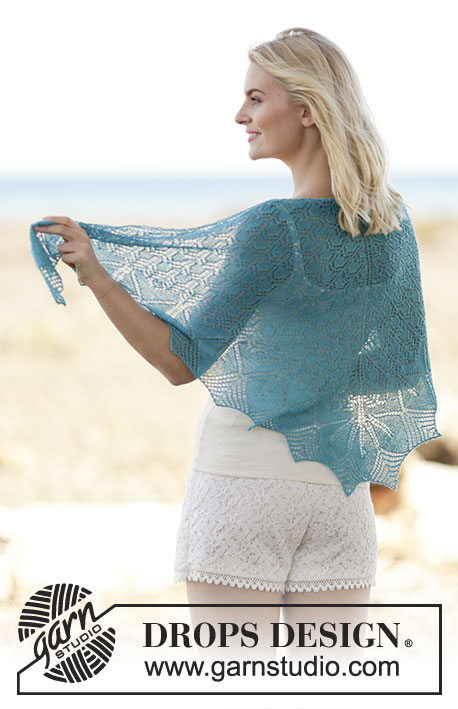
Knitted DROPS shawl with lace and leaf pattern in "Lace" or "Alpaca".
DROPS 161-12 |
|||||||||||||||||||
|
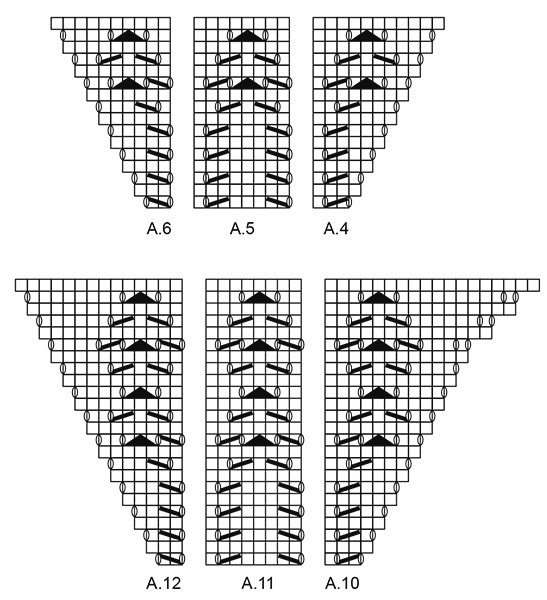
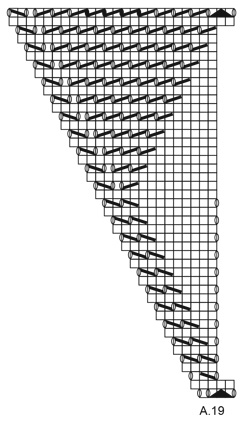
GARTER ST (back and forth): K all rows. 1 ridge = 2 rows K. PATTERN: See diagrams A.1-A.19. The diagrams show all rows in pattern seen from RS. SHAPING: When using another yarn then Lace from yarn group A, there is no need to stretch to measurements, but place it gently out in shape. Leave to dry. Repeat the process when the garment has been washed. ---------------------------------------------------------- SHAWL: The shawl is worked back and forth on circular needle from the neck to make room for all the sts. Cast on 5 sts on circular needle size 3.5 mm with Lace and work 2 ridges in GARTER ST - see explanation above. Work in garter st and inc as follows: K 1, 1 YO, K 1, 1 YO, K 1 (= mid st), 1 YO, K 1, 1 YO and K 1 = 9 sts. K, K YOs to make holes. Continue in garter st and inc with 1 YO inside 3 edge sts in each side and 1 YO on each side of mid st = 4 sts inc on every row from RS. Inc like this until there are 49 sts on needle (i.e. there are 24 sts on each side of mid st). Work according to diagram A.1-A.6 as follows: 3 edge sts in garter st, A.1 over 2 sts, repeat A.2 until 3 sts remain before mid st, A.3 over 3 sts, K 1 (= mid st), A.4 over 3 sts, A.5 until 5 sts remain, A.6 over 2 sts and 3 edge sts in garter st. Work mid st in stocking st and edge sts in garter st. When A.1-A.6 have been worked 1 time vertically there is room for 2 repetitions more of A.2/A.5 on each side of shawl. When diagram A.1-A.6 has been worked 8 times in total vertically, there are 305 sts on needle (i.e. 152 sts on each side of mid st). Work according to diagram A.7-A.12 as follows: 3 edge sts in garter st, A.7 over 2 sts, repeat A.8 until 3 sts remain before mid st, A.9 over 3 sts, K 1 (= mid st), A.10 over 3 sts, repeat A.11 until 5 sts remain, A.12 over 2 sts and 3 edge sts in garter st. When diagram A.7-A.12 have been worked 1 time vertically, there are 359 sts on needle (i.e. 179 sts on each side of mid st). Work according to diagram A.13-A.19 as follows: 3 edge sts in garter st, A.13 over 4 sts, repeat A.14 until 4 sts remain before mid st, A.15 over 1 st, A.16 over 7 sts (= mid st is in the middle of these sts), A.17 over 1 st, repeat A.18 until 7 sts remain, A.19 over 4 sts and 3 edge sts in garter st. When diagrams have been worked 1 time vertically, loosely cast off. NOTE! Work double YOs on last row in diagram as follows when casting off: K 1st YO, K 2nd YO twisted. BLOCKING: Place the shawl in lukewarm water until it is soaking wet. Carefully squeeze the water out of the shawl - do not twist the shawl - then roll the shawl in a towel and squeeze to remove more water - the shawl will now only be moist. When using Alpaca – READ SHAPING! Place the shawl on a carpet or mattress - carefully stretch it out to size and fasten it with pins, pull the middle of lace repetitions in A.13-A.19 out to form tips. Leave to dry. Repeat the process when the shawl has been washed. |
|||||||||||||||||||
Diagram explanations |
|||||||||||||||||||
|
|||||||||||||||||||
|
|||||||||||||||||||

|
|||||||||||||||||||

|
|||||||||||||||||||

|
|||||||||||||||||||
|
|||||||||||||||||||
|
Have you made this or any other of our designs? Tag your pictures in social media with #dropsdesign so we can see them! Do you need help with this pattern?You'll find tutorial videos, a Comments/Questions area and more by visiting the pattern on garnstudio.com. © 1982-2024 DROPS Design A/S. We reserve all rights. This document, including all its sub-sections, has copyrights. Read more about what you can do with our patterns at the bottom of each pattern on our site. |
|||||||||||||||||||


With over 40 years in knitting and crochet design, DROPS Design offers one of the most extensive collections of free patterns on the internet - translated to 17 languages. As of today we count 304 catalogues and 11422 patterns - 11422 of which are translated into English (UK/cm).
We work hard to bring you the best knitting and crochet have to offer, inspiration and advice as well as great quality yarns at incredible prices! Would you like to use our patterns for other than personal use? You can read what you are allowed to do in the Copyright text at the bottom of all our patterns. Happy crafting!
Comments / Questions (90)
Ich bedanke mich sehr und bin glücklich diese Arbeit geschafft zu haben. Vielen Dank für Ihren Rat. Ich habe die Farbe Camel in Baby Alpaka mit Seide genommen und es ist die traumhaft.Petra
15.03.2020 - 12:16Hallo, ich habe le Marais von Drops gestrickt und kann jetzt auf der allerletzten Reihe etwas nicht genau erkennen. Es werden dort teilweise doppelte Umschläge () schwarz ausgefüllt = zwei Umschläge zwischen zwei Maschen oder nur die normalen Umschläge(/) = ein Umschlag zwischen zwei Maschen- gestrickt? In der letzten Reihe wird im Diagramm von zwei Umschlägen die teilweise rechts verstrickt werden gesprochen, die Zeichnungen sind aber leider unscharf . Kann jemand helfen? Danke
12.03.2020 - 21:26DROPS Design answered:
Liebe Petra, bei der letzten Reihe in den Diagrammen haben Sie entweder 1 Umschlag = 2. Symbol oder 2 Umschläge = 3. Symbol - wen Sie die Maschen abketten sollen Sie die doppelte Umschläge als 2 Maschen stricken und abketten damit der Rand nicht so eng wird. Viel Spaß beim stricken!
13.03.2020 - 08:49Guten Tag, stehe wie ein Esel vor dem Berg, bin eigentlich eine gewohnte Strickerin, dieses Muster überfordert mich. Wie ist das gemeint mit den A1-A6 wo fange ich an, verstehe das absolut nicht, gibt es irgend ein einfacher Trick um das zu verstehen?FG Marianne
22.01.2020 - 22:33DROPS Design answered:
Liebe Marianne, es sind Diagramme (A.1 bis A.19= zu diesem Modell, dh Sie Sollen die Diagramme stricken, genauso wie es in der Anleitung beschrieben ist. Lesen Sie vielleicht hier mehr über Diagramme und gerne können Sie weitere Frage hier stellen. Viel Spaß beim stricken!
23.01.2020 - 09:55Sur le dernier rang à l'endroit de A14 et A18 au début et à la fin il y a un jeté faut il les faire tout les deux c'est à dire un deux jetés entre les deux mailles. Merci d’avance de votre réponse .
13.03.2019 - 10:34DROPS Design answered:
Bonjour Françoise, il y a effectivement un jeté de trop à la transition des diagrammes, vous devez bien avoir 1 jeté pour chaque diminution, même à la transition entre les diagrammes. Les diagrammes vont être corrigés, merci. Bon tricot!
25.03.2019 - 09:24Jeg kan faktisk ikke komme igang da jeg ikke i diagrammet kan se hvad de forskellige masker betyder . Fx A1 allerede de første masker kan jeg ikke se hvad betyder
18.01.2019 - 18:05DROPS Design answered:
Hei Marianne. Gjelder dette uansett hvaslags enhet du bruker? (mobil, PC, nettbrett). Vi har nå sjekket den danske oppskriften og alle symbolene ligger synlige i symbolforklaringen. Kan du se dem på et av de andre språkene? God fornøyelse
21.01.2019 - 10:03Bonjour,\r\nQue veut dire : « 3m de bordure au point mousse, A1 au dessus des 2m suivantes, répétez A2 jusqu\'à ce qu\'il reste 3m avant la maille centrale, A3 au dessus des 3m suivantes, 1m end (=m centrale), A4 au dessus des 3m suivantes, A5 jusqu\'à ce qu\'il reste 5m, A6 au dessus des 2m suivantes et 3m de bordure au point mousse?\r\nMerci
08.06.2018 - 17:09DROPS Design answered:
Bonjour Tessa, c'est la façon dont vous allez maintenant tricoter les mailles du rang: 3 m point mousse, A.1 (= 2 m), répétez les 8 m de A.2 jusqu'à ce qu'il reste 3 m avant la m centrale (= 2 fois en largeur), puis tricotez A.3 sur ces 3 dernières mailles, tricotez la m centrale en jersey, et tricotez ensuite A.4 (= 3 m), 2 x A.5 sur les 16 m suivantes) et terminez par A.6 (= 2 m) et 3 m point mousse. Bon tricot!
11.06.2018 - 08:07Leena wrote:
Would you fix this please and the diagrams A9 & A10 on line 11 in the "Le Marais" shawl, thank you!
15.03.2018 - 15:14DROPS Design answered:
Dear Leena, diagrams are correct online., they have been edited in 2016. If you got the printed catalogue or if you print the pattern before that day you may have to print pattern one more time to get it fully right. Happy knitting!
15.03.2018 - 15:45Comment termine t'on le châle sur l'envers je fai un rang de mousse et j'arrête en mousse sur le rang suivant est-ce ainsi SVP. Remerciements
21.06.2017 - 17:33DROPS Design answered:
Bonjour Manou, après les derniers diagrammes, on rabat à l'endroit sur l'envers, rabattre les jetés comme expliqué. Bon tricot!
22.06.2017 - 08:20If you want to make a larger shawl, repeat chart A1-A6 11 times before knitting chart A7-A12. I used Drops Fabel 6,5 skeins (gauge 23,5-22 sts)
05.12.2016 - 16:49Ska man avmaska med räta maskor från avigsidan eller är det bara de dubbla omslagen som ska stickas rät och vridet rät?
05.12.2016 - 16:41DROPS Design answered:
Hej Madelene. Du feller af med räta masker og de dubbla omslagen stickar du som beskrevet.
06.12.2016 - 15:32