DROPS Alpaca
DROPS Alpaca
100% Alpaca
from 3.40 £ /50g
DROPS Kid-Silk
DROPS Kid-Silk
75% Mohair, 25% Silk
from 4.60 £ /25g
Get the yarn to make this pattern from 67.40£.

The yarn cost is calculated from the pattern’s smallest size and the yarn’s cheapest product type. Looking for an even better price? You might find it on the DROPS Deals!

DROPS SS24

First in Line

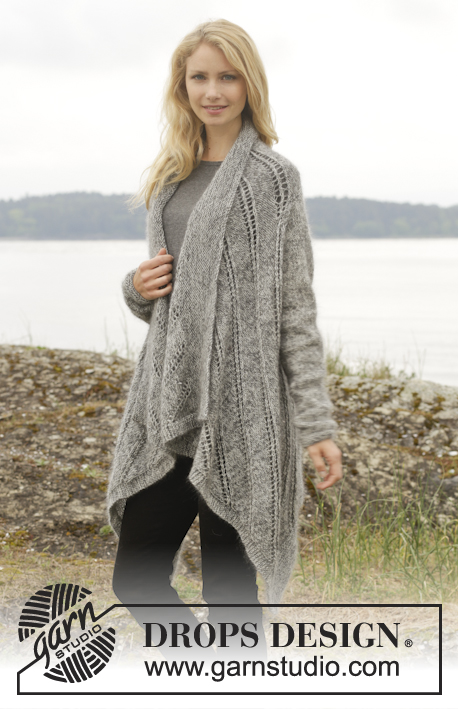
Knitted DROPS jacket in garter st with lace pattern in ”Alpaca” and ”Kid-Silk”. Size: S - XXXL.

DROPS 156-25
DROPS design: Pattern no z-680
Yarn group A + A or C
-----------------------------------------------------------
Size: S - M - L - XL - XXL - XXXL
Materials:
DROPS ALPACA from Garnstudio
450-500-550-600-650-750 g colour no 9020, light pearl grey
and use:
DROPS KID-SILK from Garnstudio
200-200-225-250-275-300 g colour no 22, ash grey

DROPS CIRCULAR NEEDLE (80 cm) SIZE 5 mm – or size needed to get 17 sts x 22 rows in stocking st with 1 strand of each yarn = 10 x 10 cm.
DROPS CIRCULAR NEEDLE (80 cm) SIZE 4 mm – for edge in garter st.

-------------------------------------------------------

Alternative Yarn – See how to change yarns here
Yarn Groups A to F – Use the same pattern and change the yarn here
Yarn usage using an alternative yarn – Use our yarn converter here

-------------------------------------------------------

DROPS Alpaca
DROPS Alpaca
100% Alpaca
from 3.40 £ /50g
DROPS Kid-Silk
DROPS Kid-Silk
75% Mohair, 25% Silk
from 4.60 £ /25g
Get the yarn to make this pattern from 67.40£.

The yarn cost is calculated from the pattern’s smallest size and the yarn’s cheapest product type. Looking for an even better price? You might find it on the DROPS Deals!

Pattern instructions

NOTE: This pattern is written in British English. All measurements in charts are in cm. For conversion from cm to inches - click here. There are different terms for crocheting in British and American English. If this pattern includes crochet, click for "crochet terms" here. For this pattern in American English, please click here.
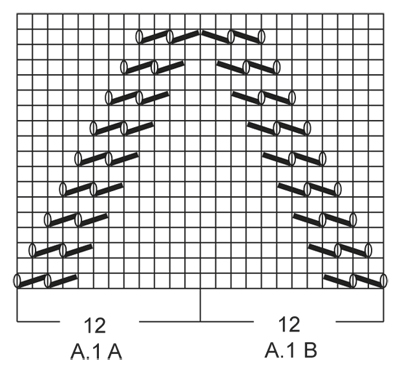
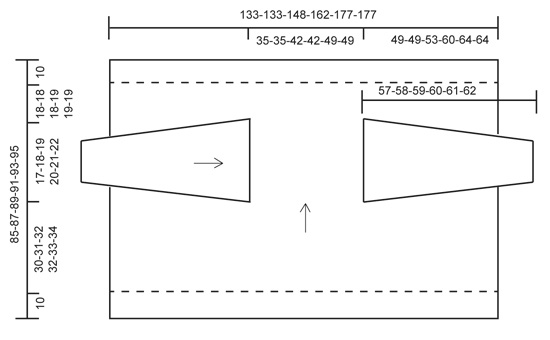
GARTER ST (back and forth on circular needle):
K all rows. 1 ridge = 2 rows K.

PATTERN:
See diagram A.1. The diagram shows all rows in pattern seen from RS. NOTE: Diagram does not fit vertically when repeated, but continue eyelet rows diagonally upwards as before, AT THE SAME TIME beg a new eyelet row every 20th row in each side of piece. I.e. 1st eyelet row in A.1 beg 4 rows before the other.
----------------------------------------------------------

JACKET:
Cast on 228-228-252-276-300-300 sts on circular needle size 4 mm with 1 strand of each yarn (= 2 strands). Work in GARTER ST - see explanation above - for 10 cm. On next row from RS switch to circular needle size 5 mm and work as follows: Work 6 sts in garter st, PATTERN A.1B (= 12 sts) – see explanation above, over the next 108-108-120-132-144-144 sts (= 9-9-10-11-12-12 repetitions in width), A.1A (= 12 sts) over the next 108-108-120-132-144-144 sts (= 9-9-10-11-12-12 repetitions in width), finish with 6 sts in garter st. Diagram A.1 is displaced 1 st towards mid back on every row from RS. REMEMBER THE KNITTING TENSION! Continue this pattern until piece measures 40-41-42-42-43-44 cm. Adjust so that last row is from WS. Work next row as follows - from RS: Work 6 sts in garter st, work pattern as before over the next 72-72-78-90-96-96 sts, garter st over the next 11 sts, pattern as before over the next 50-50-62-62-74-74 sts, garter st over the next 11 sts, pattern as before over the next 72-72-78-90-96-96 sts, finish with 6 sts in garter st. Work like this for 3 rows AT THE SAME TIME on last row cast off the middle st in every 11 sts ridge = 226-226-250-274-298-298 sts.

Now divide piece and work opening for armhole.

RIGHT FRONT PIECE:
Slip the last 143-143-161-173-191-191 sts on a stitch holder, only work over the first 83-83-89-101-107-107 sts. Continue pattern as before, i.e. work as follows from RS: 6 sts in garter st, A.1B as before, finish with 5 sts in garter st. Work until piece measures 17-18-19-20-21-22 cm from where piece was divided. NOTE: Adjust so that last row is from WS. Slip sts on a stitch holder and work left front piece.

LEFT FRONT PIECE:
Slip the last 83-83-89-101-107-107 sts back on needle, work as right front piece, work A.1A instead of A.1B. NOTE: Adjust so that last row is from WS. Slip sts on 1 stitch holder and work back piece.

BACK PIECE:
Slip the remaining 60-60-72-72-84-84 sts back on needle. Continue pattern, work the 5 sts in each side in garter st. When back piece measures 17-18-19-20-21-22 cm, adjust so that last row is from WS and adjust according to front piece, slip all parts back on same circular needle size 5 mm. Now work as follows: Work in garter st and pattern as before over front piece until the 5 sts in garter st, work 5 sts in garter st, cast on 1 new st, 5 sts in garter st, pattern over back piece as before until the 5 sts in garter st, work 5 sts in garter st, cast on 1 new st, 5 sts in garter st, pattern and garter st over front piece as before = 228-228-252-276-300-300 sts on needle. Work 2 ridges in total over the 11 sts between each front piece and back piece. Continue with pattern with 6 edge sts in garter st in each side of piece until piece measures 75-77-79-81-83-85 cm in total. Switch to circular needle size 4 mm. Work in garter st. Cast off when piece measures 85-87-89-91-93-95 cm.

SLEEVE:
Worked back and forth on circular needle.
Cast on 32-35-37-38-39-41 sts (incl 1 edge st in each side of piece) on circular needle size 4 mm with 1 strand of each yarn (= 2 strands). Work 4 ridges. Switch to circular needle size 5 mm. Now continue piece in stocking st. When piece measures 9 cm, inc 1 st inside 1 edge st in each side of piece. Repeat inc every 3-3-3-2½-2½-2½ cm 13-13-14-15-16-17 more times = 60-63-67-70-73-77 sts on needle. Work in stocking st until piece measures 52-53-54-55-56-57 cm. Cast off edge st in each side of piece at beg of the next 2 rows = 58-61-65-68-71-75 sts remain on needle. Then cast off for sleeve cap in each side of piece at beg of every row as follows: Cast off 4 sts 5 times in total = 18-21-25-28-31-35 sts remain on row. Cast off the remaining sts. Piece measures approx. 57-58-59-60-61-62 cm.

ASSEMBLY:
Sew in sleeves. Sew underarm seams inside 1 edge st.

Diagram

symbols = K from RS, P from WS
symbols = 1 YO, slip 1 st as if to K, K 1, psso
symbols = K 2 tog, 1 YO
symbols = knitting direction
diagram
diagram

Each of our patterns has specific tutorial videos to help you.

Do you have a question? See a list of frequently asked questions (FAQ)

Knitting tension is what determines the final measurements of your work, and is usually measured per 10 x 10 cm. It is provided like so: number of stitches in width x number of rows in height - eg: 19 stitches x 26 rows = 10 x 10 cm.

The knitting tension is very individual; some people knit/crochet loosely while others work tightly. You adjust the knitting tension with the needle size, which is why the suggested needle size is only meant as a guide! You need to adjust this (up or down) to ensure that YOUR knitting tension matches the knitting tension provided in the pattern. If you work with a different knitting tension than provided you will have a different yarn consumption, and your work will have different measurements than what the pattern suggests.

The knitting tension also determines which yarns can replace each other. As long as you achieve the same knitting tension you can replace one yarn with another.

See DROPS lesson: How to measure your tension/gauge

See DROPS video: How to make a gauge tension swatch

The required amount of yarn is provided in grams, eg: 450 g. To calculate how many balls you’ll need you first need to know how many grams are in 1 ball (25g, 50g or 100g). This information is available if you click on the individual yarn quality on our pages. Divide the amount required with the amount of each ball. For example, if each ball is 50g (the most common amount), the calculation will be as follows: 450 / 50 = 9 balls.

The important thing when changing from one yarn to another is that the knitting/crochet tension remains the same. This is so that the measurements of the finished piece will be the same as on the sketch provided. It is easier to achieve the same knitting tension using yarns from the same yarn group. It is also possible to work with multiple strands of a thinner yarn to achieve the knitting tension of a thicker one. Please try our yarn converter. We recommend you to always work a test swatch.

Please NOTE: when changing yarn the garment might have a different look and feel to the garment in the photo, due to individual properties and qualities of each yarn.

See DROPS lesson: Can I use a different yarn than the one mentioned in the pattern?

All our yarns are categorised into yarn groups (from A to F) according to thickness and knitting tension – group A contains the thinnest yarns and group F the thickest. This makes it easier for you to find alternative yarns to our patterns, should you wish to switch yarn. All yarns within the same group have a similar knitting tension and can easily replace each other. However, different yarn qualities have different structures and properties which will give the finished work a unique look and feel.

Click here for an overview of the yarns in each yarn group

At the top of all our patterns you’ll find a link to our yarn calculator, which is a helpful tool should you wish to use a different yarn than suggested. By filling in the yarn quality you wish to replace, the amount (in your size) and number of strands, the calculator will present good alternative yarns with the same knitting tension. Additionally it will tell you how much you’ll require in the new qualities and whether you’ll need to work with multiple strands. Most skeins are 50g (some are 25g or 100g).

If the pattern is worked with multiple colours, every colour will have to be calculated separately. Similarly, if the pattern is worked with several strands of different yarns (for example 1 strand Alpaca and 1 strand Kid-Silk) you will have to find alternatives for each, individually.

Click here to see our yarn calculator

Since different yarns have different qualities and textures we have chosen to keep the original yarn in our patterns. However, you can easily find options among our available qualities by using our yarn calculator, or simply pick a yarn from the same yarn group.

It is possible that some retailers still have discontinued yarns in stock, or that someone has a few skeins at home that they would like to find patterns for.

The yarn calculator will provide both alternative yarn as well as required amount in the new quality.

If you think it's hard to decide what size to make, it can be a good idea to measure a garment you own already and like the size of. Then you can pick the size by comparing those measures with the ones available in the pattern's size chart.

You'll find the size chart at the bottom of the pattern.

See DROPS lesson: How to read size chart

The needle size provided in the pattern serves only as a guide, the important thing is to follow the knitting tension. And since knitting tension is very individual, you will have to adjust the needle size to ensure that YOUR tension is the same as in the pattern – maybe you’ll have to adjust 1, or even 2 needle sizes, up or down to achieve the correct tension. For this, we recommend that you work test swatches.

Should you work with a different knitting tension than the one provided, the measurements of the finished garment might deviate from the measurement sketch.

See DROPS lesson: How to measure your tension/gauge

See DROPS video: How to make a tension/gauge swatch

Working a garment top-down provides more flexibility and room for personal adjustment. For example it is easier to try the garment on while working, as well as making adjustments to length of yoke and shoulder caps.

The instructions are carefully explaining every step, in the correct order. Diagrams are adjusted to the knitting direction and are worked as usual.

The diagram depicts all rows/rounds, and every stitch seen from the right side. It is read from bottom to top, from right to left. 1 square = 1 stitch.

When working back and forth, every other row is worked from the right side and every other row is worked from the wrong side. When working from the wrong side, the diagram will have to be worked reversed: from left to right, knit stitches are purled, purl stitches are knit etc.

When working in the round every round is worked from the right side and the diagram are worked from right to left on all rounds.

See DROPS lesson: How to read knitting diagrams

The diagram depicts all rows/rounds, and every stitch seen from the right side. It is worked from bottom to top, from right to left.

When working back and forth every other row is worked from the right side: from right to left and every other row is worked from the wrong side: from left to right.

When working in the round, every row in the diagram are worked from the right side, from right to left.

When working a circular diagram you start in the middle and work your way outwards, counter clockwise, row by row.

The rows usually start with a given number of chain stitches (equivalent to the height of the following stitch), this will either be depicted in the diagram or explained in the pattern.

See DROPS lesson: How to read crochet diagrams

Instructions for working several diagrams after each other on the same row/round, will often be written like so: “work A.1, A.2, A.3 a total of 0-0-2-3-4 times". This means you work A.1 once, then A.2 is worked once, and A.3 is repeated (in width) the number of times provided for your size – in this case like so: S = 0 times, M = 0 times, L=2 times, XL= 3 times and XXL = 4 times.

The diagrams are worked as usual: begin with the first row in A.1, then work the first row in A.2 etc.

See DROPS lesson: How to read knitting diagrams

See DROPS lesson: How to read crochet diagrams

The total width of the garment (from wrist-to-wrist) will be larger in the larger sizes, despite the actual sleeves being shorter. The larger sizes have longer sleeve caps and wider shoulders, so there will be a good fit in all sizes.

The measurement sketch/schematic drawing provides information regarding the full length of the garment. If it’s a jumper or a jacket the length is measured from the highest point on the shoulder closest to the neckline, and straight down to the bottom of the garment. It is NOT measured from the tip of shoulder. Similarly, the length of yoke is measured from the highest point on the shoulder and down to where yoke is split into body and sleeves.

On a jacket measures are never taken along bands, unless specifically stated. Always measure inside band stitches when measuring the length.

See DROPS lesson: How to read a schematic drawing

Diagrams are often repeated on the round or in height. 1 repeat is the diagram the way it appears in the pattern. If it says to work 5 repeats of A.1 in the round, then you work A.1 a total of 5 times after/next to each other in the round. If it says to work 2 repeats of A.1 vertically/in height you work the entire diagram once, then begin again at the start and work the entire diagram one more time.

Chain stitches are slightly narrower than other stitches and to avoid working the cast-on edge too tight, we simply chain more stitches to begin with. The stitch count will be adjusted on the following row to fit the pattern and measurement sketch.

The rib edge is more elastic and will contract slightly compared to, for example, stocking stitch. By increasing before the rib edge, you avoid a visible difference in width between the rib edge and the rest of the body.

It’s very easy to cast off too tightly, and by making yarn overs while casting off (and simultaneously casting these off) you avoid a too tight cast off edge.

See DROPS video: How to bind off with yarn overs (yo)

To achieve an even increase (or decrease) you can increase on, for example: every 3rd and 4th row alternately, like so: work 2 rows and increase on the 3rd row, work 3 rows and increase on the 4th. Repeat this until the increase is complete.

See DROPS lesson: Increase or decrease 1 st on every 3rd and 4th row alternately

Should you prefer to work in the round instead of back and forth, you may of course adjust the pattern. You’ll need to add steeks mid-front (usually 5 stitches), and follow the instructions. When you would normally turn and work from the wrong side, simply work across the steek and continue in the round. At the end you’ll cut the piece open, pick up stitches to work bands, and cover the cut edges.

See DROPS video: How to knit steeks and cut open

Should you prefer to work back and forth instead of in the round, you may of course adjust the pattern so you work the pieces separately and then assemble them at the end. Divide the stitches for the body in 2, add 1 edge stitch in each side (for sewing) and work the front and back pieces separately.

See DROPS lesson: Can I adapt a pattern for circular needles into straight needles?

Pattern repeats can vary slightly in the different sizes, in order to get the correct proportions. If you’re not working the exact same size as the garment in the photo, yours might deviate slightly. This has been carefully developed and adjusted so that the complete impression of the garment is the same in all sizes.

Make sure to follow instructions and diagrams for your size!

If you have found a pattern you like which is available in women’s size it’s not very difficult to convert it to men’s size. The biggest difference will be the length of sleeves and body. Start working on the women size that you think would fit across the chest. The additional length will be worked right before you cast off for the armhole/sleeve cap. If the pattern is worked top-down you can add the length right after the armhole or before the first decrease on sleeve.

Regarding additional yarn amount, this will depend on how much length you add, but it is better with a skein too many than too few.

All yarns will have excess fibres (from production) that might come off as lint or shedding. Brushed yarns (ie hairier yarns) have more of these loose, excess fibres, causing more shedding.

Shedding also depends on what is worn under or over the garment, and whether this pulls at the yarn fibres. It’s therefore not possible to guarantee that there will be no shedding

Below are some tips on how to get the best result when working with hairier yarns:

1. When the garment is finished (before you wash it) shake it vigorously so the looser hairs come off. NOTE: do NOT use a lint roller, brush or any method that pulls at the yarn.

2. Place the garment in a plastic bag and put it in your freezer - the temperature will cause the fibres to become less attached to each other, and excess fibres will come off easier.

3. Leave in the freezer for a few hours before taking it out and shaking it again.

4. Wash the garment according to the instructions on the yarn label.

Pilling is a natural process that happens to even the most exclusive of fibers. It's a natural sign of wear and tear that is hard to avoid, and that is most visible in high friction areas of your garment like a sweater's arms and cuffs.

You can make your garment look as new by removing the pilling, using a fabric comb or a pill/lint remover.

Still can't find the answer you need? Then scroll down and leave your question so one of our experts can try to help you. This will be done normally within 5 to 10 working days.
In the meantime, you can read the questions and answers that others have left to this pattern or join the DROPS Workshop on Facebook to get help from fellow knitters/crocheters!

You might also like...

Post a comment to pattern DROPS 156-25

We would love to hear what you have to say about this pattern!

If you want to leave a question, please make sure you select the correct category in the form below, to speed up the answering process. Required fields are marked *.

Comments / Questions (61)

country flag Isabelle wrote:

Dans ce modèle on nous dit de commencer un nouveau rang ajouré tous les 20 rangs or le diagramme est sur 18 rangs, que fait on du rang manquant ?

01.03.2024 - 19:20

DROPS Design answered:

Bonjour Isabelle, on continue simplement le motif ajouré pour que les diagonales continuent comme avant, mais il faudra 20 rangs pour pouvoir commencer un nouveau motif en largeur. Bon tricot!

04.03.2024 - 07:20

country flag Chey wrote:

Bonjour, quand est-ce qu'on arrête de tricoter avec les 2 fils différents comme dit dans la VESTE et pour les MANCHES ? : "VESTE : Monter 228-228-252-276-300-300 m avec l'aiguille circulaire 4 et 1 fil de chaque qualité (= 2 fils tricotés ensemble). " et "MANCHES : [...] Monter 32-35-37-38-39-41 m (y compris 1 m lis de chaque côté) avec l'aiguille circulaire 4 et 1 fil de chaque qualité (= 2 fils tricotés ensemble). "

23.10.2022 - 19:16

DROPS Design answered:

Bonjour Mme Chey, cette veste se tricote entièrement avec 1 fil de chacune des deux qualités, autrement dit avec 1 fil Alpaca + 1 fil Kid-Silk et 17 mailles x 22 rangs jersey = 10 x 10 cm. Bon tricot!

24.10.2022 - 08:45

country flag Bouvard Plunet Catherine wrote:

Oui j ai bien compris qu il fallait recréer un dessin mais je ne sais pas à quel moment Merci pour votre réactivité Très cordialement Cath

22.11.2021 - 09:13

DROPS Design answered:

Bonjour Mme Bouvard Plunet et désolée pour la réponse tardive, il semble que votre question n'a pas été vue; lorsque vous divisez l'ouvrage en 3 parties, vous continuez les motifs exactement comme avant sur le nombre de mailles restantes pour que les diagonales continue comme elles le faisaient avant et continuez à répéter le motif en hauteur tout comme auparavant également. Bon tricot!

19.01.2022 - 10:44

country flag Bouvard Plunet Catherine wrote:

Bonjour Lorsque le tricot est séparé en 3 morceaux dois je reconstituer le dessin du dos et si oui à quel moment Merci Cordialement Cath

22.11.2021 - 08:14

DROPS Design answered:

Bonjour Cath, tout à fait, vous devez continuer le point fantaisie du dos comme avant. La 2ème photo pourra probablement vous éclairer. Bon tricot!

22.11.2021 - 08:49

country flag Louise Linding wrote:

Hej Jeg forstår ikke forklaringen - der står at der startes på en ny hulrække for hver 20. Pind, men der er kun 18 pinde i diagrammet? Derudover står der, at 1.hulrække i A.1 starter 4 p før den anden - det forstår jeg heller ikke… Håber i kan hjælpe mig…

24.10.2021 - 17:31

DROPS Design answered:

Hej Louise, det vil ske automatisk når du starter det hvor der står JAKKE: Slå op og strik MØNSTER A.1B på første halvdel og A.1A over den anden halvdel. God fornøjelse!

25.10.2021 - 12:27

country flag Rumposch wrote:

GLEICHZEITIG beginnt in jeder 20. R auf jeder Seite der Arb eine neue Lochreihe d.h. die 1.Lochreihe von A.1 beginnt 4 R vor den anderen.----der Abstand der Reihen stimmt doch dann nicht oder sehe ich das falsch? Danke für Ihre Hilfe. Rumposch

20.04.2021 - 21:22

DROPS Design answered:

Liebe Frau Rumposch, ein neues Rapport von A.1 können Sie beginnen wenn Sie wenigstens 8 Maschen + 2 M (für das 1. Lochmuster) + 1 M davor = 11 Maschen vor dem Umschlag im ersten A.1 und nach dem Umschlag von letzen A.2. Bei dieser Reihe können Sie nur 1 Loch stricken im ersten A.1 und letzten A.2, bei der nächsten Hinreihe haben Sie dann genügend Maschen um die beiden Löcher zu stricken. Viel Spaß beim stricken!

21.04.2021 - 07:50

country flag Luiza wrote:

Lindo adorei ,vou fazer um desse pra mim parabéns pra quem criou esse belo trabalho.👏👏❤

13.03.2021 - 04:22

country flag Jackie wrote:

Loved this item but have never knitted from a chart before and am struggling a bit to follow - am I right in saying that by the time I have knitted 44cm I will have reduced my stitches? If so I am unable to see where! Is it possible to get the pattern row by row rather than a chart?

14.02.2021 - 11:18

DROPS Design answered:

Dear Jackie, after you cast on and knit the first 44 rows, your number of stitches does not change. In the pattern for ever decrease there is a corresponding yarnover. Unfortunately there is no written out explanation for the pattern itself, but HERE is a lesson, that might help you make sense of the charts. Happy Knitting!

14.02.2021 - 13:30

country flag Nelli wrote:

Ich möchte dieses Modell in Drops Air nacharbeiten, wie viel Gramm bräuchte ich für Gr. XXXL? Danke:)

16.08.2019 - 17:05

DROPS Design answered:

Liebe Nelli, Sie können unseren Garnumrechner benutzen, oder hier finden Sie wie man die neue Garnmenge kalkuliert. Viel Spaß beim stricken!

19.08.2019 - 08:37

country flag BOUVARD PLUNET wrote:

Bonjour j ai bien compris qu il fallait recommencer un nouveau dessin tout les 20 rangs mais je n ai pas assez de mailles pour créer le point fantaisie Merci beaucoup Cath bouvard plunet

07.07.2019 - 08:15

DROPS Design answered:

Bonjour Mme Bouvard Plumet, pour répéter les motifs en hauteur, on continue d'abord les diagonales de A.1B et A.1A aux rangs suivants, jusqu'à ce que vous ayez 11 m endroit en début de rang avant le 1er A.1B et après le dernier A.1A, vous pouvez maintenant commencer un nouveau motif en largeur sur ces 11 premières et dernières mailles (= 1 jeté, 1 diminution, 10 m end pour A.1B - 10 m end, 1 jeté, 1 dim pour A.1A) (soit 4 rangs en continuant les diagonales comme avant, avant de pouvoir commencer une nouvelle diagonale ajourée). Bon tricot!

08.07.2019 - 09:58