
Popular categories
Looking for a yarn?


Comments / Questions (27)
![]() Niget wrote:
Niget wrote:
Bonjour. J'ai vu que ce modèle se tricote avec des aiguilles circulaires en -retours. Est-ce que je peux le faire avec des aiguilles simples. Est-ce que le sens des explications du point fantaisie devrait changer? merci
26.07.2023 - 17:30DROPS Design answered:
Bonjour Mme Niget, tout à fait, on tricote ici en allers et retours sur aiguille circulaire pour avoir suffisamment de place pour y loger toutes les mailles, seul le col sera tricoté en rond (pour éviter cela, faites la couture de l'une des épaules seulement, relevez les mailles du col, puis tricotez en rangs et faites ensuite la couture de la 2ème épaule et du col). Retrouvez plus d'infos à ce sujet ici. Bon tricot!
28.07.2023 - 07:54
![]() Aliene wrote:
Aliene wrote:
Problemi con A2. Può spiegarmi meglio? I punti poi con A1 non corrispondono. Ho fatto campione con 2 motivi A1 montando 18 punti + 2 di vivagno totale 20. Ma A2 non corrisponde.
04.04.2022 - 09:19DROPS Design answered:
Buonasera Aliene, nella lavorazione del top si lavora prima A.2 e poi A.1 perchè sul 1° ferro di A.2 si diminuiscono 2 maglie per ogni ripetizione di A.2. Buon lavoro!
05.04.2022 - 19:11
![]() Airi wrote:
Airi wrote:
Not that instruction explains those raised loops at all that twist the knit a few times. I do not understand. A2 pattern round is not explained in the middle of the knit?
09.11.2020 - 10:55DROPS Design answered:
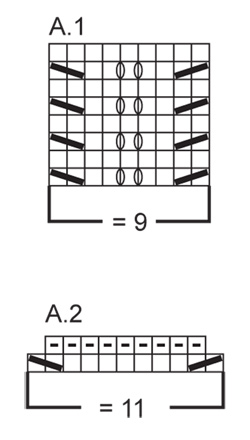
Dear Airi, A.2 will be worked only one time in height (but repeated 12 to 18 times in the round, see size), this means on first round in A.2 work: *K2 tog, K7, slip 1 st as if to K, K 1, psso*, repeat from *-* (there are now 9 sts in each A.2). On round 2, purl all stitches. Hope this helps, happy knitting!
09.11.2020 - 11:48
![]() Barbara wrote:
Barbara wrote:
Sieht toll aus, aber wenn mich nicht alles täuscht sind Strickbild im Foto und die Strickschrift A1 nicht identisch. Auf dem Foto sieht es so aus, als ob nur die Reihen mit den Abnahmen und nicht noch zusätzlich eine Reihe rechts, Rückreihe links gestrickt wurden. Bleibt dann die Zählweise die gleiche, also 7xA1 usw.?
18.06.2015 - 18:30DROPS Design answered:
A.1 ist komplett mit allen Hin- und Rück-R dargestellt und korrekt, das Diagramm passt so auch zum Foto. In den Hin-R machen Sie die Musterung mit Löchern und Zusammenstricken, in den Rück-R stricken Sie links. Die Rück-R sind nötig, damit das Muster so erscheint, wie es erscheint, die Umschläge müssen abgestrickt werden, damit sich die Löcher wie auf dem Bild ergeben. Halten Sie sich also einfach genau an die Anleitung, dann sollte es gelingen.
24.06.2015 - 10:52
![]() Sara wrote:
Sara wrote:
132-24=108:2= 54 per axel.Avm. 6 m(2,2,1,1)=48
10.08.2014 - 13:43
![]() Carina Gulliksson wrote:
Carina Gulliksson wrote:
Har stickat detta linne och får inte ihop maskantalet på framstycket....lägger upp 156 m till stl m stickar som bakstycket och sen lägger 2 nya m i var sida som stickas r....= 160 m sen ska de mittersta 24 m sättas på en tråd = 136 m...sen ska det maskas av 2 maskor 2 gånger= 4 m och 1 m 2 gånger = 2 då har jag 65 maskor kvar på var sida och enl mönstret ska det vara 48...jag får i alla fall inte ihop det , så nu gjorde jag lite som jag ville M V H Carina Gulliksson
08.08.2014 - 16:57DROPS Design answered:
Men har du minskat till 128 m som du gjorde på bakstk ?
04.09.2014 - 11:41Anna wrote:
What does "1 ridge" mean?
02.06.2014 - 14:31DROPS Design answered:
Dear Anna, 1 ridge = K 2 rows when worked back and forth or K1 round, P1 round when worked in the round. Happy knitting!
03.06.2014 - 09:57
![]() OROBINO wrote:
OROBINO wrote:
Pourquoi les modèles sont-ils prévus avec des aiguilles circulaires et non pas droites? Merci pour votre réponse.
08.05.2014 - 19:38DROPS Design answered:
Bonjour Mme Orobino, ce modèle se tricote en allers et retours sur aiguille circulaire pour avoir suffisamment de place pour y loger toutes les mailles. Vous pouvez ainsi le tricoter sur aiguilles droites, veillez à bien conserver la bonne tension (mailles plus serrées). Pour le col, cousez 1 seule épaule avant de relever les mailles puis faites la couture de la 2ème épaule et du col. Bon tricot!
09.05.2014 - 08:43
![]() Michaela wrote:
Michaela wrote:
Sehr schönes Top, das Muster lässt sich gut stricken und die Wolle ist wunderschön von der Farbe, Verarbeitung und so weich. Danke
07.05.2014 - 22:58
![]() Geier Petra wrote:
Geier Petra wrote:
Hallo zusammen,ist das garn für einen sommerpulli nicht zu warm,und kratzt es???
01.05.2014 - 13:33DROPS Design answered:
Liebe Frau Geier, das Garn hat einen hohen Baumwollanteil (fast die Hälfte ist Baumwolle), darum ist es auch für leichtere Kleidung geeignet, trotz der Merinowolle. Außerdem ist das Modell durch das Lochmuster sehr luftig. Das Garn ist auch für Babykleidung geeignet, was nicht gut ginge, wenn es kratzen würde. Lesen Sie hierzu doch auch unsere Beschreibung zu Cotton Merino, die Sie bei der Farbkarte finden. Bei starker Wollempfindlichkeit können Sie als Garnalternative Cotton Light wählen, aus Baumwolle und Polyester.
01.05.2014 - 17:18
|
||||||||||||||||
Audrey#audreytop |
||||||||||||||||
|
|
||||||||||||||||
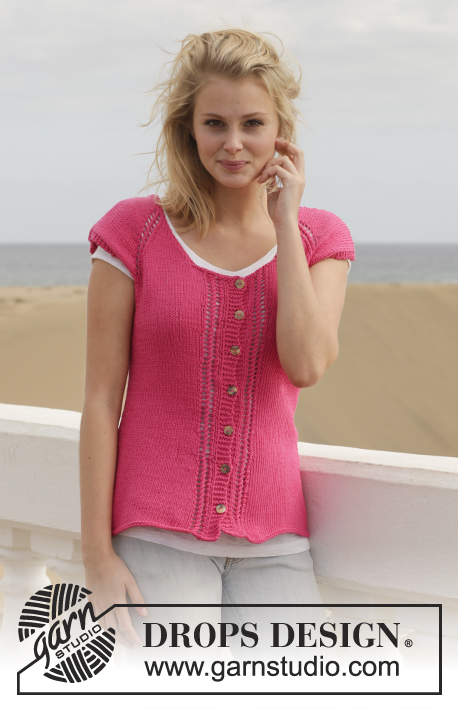
Knitted DROPS top with lace pattern in ”Cotton Merino”. Size: S - XXXL.
DROPS 154-36 |
||||||||||||||||
|
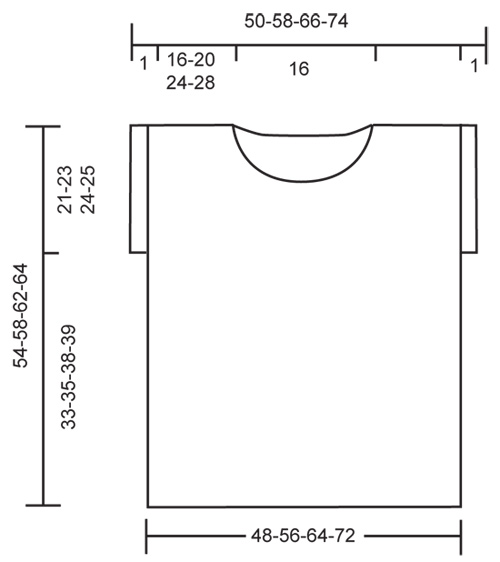
GARTER ST (in the round on circular needle): * K 1 round and P 1 round *, repeat from *-*. 1 ridge = 2 rounds. GARTER ST (back and forth on needle): K all rows. 1 ridge = 2 rows K. PATTERN: See diagram A.1 and A.2. A.1 and A.2 shows all rows in pattern seen from RS. Work pattern as follows: * A.1 7 times vertically, 1 ridge, A.1 3 times vertically, 1 ridge, A.1 2 times vertically , 1 ridge, A.1 1 time vertically *, repeat from *-* throughout the rest of the piece. ---------------------------------------------------------- BACK PIECE: Worked back and forth on circular needle. Loosely cast on 134-156-178-200 sts (incl 1 edge st in garter st in each side) on circular needle size 4 mm with Cotton Merino. Work next row (= from RS) as follows: 1 edge st in garter st, pattern according to diagram A.2 (= 11 sts on 1st row in diagram) over all sts on needle = 12-14-16-18 repetitions in width, 1 edge st in garter st. When A.2 has been worked 1 time vertically, there are 110-128-146-164 sts on needle. Then work as follows: 1 edge st in garter st, pattern according to diagram A.1 (= 9 sts) 12-14-16-18 times in total in width, 1 edge st in garter st. Continue with PATTERN - see explanation above. AT THE SAME TIME when piece measures 33-35-38-39 cm, cast on 2 new sts at the end of the next 2 rows for armholes = 114-132-150-168 sts. Continue pattern as before but now with 3 edge sts in garter st in each side. When piece measures 51-55-59-61 cm, cast off the middle 34 sts for neck and finish each shoulder separately. Continue to cast off 1 st at beg of row from neck = 39-48-57-66 sts remain for shoulder. When piece measures 54-58-62-64 cm, cast off all sts. Work the other shoulder. FRONT PIECE: Cast on and work as back piece. When piece measures 48-52-54-56 cm, slip the middle 24 sts on a stitch holder for neck and finish each side separately. Then cast off at beg of every row from neck: 2 sts 2 times and 1 st 2 times = 39-48-57-66 sts remain for shoulder. When piece measures 54-58-62-64 cm, cast off all sts. Work the other shoulder. ASSEMBLY: Sew the shoulder seams. Sew side seams in one, in outer loops of edge sts. Cut and fasten the yarn. NECK EDGE: Pick up approx. 80-88 sts around the neck incl sts on stitch holder at the front. Work 3 ridges in GARTER ST in the round on circular needle - see explanation above. Loosely cast off. |
||||||||||||||||
Diagram explanations |
||||||||||||||||
|
||||||||||||||||
|
||||||||||||||||
|
||||||||||||||||
Have you finished this pattern?Tag your pictures with #dropspattern #audreytop or submit them to the #dropsfan gallery. Do you need help with this pattern?You'll find 21 tutorial videos, a Comments/Questions area and more by visiting the pattern on garnstudio.com. © 1982-2025 DROPS Design A/S. We reserve all rights. This document, including all its sub-sections, has copyrights. Read more about what you can do with our patterns at the bottom of each pattern on our site. |
||||||||||||||||


With over 40 years in knitting and crochet design, DROPS Design offers one of the most extensive collections of free patterns on the internet - translated to 17 languages. As of today we count 314 catalogues and 11822 patterns translated into English (UK/cm).
We work hard to bring you the best knitting and crochet have to offer, inspiration and advice as well as great quality yarns at incredible prices! Would you like to use our patterns for other than personal use? You can read what you are allowed to do in the Copyright text at the bottom of all our patterns. Happy crafting!
Post a comment to pattern DROPS 154-36
We would love to hear what you have to say about this pattern!
If you want to leave a question, please make sure you select the correct category in the form below, to speed up the answering process. Required fields are marked *.