
Looking for a yarn?


Comments / Questions (12)
![]() Merethe Nielsen wrote:
Merethe Nielsen wrote:
Jeg er gået i stå efter række 28, den har fået en form for spids, kan ikke se hvor jeg starter i række 29? Synes også at det stykke fra 23 ligner hen ad ryggen, men forstå det er brystkassen? Er halsen drejet?
18.02.2025 - 02:10DROPS Design answered:
Hei Merethe. Når du starter med rad 29, hekler du 4 fastmasker bortover (du hekler "nedover" i radene), ikke i en fastmaske som tidligere. Dette gjøres 6 ganger (rad 29 til rad 34). Du har da heklet brystkassen. Når du heklet omgang 20, skulle denne omgangen hekles 20,5 gang slik at man avsluttet midt oppå nakken. Da vil brystkassen komme i front, ikke på ryggen. mvh DROPS Design
10.03.2025 - 07:45
![]() Anne wrote:
Anne wrote:
Bonjour, Je ne comprends pas, pour les rangs 8 à 20 de la tête, cou et corps : "sans joindre à la fin de chaque tour". Pouvez-vous m'expliquer? Merci
18.10.2021 - 19:57DROPS Design answered:
Bonjour Anne, bien volontiers: crochetez 1 maille serrée dans chaque maille serrée tout le tour, à la fin du tour, au lieu de terminer par 1 maille coulée dans la première maille serrée du tour, mettez un marqueur pour repérer la fin/le début du tour et crochetez simplement 1 maille serrée dans la 1ère maille serrée du tour suivant, et continuez ainsi, en faisant bien suivre votre marqueur pour repérer le début des tours, vous crochetez ainsi en spirale. Bon crochet!
19.10.2021 - 07:49
![]() Gabriela María Sanmarti wrote:
Gabriela María Sanmarti wrote:
Could you please send me the pattern to knit a panda toy of about 60 cm? Thank you very much. In spanglish much better
19.12.2020 - 02:08DROPS Design answered:
Hola Gabriela. No hacemos patrones personalizados. Puedes ver en el apartado Mascotas & Juguetes todos los patrones disponibles.
20.12.2020 - 12:24
![]() Herma Van Der Moolen wrote:
Herma Van Der Moolen wrote:
Hoe haak ik verder na toer 29???????
02.01.2019 - 12:20
![]() Erika Procter wrote:
Erika Procter wrote:
Hello, where it says 'ROUND 8 to 20: Work 1 dc in every dc in the round without finishing every round, then work up to the middle on top of neck', how do you crochet in the round and not finish every round?
27.03.2018 - 15:32DROPS Design answered:
Dear Mrs Procter, just work 1 dc in each dc without joining at the end of round with a sl st, insert a marker at the beg of each row and move it upwards so that you can count the number of rounds worked. Happy crocheting!
28.03.2018 - 15:09
![]() Kristin wrote:
Kristin wrote:
Hallo, das Problem ist, wie man ab der 35. Runde weiterhäkelt. An den Seiten befinden sich ja dann so große Löcher.... Danke für die Hilfe! Viele Grüße, Kristin
03.10.2017 - 15:13DROPS Design answered:
Liebe Kristin, bei der 35. Runde werden Sie um herum die ganze "Öffnung" arbeiten, dh in die Maschen der vorrigen Reihe sowie entlang den Reihen 24 bis 35 so daß keinen Loch mehr gibt. Dann in der Runde weiter häkeln. Viel Spaß beim häkeln!
03.10.2017 - 15:37
![]() Alicia wrote:
Alicia wrote:
I'm very confused at row 34/round 35 - how should I work around the opening? My current attempt has two holes where the precious row ends are, but I can't see any mention of sewing them up later. What forms the opening? Thanks for any help you can offer!
23.02.2015 - 21:45DROPS Design answered:
Dear Alicia, after row 34, turn to work next round from RS, then work 1 dc in each st around the opening created by the rows worked back and forth, working 2 dc in the same dc to get a total of 22 dc at the end of the 35th round. You continue then body in the round to back. Happy crocheting!
24.02.2015 - 09:10
![]() Rob wrote:
Rob wrote:
I've asked my wife to make me one of these as a present for a friend. She is confused by the instructions at ROUND 2 - Work 2 dc in every dc = 10 dc. Turn with 1 ch, then work back and forth in one." What does the last sentence mean?
28.11.2014 - 16:43DROPS Design answered:
Dear Rob, you first have to work 2 first rounds in the round, but then after round 2, you have to turn and work in rows from row 3 to row 7 (ie for 5 rows), this creates the opening for snout worked later (see in pattern below "SNOUT"). Afterwards, you continue from round 8 in the round again. Happy crocheting to your wife!
28.11.2014 - 17:47
![]() Elisabeth wrote:
Elisabeth wrote:
Combien de temps faut-il pour réaliser ce modèle ? D'avance merci
17.09.2014 - 21:18DROPS Design answered:
Bonjour Elisabeth, le temps de réalisation dépend notamment de l'expérience de chacune. Bon crochet!
18.09.2014 - 08:53
![]() DROPS Design wrote:
DROPS Design wrote:
Liebe Abc, das ist 0-1001.
10.01.2014 - 15:04
|
|
Roger |
|
 |
 |
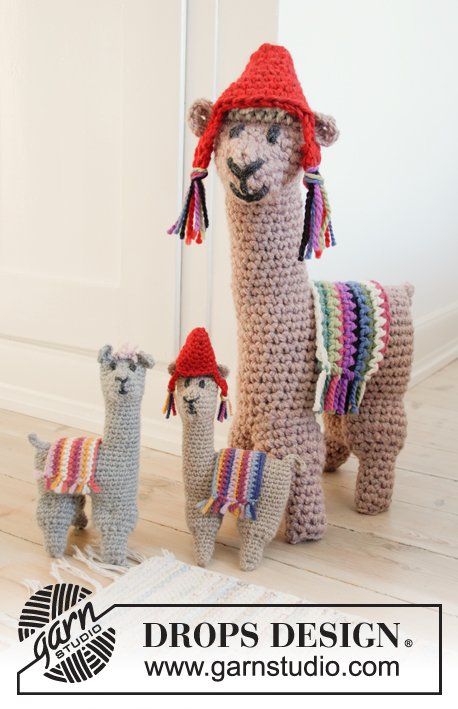
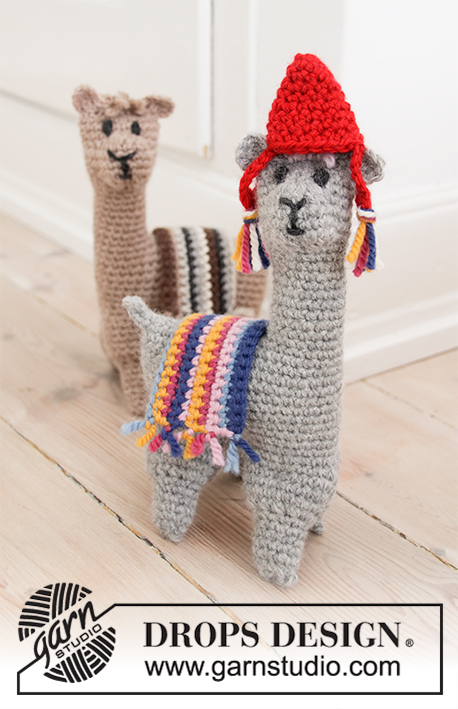
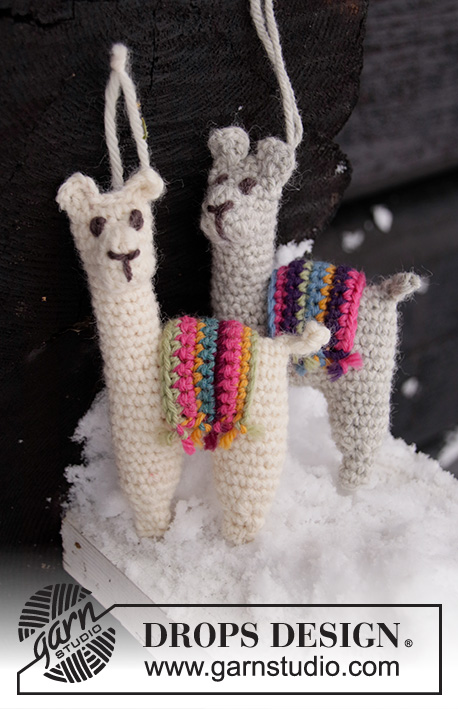
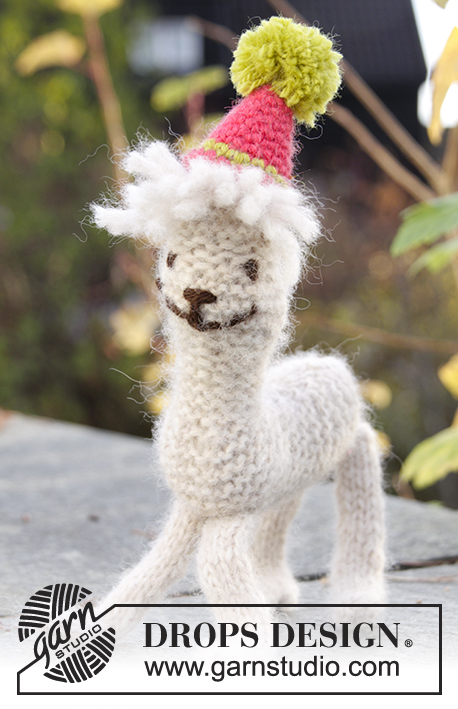
Crochet DROPS Alpaca in "Brushed Alpaca Silk".
DROPS Extra 0-985 |
|
|
FILLING TIP: Gradually fill some poly stuffing or Alpaca Silk in the animal when working. CROCHET TIP: Beg every sc round with 1 ch (this does not replace first sc) and finish with 1 sl st in first sc from beg of round. Turn every sc row with 1 ch - this ch does not replace first sc on row. DECREASE TIP: Dec 1 sc by working 2 sts tog. This is done as follows: Insert hook in first st and pull yarn through, insert hook in next st and pull yarn through, make 1 YO and pull yarn through all 3 sts on hook. ---------------------------------------------------------- ALPACA: Worked from the top of head, down the neck and along the body. Legs, tail and ears are worked separately and sew on at the end. READ FILLING TIP! HEAD, NECK AND BODY: Work 4 ch with beige on hook size 3 mm / C and form a ring with 1 sl st in first ch. ROUND 1: Work 5 sc in ch-ring. ROUND 2: Work 2 sc in every sc = 10 sc. Turn with ch 1, then work back and forth in one. ROW 3-7: Work 1 sc in every sc back and forth (= opening for snout, which is worked later). ROUND 8 to 20: Work 1 sc in every sc in the round without finishing every round, then work up to the middle on top of neck. ROUND 21: Work 1 sc in each of the first 4 sc, 2 sc in each of the next 2 and 1 sc in each of the last 4 = 12 sc. ROUND 22: Work 1 sc in each of the first 5 sc, 2 sc in each of the next 2 and 1 sc in each of the last 5 = 14 sc. ROW 23: Work 1 sc in each of the first 12 sc, turn piece with ch 1, now work back and forth in one for chest. ROW 24 (WS): Skip the first sc, 1 sc in each of the next 10 sc, turn with 1 ch. ROW 25 (RS): Skip the first sc, 1 sc in each of the next 8 sc, turn with 1 ch. ROW 26 (WS): Skip the first sc, 1 sc in each of the next 6 sc, turn with 1 ch. ROW 27 (RS): Skip the first sc, 1 sc in each of the next 4 sc, turn with 1 ch. ROW 28 (WS): Skip the first sc, 1 sc in each of the next 2 sc, turn with 1 ch. ROW 29 (RS): Skip first sc, then work 4 sc, turn with 1 ch. ROW 30 (WS): Skip first sc, then work 6 sc, turn with 1 ch. ROW 31 (RS): Skip first sc, then work 8 sc, turn with 1 ch. ROW 32 (WS): Skip first sc, then work 10 sc, turn with 1 ch. ROW 33 (RS): Skip first sc, then work 12 sc, turn with 1 ch. ROW 34 (WS): Skip first sc, then work 14 sc, turn with 1 ch. Now continue in the round again. ROUND 35: Work sc around the entire opening - inc evenly so that there are 22 sc in total. ROUND 36 to 45: Continue in the round with 10 rounds sc. ROUND 46: Work sc, at the same time dec 4 sc evenly by working 2 and 2 sc tog – SEE DECREASE TIP = 18 sc. ROUND 47: Work sc, at the same time dec 4 sc evenly by working 2 and 2 sc tog = 14 sc - SEE FILLING TIP. ROUND 48: Work sc, at the same time dec 4 sc evenly by working 2 and 2 sc tog = 10 sc. ROUND 49: Work all sc tog 2 by 2 = 5 sc. Cut the yarn, bast it around the opening, tighten tog and fasten. SNOUT: Work 14 sc with beige on hook size 3 mm / C around the opening at the front of head. Insert 1 marker mid on top of head. Continue with 4 rounds with 1 sc in every sc while at the same time working the 2 sc mid on top of head tog on every round = 10 sc. Then work 1 round where all sc are worked tog 2 by 2 = 5 sc, fasten off. Put some poly stuffing in snout, baste the yarn end around the opening, tighten tog and fasten. LEGS: Ch 4 with beige on hook size 3 mm / C and form a ring with 1 sl st in first ch. ROUND 1: 6 sc in ch-ring. ROUND 2: * 1 sc in first sc, 2 sc in next sc *, repeat from *-* = 9 sc. ROUND 3-12: Work 1 sc in every sc in the round, fasten off. Work a total of 4 legs like this. Fill some poly stuffing in them and sew them to the underside of body. TAIL: Ch 7 with two strands beige on hook size 3 mm / C, then work 2 tr in 2nd ch from hook, then 1 hdc in each of the last ch 5, fasten off and sew the tail to the back of body so that it hangs down. EAR: Ch 6 with two strands beige on hook size 3 mm / C, then work 2 hdc in 2nd ch from hook, then 1 sc in each of the last ch 4, fasten off. Work another ear and sew them on top of the head. HAIR TUFT: Cut 8 strands beige, approx. 8 cm / 3'' long. Place two and two strands tog, insert a hook through a st on top of head at one ear and pull the yarn half way through to make a loop. Pull yarn ends through this loop and tighten. Repeat this three more times so that there are hair tufts between the ears. Cut hair tufts to desired length. Embroider eyes, snout and mouth with black. |
|
Have you finished this pattern?Tag your pictures with #dropspattern or submit them to the #dropsfan gallery. Do you need help with this pattern?You'll find 10 tutorial videos, a Comments/Questions area and more by visiting the pattern on garnstudio.com. © 1982-2025 DROPS Design A/S. We reserve all rights. This document, including all its sub-sections, has copyrights. Read more about what you can do with our patterns at the bottom of each pattern on our site. |
|


With over 40 years in knitting and crochet design, DROPS Design offers one of the most extensive collections of free patterns on the internet - translated to 17 languages. As of today we count 314 catalogs and 11822 patterns - 11812 of which are translated into English (US/in).
We work hard to bring you the best knitting and crochet have to offer, inspiration and advice as well as great quality yarns at incredible prices! Would you like to use our patterns for other than personal use? You can read what you are allowed to do in the Copyright text at the bottom of all our patterns. Happy crafting!
Post a comment to pattern DROPS Extra 0-985
We would love to hear what you have to say about this pattern!
If you want to leave a question, please make sure you select the correct category in the form below, to speed up the answering process. Required fields are marked *.