Comentarios / Preguntas (93)
![]() Regine Birk escribió:
Regine Birk escribió:
Hallo, ich möchte die Decke aus Drops Merino Extra Fine stricken. Ist das möglich oder ist das Brombeermuster eher für dünnere Garne geeignet? Vielen Dank im Voraus!
24.01.2025 - 14:45
![]() Nina escribió:
Nina escribió:
Hi, ich fand die Decke sehr schön und hab mir auch das Orginalgarn besorgt, welches ebenfalls sehr schön ist. Ich habe einige Reihen des mittleren Musters gestrickt, aber dann die Decke wieder aufgetrennt und stricke jetzt ein ganz anderes Muster. Ich fand es überhaupt nicht schön. Es entstehen grosse Löcher trotz sehr dünner Nadeln und die Decke ich überhaupt nicht kuschelig. schade. Mit den anderen Anleitungen und dem Ergebnis war ich immer sehr zufrieden.
20.12.2024 - 13:43
![]() Kaya escribió:
Kaya escribió:
Hi, also ich habe das Muster begonnen und es glaube ich aber nicht richtig verstanden. Aktuell bin ich an dem Punkt, dass ich die 16 Maschen zugenommen habe und jetzt bei 160 Maschen bin. Als nächstes würde ich 24 M re stricken und dann mit der untersten Zeile von M1 beginnen und dann wieder 24M re stricken. Dann kommt die zweite Zeile wo ich wieder 24M re stricke und dann die 112 inneren M re stricke - ist das so richtig oder ist die zweite Zeile schon eine verkürzte Reihe ?
28.09.2024 - 18:07DROPS Design respondió:
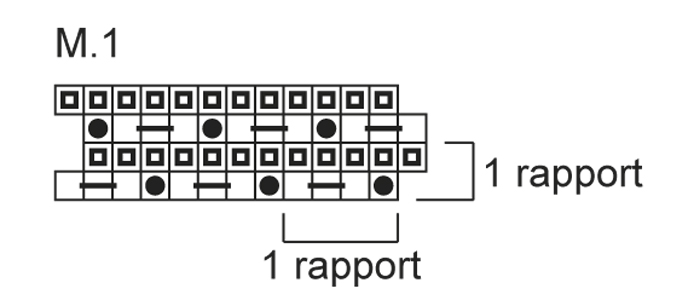
Liebe Kaya, bei der 1. Hin-Reihe nach den Zunahmen stricken Sie das Muster M.1 zwischen die 24 Maschen kraus rechts; dh: 24 M kraus rechts, die 4 Maschen für je 1 Rapport M.1 wiederholen (28 Mal) und mit 24 M kraus rechts enden. Bei den Rückreihen stricken Sie 24 M Krausrechts, die 4 M für je 1 Rapport (von links nach rechts) wiederholen und mit 24 M Krausrechts enden. Viel Spaß beim Stricken!
30.09.2024 - 08:05
![]() Julie Sheehy escribió:
Julie Sheehy escribió:
The video of a blackberry stitch is purl 3 together but this is not what this pattern states. Is there a tutorial for this? And also all the blackberry videos I've seen call for purling the non pattern row but this is calling for knitting is that correct? Thank you Julie
07.05.2023 - 19:22DROPS Design respondió:
Dear Julie, the blackberry stitch can be worked in different ways, but the basis is the same: you make 3 stitches in one and then work the next 3 stitches together. The video shows one method and the chart another one. The one in the chart should look slightly fluffier than the one in the video. And yes, you knit all stitches on the WS, since you work the 2nd and 4th rows without the pattern, instead of the 1st and 3rd rows as in the video. Happy knitting!
07.05.2023 - 19:40
![]() Julie Sheehy escribió:
Julie Sheehy escribió:
I am confused on the short rows so for the row you are knitting the K1,P1,K1 in same stitch are you only doing the short row on one side then when you turn to knit back you are doing a short row on that side. Is there a way to get the pattern written out. Is the diagram from the top down or bottom up? thank you, Julie
07.05.2023 - 18:55DROPS Design respondió:
Dear Julie, the short rows are only worked over the stitches in garter stitch and not the stitches in chart M.1, so they shouldn't interfere with each other. You work over the sts in garter stitch, then you turn and work back over these stitches and then you work one normal row. On the other side, work only over the stitches in garter stitch in that side, turn and work back and turn and work a normal row. Charts are read from the bottom up; you can see more information about charts here: https://www.garnstudio.com/lesson.php?id=68&cid=19
07.05.2023 - 19:44
![]() Agnes escribió:
Agnes escribió:
Sziasztok, A következőképp készítettem el ezt a takarót, hátha segítség valakinek: Drops Big Merino fonal 5 mm-es körkötőtűvel kötve. 144 szemmel kezdtem (20+104+20), szaporitás nélkül készítettem a mintát, minden második sorba került csak rövidített lustakötés sor. 650 g (13x50g) fonalból 74x94 cm-es takaró készült. Csodás minta! Köszönöm!
28.03.2023 - 18:05
![]() Karoliina escribió:
Karoliina escribió:
Tämä ohje tuottaa minulle niin paljon päänvaivaa. En ymmärrä mallipiirrosta. Ymmärtääkseni se on eri kuin karhunvatukkaneulos? Voinko silti tehdä vain karhunvatukkaneulosta? En saa mitään järkevää neulomalla kolme yhteen silmukkaan niin että 1n, langankierto nurjalta puolelta, 1n.
03.12.2022 - 21:20DROPS Design respondió:
Hei, mallineuleen ensimmäinen kerros on oikean puolen kerros. Eli 1 nurja silmukka + 1 langankierto + 1 nurja silmukka tehdään työn oikealta puolelta. Nurjan puolen kerroksilla neulotaan oikeaa.
16.01.2023 - 18:06
![]() Cornelie escribió:
Cornelie escribió:
Stricke die Decke wie angegeben nach dem Diagramm. Habe zwischendurch das Videotutorial zu Brombeermuster angesehen - das ist nicht identisch. Macht wahrscheinlich nichts, irritiert nur. Könnte man das angleichen? Vielen Dank.
15.09.2022 - 22:40DROPS Design respondió:
Liebe Cornelie, es sind nur kleine Unterschied zwischen Video und Anleitung, da es immer mehrere Technike gibt, Sie können entweder wie im Video or wie in der Anleitung zu- bzw abnehmen. Viel Spaß beim stricken!
16.09.2022 - 09:40
![]() Yefra escribió:
Yefra escribió:
Witam, Czyli na wzór (4 rzędy) przypadnie 12 rzędów ściegiem francuskim po bokach?
20.03.2022 - 00:00DROPS Design respondió:
Witaj, Rzędów na bokach jest 2 razy więcej niż na środku, czyli na 4 rzędy wzoru, przypada 8 rzędów ściegiem francuskim z każdej strony. Pamiętaj, że rzędy skrócone wykonujesz tylko na początku rzędu (zarówno na prawej jak i na lewej stronie robótki). Pozdrawiamy!
21.03.2022 - 08:51
![]() Emilia escribió:
Emilia escribió:
Buonasera ma la spiegazione del diagramma M1 è diversa dal video punto mimosa o sbaglio? Grazie
12.03.2022 - 21:31DROPS Design respondió:
Buongiorno Emilia, deve seguire la spiegazione riportata nel diagramma. Buon lavoro!
13.03.2022 - 14:44
Bundle of Joy#bundleofjoyblanket |
||||||||||
|
|
||||||||||
Frazada de punto para bebé con patrón de moras en DROPS Alpaca
DROPS Baby 21-38 |
||||||||||
|
PT MUSGO (de ida y vuelta en la ag): Todas las vtas de derecho. PATRÓN: Ver diagrama M.1. El diagrama muestra el patrón por el LD. VUELTAS CORTAS (aplica a los pts en pt musgo en los lados de la frazada): Para evitar que la frazada se estreche en los lados debido a los pts en pt musgo, tejer vueltas adicionales en pt musgo, en cada lado, de la manera sig: * Tejer 1 vta de derecho sobre los 24 pts externos, virar la pieza, deslizar el primer pt, tensar el hilo y tejer de regreso, tejer 1 vta sobre todos los pts conforme a la explicación en el patrón (tejer 24 pts derechos, diagrama M.1 sobre 112 pts, tejer 24 pts derechos), virar la pieza *, repetir de *a*. ------------------------------------------------------ FRAZADA: Tejida de ida y vuelta en ag circular para tener espacio suficiente para todos los pts. Mon FLOJAMENTE 144 pts en ag circular tamaño 3 mm con Alpaca. Tejer en PT MUSGO – ver explicación arriba. Cuando la pieza mida 12 cm – ajustar para que la vta sig sea tejida por el LR – aum 16 pts distribuidos equitativamente sobre los 96 pts centrales (es decir, aum en cada 6º pt) = 160 pts. Continuar tejiendo de la manera sig: 24 pts en pt musgo, diagrama M.1 sobre los 112 pts sig, 24 pts en pt musgo – AL MISMO TIEMPO tejer vueltas cortas sobre los 24 pts externos en cada lado – VER EXPLICACIÓN ARRIBA. Continuar de esta manera hasta que la pieza mida aprox 68 cm, ahora tejer 1 vta de derecho por el LD y AL MISMO TIEMPO, dism 16 pts distribuidos equitativamente sobre los 112 pts centrales (es decir, tejer juntos cada 6º y 7º pt) = 144 pts. Tejer en pt musgo sobre todos los pts (las vueltas cortas ahora están terminadas). Rem FLOJAMENTE cuando la sección en pt musgo después del patrón de moras mida 12 cm. La frazada completa mide aprox 80 cm. |
||||||||||
Explicaciones del diagrama |
||||||||||
|
||||||||||

|
||||||||||
¿Terminaste este patrón?Entonces, etiqueta tus fotos con #dropspattern #bundleofjoyblanket o envíalas a la galería #dropsfan. ¿Necesitas ayuda con este patrón?Encontrarás 8 videos tutoriales, un espacio para comentarios/preguntas y más visitando la página del patrón en garnstudio.com © 1982-2025 DROPS Design A/S. Todos los derechos reservados. Este documento, incluyendo todas sus sub-secciones, está protegido por los derechos de autor (copyright). Lee más acerca de lo que puedes hacer con nuestros patrones en la parte de abajo de cada patrón de nuestro sitio. |
||||||||||


Escribe un comentario sobre DROPS Baby 21-38
¡Nos encantaría saber qué piensas acerca de este patrón!
Si quieres escribir una pregunta referente al patrón, por favor asegúrate de elegir la categoría correcta en el formulario debajo, para acelerar el proceso de respuesta. Los campos obligatorios están marcados con un *.