
Popular categories
Looking for a yarn?


Comments / Questions (221)
![]() Carmen LEMAIRE wrote:
Carmen LEMAIRE wrote:
Bonjour Je bloque au niveau A 17 cm de hauteur total 4 rang point mousse au dessus des 20 mailles centrales sur les côtes 10 maille de chaque côtés on fait comment on tricote de quel marqueur s'agit il cotes emmanchures sinon fait chaque marqueur ça fait un total de 40 maille poit mousse Merci d’avance
23.06.2025 - 06:12DROPS Design answered:
Bonjour Mme Lemaire, ça fait effectivement un total de 40 m point mousse mais vous n'aurez que 20 mailles pour chaque emmanchure, autrement dit, 2ème taille: tricotez comme avant jusqu'à ce qu'il reste 10 m avant le 1er marqueur, tricotez les 20 m suivantes au point mousse, tricotez comme avant jusqu'à ce qu'il reste 10 m avant le 2ème marqueur, tricotez les 20 m suivantes au point mousse et terminez comme avant. Tricotez ainsi 4 rangs, puis rabattez 10 m pour chaque emmanchure = 5 de chaque côté de chaque marqueur, il reste 5 m de bordure d'emmanchure au point mousse pour chaque devant et de chaque côté pour le dos. Bon tricot!
23.06.2025 - 08:38
![]() Lemaire Carmen wrote:
Lemaire Carmen wrote:
Bonjour je tricote le gilet en 6/9mois J en sui5a: Tricoter 4 rg point mousse continuer en double point de riz pendant combien cm? Et je comprends pas du tout comment faire les diminutions pour les devant et le dos Merci de votre aide
17.06.2025 - 17:01DROPS Design answered:
Bonjour Mme Lemaire, jusqu'à ce que l'ouvrage mesure 17 cm de hauteur totale dans la 2ème taille, vous allez ensuite former l'encolure (tricotez d'abord 2 rangs raccourcis sur les mailles de bordure devant de chaque côté), puis diminuez pour l'encolure, et, en même temps, formez les emmanchures en tricotant 4 rangs point mousse sur les 20 m de chaque côté (bordure sous les bras) - tricotez les autres mailles comme avant, et rabattez 10 m de chaque côté et terminez le dos et les devants séparément. Bon tricot!
18.06.2025 - 07:27
![]() Nicola wrote:
Nicola wrote:
Hi. With regard to the back piece, I have 56 stitches and now decreasing for the armholes. It says dec 1st every other row from RS a total of 6 times = 44 st. How does that work (56 - 6 = 50) ... am I decreasing each side? Thanks for any help, Nicola
13.06.2025 - 01:32DROPS Design answered:
Hi Nicola, Yes, you decrease on each side of the back piece for the armholes, 1 stitch x 6 = 12 stitches in total. Regards, Drops team.
13.06.2025 - 06:07
![]() Nicola wrote:
Nicola wrote:
Hi. With regard to the back piece, I have 56 stitches and now decreasing for the armholes. It says dec 1st every other row from RS a total of 6 times = 44 st. How does that work (56 - 6 = 50) ... am I decreasing each side? Thanks for any help, Nicola
12.06.2025 - 23:20DROPS Design answered:
Dear Nicola, correct on back piece you will increase for armholes on both sides, ie at the beginning + at the end of a row from right side as explained under DEC FOR V-NECK AND ARMHOLES IN DOUBLE MOSS ST:; when you will work front pieces later you will decrease only towards armhole (just 1 stitch on each front piece). So on back piece decrease 2 sts a total of 6 times= 56 sts - (2 sts x 6 times) = 44 sts remain. Happy knitting!
13.06.2025 - 07:39
![]() Lemaire wrote:
Lemaire wrote:
Je ne comprends pas comment faire les poches Et les diminutions du début Merci pour votre aide
04.06.2025 - 10:44DROPS Design answered:
Bonjour Mme Lemaire, pour les diminutions à répartir à intervalles réguliers, prenez votre nombre de mailles total, retirez les mailles de bordure des devants (10 m) et divisez par le nombre de diminutions à faire - ou bien utilisez le calculateur dont vous trouverez le lien sous "Explications" ou bien en utilisant la petite calculatrice que vous pourrez voir en bas à droite de la fenêtre. Pour la bordure des poches, notez que vous tricotez d'abord les mailles des poches avant de les mettre en attente: tricotez le nombre de mailles indiqué puis placé le nombre de mailles indiqué pour la poche en attente (les dernières que vous avez tricotées). Bon tricot!
04.06.2025 - 13:34
![]() Anneke wrote:
Anneke wrote:
Is dit patroon ook zonder rondbreinaald te maken? En zo ja, hoe? Bedankt voor uw reactie.
09.05.2025 - 10:23DROPS Design answered:
Dag Anneke,
Om een patroon aan te passen om op rechte naalden te breien hebben we een instructie gemaakt. Deze vind je hier.
11.05.2025 - 20:01
![]() Maryse wrote:
Maryse wrote:
MÊME TEMPS, à 16-17-19 (20-22) cm de hauteur totale, tricoter 4 rangs point mousse au-dessus des 18-20-20 (20-20) m centrales sur les côtés (soit 9-10-10 (10-10) m de chaque côté de chaque marqueur)je ne comprends pas cette partie Merci de m'éclaircir
22.04.2025 - 22:10DROPS Design answered:
Bonjour Maryse, vous devez ici tricoter la bordure des emmanchures, tricotez les 18-20 m (cf taille) sous chaque emmanchure (soit 9 ou 10 m de chaque côté de chacun des marqueurs) au point mousse (à l'endroit sur l'endroit et sur l'envers) et en même temps, tricotez les autres mailles comme avant. Tricotez ainsi pendant 4 rangs = 2 côtes mousse sous les emmanchures. Bon tricot!
23.04.2025 - 07:53
![]() Inger Bengtsson wrote:
Inger Bengtsson wrote:
Detta mönster stämmer inte. Strl 5-9 mån. När jag har stickat fram och bakstycke och gjort avmaskning för ärmhål ska det vara 52 maskor kvar till bakstycket, men det är bara 42. Jag har stickat exakt som det står i beskrivningen.
22.03.2025 - 15:10
![]() Lisa wrote:
Lisa wrote:
Inte lätt för nybörjaren att följa och förstå denna beskrivning! Den upplevs mycket ”rörig” och ostrukturerad. I det ”gemensamma” stycket står att det skall maskas av 1 m på va varv 16 ggr för V-hals. Det stämmer inte med att det då på framstyckena skall vara 12 kvar (stl 12-18 mån) Borde stå 8 ggr i så fall.
20.03.2025 - 15:09
![]() Lisa wrote:
Lisa wrote:
Inte lätt för nybörjaren att följa och förstå denna beskrivning! Den upplevs mycket ”rörig” och ostrukturerad. I det ”gemensamma” stycket står att det skall maskas av 1 m på va varv 16 ggr för V-hals. Det stämmer inte med att det då på framstyckena skall vara 12 kvar (stl 12-18 mån) Borde stå 8 ggr i så fall.
20.03.2025 - 14:07
|
|
Junior#juniorvest |
|
 |
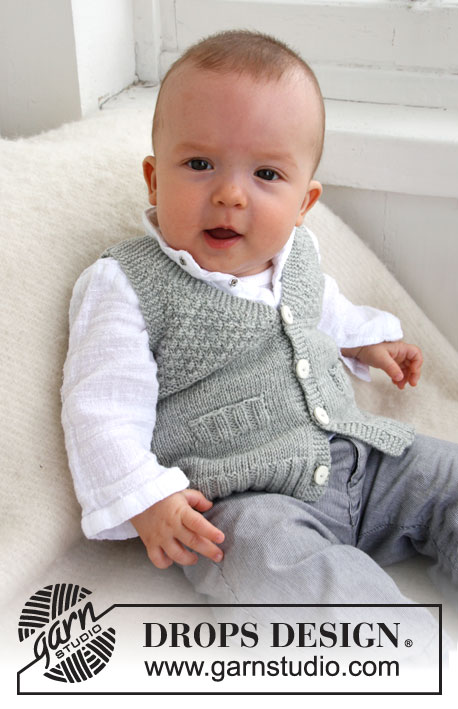 |
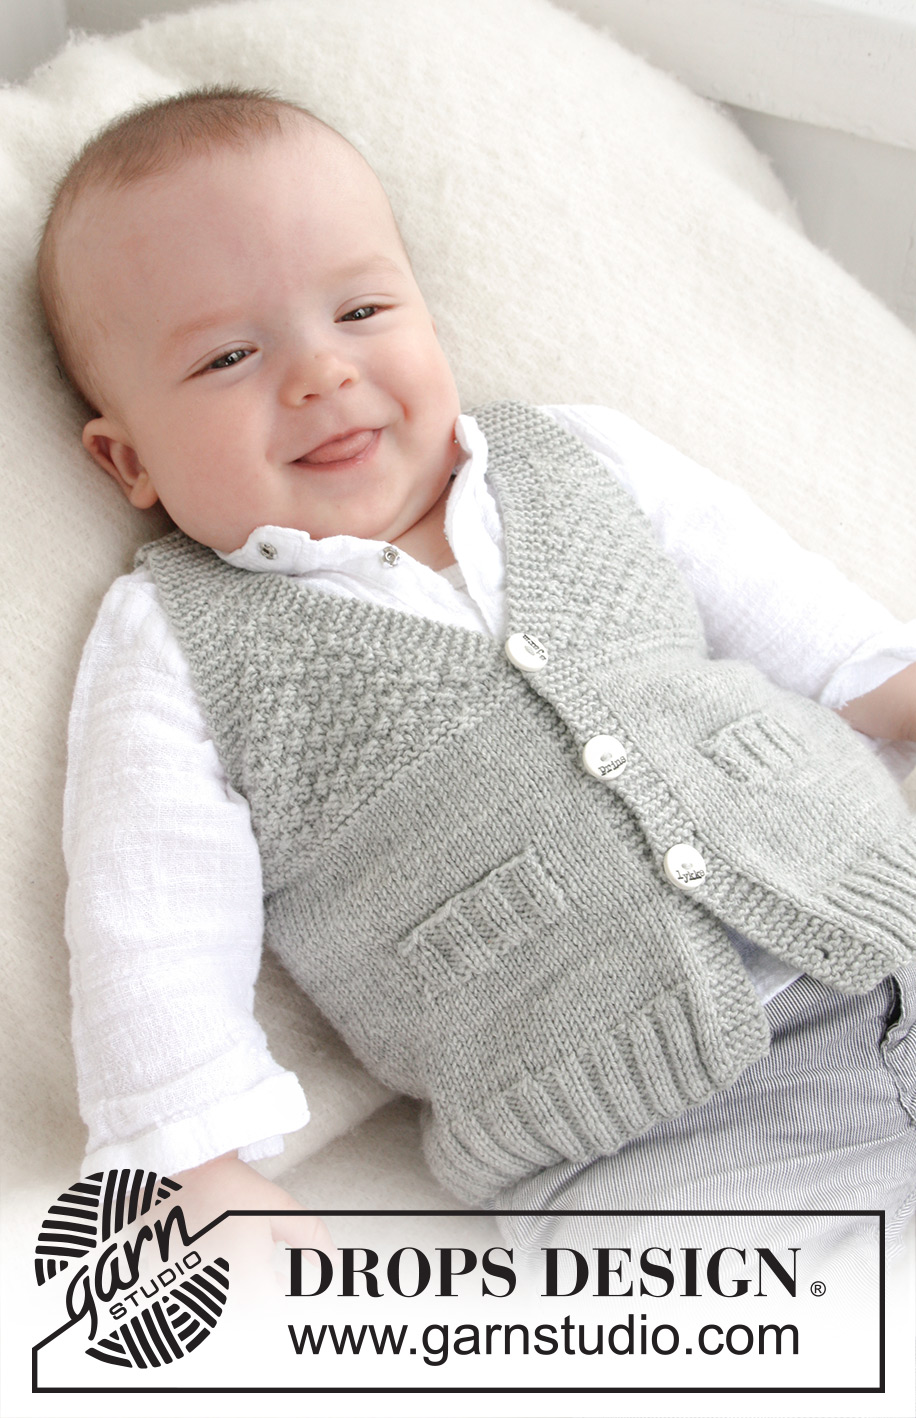
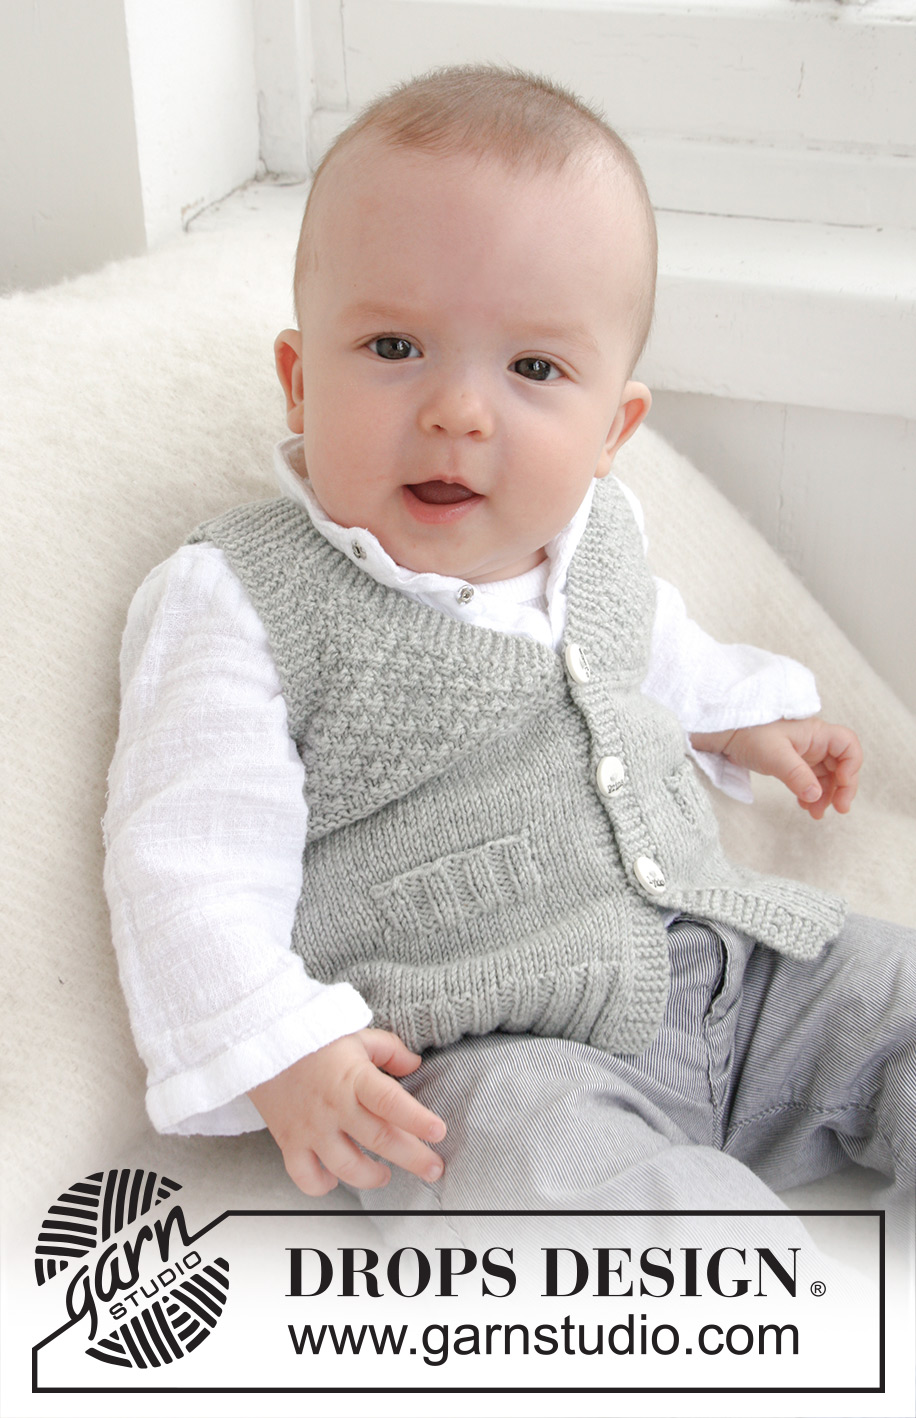
Knitted vest with V-neck and textured pattern for baby and children in DROPS BabyMerino or DROPS BabyAlpaca Silk
DROPS Baby 21-8 |
|
|
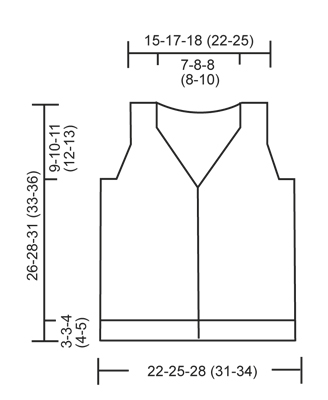
GARTER ST (back and forth on needle): K all rows. DOUBLE MOSS ST: Row 1: * K 2, P 2 *, repeat from *-*. Row 2: K over K and P over P. Row 3: P over K and K over P. Row 4: As row 2. Repeat row 1 to 4. BUTTON HOLES: Cast off for button holes on right band. 1 button hole = K tog 2nd and 3rd st from edge and make 1 YO. Cast off for button holes when piece measures: SIZE 1/3 MONTHS: 2, 6, 10 and 14 cm. SIZE 6/9 MONTHS: 2, 7, 11 and 16 cm. SIZE 12/18 MONTHS: 2, 7, 12 and 17 cm. SIZE 2 YEARS: 2, 8, 13 and 19 cm. SIZE 3/4 YEARS: 2, 8, 14 and 20 cm. DEC FOR V-NECK AND ARMHOLES IN DOUBLE MOSS ST: All dec are done from RS! DEC AS FOLLOWS BEFORE BAND/SLEEVE EDGE: When last st should be K: K 2 tog. When last st should be P: P 2 tog. DEC AS FOLLOWS AFTER BAND/SLEEVE EDGE: When first st should be K: Slip 1 st as if to K, K 1, psso. When first st should be P: P 2 twisted tog (i.e. work in back loop of st instead of front). -------------------------------------------------------- -------------------------------------------------------- BODY: Worked back and forth on circular needle from mid front. Cast on 148-168-184 (204-224) sts on circular needle size 2.5 mm with Baby Merino. Work first row as follows from RS: 5 sts in GARTER ST (= band) - see explanation above, * K 2, P 2 *, repeat from *-* until 7 sts remain, finish with K 2 and 5 sts in GARTER ST (= band). Continue rib like this with 5 sts in garter st in each side until piece measures 3-3-4 (4-5) cm - REMEMBER BUTTON HOLES on band - see explanation above. Switch to circular needle size 3 mm and work in stocking st but continue bands in garter st as before. AT THE SAME TIME on first row after rib, dec 32-36-40 (44-52) sts evenly (do not dec over bands) = 116-132-144 (160-172) sts. Insert a marker 31-35-39 (43-45) sts in from each side (= 54-62-66 (74-82) sts between markers on back piece). REMEMBER THE KNITTING TENSION! When piece measures 7-7½-8 (9-10) cm, work next row as follows from RS: 5 sts in garter st, 21-21-27 (27-31) sts in stocking st, slip the last 16-16-20 (20-24) sts that were worked on a stitch holder for pocket slit, work until 10-10-12 (12-12) sts remain on needle, slip the last 16-16-20 (20-24) sts that were worked on a stitch holder for pocket slit, work 5-5-7 (7-7) sts in stocking st and finish with 5 sts in garter st. On next row cast on 16-16-20 (20-24) new sts over each of the 2 stitch holders with sts = 116-132-144 (160-172) sts. Continue in stocking st and in garter st until piece measures 13-14-16 (16-18) cm. Now K 4 rows over all sts (= 2 ridges). Then work DOUBLE MOSS ST - see explanation above (continue bands in garter st as before). READ ALL OF THE FOLLOWING SECTION BEFORE CONTINUING! When piece measures 15-17-18 (20-21) cm, work 2 rows in garter st over the first 5 sts on needle (do not work the other sts on needle), then work 1 row over all sts before working 2 rows in garter st over the first 5 sts on needle in the other side of piece (this is done so that the V-neck looks nice). Then dec for V-neck - see explanation above: Dec 1 st every other row (i.e. every row from RS) a total of 12-13-16 (16-16) times. AT THE SAME TIME when piece measures 16-17-19 (20-22) cm, work 4 rows in garter st over the middle 18-20-20 (20-20) sts in each side (i.e. over 9-10-10 (10-10) sts on each side of both markers) – work the other sts as before. On next row, cast off the middle 8-10-10 (10-10) sts in each side for armhole and finish front and back piece separately. BACK PIECE: = 46-52-56 (64-72) sts. Work double moss st with 5 sts in garter st in each side (= sleeve edges). AT THE SAME TIME dec for armholes - see explanation above: Dec 1 st every other row (i.e. on every row from RS) a total of 5-6-6 (6-6) times = 36-40-44 (52-60) sts. Continue in double moss st and in garter st until piece measures 24-26-29 (31-34) cm. Now work in garter st over all sts until finished measurements. AT THE SAME TIME when piece measures 25-27-30 (32-35) cm, cast off the middle 16-18-20 (20-24) sts for neck = 10-11-12 (16-18) sts remain on each shoulder. Now finish each shoulder separately. Continue with garter st until piece measures 26-28-31 (33-36) cm, cast off. LEFT FRONT PIECE: Continue with double moss st and in garter st while AT THE SAME TIME dec for armhole in the side as on back piece and continue dec for V-neck as before. After last dec, 10-11-12 (16-18) sts remain on needle. Work garter st over all sts until piece measures 26-28-31 (33-36) cm and cast off. RIGHT FRONT PIECE: Work as left front piece but reversed. POCKET SLIT: Slip the 16-16-20 (20-24) sts from stitch holder on one front piece back on needle size 2.5 mm. Work rib K2/P2 with 1 st in garter st and K 2 in each side (seen from RS). When pocket slit measures 2½-2½-3 (3-3) cm, loosely cast off with K over K and P over P. Sew pocket slit to front piece with duplicate sts in each side. Sew pocket opening to bottom of pocket slit (where sts were put on a stitch holder) on the back of piece. Work another pocket slit the same way on the other front piece. ASSEMBLY: Sew the shoulder seams. Sew on buttons. |
|
|
|
Have you finished this pattern?Tag your pictures with #dropspattern #juniorvest or submit them to the #dropsfan gallery. Do you need help with this pattern?You'll find 13 tutorial videos, a Comments/Questions area and more by visiting the pattern on garnstudio.com. © 1982-2025 DROPS Design A/S. We reserve all rights. This document, including all its sub-sections, has copyrights. Read more about what you can do with our patterns at the bottom of each pattern on our site. |
|


With over 40 years in knitting and crochet design, DROPS Design offers one of the most extensive collections of free patterns on the internet - translated to 17 languages. As of today we count 314 catalogues and 11822 patterns translated into English (UK/cm). 11822
We work hard to bring you the best knitting and crochet have to offer, inspiration and advice as well as great quality yarns at incredible prices! Would you like to use our patterns for other than personal use? You can read what you are allowed to do in the Copyright text at the bottom of all our patterns. Happy crafting!
Post a comment to pattern DROPS Baby 21-8
We would love to hear what you have to say about this pattern!
If you want to leave a question, please make sure you select the correct category in the form below, to speed up the answering process. Required fields are marked *.