DROPS Muskat
DROPS Muskat
100% Cotton
from 3.90 CAD /50g
Get the yarn to make this pattern from 15.60CAD.

The yarn cost is calculated from the pattern’s smallest size and the yarn’s cheapest product type. Looking for an even better price? You might find it on the DROPS Deals!

DROPS SS24

Wonder Wave

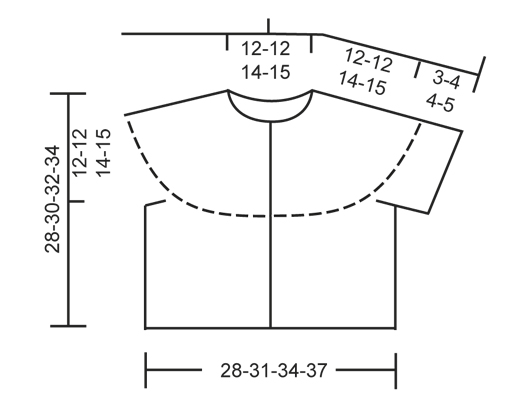
Knitted DROPS jacket with short sleeves, wavy pattern and round yoke in ”Muskat”. Size 3 - 12 years

DROPS Children 22-22
DROPS design: Pattern no R-030-bn
---------------------------------------------------------
Size: 3/4 - 5/7 - 8/10 - 11/12 years
Finished measurements:
Bust: 56-62-68-74 cm / 22"-24½"-26¾"-29"
Full length: 28-30-32-34 cm / 11"-11¾"-12½"-13½"

Materials: DROPS MUSKAT from Garnstudio
200-200-250-250 g color no 04, lilac

DROPS DOUBLE POINTED NEEDLES and CIRCULAR NEEDLE (80 cm / 32") SIZE 4 mm/US 6 - or size needed to get 23 sts x 28 rows in Wavy pattern = 10 x 10 cm / 4" x 4". 1 repetition of pattern should measure approx. 6 cm / 2⅜" in width.

DROPS Angular silver buttons no 534: 3 pieces

-------------------------------------------------------

Alternative Yarn – See how to change yarns here
Yarn Groups A to F – Use the same pattern and change the yarn here
Yarn usage using an alternative yarn – Use our yarn converter here

-------------------------------------------------------

DROPS Muskat
DROPS Muskat
100% Cotton
from 3.90 CAD /50g
Get the yarn to make this pattern from 15.60CAD.

The yarn cost is calculated from the pattern’s smallest size and the yarn’s cheapest product type. Looking for an even better price? You might find it on the DROPS Deals!

Pattern instructions

NOTE: This pattern is written in American English. All measurements in charts are in cm. For conversion from inches to cm - click here. There are different terms for crocheting in American and British English. If this pattern includes crochet, click for "crochet terms" here. For this pattern in British English, please click here.
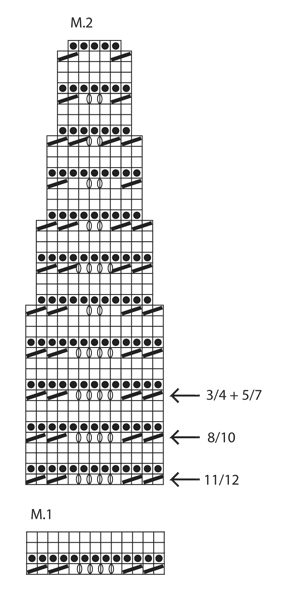
WAVY PATTERN:
See diagrams M.1 and M.2. The diagrams show all rows in pattern seen from RS.

GARTER ST (in the round on double pointed needles/circular needle):
* K 1 round and P 1 round *, repeat from *-*.

BUTTON HOLES:
Bind off for button holes on right band from RS.
1 button hole = bind off 3rd band st from edge, on next row cast on 1 new st over the bound off st.
Bind off for button holes when piece measures:
SIZE 3/4 years: 18, 23 and 27 cm / 7", 8¾" and 10½"
SIZE 5/7 years: 20, 25 and 29 cm / 8",9¾" and 11½"
SIZE 8/10 years: 21, 27 and 31 cm / 8¼",10¼" and 12¼"
SIZE 10/12 years: 23, 29 and 33 cm / 9", 11½" and 13"
NOTE: Last button hole is bound off on row after diagram M.2 has been worked.
---------------------------------------------------------

BODY:
Worked back and forth on circular needle from mid front.
Loosely cast on 152-166-180-194 sts (includes 5 band sts in each side) on circular needle size 4 mm / US 6 with Muskat. Work first row as follows from RS: * K 10, K 2 tog *, repeat from *-* until 8-10-12-14 sts remain, K these sts = 140-153-166-179 sts. Then K 3 rows back and forth.
Continue with diagram M.1 with 5 band sts in each side in garter st until finished measurements. REMEMBER THE GAUGE!
When piece measures approx. 16-18-18-19 cm / 6¼"-7"-7"-7½" (adjust so that 1 row remains of diagram M.1), work next row as follows (= WS): Work 34-37-41-44 sts, loosely bind off 7-7-6-6 sts for armhole, work 58-65-72-79 sts, loosely bind off 7-7-6-6 sts for armhole and work the rest of row (= 34-37-41-44 sts).
Put piece aside and knit the sleeves.

RIGHT SLEEVE:
Worked in the round on double pointed needles.
Cast on 59-59-74-74 sts on double pointed needles size 4 mm / US 6 with Muskat. Work first round as follows: * K 6, K 2 tog *, repeat from *-* until 3-3-2-2 sts remain, K these sts = 52-52-65-65 sts. Then P 1 round, K 1 round and P 1 round. Insert a marker at the beg of the round.
Continue with diagram M.1 - beg in the 11th-1st-4th-7th sts in diagram, count from the right (in size 3/4 and 8/10 years, K first st, and at the end of round K this st tog with the last st on round).
Continue working like this until piece measures approx. 3-4-4-5 cm / 1⅛"-1½"-1½"-2" (adjust so that 1 round of diagram M.1 remains).
On next round bind off the FIRST 6-6-7-7 sts, work the rest of round = 46-46-58-58 sts.

LEFT SLEEVE:
Cast on and work as right sleeve but when piece measures 3-4-4-5 cm / 1⅛"-1½"-1½"-2", bind off like this:
Size 3/4 and 8/10: bind off the FIRST 6-7 sts on round
Size 5/7 and 11/12: bind off the LAST 6-7 sts on round
(this is important to make the pattern correct on yoke).

YOKE:
Slip sleeves on to same circular needle as body where armholes were bind off = 218-231-270-283 sts. NOTE: It is very important that the right sleeve is inserted in the right side and the left sleeve is inserted in the left side so that the pattern fits onwards.
Continue with diagram M.2 – start at the arrow for the correct size - with 5 band sts in garter st in each side (= 16-17-20-21 repetitions on the round).
AT THE SAME TIME when piece measures 18-20-21-23 cm / 7"-8"-8¼"-9", bind off for BUTTON HOLES - see explanation above.
When diagram M.2 has been worked vertically, 90-95-110-115 sts remain on needle. Work next row as follows from RS: K 5 (while at the same time casting/binding off for the last button hole), * K 2 tog, K 1 *, repeat from *-* until 7-6-6-5 sts remain, K these sts = 64-67-77-80 sts. K 3-3-5-5 rows back and forth, then bind off with K from RS.

ASSEMBLY:
Sew tog the openings under the sleeves and sew on buttons.

This pattern has been corrected.

Updated online: 02.05.2012
LEFT SLEEVE: Cast on and work as right sleeve but when piece measures 3-4-4-5 cm / 1 1/8"-1½''-1½''-2'', bind off like this:
Size 3/4 and 8/10: bind off the FIRST 6-7 sts on round
Size 5/7 and 11/12: bind off the LAST 6-7 sts on round
(this is important to make the pattern correct on yoke).

Diagram

symbols = K from RS, P from WS
symbols = K from WS
symbols = 1 YO between 2 sts
symbols = K 2 tog
diagram
diagram
Do you have a question? See a list of frequently asked questions (FAQ)

Knitting tension is what determines the final measurements of your work, and is usually measured per 10 x 10 cm. It is provided like so: number of stitches in width x number of rows in height - eg: 19 stitches x 26 rows = 10 x 10 cm.

The knitting tension is very individual; some people knit/crochet loosely while others work tightly. You adjust the knitting tension with the needle size, which is why the suggested needle size only serve as a guide! You need to adjust this (up or down) to ensure that YOUR knitting tension matches the knitting tension provided in the pattern. If you work with a different knitting tension than provided you will have a different yarn consumption, and your work will have different measurements than what the pattern suggests.

The knitting tension also determines which yarns can replace each other. As long as you achieve the same knitting tension you can replace one yarn with another.

See DROPS lesson: How to measure your tension/gauge

See DROPS video: How to make a gauge tension swatch

The required amount of yarn is provided in grams, eg: 450 g. To calculate how many balls you’ll need you first need to know how many grams are in 1 ball (25g, 50g or 100g). This information is available if you click on the individual yarn quality on our pages. Divide the amount required with the amount of each ball. For example, if each ball is 50g (the most common amount), the calculation will be as follows: 450 / 50 = 9 balls.

The important thing when changing from one yarn to another is that the knitting/crochet tension remains the same. This is so that the measurements of the finished piece will be the same as on the sketch provided. It is easier to achieve the same knitting tension using yarns from the same yarn group. It is also possible to work with multiple strands of a thinner yarn to achieve the knitting tension of a thicker one. Please try our yarn converter. We recommend you to always work a test swatch.

Please NOTE: when changing yarn the garment might have a different look and feel to the garment in the photo, due to individual properties and qualities of each yarn.

See DROPS lesson: Can I use a different yarn than the one mentioned in the pattern?

All our yarns are categorised into yarn groups (from A to F) according to thickness and knitting tension – group A contains the thinnest yarns and group F the thickest. This makes it easier for you to find alternative yarns to our patterns, should you wish to switch yarn. All yarns within the same group have a similar knitting tension and can easily replace each other. However, different yarn qualities have different structures and properties which will give the finished work a unique look and feel.

Click here for an overview of the yarns in each yarn group

At the top of all our patterns you’ll find a link to our yarn converter, which is a helpful tool should you wish to use a different yarn than suggested. By filling in the yarn quality you wish to replace, the amount (in your size) and number of strands, the converter will present good alternative yarns with the same knitting tension. Additionally it will tell you how much you’ll require in the new qualities and whether you’ll need to work with multiple strands. Most skeins are 50g (some are 25g or 100g).

If the pattern is worked with multiple colours, every colour will have to be converted separately. Similarly, if the pattern is worked with several strands of different yarns (for example 1 strand Alpaca and 1 strand Kid-Silk) you will have to find alternatives for each, individually.

Click here to see our yarn converter

Since different yarns have different qualities and textures we have chosen to keep the original yarn in our patterns. However, you can easily find options among our available qualities by using our yarn converter, or simply pick a yarn from the same yarn group.

It is possible that some retailers still have discontinued yarns in stock, or that someone has a few skeins at home that they would like to find patterns for.

The yarn converter will provide both alternative yarn as well as required amount in the new quality.

If you think it's hard to decide what size to make, it can be a good idea to measure a garment you own already and like the size of. Then you can pick the size by comparing those measures with the ones available in the pattern's size chart.

You'll find the size chart at the bottom of the pattern.

See DROPS lesson: How to read size chart

The needle size provided in the pattern serves only as a guide, the important thing is to follow the knitting tension. And since knitting tension is very individual, you will have to adjust the needle size to ensure that YOUR tension is the same as in the pattern – maybe you’ll have to adjust 1, or even 2 needle sizes, up or down to achieve the correct tension. For this, we recommend that you work test swatches.

Should you work with a different knitting tension than the one provided, the measurements of the finished garment might deviate from the measurement sketch.

See DROPS lesson: How to measure your tension/gauge

See DROPS video: How to make a gauge tension swatch

Working a garment top-down provides more flexibility and room for personal adjustment. For example it is easier to try the garment on while working, as well as making adjustments to length of yoke and shoulder caps.

The instructions are carefully explaining every step, in the correct order. Diagrams are adjusted to the knitting direction and are worked as usual.

The diagram depicts all rows/rounds, and every stitch seen from the right side. It is read from bottom to top, from right to left. 1 square = 1 stitch.

When working back and forth, every other row is worked from the right side and every other row is worked from the wrong side. When working from the wrong side, the diagram will have to be worked reversed: from left to right, knit stitches are purled, purl stitches are knit etc.

When working in the round every round is worked from the right side and the diagram are worked from right to left on all rounds.

See DROPS lesson: How to read knitting diagrams

The diagram depicts all rows/rounds, and every stitch seen from the right side. It is worked from bottom to top, from right to left.

When working back and forth every other row is worked from the right side: from right to left and every other row is worked from the wrong side: from left to right.

When working in the round, every row in the diagram are worked from the right side, from right to left.

When working a circular diagram you start in the middle and work your way outwards, counter clockwise, row by row.

The rows usually start with a given number of chain stitches (equivalent to the height of the following stitch), this will either be depicted in the diagram or explained in the pattern.

See DROPS lesson: How to read crochet diagrams

Instructions for working several diagrams after each other on the same row/round, will often be written like so: “work A.1, A.2, A.3 a total of 0-0-2-3-4 times". This means you work A.1 once, then A.2 is worked once, and A.3 is repeated (in width) the number of times provided for your size – in this case like so: S = 0 times, M = 0 times, L=2 times, XL= 3 times and XXL = 4 times.

The diagrams are worked as usual: begin with the first row in A.1, then work the first row in A.2 etc.

See DROPS lesson: How to read knitting diagrams

See DROPS lesson: How to read crochet diagrams

The total width of the garment (from wrist-to-wrist) will be larger in the larger sizes, despite the actual sleeves being shorter. The larger sizes have longer sleeve caps and wider shoulders, so there will be a good fit in all sizes.

The measurement sketch/schematic drawing provides information regarding the full length of the garment. If it’s a jumper or a jacket the length is measured from the highest point on the shoulder (usually closest to the neckline), and straight down to the bottom of the garment. It is NOT measured from the tip of shoulder. Similarly, the length of yoke is measured from the highest point on the shoulder and down to where yoke is split into body and sleeves.

See DROPS lesson: How to read a schematic drawing

Diagrams are often repeated on the round or in height. 1 repeat is the diagram the way it appears in the pattern. If it says to work 5 repeats of A.1 in the round, then you work A.1 a total of 5 times after/next to each other in the round. If it says to work 2 repeats of A.1 vertically/in height you work the entire diagram once, then begin again at the start and work the entire diagram one more time.

Chain stitches are slightly narrower than other stitches and to avoid working the cast-on edge too tight, we simply chain more stitches to begin with. The stitch count will be adjusted on the following row to fit the pattern and measurement sketch.

The rib edge is more elastic and will contract slightly compared to, for example, stocking stitch. By increasing before the rib edge, you avoid a visible difference in width between the rib edge and the rest of the body.

It’s very easy to cast off too tightly, and by making yarn overs while casting off (and simultaneously casting these off) you avoid a too tight cast off edge.

See DROPS video: How to bind off with yarn overs (yo)

To achieve an even increase (or decrease) you can increase on, for example: every 3rd and 4th row alternately, like so: work 2 rows and increase on the 3rd row, work 3 rows and increase on the 4th. Repeat this until the increase is complete.

See DROPS lesson: Increase or decrease 1 st on every 3rd and 4th row alternately

Should you prefer to work in the round instead of back and forth, you may of course adjust the pattern. You’ll need to add steeks mid-front (usually 5 stitches), and follow the instructions. When you would normally turn and work from the wrong side, simply work across the steek and continue in the round. At the end you’ll cut the piece open, pick up stitches to work bands, and cover the cut edges.

See DROPS video: How to knit steeks and cut open

Should you prefer to work back and forth instead of in the round, you may of course adjust the pattern so you work the pieces separately and then assemble them at the end. Divide the stitches for the body in 2, add 1 edge stitch in each side (for sewing) and work the front and back pieces separately.

See DROPS lesson: Can I adapt a pattern for circular needles into straight needles?

Pattern repeats can vary slightly in the different sizes, in order to get the correct proportions. If you’re not working the exact same size as the garment in the photo, yours might deviate slightly. This has been carefully developed and adjusted so that the complete impression of the garment is the same in all sizes.

Make sure to follow instructions and diagrams for your size!

If you have found a pattern you like which is available in women’s size it’s not very difficult to convert it to men’s size. The biggest difference will be the length of sleeves and body. Start working on the women size that you think would fit across the chest. The additional length will be worked right before you cast off for the armhole/sleeve cap. If the pattern is worked top-down you can add the length right after the armhole or before the first decrease on sleeve.

Regarding additional yarn amount, this will depend on how much length you add, but it is better with a skein too many than too few.

All yarns will have excess fibres (from production) that might come off as lint or shedding. Brushed yarns (ie hairier yarns) have more of these loose, excess fibres, causing more shedding.

Shedding also depends on what is worn under or over the garment, and whether this pulls at the yarn fibres. It’s therefore not possible to guarantee that there will be no shedding

Below are some tips on how to get the best result when working with hairier yarns:

1. When the garment is finished (before you wash it) shake it vigorously so the looser hairs come off. NOTE: do NOT use a lint roller, brush or any method that pulls at the yarn.

2. Place the garment in a plastic bag and put it in your freezer - the temperature will cause the fibres to become less attached to each other, and excess fibres will come off easier.

3. Leave in the freezer for a few hours before taking it out and shaking it again.

4. Wash the garment according to the instructions on the yarn label.

Pilling is a natural process that happens to even the most exclusive of fibers. It's a natural sign of wear and tear that is hard to avoid, and that is most visible in high friction areas of your garment like a sweater's arms and cuffs.

You can make your garment look as new by removing the pilling, using a fabric comb or a pill/lint remover.

Still can't find the answer you need? Then scroll down and leave your question so one of our experts can try to help you. This will be done normally within 5 to 10 working days.
In the meantime, you can read the questions and answers that others have left to this pattern or join the DROPS Workshop on Facebook to get help from fellow knitters/crocheters!

You might also like...

Wonder Wave

Sonja Eliassen, Norway

Wonder Wave

Becky, United Kingdom

Post a comment to pattern DROPS Children 22-22

We would love to hear what you have to say about this pattern!

If you want to leave a question, please make sure you select the correct category in the form below, to speed up the answering process. Required fields are marked *.

Comments / Questions (179)

country flag Tiina Kaljumäe wrote:

Mõnus suvine jakk, õpetus selge, lihtne kududa. Nööbid tegin ise lõngast,

14.05.2023 - 09:59

country flag Annelies Rennert wrote:

Hallöchen, komme mut den Armen nicht klar. Bei M1 wird doch re, re, links gestrickt. Bei den runden komme ich nicht klar. Wie müssen die Runden da gestrickt werden? LG. Annelies Rennert

13.05.2023 - 21:44

DROPS Design answered:

Liebe Frau Rennert, in Runden stricken Sie die Runden mit den weissen Kästchen rechts und die Runden mit den schwarzen Pünktchen stricken Sie links. Viel Spaß beim stricken!

15.05.2023 - 08:36

country flag Annelies Rennert wrote:

Hallo, mur ist bei d3n Ärmel unklar warum bei grösse 3/4 erst bei der 11. Masche im Diagramm angefangen wird ubd wie geht es dann weiter? Es bleiben doch dann 11 maschen rechts. Verstehe ich nicht. Bitte um Erklärung möchte nächste Woche fertig werden. Wird ein Geschenk. LG.

05.05.2023 - 17:34

DROPS Design answered:

Liebe Frau Rennert, es wird so angefangen, damit das Muster dann bei der Passe zusammenpasst; mit der 11. Masche anfangen bedeutet man wird 1 Masche rechts stricken dann Diagram weiter (rechts nach links lesen), dann M.1 wiederholen und bei dem letzten Rapport stricken Sie die letzte Masche der Runde zusammen mit der ersten Masche und so weiterstricken. Viel Spaß beim stricken!

08.05.2023 - 07:30

country flag Hanne wrote:

Hvis man vælger at strikke ærmer på 2 pinde i stedet for strømper. hvordan skal der så tages ind, - der hvor der står, at 1. og sidste maske strikkes sammen?

22.03.2023 - 13:12

DROPS Design answered:

Hei Hanne Da må det evnt felles vekselsvis i hver side, og man må påse at mønstret vil stemme med bolen når fellingene er gjort. Usikker på hvordan det vil bli under ermet og om det vil vises, kommer jo også an på hvilken str som strikkes. mvh DROPS Design

27.03.2023 - 11:20

country flag Lana wrote:

When I follow the instructions it appears as if the sleeve stitches, when placed on the circular needle do not align correctly. It appears that when the sleeves are joined I will be knitting two YO sections together instead of alternating with the knit two-together pattern. I also need help understaing the pattern instructions for the sleeve continuing with M1 beginning in the 4th st. The 4th st is the second stitch in the knit 2 together.

16.01.2023 - 02:16

DROPS Design answered:

Dear Lana, starting with the 4th stitch in the pattern will let you start with K1 and then work the next 9 sts as follows: K1, (YO, K1) x 4, K2 tog, K2 tog, then repeat M.1 from the first stitch. Happy knitting!

16.01.2023 - 10:33

country flag Emi wrote:

Do we need to cast off for neck.

27.06.2022 - 13:54

DROPS Design answered:

Dear Emi, there is no cast off for neck, when M.2 is done, you will work the decrease row ( K 5 (while at the same time casting off for the last button hole), * K 2 tog, K 1 *, repeat from *-* until 7-6-6-5 sts remain, K these sts = 64-67-77-80 sts), then K3 or K5 more rows and cast off. Happy knitting!

27.06.2022 - 15:28

country flag Barbara wrote:

Das ist meine absolute Lieblingsanleitung! Ich habe diese Weste/Jacke für meine Enkelin schon an die 6 mal gestrickt und kann gar nicht aufhören, das Muster ist so leicht nachzustricken und gerade für kühlere Sommertage ist die Weste ideal. Meine Bitte wäre: könnt ihr nicht so ein Modell für Damen ausarbeiten? Ich möchte mir auch gerne so eine Weste stricken. Vielen Dank. Barbara, Wien

04.05.2022 - 13:50

DROPS Design answered:

Liebe Barbara, wussten Sie, daß Sie gerne Ihre Fotos mit uns teilen können? hier lesen Sie mehr. Schauen Sie mal ob den Shore Line Cardigan oder die Fairy Dust Jacke Ihnen gefällt. Hier finden Sie noch mehr Jacken mit Wellenmuster. Viel Spaß beim stricken!

04.05.2022 - 15:55

country flag Lis Mann wrote:

Mange tak for hjælpen med strikketøjet, det hjalp mig meget til at komme videre. Mange rare hilsner fra Lis mann

25.04.2022 - 16:38

country flag Lis Mann wrote:

Hej igen. Jeg tror ikke at I har læst mit spørgsmål rigtigt igennem, for jeg skrev jo til jer at jeg har 67 m på pinden fordi jeg jo strikker ærmerne på 2 pinde i stedet for 4 pinde ( det prøvede jeg da jeg strikkede str 5-7, som I foreslog mig) derfor spørger jeg , når jeg nu har 67 m på pinden, hvordan strikker jeg så diag’s FØRSTE PIND??? Håber meget at I kan svare mig på det, for strikketøjet venter bare på at jeg kan komme videre. Venlig hilsen Lis Mann

22.04.2022 - 16:15

DROPS Design answered:

Hei Lis. Om du har lagt opp 1 ekstra masker i hver side som du skal sy ermet sammen med, må du felle disse 2 maskene når du skal sette ermene innpå rundpinnen sammen med bolen. Men husk å avpass slik at det gjenstår 1 omg av M.1 når du feller disse 2 maskene. mvh DROPS Design

25.04.2022 - 10:11

country flag Sigrid wrote:

Bestaat dit patroon ook in een trui of vest voor volwassenen?

17.04.2022 - 07:19

DROPS Design answered:

Dag Sigrid,

Niet specifiek van dit patroon, maar je kunt, als je bijvoorbeeld in de categorie damestruien zoekt, het filter op 'golfjespatroon' zetten. Misschien zit daar iets tussen wat je leuk vindt.

20.04.2022 - 10:26