
Looking for a yarn?


Comments / Questions (10)
![]() Inkeri Koski-Lammi wrote:
Inkeri Koski-Lammi wrote:
Suomi-käännöksessä (myös muissa vastaavissa) lienee virhe, eli ’lauta-alusta’ po. lautasalusta?
05.07.2019 - 09:22
![]() Hannele Björemo wrote:
Hannele Björemo wrote:
Jag får det inte att gå ihop. Allt tycks stämma till varv 9, men varv 10, 11 och tolv måste vara till en annan tallriksunderlägg. De 14 trippelstolparna är rätt, men när jag virkar efter mönstret ( v 10, 11, 12), ser det inte alls ut som på bilden.
30.03.2018 - 15:57
![]() DANA wrote:
DANA wrote:
Bonjour, Il doit y avoir une erreur quelque part car je suis arrivée au 9ème rang et lorsque je fais les brides puis les mailles en l'air cela me revient à 16 arceaux et non 8 arceaux comme notés. Pourriez-vous me dire ce qui ne va pas s'il vous plaît? Merci d'avance pour la prochaine réponse car je crochète ce modèle pour ma sœur qui viendra cette semaine.
10.12.2017 - 10:05DROPS Design answered:
Bonjour Dana, au 8ème tour, vous avez 96 B et vous crochetez au 9ème tour: *6 B, 6 ml, 6B*, répétez de *-* tout le tour. Vous aurez ainsi 12 brides entre chaque arceau de 6 ml et un total de 8 arceaux de 6 ml. Bon crochet!
11.12.2017 - 10:40
![]() Marilyn wrote:
Marilyn wrote:
In round #9, pattern states 6 DC, ch 6 .. etc; however, this results in incorrect number of spaces. I corrected this to 12 DC. HOWEVER, rounds 10, etc. are now ionconsistent. Can you advise or revise round 10, 11 and 12? Like the pattern and planned on four placemats for Christmas but now stumped at round #9. Thank you in advance,
08.10.2015 - 15:58DROPS Design answered:
Dear Marylin, on round 9, you work: *6 dc, 6 ch, 6 dc* and repeat around a total of 8 times, so that you get 8 ch-loops and 12 dc between each ch-loop(12 dc x 8 times = 96 sts). Round 10 match then over round 9. Happy croheting!
08.10.2015 - 17:33
![]() Stephanie Hutton wrote:
Stephanie Hutton wrote:
Hello, I'm quite new to Drops patterns and I'm always confused with the "crochet info". On this pattern I don't understand where to work the "crochet info" within the pattern. Can you please help. Kind regards, Stephanie.
01.02.2015 - 19:23DROPS Design answered:
Dear Mrs Hutton, the crochet info explains how to start each row, ie replace 1st dtr at beg of each round with dtr with 4 ch, replace 1st tr at beg of each round with tr with 3 ch and so on, ex. on round 1, you start with 4 ch, 23 dtr in the ch-ring. Happy crocheting!
02.02.2015 - 12:56
![]() Nynke Snoek wrote:
Nynke Snoek wrote:
De 10 e toer is onbegrijpelijk. Na de 14 driedubbele stokjes in het lossenboogje, moet ik een vaste doen in het 5e stk van de lossenboog? Op de foto zitten de bogen dicht op elkaar, ik heb er zoveel stokjes tussen, hoe kan dat?
17.06.2014 - 11:31DROPS Design answered:
Hoi Nynke. Je moet 1 v haken in de 5 stk vanaf de l-lus (dus niet de stk van de boog).
27.06.2014 - 12:38
![]() Anne wrote:
Anne wrote:
På 9 omgang kan det ikke passe at der skal være 6 st imellem, så kan der ikke blive kun 8 lm buer. Der må skulle være 12 i mellem, ikke?
10.02.2014 - 16:51Yolanda wrote:
Un cordial saludo, gracias a sus patrones he podido realizar muchos de sus diseños, pero con este no ha sido posible, quisiera una mayor explicación a paritr de la vuelta 9. Un abrazo desde Colombia y felicitaciones , muchas gracias gracias,
24.02.2012 - 03:54
![]() DROPS Deutsch wrote:
DROPS Deutsch wrote:
Das haben Sie falsch gelesen: * 1 Stb in jedes der 6 nächsten Stb, 6 Lm, 1 Stb in jedes der 6 nächsten Stb * = 12 Stb pro wiederholung.
18.12.2011 - 19:34
![]() Ulla König wrote:
Ulla König wrote:
Ich habe eine Frage zu Reihe 9: "* 1 Stb in jedes der 6 nächsten Stb, 6 Lm, 1 Stb in jedes der 6 nächsten Stb *, von *-* wiederholen ( 8 Lm-Bogen).". Wenn ich in Runde 9 nur 8*6 Stäbchen häkle, dann komme ich lediglich auf 42 Stäbchen. Nicht aber auf die 96 Stäbchen, die ich in Runde 8 zuvor angelegt habe. Habe ich etwas falsch verstanden?
18.12.2011 - 11:17
|
|
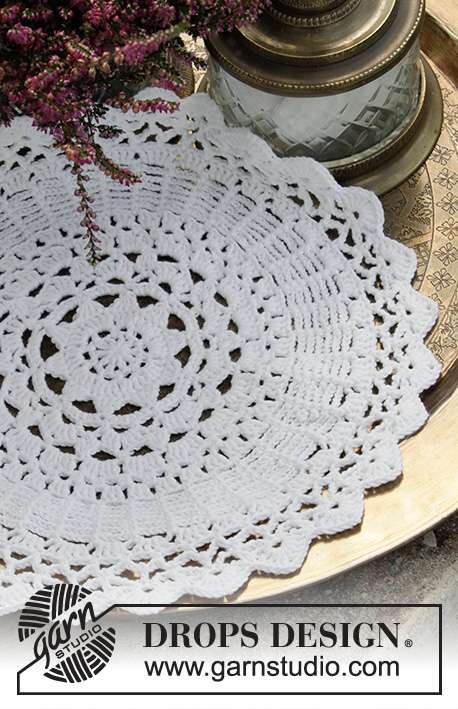
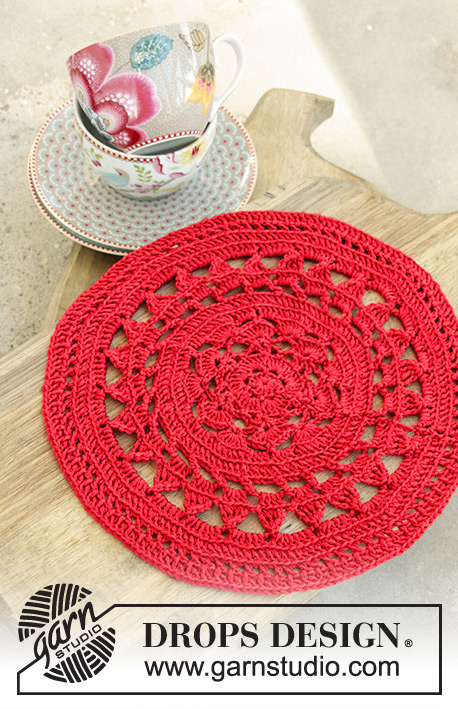
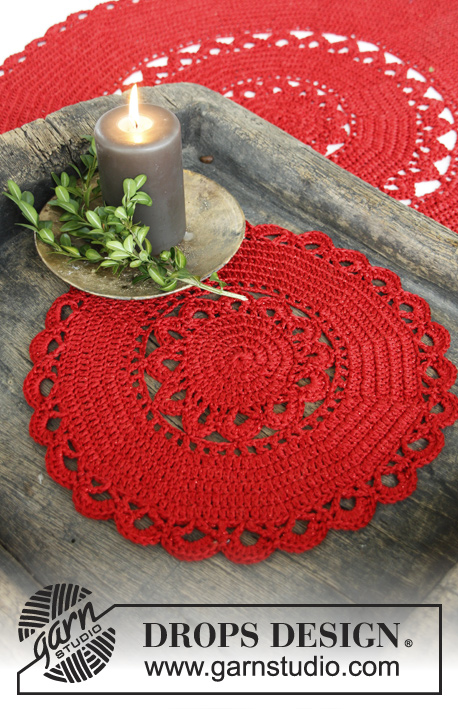
Blooming Placemat#dropsbloomingplacemat |
|
|
|
|
Crochet DROPS place mat for Christmas in 1 strand ”Fabel” or “Alpaca” and 1 strand “Glitter”.
DROPS Extra 0-800 |
|
|
CROCHET INFO: Replace 1st tr with ch 4, 1st dc with ch 3 and 1st sc with ch 1. Finish the round with 1 sl st in 4th, 3rd or 1st ch respectively from beg of round. -------------------------------------------------------- PLACE MAT: Ch 6 on hook size 2.5 mm/US C with 1 strand Fabel or Alpaca and 1 strand Glitter and form a ring with 1 sl st in first ch. Read CROCHET INFO! ROUND 1: 24 tr in ch-ring. ROUND 2: * 1 sc in next tr, ch 5, 1 dc in 5th ch from hook, skip 1 tr *, repeat from *-* the entire round, finish with 1 sl st in 1st sc from beg of round (= 12 leaves). ROUND 3: 1 sl st in first sc, * ch 8, 1 sl st in next sc *, repeat from *-* the entire round, finish with 1 sl st in 1st sl st from beg of round. ROUND 4: ch 3, 1 sc in first ch space, * ch 6, 1 sc in next ch space *, repeat from *-* 11 times, ch 6, finish with 1 sl st in 1st sc from beg of round (= 12 ch spaces). ROUND 5: 6 dc in every ch space = 72 dc. ROUND 6: * 1 dc in each of the next 8 dc, 2 dc in next dc *, repeat from *-* the entire round = 80 dc. ROUND 7: * 1 dc in each of the next 9 dc, 2 dc in next dc *, repeat from *-* the entire round = 88 dc. ROUND 8: * 1 dc in each of the next 10 dc, 2 dc in next dc *, repeat from *-* the entire round = 96 dc. ROUND 9: * 1 dc in each of the next 6 dc, ch 6, 1 dc in each of the next 6 dc *, repeat from *-* the entire round (8 ch spaces evenly distributed). ROUND 10: 1 sc in first dc, ch 2, skip 1 dc, 1 sc in next dc, * 14 dtr in ch space, 1 sc in 5th dc after ch space, ch 2, skip 1 dc, 1 sc in next dc, ch 2, skip 1 dc, 1 sc in next dc *, repeat from *-* 7 times, 14 dtr in ch space, 1 sc in 5th dc from ch space, ch 2, skip 1 dc and finish with 1 sl st in 1st sc from beg of round. ROUND 11: 1 sc in first sc, ch 2, 1 sc in next sc,* " ch 5, 1 dc in 5th ch from hook, skip 1 dtr, 1 sc in next dtr ", repeat from "-" 7 times, ch 2, 1 sc in next sc, ch 2, 1 sc in next sc * repeat from *-* the entire round. Fasten off. |
|
Have you finished this pattern?Tag your pictures with #dropspattern #dropsbloomingplacemat or submit them to the #dropsfan gallery. Do you need help with this pattern?You'll find 7 tutorial videos, a Comments/Questions area and more by visiting the pattern on garnstudio.com. © 1982-2025 DROPS Design A/S. We reserve all rights. This document, including all its sub-sections, has copyrights. Read more about what you can do with our patterns at the bottom of each pattern on our site. |


With over 40 years in knitting and crochet design, DROPS Design offers one of the most extensive collections of free patterns on the internet - translated to 17 languages. As of today we count 314 catalogs and 11822 patterns - 11812 of which are translated into English (US/in).
We work hard to bring you the best knitting and crochet have to offer, inspiration and advice as well as great quality yarns at incredible prices! Would you like to use our patterns for other than personal use? You can read what you are allowed to do in the Copyright text at the bottom of all our patterns. Happy crafting!
Post a comment to pattern DROPS Extra 0-800
We would love to hear what you have to say about this pattern!
If you want to leave a question, please make sure you select the correct category in the form below, to speed up the answering process. Required fields are marked *.