
Popular categories
Looking for a yarn?


Comments / Questions (61)
![]() Sandra wrote:
Sandra wrote:
Re pattern 110 23 when am increasing for the collar, I tried to do the increase at the start of the row and this doesn’t look right to me, so not sure where to do the increase.
11.02.2024 - 10:11DROPS Design answered:
Dear Sandra, you increase for the collar as follows: work 2 edge stitches, then increase 1 stitch. When working back work the increased stitch twisted so that there is no hole. You don't increase at the very start of the row; you increase after the edge stitches. Happy knitting!
11.02.2024 - 23:43
![]() Sandra wrote:
Sandra wrote:
When I get to the k1, p 7 section when I continue doing this my pattern looks nothing like yours.obviously I am doing something wrong or not understanding the pattern, it says to continue with the k1, p7, but is just not correct.
07.10.2023 - 05:59DROPS Design answered:
Dear Sandra, you should work the rib (K1, P7) seen from right side, this means, from wrong side you will K over K and P over P (= P1, K7). Happy knitting!
09.10.2023 - 10:00
![]() Carolyn wrote:
Carolyn wrote:
Can this sweater be knit using the M1 Seed Stitch for the entire sweater with the gauge border as shown? Thank you.
24.06.2023 - 14:10DROPS Design answered:
Dear Carolyn, if you work the whole garment in M.1 you need to make the necessary calculations for the decreases for the round yoke or to adapt it to a different yoke such as raglan. Happy knitting!
25.06.2023 - 15:57
![]() Loraine McLean wrote:
Loraine McLean wrote:
At the end of the pattern, under Assembly, it says to join both sides of the collar at the back neck, and stitch it to the back neck. To do this I would have gathers at the back neck. Is this correct? Or should I knit the collar longer on each side until it meets in the middle of the back neck, without any gathers? Thank you Loraine Mclean
30.11.2020 - 16:09DROPS Design answered:
Dear Mrs MacLean, you work each side of the shawl collar with short rows until collar measures 8-9 or 10 cm (see size) - this should reach mid back of neck. So that you sew both small pieces together then sew collar along neck on back piece - see also this video showing how to knit a simple shawl collar (without short rows). Happy knitting!
30.11.2020 - 16:23
![]() Giorgia wrote:
Giorgia wrote:
Buonasera. Sono arrivata alla scollatura. Diminuire/aumentare a ferri alterni si intende contando solo i ferri a diritto del lavoro? Grazie mille
20.12.2019 - 23:47DROPS Design answered:
Buonasera Giorgia, si, deve lavorare aumenti e diminuzioni sul diritto del lavoro! Buon lavoro!
21.12.2019 - 18:52
![]() Doris wrote:
Doris wrote:
Liebes Drops-Team, jetzt bin ich mit den Zu- und Abnahmen durch und die Jacke sieht schon toll aus :-) Allerdings hakt es bei mir mal wieder am Verständnis. Was ist gemeint mit: "Nach 57-59-61-63-65-67 cm 1 R. re. auf rechts stricken und gleichzeitig die Maschenanzahl auf 96-100-104-108-112-116 M. anpassen.", wie geht "1 Runde rechts auf rechts stricken, wenn ich doch bisher noch ein Rippenmuster habe? Nochmal Danke für Ihre Hilfe!
05.06.2018 - 17:30DROPS Design answered:
Liebe Doris, nach 57-59-61-63-65-67 cm stricken Sie eine Hinreihe rechts und gleichzeitig regelmäßig abnehmen um die Maschenanzhal auf 96-100-104-108-112-116 M anpassen (über die ersten und letzten 27 M der Reihe soll es nicht abgenommen). Viel Spaß beim stricken!
06.06.2018 - 09:39
![]() Doris wrote:
Doris wrote:
Liebes Drops-Team, habe jetzt die Ärmel mit auf die Nadeln genommen und die 4 Reihen kraus rechts gestrickt. Jetzt kommt das Muster mit *1 re,7 li*. In den Rückreihen muss ich dann *1 li, 7 re* stricken. Oder? Und dann direkt die nächste Frage zur Passe: Wo/an welcher Stelle des Musters müssen die Maschen ok zusammen gestrickt werden? Danke für Ihre Hilfe
15.05.2018 - 23:08DROPS Design answered:
Liebe Doris, ja so wird das Rippenmuster gestrickt - für die Rundpasse werden Sie nach 42-47 cm (siehe Grösse) in jeder li.-Partie 1 M. abnehmen - bei der 1. Abnahmenreihe stricken Sie die 2 ersten li-Ma zusammenstricken und bei der 2. Abnahmenreihe stricken Sie die 2 letzten li-Ma zusammen, diese 2 Reihe wiederholen dh abwechslungsweise auf der rechen und linken Seite jeder li-Partie abnehmen. Viel Spaß beim stricken!
16.05.2018 - 09:18
![]() Astrid Paulus wrote:
Astrid Paulus wrote:
Hallo Drops-Team! Zu Beginn der Passe schreibt ihr: 4 Reihen rechts stricken. Auf dem Photo sieht´s jedoch aus, als wären es Kraus rechts Rippen. Sollen hier 4 Reihen oder 4 Rippen Kraus rechts gestrickt werden?
22.06.2016 - 10:38DROPS Design answered:
Hallo Astrid, 4 Reihen rechts gestrickt ergeben 2 Krausrippen.
23.06.2016 - 08:40Lidia wrote:
Porque la mayoria de los tejidos estan en agujas circular y no asi en agujas comunes?? podrian poner la opcion de agujas comunes igual?? Gracias
14.06.2016 - 18:46DROPS Design answered:
Hola Lidia, la aguja circular es tan común como las rectas. Se usa en nuestros modelos para minimizar el número de costuras necesarias y está muy extendida en los paises nórdicos. Muchos de los modelos sólo se pueden trabajar con ag circular, otros se podrían trabajar con ag rectas también pero tendrías que hacer los cálculos necesarios de cada parte a trabajar y luego hacer las costuras necesarias.
15.06.2016 - 19:46
![]() Andrea Blümel wrote:
Andrea Blümel wrote:
Liebes DROPS Team! Ich fange bald mit der Abnahmen bei der Rundpasse an, da bräuchte ich Hilfe. Ist es so gemeint, dass ich abwechselnd an den Vorder- und Rückteilen auf der linken Seite an den Ärmelansätzen jeweils 1 M abnehmen? Vielen Dank im Voraus
25.08.2015 - 12:18DROPS Design answered:
Sie nehmen nur in Hin-Reihen ab. Rechts und links bezieht sich auf die Stelle des Linksbereichs. Sie machen die Abnahmen ja immer in den Bereichen, die glatt links gestrickt werden. In der ersten Abnahme-Reihe (= Hin-R) nehmen Sie an der rechten Seite aller Glattlinksbereiche ab, in der nächsten Abnahme-Reihe (wieder eine Hin-R) nehmen Sie an der linken Seite aller Linksbereiche ab. Das machen Sie nicht nur an den Ärmelansätzen, sondern in jedem Linksbereich. Gleichzeitig müssen Sie an den Halsausschnitt und den Kragen denken.
01.09.2015 - 15:39
|
|||||||
Tasia |
|||||||
 |
 |
||||||
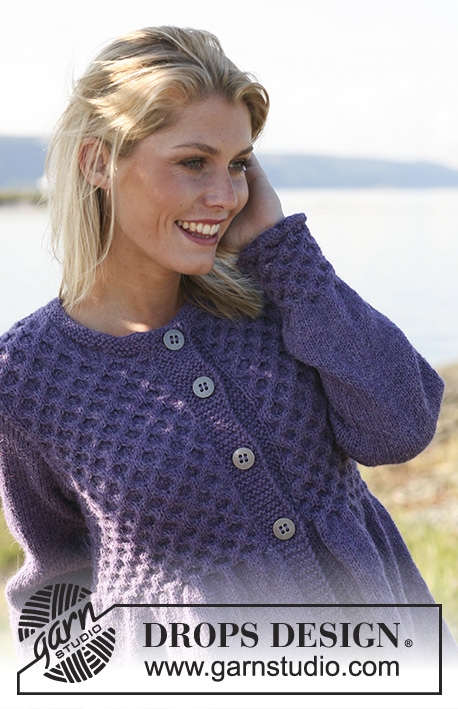
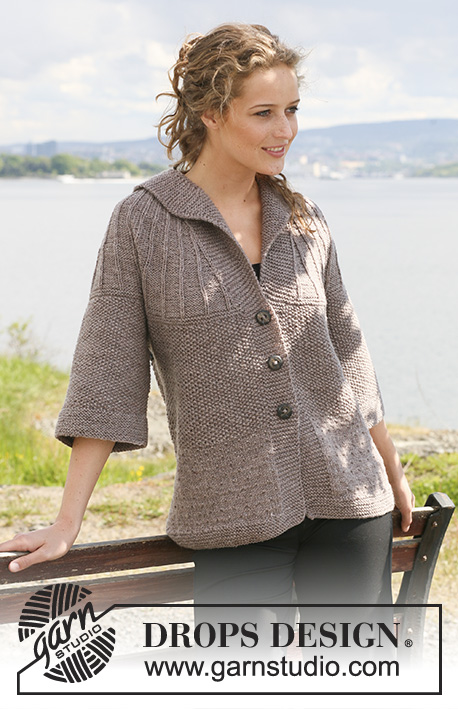
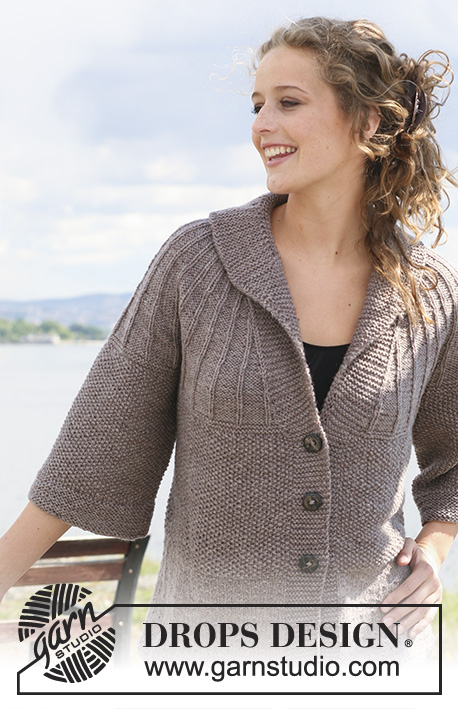
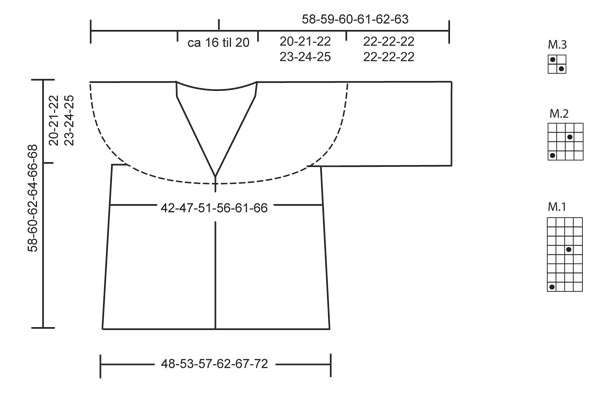
DROPS jacket in moss st with round yoke in ”Merino extra fine”. Size S – XXXL.
DROPS 110-23 |
|||||||
|
Garter st, back and forth on needle: K all rows. Garter st, in the round: K 1 round, P 1 round. Pattern: See diagram M.1, M.2, and M.3. Diagram shows the pattern from the RS. Decreasing tip-1, applies to yoke: Dec 1 st in each P-section by P2 tog at the right and at the left side alternately in P-section. Decreasing tip-2, applies to neckline: Dec from the RS inside 10 front band sts. Dec as follows after 10 sts: slip 1 st as if to K, K1, psso Dec as follows before 10 sts: K2 tog. Increasing tip, applies to collar: Inc 1 st inside 2 sts by making 1 YO. Work YO into back of loop on return row to avoid a hole. Buttonholes: Cast off for buttonholes on right front piece. 1 buttonhole = cast off 5th and 6th st from mid front and cast on 2 new sts on return row. Cast off for buttonholes when piece measures: Size S: 18, 28 and 38 cm Size M: 19, 29 and 39 cm Size L: 20, 30 and 40 cm Size XL: 21, 31 and 41 cm Size XXL: 22, 32 and 42 cm Size XXXL: 23, 33 and 43 cm Body piece: Worked back and forth on needle from mid front. Cast on 203-223-239-259-279-299 sts (includes 10 front band sts each side towards mid front) on circular needle size 4.5 mm with Merino. K 1 row from WS and continue in garter st – see above. When piece measures 4 cm work next row as follows from the RS: 10 garter sts (front band), M.1 on the next 183-203-219-239-259-279 sts, 10 garter sts (front band). Remember the knitting tension! Insert 2 MT (= marking threads) in piece, 54-59-63-68-73-78 sts in from each side (= 95-105-113-123-133-143 sts between MT on back piece). Now read all of the following section before continuing: Decreases: Continue in M.1 – at the same time when piece measures 8 cm dec 1 st on each side of both MT and repeat the dec on every 5 cm another 5 times = 179-199-215-235-255-275 sts. Pattern: At the same time When piece measures approx 15 cm (adjust to after a full repeat of M.1) continue in M.2 on all sts (with front bands in garter st as before). After 2 vertical repeats of M.2, continue in M.3 (= moss st). Buttonholes: When piece measures 18-19-20-21-22-23 cm cast off for buttonholes on right front piece – see above! When piece measures 38-39-40-41-42-43 cm cast off 6 sts each side for armhole (= 3 sts on each side of both MT) = 167-187-203-223-243-263 sts. Put piece aside and knit the sleeves. Sleeve: Worked in the round on double pointed needles. Cast on 68-72-76-80-84-88 sts on double pointed needles size 4.5 mm with Merino. Work 6 cm garter st and continue in M.3. When piece measures 22 cm cast off 6 sts mid under arm = 62-66-70-74-78-82 sts. Put piece aside and knit the other sleeve. Yoke: Slip sleeves in on the same circular needle as body piece where cast off for armholes = 291-319-343-371-399-427 sts. K 4 rows (first row = RS) on all sts, at the same time on the last row adjust no of sts to 293-317-341-373-397-429 sts (do not dec on front band sts). Read all of the following section before continuing: Pattern: Work next row from RS as follows: 10 garter sts, * K1, P7 *, repeat from *-* until 11 sts remain, K1, 10 garter sts. Continue in rib, K1 / P7. Neckline and collar: When piece measures 41-42-43-44-45-46 cm dec 1 st each side to shape the V-neck– see Decreasing tip-2 – on every other row 12 times and then on every 4th row 5 times. At the same time inc for collar – see Increasing tip – on every other row 10 times and then on every 4th row 7 times = a total of 27 garter sts incl front band. Raglan: When piece measures 42-43-44-45-46-47 cm dec 1 st in each P-section – see Decreasing tip-1. Repeat the dec on every 8-8-10-10-12-12 row another 4 times (= K1/P2). When all dec and inc are complete piece measures approx 54-55-60-61-64-65 cm and there are approx 135-144-153-165-174-186 sts on row. When piece measures 57-59-61-63-65-67 cm K 1 row from the RS, at the same time dec evenly to 96-100-104-108-112-116 sts – Note: Do not dec on the 27 garter sts. On next row cast off the middle 42-46-50-54-58-62 sts on back piece for neck. Slip the 27 garter sts on the left side of piece on a stitch holder and continue on the 27 sts on the right side of piece for collar as follows * work 2 rows garter st on all sts, work 2 rows garter st on the 14 sts towards mid front only *, repeat from *-* until collar measure 8-8-9-9-10-10 cm on the shorter side from where sts were cast off for neckline on back piece. Cast off. Slip sts from stitch holder back on needle and work these in the same way Assembly: Sew collar tog mid back and sew to neckline. Sew openings under arms. Sew on buttons. |
|||||||
Diagram explanations |
|||||||
|
|||||||
|
|||||||
Have you finished this pattern?Tag your pictures with #dropspattern or submit them to the #dropsfan gallery. Do you need help with this pattern?You'll find 24 tutorial videos, a Comments/Questions area and more by visiting the pattern on garnstudio.com. © 1982-2025 DROPS Design A/S. We reserve all rights. This document, including all its sub-sections, has copyrights. Read more about what you can do with our patterns at the bottom of each pattern on our site. |
|||||||


With over 40 years in knitting and crochet design, DROPS Design offers one of the most extensive collections of free patterns on the internet - translated to 17 languages. As of today we count 314 catalogues and 11821 patterns translated into English (UK/cm).
We work hard to bring you the best knitting and crochet have to offer, inspiration and advice as well as great quality yarns at incredible prices! Would you like to use our patterns for other than personal use? You can read what you are allowed to do in the Copyright text at the bottom of all our patterns. Happy crafting!
Post a comment to pattern DROPS 110-23
We would love to hear what you have to say about this pattern!
If you want to leave a question, please make sure you select the correct category in the form below, to speed up the answering process. Required fields are marked *.