Winter Sprite by DROPS Design

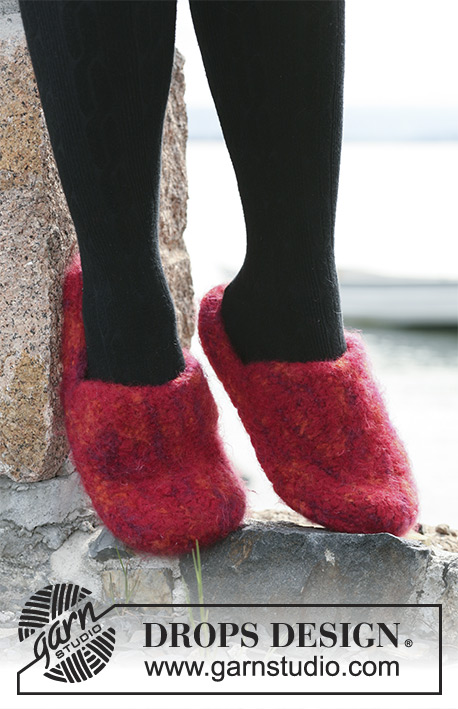
Felted slippers in DROPS Snow. Size 35 – 44.

Keywords: christmas, slippers
DROPS 104-4
DROPS design: Pattern no ee-156
Yarn group E
-----------------------------------------------
Size: 35/37 - 38/39 - 40/42 - 43/44
UK Size: 4/5 – 5/6 – 6/7 – 7/8
Measurements: see sketch

Materials: DROPS SNOW from Garnstudio
150-200-250-250 gr, colour 14, dark grey
And use
50 gr, colour 08, red

DROPS STRAIGHT NEEDLES SIZE 8 mm - or size needed to get 11 stitches x 15 rows in stocking stitch = 10 x 10 cm before felting.
After felting 10 x 10 cm = 13.5 stitches x 28 rows.

-------------------------------------------------------

Knitting tension – See how to measure it and why here
Alternative Yarn – See how to change yarns here
Yarn Groups A to F – Use the same pattern and change the yarn here
Yarn usage using an alternative yarn – Use our yarn converter here

-------------------------------------------------------


100% Wool
from 1.40 £ /50g
DROPS Snow uni colour DROPS Snow uni colour 1.40 £ /50g
Wool Warehouse Direct Ltd
Order
DROPS Snow mix DROPS Snow mix 1.60 £ /50g
Wool Warehouse Direct Ltd
Order
needles DROPS Needles & Hooks Order
You can get the yarn to make this pattern from 7.00£. Read more.

Pattern instructions

NOTE: This pattern is written in British English. All measurements in charts are in cm. For conversion from cm to inches - click here. There are different terms for crocheting in British and American English. If this pattern includes crochet, click for "crochet terms" here. For this pattern in American English, please click here.
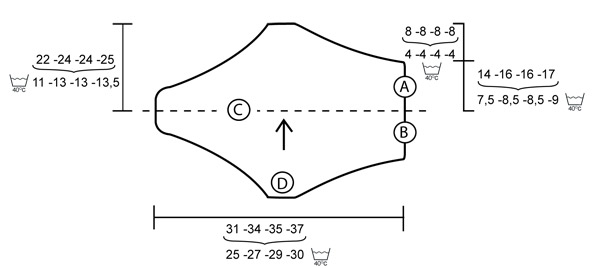
SLIPPER:
The slipper is worked in one with a seam mid front and mid back, beginning at the top of instep (see sketch – D)

Cast on 4-4-5-4 stitches on needle size 8 mm with dark grey Snow. Work in stocking stitch. Increase in each side by casting on new stitches at the end of every row as follows:
Right side seen from RS (towards heel): 2 stitches 3 times, 3 stitches 2 times, 5-6-7-8 stitches 1 time.
Left side seen from RS (towards toe): 2 stitches 5-6-6-7 times, 1 stitch 3 times.
After all increases are done there are 34-37-39-41 stitches on needle. Continue in stocking stitch. REMEMBER THE KNITTING TENSION! When piece measures 22-24-24-25 cm, insert a marker in the piece = mid under foot. Now work the other side of slipper with cast offs instead of cast ons. Begin cast off when piece is the same length from marker as from last increase in each side and up to marker - NOTE! Cast offs in right side begin when 2-3-3-4 cast offs have been done in the left side. Cast off at beg of every row as follows:
Right side seen from RS (from heel): 5-6-7-8 stitches 1 time, 3 stitches 2 times, 2 stitches 3 times
Left side seen from RS (from toe): 1 stitch 3 times, 2 stitches 5-6-6-7 times = 4-4-5-4 stitches remain. Cast off.

ASSEMBLY:
Fold the slipper mid under foot and sew seam mid on top of foot (including cast on and cast off edge).
Pick up approximately 55 to 60 stitches on needle size 8 mm around the opening at the top (it is important to pick up enough stitches to avoid a tight edge). Knit 2 rows. Cast off. Sew seam mid back (A + B) in front loop of outermost stitch. Knit another slipper.

FELTING:
Place the slippers in the washing machine with a detergent without enzymes and optical bleach. Wash at 40 degrees with normal spin but no pre-wash. Put on the slippers and shape it to the correct size while it is still wet. At subsequent wash, wash the slippers at regular wool programme.

This pattern has been corrected. .

Updated online: 07.09.2007
150-200-250-250 g colour no 14, dark grey
Updated online: 08.08.2018
No correction, but pattern has been rewritten

Diagram

symbols = heel mid back, sew onto B
symbols = heel mid back, sew onto A
symbols = mid under foot
symbols = start knitting here
symbols = knitting direction.
diagram

Do you need help with this pattern?

Thank you for choosing a DROPS Design pattern. We take pride in providing patterns that are correct and easy to understand. All patterns are translated from Norwegian and you can always check the original pattern (DROPS 104-4) for measurements and calculations.

Are you having trouble following the pattern? See below for a list of resources to help you finish your project in no time - or why not, learn something new.

signature-image signature

Are you having trouble following the pattern? See below for a list of resources to help you finish your project in no time - or why not, learn something new.

We have also step-by-step guides for different techniques which you'll find here.

1) Why is the knitting/crochet tension so important?

Knitting tension is what determines the final measurements of your work, and is usually measured per 10 x 10 cm. It is provided like so: number of stitches in width x number of rows in height - eg: 19 stitches x 26 rows = 10 x 10 cm.

The knitting tension is very individual; some people knit/crochet loosely while others work tightly. You adjust the knitting tension with the needle size, which is why the suggested needle size only serve as a guide! You need to adjust this (up or down) to ensure that YOUR knitting tension matches the knitting tension provided in the pattern. If you work with a different knitting tension than provided you will have a different yarn consumption, and your work will have different measurements than what the pattern suggests.

The knitting tension also determines which yarns can replace each other. As long as you achieve the same knitting tension you can replace one yarn with another.

See DROPS lesson: How to measure your tension/gauge

See DROPS video: How to make a gauge tension swatch

to top

2) What are the yarn groups?

All our yarns are categorised into yarn groups (from A to F) according to thickness and knitting tension – group A contains the thinnest yarns and group F the thickest. This makes it easier for you to find alternative yarns to our patterns, should you wish to switch yarn. All yarns within the same group have a similar knitting tension and can easily replace each other. However, different yarn qualities have different structures and properties which will give the finished work a unique look and feel.

Click here for an overview of the yarns in each yarn group

to top

3) Can I use a different yarn than what the pattern suggests?

The important thing when changing from one yarn to another is that the knitting/crochet tension remains the same. This is so that the measurements of the finished piece will be the same as on the sketch provided. It is easier to achieve the same knitting tension using yarns from the same yarn group. It is also possible to work with multiple strands of a thinner yarn to achieve the knitting tension of a thicker one. Please try our yarn converter. We recommend you to always work a test swatch.

Please NOTE: when changing yarn the garment might have a different look and feel to the garment in the photo, due to individual properties and qualities of each yarn.

See DROPS lesson: Can I use a different yarn than the one mentioned in the pattern?

to top

4) How do I use the yarn converter?

At the top of all our patterns you’ll find a link to our yarn converter, which is a helpful tool should you wish to use a different yarn than suggested. By filling in the yarn quality you wish to replace, the amount (in your size) and number of strands, the converter will present good alternative yarns with the same knitting tension. Additionally it will tell you how much you’ll require in the new qualities and whether you’ll need to work with multiple strands. Most skeins are 50g (some are 25g or 100g).

If the pattern is worked with multiple colours, every colour will have to be converted separately. Similarly, if the pattern is worked with several strands of different yarns (for example 1 strand Alpaca and 1 strand Kid-Silk) you will have to find alternatives for each, individually.

Click here to see our yarn converter

to top

5) Why do I get the wrong knitting tension with the suggested needle size?

The needle size provided in the pattern serves only as a guide, the important thing is to follow the knitting tension. And since knitting tension is very individual, you will have to adjust the needle size to ensure that YOUR tension is the same as in the pattern – maybe you’ll have to adjust 1, or even 2 needle sizes, up or down to achieve the correct tension. For this, we recommend that you work test swatches.

Should you work with a different knitting tension than the one provided, the measurements of the finished garment might deviate from the measurement sketch.

See DROPS lesson: How to measure your tension/gauge

See DROPS video: How to make a gauge tension swatch

to top

6) Why is the pattern worked top-down?

Working a garment top-down provides more flexibility and room for personal adjustment. For example it is easier to try the garment on while working, as well as making adjustments to length of yoke and shoulder caps.

The instructions are carefully explaining every step, in the correct order. Diagrams are adjusted to the knitting direction and are worked as usual.

to top

7) Why are the sleeves shorter in larger sizes?

The total width of the garment (from wrist-to-wrist) will be larger in the larger sizes, despite the actual sleeves being shorter. The larger sizes have longer sleeve caps and wider shoulders, so there will be a good fit in all sizes.

to top

8) What is a repeat?

Diagrams are often repeated on the round or in height. 1 repeat is the diagram the way it appears in the pattern. If it says to work 5 repeats of A.1 in the round, then you work A.1 a total of 5 times after/next to each other in the round. If it says to work 2 repeats of A.1 vertically/in height you work the entire diagram once, then begin again at the start and work the entire diagram one more time.

to top

9) How do I work according to a knitting diagram?

The diagram depicts all rows/rounds, and every stitch seen from the right side. It is read from bottom to top, from right to left. 1 square = 1 stitch.

When working back and forth, every other row is worked from the right side and every other row is worked from the wrong side. When working from the wrong side, the diagram will have to be worked reversed: from left to right, knit stitches are purled, purl stitches are knit etc.

When working in the round every round is worked from the right side and the diagram are worked from right to left on all rounds.

See DROPS lesson: How to read knitting diagrams

to top

10) How do I work according to a crochet diagram?

The diagram depicts all rows/rounds, and every stitch seen from the right side. It is worked from bottom to top, from right to left.

When working back and forth every other row is worked from the right side: from right to left and every other row is worked from the wrong side: from left to right.

When working in the round, every row in the diagram are worked from the right side, from right to left.

When working a circular diagram you start in the middle and work your way outwards, counter clockwise, row by row.

The rows usually start with a given number of chain stitches (equivalent to the height of the following stitch), this will either be depicted in the diagram or explained in the pattern.

See DROPS lesson: How to read crochet diagrams

to top

11) How do I work several diagrams simultaneously on the same row/round?

Instructions for working several diagrams after each other on the same row/round, will often be written like so: “work A.1, A.2, A.3 a total of 0-0-2-3-4 times". This means you work A.1 once, then A.2 is worked once, and A.3 is repeated (in width) the number of times provided for your size – in this case like so: S = 0 times, M = 0 times, L=2 times, XL= 3 times and XXL = 4 times.

The diagrams are worked as usual: begin with the first row in A.1, then work the first row in A.2 etc.

See DROPS lesson: How to read knitting diagrams

See DROPS lesson: How to read crochet diagrams

to top

12) Why does the piece start with more chain stitches than it’s worked with?

Chain stitches are slightly narrower than other stitches and to avoid working the cast-on edge too tight, we simply chain more stitches to begin with. The stitch count will be adjusted on the following row to fit the pattern and measurement sketch.

to top

13) Why increase before the rib edge when the piece is worked top-down?

The rib edge is more elastic and will contract slightly compared to, for example, stocking stitch. By increasing before the rib edge, you avoid a visible difference in width between the rib edge and the rest of the body.

to top

14) Why increase in the cast-off edge?

It’s very easy to cast off too tightly, and by making yarn overs while casting off (and simultaneously casting these off) you avoid a too tight cast off edge.

See DROPS video: How to bind off with yarn overs (yo)

to top

15) How do I increase/decrease on every 3rd and 4th row/round alternately?

To achieve an even increase (or decrease) you can increase on, for example: every 3rd and 4th row alternately, like so: work 2 rows and increase on the 3rd row, work 3 rows and increase on the 4th. Repeat this until the increase is complete.

See DROPS lesson: Increase or decrease 1 st on every 3rd and 4th row alternately

to top

16) Why is the pattern slightly different than what I see in the photo?

Pattern repeats can vary slightly in the different sizes, in order to get the correct proportions. If you’re not working the exact same size as the garment in the photo, yours might deviate slightly. This has been carefully developed and adjusted so that the complete impression of the garment is the same in all sizes.

Make sure to follow instructions and diagrams for your size!

to top

17) How can I work a jacket in the round instead of back and forth?

Should you prefer to work in the round instead of back and forth, you may of course adjust the pattern. You’ll need to add steeks mid-front (usually 5 stitches), and follow the instructions. When you would normally turn and work from the wrong side, simply work across the steek and continue in the round. At the end you’ll cut the piece open, pick up stitches to work bands, and cover the cut edges.

See DROPS video: How to knit steeks and cut open

to top

18) Can I work a jumper back and forth instead of in the round?

Should you prefer to work back and forth instead of in the round, you may of course adjust the pattern so you work the pieces separately and then assemble them at the end. Divide the stitches for the body in 2, add 1 edge stitch in each side (for sewing) and work the front and back pieces separately.

See DROPS lesson: Can I adapt a pattern for circular needles into straight needles?

to top

19) Why do you show discontinued yarns in the patterns?

Since different yarns have different qualities and textures we have chosen to keep the original yarn in our patterns. However, you can easily find options among our available qualities by using our yarn converter, or simply pick a yarn from the same yarn group.

It is possible that some retailers still have discontinued yarns in stock, or that someone has a few skeins at home that they would like to find patterns for.

The yarn converter will provide both alternative yarn as well as required amount in the new quality.

to top

20) How do I make a women’s size garment into a men’s size one?

If you have found a pattern you like which is available in women’s size it’s not very difficult to convert it to men’s size. The biggest difference will be the length of sleeves and body. Start working on the women size that you think would fit across the chest. The additional length will be worked right before you cast off for the armhole/sleeve cap. If the pattern is worked top-down you can add the length right after the armhole or before the first decrease on sleeve.

Regarding additional yarn amount, this will depend on how much length you add, but it is better with a skein too many than too few.

to top

21) How do I prevent a hairy garment from shedding?

All yarns will have excess fibres (from production) that might come off as lint or shedding. Brushed yarns (ie hairier yarns) have more of these loose, excess fibres, causing more shedding.

Shedding also depends on what is worn under or over the garment, and whether this pulls at the yarn fibres. It’s therefore not possible to guarantee that there will be no shedding

Below are some tips on how to get the best result when working with hairier yarns:

1. When the garment is finished (before you wash it) shake it vigorously so the looser hairs come off. NOTE: do NOT use a lint roller, brush or any method that pulls at the yarn.

2. Place the garment in a plastic bag and put it in your freezer - the temperature will cause the fibres to become less attached to each other, and excess fibres will come off easier.

3. Leave in the freezer for a few hours before taking it out and shaking it again.

4. Wash the garment according to the instructions on the yarn label.

to top

22) Where on the garment is the length measured?

The measurement sketch/schematic drawing provides information regarding the full length of the garment. If it’s a jumper or a jacket the length is measured from the highest point on the shoulder closest to the neckline, and straight down to the bottom of the garment. It is NOT measured from the tip of shoulder. Similarly, the length of yoke is measured from the highest point on the shoulder and down to where yoke is split into body and sleeves.

On a jacket measures are never taken along bands, unless specifically stated. Always measure inside band stitches when measuring the length.

See DROPS lesson: How to read a schematic drawing

to top

23) How do I know how many balls of yarn I need?

The required amount of yarn is provided in grams, eg: 450 g. To calculate how many balls you’ll need you first need to know how many grams are in 1 ball (25g, 50g or 100g). This information is available if you click on the individual yarn quality on our pages. Divide the amount required with the amount of each ball. For example, if each ball is 50g (the most common amount), the calculation will be as follows: 450 / 50 = 9 balls.

to top

Have you purchased DROPS yarn to make this pattern? Then you are entitled to receive help from the store where you bought the yarn. Find a list of DROPS stores here!
Still can't find the answer you need? Then scroll down and leave your question so one of our experts can try to help you. This will be done normally within 5 to 10 working days. In the meantime, you can read the questions and answers that others have left to this pattern or join the DROPS Workshop on Facebook to get help from fellow knitters/crocheters!

Comments / Questions (104)

country flag Barbara Schust-Lawrence wrote:

I love the look of these slipper! I have made several slippers from another pattern, but now want to make a slip on style. I am a novice knitter, and the pattern I used was so easy, as there was a chart with directions for every row, for every size. I don’t want to give up on this pattern but I can’t even begin to understand the directions. Has anyone created a chart for these lovely Winter Sprite slippers and could share it?

20.02.2023 - 14:30

DROPS Design answered:

Dear Mrs Schust-Lawrence, we don't have any chart for this pattern, but just follow the pattern step by step, and feel free to ask any question here. Happy knitting!

21.02.2023 kl. 09:49

country flag Jutta Schwan-Mahut wrote:

Hallo, wo finde ich die Anleitung der gefilzten blaue krone? Ist abgebildet wo man näheres über das verfilzen nach lesen kann. Mit freundlichen Grüßen Jutta

05.02.2023 - 02:37

DROPS Design answered:

Liebe Frau Schwan-Mahut, wir haben einige Anleitung für Kronen (siehe hier) aber für diese gefiltze haben wir keine. Viel Spaß beim filzen!

08.03.2023 kl. 13:23

country flag Helene wrote:

Jeg har meget smalle fødder og lav vrist, så når jeg strikker i str. 40, skal midten ikke være 24 cm høj, som der står i opskriften, men kun 18 cm. Det svarer til 20 pinde fra sidste udtagning til første indtagning. Og der skal kun samles 50 masker op til kanten rundt om åbningen. Jeg har også lavet et diagram på ternet papir til udtagningerne/indtagningerne - det gør det meget nemmere at holde styr på.

29.01.2023 - 11:46

country flag Helene wrote:

Hej - Jeg har strikket hjemmeskoene i str. 40, men de blev alt for brede/høje. Nu har jeg strakt dem ud til en str. 44 i stedet, men kan det være rigtigt, at arbejdet skal være 24 cm på midten i str. 40? (Skitsen ser heller ikke så “høj” ud …) Et andet spørgsmål: Når man syr vristen og tåen sammen, skal man så bare sy sømmen fladt hele vejen frem til tåen? Jeg lagde tåen sammen og syede den på tværs … jeg ved ikke, om det var en fejl?

07.01.2023 - 20:06

country flag Stella wrote:

Hej, det vore oerhört användbart för nybörjare om ni någonstans förklarar grunder, t ex 1. lägga upp 4-4-5-5 vad betyder detta om jag har vanliga stickor eller menar ni att jag ska ha fyra sockstickor? Ska jag lägga upp vissa rätt och vissa aviga eller? 2. Ökning 2 maskor 5-6-6-7 gånger menas här på sockstickor eller? Tack.

30.12.2022 - 12:33

DROPS Design answered:

Hei Stella. Tallene 4-4-5-5 forteller deg hvor mange masker du skal legge opp. I denne oppskriften er det 4 størrelse og de 4 tallene forteller deg at første tallet er til den minste størrelsen og det siste tallet er til den største størrelsen. Men ta gjerne en titt her for å forstå en DROPS oppskrift for du begynner å strikke: Hur man följer ett DROPS mönster mvh DROPS Design

05.01.2023 kl. 12:36

country flag Gunvor wrote:

Det här är andra mönstret tofflor jag provar av era beskrivningar och båda är värdelösa. Mycket förvirrande och konstiga beskrivningar, och resultatet som inte alls liknar era ritningar. Och jag är ingen nybörjare. Tråkigt att behövs repa upp ullgarn son lätt slits....ska man verkligen behövs provsticka i ett annat garn först? Nä jag ger upp och letar mönster någon annanstans....

02.12.2022 - 11:26

country flag Chiara Eller wrote:

Hallo, Ich war immer sehr zufrieden mit den Anleitungen von Garnstudio. Ich hab mich auch genau an die Anleitung gehalten, dennoch ist ein oben viel zu weiter Schuh bei mir raus gekommen, was super ärgerlich ist. Die neu überarbeiteten Anleitungen sind irgendwie nicht mehr das gleiche 😔 Ich muss jetzt schauen, wie ich meinen Schuh noch tragfähig machen kann, da ich so rausschlüpfe und sie aber von der Fußlänge super passen.

22.01.2022 - 17:46

country flag Gail wrote:

Hi, oh my goodness I am so confused by this pattern. I want to knit the largest size so I cast on 4 stitches. I don’t know where to make my increases and how many times? Do I cast on 8 stitches only once or on the end of every knit row and increase by only 1 stitch 3 times on the purl side? Thank you. Gail

04.12.2021 - 21:53

DROPS Design answered:

Dear Gail, you are working slippers lengthwise - see chart- (A-B = towards heel) this means you will cast on at the end of each row from RS = towards toe (on the left side, seen from RS): 2 sts 7 times and 3 sts 1 time and at the same time, increase at the end of every row from WS = towards heel (on the right side, seen from RS): 2 sts 3 times, 3 sts 2 times and 8 sts 1 time. Can this help?

06.12.2021 kl. 08:00

country flag Jacoline wrote:

Ik heb deze sloffen al een flink aantal keren gemaakt, en altijd met groot succes. Dat was nog wel met de Eskimo versie. Het lijkt mij dat alleen de naam is aangepast in Snow. Het vreemde is echter dat na het vilten de sloffen met Snow echt veel kleiner uitvallen. Is dit iets wat jullie vaker hebben gehoord? Het verschil is namelijk echt heel groot!

05.10.2021 - 19:34

DROPS Design answered:

Dag Jacoline,

Dat is vervelend zeg! Het klopt dat alleen de naam is aangepast, maar het kan natuurlijk zijn dat er een bepaalde partij is met een afwijking. Zou je dit door willen geven en af willen handelen met de winkel waar je de wol hebt gekocht?

07.10.2021 kl. 10:41

country flag Suzie Durand wrote:

Bonjour, avec la grandeur 35/37 lorsque je mesure l'ouvrage a 22cm la pointe et le talon ont la même longueur, soit 14cm? Et ensuite, je ne comprends pas la Note qui dit de commencer à rabattre à droite quand on a rabattu 2 fois les mailles a gauche. Le chausson n'est plus symétrique. Merci de bien vouloir m'éclairer.

16.03.2021 - 19:38

DROPS Design answered:

Bonjour Mme Durand, les 22 cm se mesurent à partir des 4 mailles montées (à partir de D dans le schéma). Vous rabatte ensuite pour le talon en début de rang sur l'endroit (= à droite, vu sur l'endroit) et pour la pointe en début de rang sur l'envers (= à gauche, vu sur l'endroit). Bon tricot!

17.03.2021 kl. 08:11

Post a comment to pattern DROPS 104-4

We would love to hear what you have to say about this pattern!

If you want to leave a question, please make sure you select the correct category in the form below, to speed up the answering process. Required fields are marked *.