DROPS Vienna
DROPS Vienna
91% Mohair, 9% Polyester
Discontinued
find alternatives
DROPS Snow
DROPS Snow
100% Wool
from 2.00 £ /50g
DROPS SS24

Beach Wedding

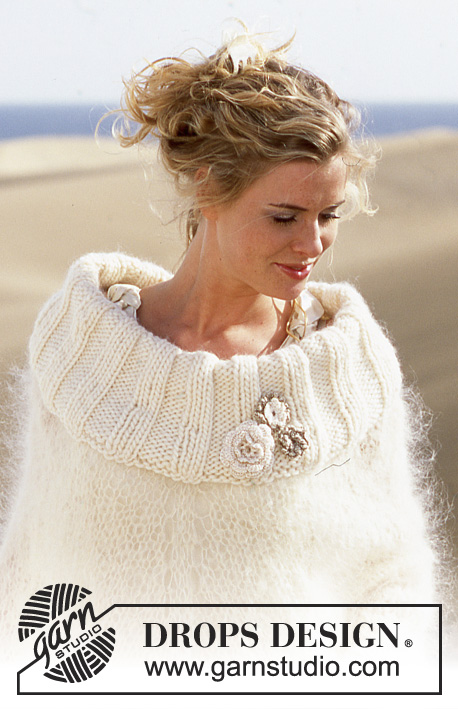
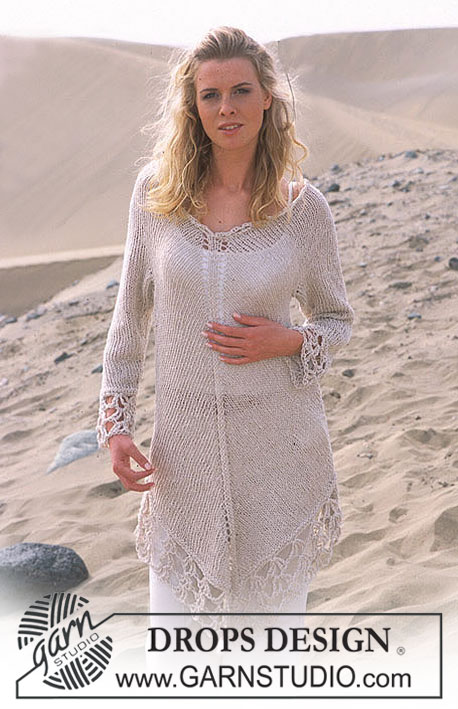
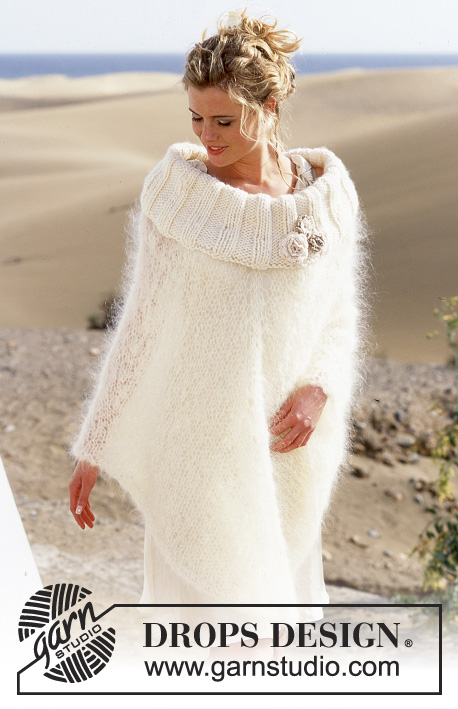
DROPS Knitted poncho with large neck in "Vienna" or "Melody" and "Snow" with crochet flowers in "Cotton Viscose"

DROPS 89-25
DROPS design: Pattern no O-256
--------------------------------------------------------

Sizes: S - M - L - XL/XXL
Materials: DROPS Vienna from Garnstudio
200-200-200-250 g colour no 21, off white
and use: DROPS Snow from Garnstudio
200-200-200-250 g colour no 01, off white
and use: DROPS Cotton Viscose from Garnstudio
1 left-over of colour no 02, off white
1 left-over of colour no 17, light beige
(for crochet flowers)

Or use:
DROPS Melody from Garnstudio
150-150-150-200 g colour no 15, beige
and use: DROPS Snow from Garnstudio
200-200-200-250 g colour no 01, off white
and use: DROPS Cotton Viscose from Garnstudio
1 left-over of colour no 02, off white
1 left-over of colour no 17, light beige
(for crochet flowers)


DROPS Circular needle size 9 and 12 mm.
DROPS Crochet hook size 3 mm.
-------------------------------------------------------------

-------------------------------------------------------

Alternative Yarn – See how to change yarns here
Yarn Groups A to F – Use the same pattern and change the yarn here
Yarn usage using an alternative yarn – Use our yarn converter here

-------------------------------------------------------

DROPS Vienna
DROPS Vienna
91% Mohair, 9% Polyester
Discontinued
find alternatives
DROPS Snow
DROPS Snow
100% Wool
from 2.00 £ /50g

Pattern instructions

NOTE: This pattern is written in British English. All measurements in charts are in cm. For conversion from cm to inches - click here. There are different terms for crocheting in British and American English. If this pattern includes crochet, click for "crochet terms" here. For this pattern in American English, please click here.
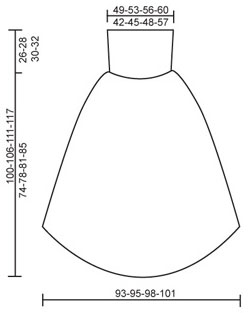
Knitting tension: Remember needle size is only a guide
Snow:
10 stitches x 14 rows with needle size 9 mm and stocking stitch = 10 x 10 cm
Vienna /Melody:
8 stitches x 10 rows with needle size 12 mm and stocking stitch = 10 x 10 cm

Rib: * K4, P3 *, repeat from *-*.

Ridge/garter stitch (in the round):
1 ridge = 2 rounds. Knit 1 round and purl 1 round.

Increase tip (for increases front and back): Increase by making 1 yarn over on each side of the middle 4 stitches (in Size XL/XXL increase on each side of the middle 3 stitches) mid front and back.
Poncho: The poncho is worked in the round from neck down. Loosely cast on 98-105-112-119 stitches with circular needle size 9 mm and Snow. Purl 1 round, then work rib - see description above. When piece measures 13-14-15-16 cm decrease all K4 to K3 = 84-90-96-102 stitches. Continue working until piece measures 26-28-30-32 cm, then work 1 ridge. Change to circular needle size 12 mm and Vienna or Melody and work stocking stitch at the same time as you adjust the number of stitches to 68-72-76-82 stitches on first round after ridge. On the next round insert 4 marker threads in the piece as follows: * 1 marker thread (= shoulder), 17-18-19-20 stitches, 1 marker thread (= mid front/back) - in Size XL/XXL insert this marker thread in the 21st stitch, 17-18-19-20 stitches *, repeat from *-*. The piece is now measured from here. Remember the knitting tension!

Read the whole of the next section before continuing! 

Increase mid front and mid back: Continue with stocking stitch at the same time as you increase every 4th round - see Increase tip: 1 stitch a total of 21-22-23-24 times.
Increase to shoulder: At the same time, increase on each shoulder (alternately after and before the marker thread) every 2nd round: 1 stitch a total of 3 times.
Side decrease: At the same time, when piece measures 9-7-6-5 cm decrease in each side (alternately before and after the marker thread) every 9-7-6-5 cm: 1 stitch a total of 5-7-9-11 times.
After all increases and decreases there are 148-152-156-162 stitches on needle. The poncho measures approx. 59-62-65-68 cm from the neck and down along shoulder and approx. 74-78-81-85 cm from neck and down mid front. Finish with 1 ridge before loosely casting off - NOTE: So the tip does not curl, work 2 stitches in the 2 stitches mid front (in size XL work 2 stitches in the 2 stitches on each side of the mid stitch) at the same time as casting off.


Crochet flowers: Work 3 flowers to decorate the poncho.
Large flower: Work 4 chain stitches with hook size 3 mm and off white Cotton Viscose and form them into a ring with 1 slip stitch.
Round 1: 1 double crochet around the ring, * 2 chain stitches, 1 double crochet around the ring *, repeat from *-* a total of 7 times and finish with 2 chain stitches and 1 slip stitch in first double crochet at beginning of round = 8 chain-spaces.
Round 2: 1 chain stitch, then work as follows in all chain-spaces: * 1 double crochet, 2 treble crochets, 1 double crochet *, and finish with 1 slip stitch in first double crochet at beginning of round. Turn piece - finish working flower from back.
Round 3: 1 chain stitch, * work 1 double crochet around double crochet from round 1 (i.e. work in back of petals around stitch from previous round, tighten strand), 3 chain stitches *, repeat from *-* a total of 8 times and finish with 1 slip stitch in first double crochet at beginning of round.
Round 4: 1 chain stitch, then work as follows in all chain-spaces: * 1 double crochet, 4 treble crochets, 1 double crochet *, and finish round with 1 slip stitch in first double crochet at beginning of round.
Round 5: 1 chain stitch, * work 1 double crochet around double crochet from round 3 (i.e. work in back of the 2 petals around the stitch from the previous round, tighten strand), 4 chain stitches *, repeat from *-* a total of 8 times and finish with 1 slip stitch in first double crochet at beginning of round.
Round 6: 1 chain stitch, then work as follows in all chain-spaces: * 1 double crochet, 6 treble crochets, 1 double crochet *, and finish with 1 slip stitch in first double crochet at beginning of round. Cut and fasten strand.
Medium flower: First work a small flower in off white Cotton Viscose with hook size 3 mm as follows: Work 4 chain stitches and form them into a ring with 1 slip stitch.
Round 1: 1 double crochet around the ring, * 5 chain stitches, 1 double crochet around the ring *, repeat from *-* a total of 15 times (chain-spaces should be close to each other) and finish with 5 chain stitches and 1 slip stitch in first double crochet at beginning of round = 16 chain-spaces. Cut strand.
Then work a slightly larger flower in light beige Cotton Viscose with hook size 3 mm as follows:
Work 5 chain stitches and form them into a ring with 1 slip stitch.
Round 1: 1 double crochet around the ring, * 10 chain stitches, 1 double crochet around the ring *, repeat from *-* a total of 19 times (chain-spaces should be close to each other) and finish with 10 chain stitches and 1 slip stitch in first double crochet at beginning of round = 20 chain-spaces. Cut strand.
Lay the small off white flower on top of the light beige and sew them together.
Small flower: Work as for the larger flower in Medium flower.
Sew the flowers to the neck as shown on picture.

Diagram

diagram measurements
Do you have a question? See a list of frequently asked questions (FAQ)

Knitting tension is what determines the final measurements of your work, and is usually measured per 10 x 10 cm. It is provided like so: number of stitches in width x number of rows in height - eg: 19 stitches x 26 rows = 10 x 10 cm.

The knitting tension is very individual; some people knit/crochet loosely while others work tightly. You adjust the knitting tension with the needle size, which is why the suggested needle size is only meant as a guide! You need to adjust this (up or down) to ensure that YOUR knitting tension matches the knitting tension provided in the pattern. If you work with a different knitting tension than provided you will have a different yarn consumption, and your work will have different measurements than what the pattern suggests.

The knitting tension also determines which yarns can replace each other. As long as you achieve the same knitting tension you can replace one yarn with another.

See DROPS lesson: How to measure your tension/gauge

See DROPS video: How to make a gauge tension swatch

The required amount of yarn is provided in grams, eg: 450 g. To calculate how many balls you’ll need you first need to know how many grams are in 1 ball (25g, 50g or 100g). This information is available if you click on the individual yarn quality on our pages. Divide the amount required with the amount of each ball. For example, if each ball is 50g (the most common amount), the calculation will be as follows: 450 / 50 = 9 balls.

The important thing when changing from one yarn to another is that the knitting/crochet tension remains the same. This is so that the measurements of the finished piece will be the same as on the sketch provided. It is easier to achieve the same knitting tension using yarns from the same yarn group. It is also possible to work with multiple strands of a thinner yarn to achieve the knitting tension of a thicker one. Please try our yarn converter. We recommend you to always work a test swatch.

Please NOTE: when changing yarn the garment might have a different look and feel to the garment in the photo, due to individual properties and qualities of each yarn.

See DROPS lesson: Can I use a different yarn than the one mentioned in the pattern?

All our yarns are categorised into yarn groups (from A to F) according to thickness and knitting tension – group A contains the thinnest yarns and group F the thickest. This makes it easier for you to find alternative yarns to our patterns, should you wish to switch yarn. All yarns within the same group have a similar knitting tension and can easily replace each other. However, different yarn qualities have different structures and properties which will give the finished work a unique look and feel.

Click here for an overview of the yarns in each yarn group

At the top of all our patterns you’ll find a link to our yarn calculator, which is a helpful tool should you wish to use a different yarn than suggested. By filling in the yarn quality you wish to replace, the amount (in your size) and number of strands, the calculator will present good alternative yarns with the same knitting tension. Additionally it will tell you how much you’ll require in the new qualities and whether you’ll need to work with multiple strands. Most skeins are 50g (some are 25g or 100g).

If the pattern is worked with multiple colours, every colour will have to be calculated separately. Similarly, if the pattern is worked with several strands of different yarns (for example 1 strand Alpaca and 1 strand Kid-Silk) you will have to find alternatives for each, individually.

Click here to see our yarn calculator

Since different yarns have different qualities and textures we have chosen to keep the original yarn in our patterns. However, you can easily find options among our available qualities by using our yarn calculator, or simply pick a yarn from the same yarn group.

It is possible that some retailers still have discontinued yarns in stock, or that someone has a few skeins at home that they would like to find patterns for.

The yarn calculator will provide both alternative yarn as well as required amount in the new quality.

If you think it's hard to decide what size to make, it can be a good idea to measure a garment you own already and like the size of. Then you can pick the size by comparing those measures with the ones available in the pattern's size chart.

You'll find the size chart at the bottom of the pattern.

See DROPS lesson: How to read size chart

The needle size provided in the pattern serves only as a guide, the important thing is to follow the knitting tension. And since knitting tension is very individual, you will have to adjust the needle size to ensure that YOUR tension is the same as in the pattern – maybe you’ll have to adjust 1, or even 2 needle sizes, up or down to achieve the correct tension. For this, we recommend that you work test swatches.

Should you work with a different knitting tension than the one provided, the measurements of the finished garment might deviate from the measurement sketch.

See DROPS lesson: How to measure your tension/gauge

See DROPS video: How to make a tension/gauge swatch

Working a garment top-down provides more flexibility and room for personal adjustment. For example it is easier to try the garment on while working, as well as making adjustments to length of yoke and shoulder caps.

The instructions are carefully explaining every step, in the correct order. Diagrams are adjusted to the knitting direction and are worked as usual.

The diagram depicts all rows/rounds, and every stitch seen from the right side. It is read from bottom to top, from right to left. 1 square = 1 stitch.

When working back and forth, every other row is worked from the right side and every other row is worked from the wrong side. When working from the wrong side, the diagram will have to be worked reversed: from left to right, knit stitches are purled, purl stitches are knit etc.

When working in the round every round is worked from the right side and the diagram are worked from right to left on all rounds.

See DROPS lesson: How to read knitting diagrams

The diagram depicts all rows/rounds, and every stitch seen from the right side. It is worked from bottom to top, from right to left.

When working back and forth every other row is worked from the right side: from right to left and every other row is worked from the wrong side: from left to right.

When working in the round, every row in the diagram are worked from the right side, from right to left.

When working a circular diagram you start in the middle and work your way outwards, counter clockwise, row by row.

The rows usually start with a given number of chain stitches (equivalent to the height of the following stitch), this will either be depicted in the diagram or explained in the pattern.

See DROPS lesson: How to read crochet diagrams

Instructions for working several diagrams after each other on the same row/round, will often be written like so: “work A.1, A.2, A.3 a total of 0-0-2-3-4 times". This means you work A.1 once, then A.2 is worked once, and A.3 is repeated (in width) the number of times provided for your size – in this case like so: S = 0 times, M = 0 times, L=2 times, XL= 3 times and XXL = 4 times.

The diagrams are worked as usual: begin with the first row in A.1, then work the first row in A.2 etc.

See DROPS lesson: How to read knitting diagrams

See DROPS lesson: How to read crochet diagrams

The total width of the garment (from wrist-to-wrist) will be larger in the larger sizes, despite the actual sleeves being shorter. The larger sizes have longer sleeve caps and wider shoulders, so there will be a good fit in all sizes.

The measurement sketch/schematic drawing provides information regarding the full length of the garment. If it’s a jumper or a jacket the length is measured from the highest point on the shoulder closest to the neckline, and straight down to the bottom of the garment. It is NOT measured from the tip of shoulder. Similarly, the length of yoke is measured from the highest point on the shoulder and down to where yoke is split into body and sleeves.

On a jacket measures are never taken along bands, unless specifically stated. Always measure inside band stitches when measuring the length.

See DROPS lesson: How to read a schematic drawing

Diagrams are often repeated on the round or in height. 1 repeat is the diagram the way it appears in the pattern. If it says to work 5 repeats of A.1 in the round, then you work A.1 a total of 5 times after/next to each other in the round. If it says to work 2 repeats of A.1 vertically/in height you work the entire diagram once, then begin again at the start and work the entire diagram one more time.

Chain stitches are slightly narrower than other stitches and to avoid working the cast-on edge too tight, we simply chain more stitches to begin with. The stitch count will be adjusted on the following row to fit the pattern and measurement sketch.

The rib edge is more elastic and will contract slightly compared to, for example, stocking stitch. By increasing before the rib edge, you avoid a visible difference in width between the rib edge and the rest of the body.

It’s very easy to cast off too tightly, and by making yarn overs while casting off (and simultaneously casting these off) you avoid a too tight cast off edge.

See DROPS video: How to bind off with yarn overs (yo)

To achieve an even increase (or decrease) you can increase on, for example: every 3rd and 4th row alternately, like so: work 2 rows and increase on the 3rd row, work 3 rows and increase on the 4th. Repeat this until the increase is complete.

See DROPS lesson: Increase or decrease 1 st on every 3rd and 4th row alternately

Should you prefer to work in the round instead of back and forth, you may of course adjust the pattern. You’ll need to add steeks mid-front (usually 5 stitches), and follow the instructions. When you would normally turn and work from the wrong side, simply work across the steek and continue in the round. At the end you’ll cut the piece open, pick up stitches to work bands, and cover the cut edges.

See DROPS video: How to knit steeks and cut open

Should you prefer to work back and forth instead of in the round, you may of course adjust the pattern so you work the pieces separately and then assemble them at the end. Divide the stitches for the body in 2, add 1 edge stitch in each side (for sewing) and work the front and back pieces separately.

See DROPS lesson: Can I adapt a pattern for circular needles into straight needles?

Pattern repeats can vary slightly in the different sizes, in order to get the correct proportions. If you’re not working the exact same size as the garment in the photo, yours might deviate slightly. This has been carefully developed and adjusted so that the complete impression of the garment is the same in all sizes.

Make sure to follow instructions and diagrams for your size!

If you have found a pattern you like which is available in women’s size it’s not very difficult to convert it to men’s size. The biggest difference will be the length of sleeves and body. Start working on the women size that you think would fit across the chest. The additional length will be worked right before you cast off for the armhole/sleeve cap. If the pattern is worked top-down you can add the length right after the armhole or before the first decrease on sleeve.

Regarding additional yarn amount, this will depend on how much length you add, but it is better with a skein too many than too few.

All yarns will have excess fibres (from production) that might come off as lint or shedding. Brushed yarns (ie hairier yarns) have more of these loose, excess fibres, causing more shedding.

Shedding also depends on what is worn under or over the garment, and whether this pulls at the yarn fibres. It’s therefore not possible to guarantee that there will be no shedding

Below are some tips on how to get the best result when working with hairier yarns:

1. When the garment is finished (before you wash it) shake it vigorously so the looser hairs come off. NOTE: do NOT use a lint roller, brush or any method that pulls at the yarn.

2. Place the garment in a plastic bag and put it in your freezer - the temperature will cause the fibres to become less attached to each other, and excess fibres will come off easier.

3. Leave in the freezer for a few hours before taking it out and shaking it again.

4. Wash the garment according to the instructions on the yarn label.

Pilling is a natural process that happens to even the most exclusive of fibers. It's a natural sign of wear and tear that is hard to avoid, and that is most visible in high friction areas of your garment like a sweater's arms and cuffs.

You can make your garment look as new by removing the pilling, using a fabric comb or a pill/lint remover.

Still can't find the answer you need? Then scroll down and leave your question so one of our experts can try to help you. This will be done normally within 5 to 10 working days.
In the meantime, you can read the questions and answers that others have left to this pattern or join the DROPS Workshop on Facebook to get help from fellow knitters/crocheters!

You might also like...

Post a comment to pattern DROPS 89-25

We would love to hear what you have to say about this pattern!

If you want to leave a question, please make sure you select the correct category in the form below, to speed up the answering process. Required fields are marked *.

Comments / Questions (53)

Sue wrote:

What type of increase is used for the shoulder increases please

21.05.2016 - 05:00

DROPS Design answered:

Dear Sue, for shoulders, you can use the increase you prefer, for example you can kfb. Happy knitting!

21.05.2016 - 20:21

country flag Sara Lykke wrote:

Der står at man skal tage en maske ind i hver side... Altså hver skulder eller hvor er det I mener? Tak

02.11.2015 - 15:42

DROPS Design answered:

Hej Sara Lykke. Ja, det er det.

05.11.2015 - 11:22

country flag Jeanette Jensen wrote:

Hvor lang anbefaler i at rundepindende skal være?

30.10.2015 - 13:38

DROPS Design answered:

Hej Jeanette, du skal nok vælge en 80 cm lang rundpind. God fornøjelse!

30.10.2015 - 14:19

country flag Alexandra wrote:

Hallo, In der Anleitung steht, dass man vom Drops Melody-Garn die Farbe beige 15. nehmen soll. Wieso beige? Würde Natur nicht besser passen? Oder würde Natur nicht mit Eskimo Natur zusammenpassen? Ist Melody beige wie Vienna Natur? Ich möchte den Poncho schon getreu dem Bild machen...

19.10.2015 - 12:40

country flag Heidrun wrote:

Hallöchen nochmal ... ich würde so gerne weiterstricken ... deshalb habe nich meine Frage nochmal eingegeben (vielleicht hatte ich sie ja als Kommentar eingestellt ...) Ich möchte den Poncho mit Melody stricken, aber sie hat ganz andere Maße als Vienna. Nehme ich in dem Fall Melody als Doppelfaden? Vielen Dank, Grüße Heidrun

30.09.2015 - 18:22

DROPS Design answered:

Ja, Sie können den Poncho einfädig mit Melody stricken, Sie müssen dafür aber die Garnmenge neu berechnen. Dazu ermitteln Sie die Gesamtlauflänge, die für Ihre gewünschte Größe nötig ist (also 200 oder 250 gr von Vienna, je nach Größe, 50 gr = 95 m, also 380m oder 475 m), dann rechnen Sie diese ermittelte Zahl auf Melody um, also 50 g Melody = 140 m, 380 m bzw. 475 m geteilt durch diese Lauflänge ergibt aufgerundet 150 g oder 200 g Melody. Sie brauchen nur einfädig zu stricken, denn Melody ist sehr voluminös.

02.10.2015 - 11:42

country flag Tooze wrote:

Bonjour je souhaite faire ce modèle avec la laine mélodie coloris Brouillard pouvez vous m'indiquer quel coloris pour la laine eskimo uni je dois choisir pour une harmonie merci

30.09.2015 - 09:10

DROPS Design answered:

Bonjour Mme Tooze, pour tout conseil sur le choix des couleurs, contactez votre magasin DROPS par mail ou téléphone, il pourra vous aider et vous orienter en fonction de ce que vous souhaitez. Bon tricot!

30.09.2015 - 09:43

country flag Heidrun wrote:

Ich möchte den Poncho mit Melody stricken, aber sie hat ganz andere Maße als Vienna. Nehme ich in dem Fall Melody als Doppelfaden? Vielen Dank, Grüße Heidrun

28.09.2015 - 14:58

DROPS Design answered:

Antwort siehe oben! :-)

03.10.2015 - 10:54

country flag KARINE wrote:

BONJOURS JE SUIS ENTRAIN DE FAIRE CE MODEL MAIS JE VOUDRAIS SAVOIR SI IL EST EN UNE SEULE PARTIE OU IL FAUT FAIRE D ABORD LE DOS ET APRES LA DEVANT MERCI

20.06.2015 - 11:40

DROPS Design answered:

Bonjour Karine, le poncho se tricote en une seule pièce, en rond, de haut en bas en commençant par le col en Eskimo. Bon tricot!

22.06.2015 - 10:19

country flag ANTOINETTE wrote:

Do you do the increase for center and shoulders at the same time or complex front back first then shoulder increase

14.12.2014 - 03:30

DROPS Design answered:

Dear Antoinette, You inc mid front and mid back every 3rd row, and inc at the same time 1 st for shoulder every other row, then dec at each side - all at the same time, respectively as stated for each inc/dec. Happy knitting!

14.12.2014 - 17:02

country flag Lydia Veldhuizen wrote:

Beste, Ik zou heel graag dit patroon willen maken in dezelfde kleuren. Nu zag ik dat Vienna nr 21 niet meer verkocht wordt en de garenalternatieven (Verdi en Symphony) in de juiste kleuren ook niet meer beschikbaar zijn. Zijn er nog andere alternatieven? Of komt er 1 van deze garen wel weer terug in het assortiment? Alvast bedankt voor uw reactie, Met vriendelijke groet, Lydia Veldhuizen

16.10.2014 - 16:59

DROPS Design answered:

Helaas, deze kleur komt niet terug. We hopen dat u een van de andere kleuren ook mooi vindt.

16.10.2014 - 17:29