
Popular categories
Looking for a yarn?


Comments / Questions (3)
![]() Anna wrote:
Anna wrote:
Hallo, leider fehlt bei der Mütze die Anleitung für die Vorderseite und Rückseite. Ich würde mich sehr darüber freuen, wenn Sie diese noch hinzufügen könnten, da mir die Mütze sehr gefällt. Vielen Dank!
13.10.2021 - 22:10DROPS Design answered:
Liebe Anna, es sieht so aus, die Anleitung stimmt, was meinen Sie hier? Misverstehe ich Ihre Frage?
14.10.2021 - 09:12
![]() Iris wrote:
Iris wrote:
Guten Tag, ich bin eine langjährige Strickerin, aber die Anleitung für die Mütze ist derart unverständlich geschrieben, dass ich von vornehinein keine Lust habe, mich mit dem Entschlüsseln zu beschäftigen. Sie haben wunderschöne Modelle und Muster, die leider für mich unnötig kompliziert und unverständlich beschrieben werden. Sehr schade.
09.03.2013 - 11:27
![]() Sarah Fritsche wrote:
Sarah Fritsche wrote:
Der er jo ingen opskrift kun diagram?
10.12.2009 - 13:11
|
|||||||||||||||||||
DROPS Baby 5-11 |
|||||||||||||||||||
|
|
|||||||||||||||||||
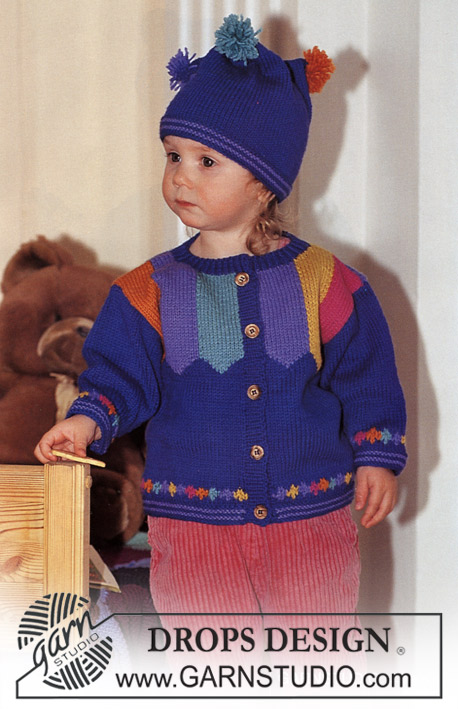
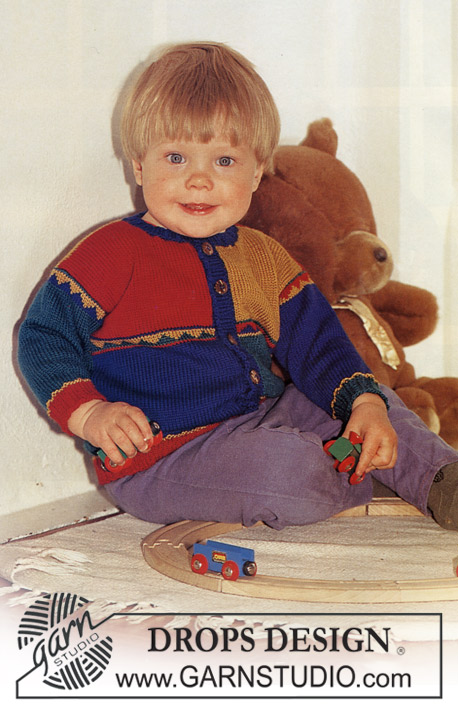
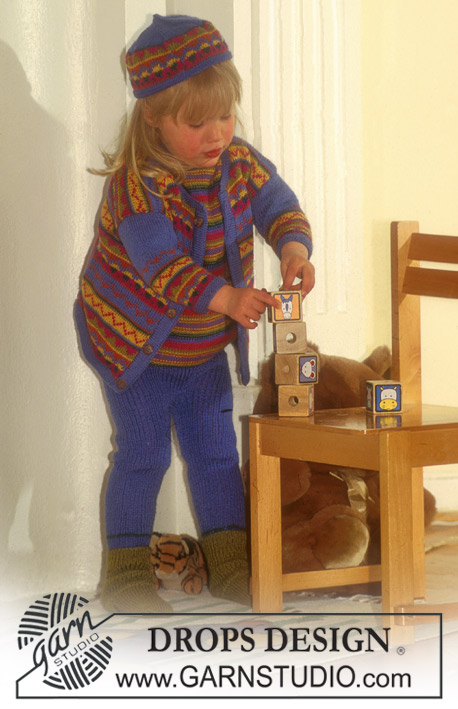
Cardigan, trousers, hat / balaclava, mittens and socks in Alpaca.
DROPS Baby 5-11 |
|||||||||||||||||||
|
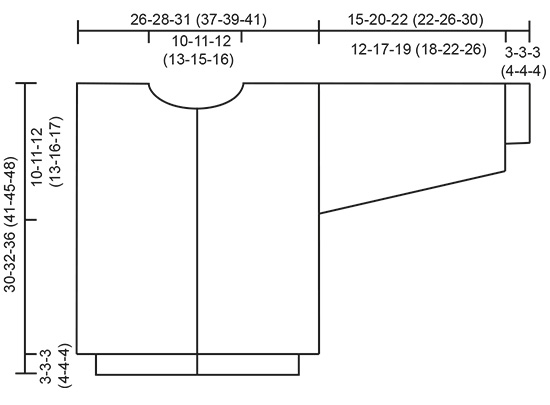
CARDIGAN Finished Measurements: 52-56-62 (74-76-82) cm 5-6 DROPS wooden buttons (button No. 503). DROPS 2 mm and 2.5 mm circular needles and double pointed needles, or sizes needed to obtain correct gauge. Gauge: 26 sts and 35 rows on larger needles in stockinette st = 10 x 10 cm Pattern: See chart. One chart equals one repeat of the pattern. The pattern is seen from the right side and is knit entirely in stockinette stitch. Rib in Stripes: 1 row natural, 2 rows dark blue, 2 rows natural, 2 rows mint, 2 rows natural, 2 rows light blue and then natural to finished dimensions. Garter Stitch, when knitting flat: Knit all sts all rows. Garter Stitch, when knitting in the round: *Rnd 1, knit. Rnd 2, purl. Repeat from * - *. Rib: * knit 1, purl 1*. Repeat from *-*. BODY Cast on 137-149-161 (191-203-215) sts on smaller circular needles with natural and knit rib in stripes (see instructions above) for 3-3-3 (4-4-4) cm . Change to larger needles and knit in pattern with 1 edge st on each side (center front) which is not worked in the pattern. When the work measures 20-21-24 (28-29-31) cm , divide it into front and back as follows: 35-38-41 (48-51-54) sts for the front, 67-73-79 (95-101-107) sts for the back, 35-38-41 (48-51-54) sts for the front. Knit the rest of each part separately from this point. Front: 35-38-41 (48-51-54) sts. When the work measures 26-28-31 (36-40-43) cm , bind off at the neck edge every other row: 8-10-11 (11-14-15) sts 1 time, 3 sts 1 time, 2 sts 1 time, 1 st 1 time. Bind off all sts when the work measures 30-32-36 (41-45-48) cm . Back: 67-73-79 (95-101-107) sts. When the work measures 28-30-34 (39-43-46) cm , bind off the center 19-23-25 (27-33-35) sts for the neck. Bind off at each neck edge every other row: 2 sts 1 time, 1 st 1 time. Bind off all sts when the work measures 30-32-36 (41-45-48) cm . Sleeves: Cast on 58-58-64 (64-70-74) sts on smaller double pointed needles with natural. Join, being careful not to twist the sts. Place a marker at the join and knit rib in stripes (see instructions above) then continue with natural and rib for 3-3-3 (4-4-4) cm . Change to larger double pointed needles and knit pattern. Dec 14-12-16 (12-18-16) sts evenly distributed on the 1st row. 44-46-48 (52-52-58) sts. At the same time, after the rib, inc 1 st on each side of the marker 4-6-7 (8-16-15) times: Sizes 1/3 + 6/9 months: every 9th row. Size 12/18 months: alternately every 8th and 9th row Size 2 years: alternately every 6th and 7th row. Size 3/4 years: every 4th row. Size 5/6 years: alternately every 5th and 6th row. = 52-58-62 (68-84-88) sts. Bind off all sts when the work measures 15-20-22 (22-26-30) cm . Assembly: Sew shoulder seams. Pick up approx. 80-100 sts along the left front on smaller circular needles with natural and knit rib for 2-2.5 cm . Bind off. Repeat along the right front, but after 1 cm make 5-5-5 (6-6-6) buttonholes evenly distributed on the row (1 buttonhole = bind off 3 sts and cast on 3 new sts over the bound-off sts on the next row). Place the top buttonhole 2 sts from the top edge and the lowest buttonhole 1 cm from the bottom edge. Pick up approx. 90-100 sts around the neck on smaller circular needles with natural and knit rib for 4-4-5 (5-6-6) cm . Bind off, and fold the edge over against the wrong side and sew. Sew on the sleeves and buttons. ________________________________________ TROUSERS Trouser-length: 38-42-47 (52-58-64) cm Leg-length: 18-22-25 (27-35-41) cm DROPS 2.5 mm and 3 mm circular needles and double pointed needles, or sizes needed to obtain correct gauge. Gauge: 24 sts and 64 rows on larger needles in pattern = 10 x 10 cm Pattern: Pattern is knit back and forth on the needles and is divisible by 2 + 3 sts. Row 1 (right side): K 1, * yo, sl 1, P 1*. Repeat from * - * until 2 sts remain, yo, sl 1, K 1 Row 2 (wrong side): K 1, * purl the slipped st and the yarn over tog, K 1 *. Repeat from * - * until 3 sts remain. P the slipped st and the yarn over tog, K 1. Repeat the 1st and 2nd rows throughout. Rib: * knit 1, purl 1*. Repeat from *-*. Left leg: Cast on 58-64-66 (70-70-70) sts on smaller circular needles and knit in rib for 10-10-10 (12-12-12) cm . The rib will be folded over later and should therefore be measured as 5-5-5 (6-6-6) cm . Change to larger circular needles, inc 1 st at beg of row and knit pattern with 1 edge st on each side back and forth on the needle. Then inc 1 st within the edge stitch on each side: 10-10-10 (12-12-12) times: Size 0/3 months: every 1 cm . Sizes 6/9 + 12/18 +2 years: alternately every and every other 1 cm . Size 3/4 years: every 2nd cm . Size 5/6 years: alternately every 2nd and 3rd cm . = 79-85-87 (95-95-95) sts. When the work measures 18-22-25 (27-35-41) cm , bind off 6-8-8 (10-8-8) sts on each side. 67-69-71 (75-79-79) sts. Put the work aside. Right leg: Knit like the left. Trouser: Put the right and left leg together on the same larger sized circular needles, with a marker at the join (center front). 134-138-142 (150-158-158) sts. Knit in pattern with 1 edge st on each side back and forth on the needle -- the edges are the center back. Inc 1 st at one side. 135-139-143 (151-159-159) sts. Knit 3 rows in pattern and then inc 1 st within the edge sts on each side (center back): 8 times every 4th row and at the same time dec 1 st the center front marker (1 st in from the marker): 8 times every 4th row. 135-139-143 (151-159-159) sts. When the work measures 35-39-44 (49-55-61) cm , change to smaller circular needles and decrease 25-23-23 (27-35-35) sts evenly distributed on the row. 110-116-120 (124-124-124) sts. Knit waistband as follows: knit 3 cm in stockinette st, purl 1 row, knit 3 cm in stockinette st for border. Bind off and fold the edge over against the wrong side and sew. The trouser measures 38-42-47 (52-58-64) cm in its entire length. Sew together the split on the inside of each leg up to the bound-off sts and then sew together the opening between the legs from the center front to the center back on the trouser. Sew the seam at the center back within 1 edge st. Sew in the trouser st at the edge. ________________________________________ MITTENS WITH AND WITHOUT THUMB Hand length of the mitten: 9-10-11 (12-12) cm . DROPS 2.5 mm and 3 mm double pointed needles, or sizes needed to obtain correct gauge. Gauge: 24 sts and 64 rows on larger needles in pattern = 10 x 10 cm Pattern: Pattern is knit back and forth on the needles and is divisible by 2 + 3 sts. Row 1 (right side): K 1, * yo, sl 1, P 1*. Repeat from * - * until 2 sts remain, yo, sl 1, K 1 Row 2 (wrong side): K 1, * purl the slipped st and the yarn over tog, K 1 *. Repeat from * - * until 3 sts remain. P the slipped st and the yarn over tog, K 1. Repeat the 1st and 2nd rows throughout. Rib: * knit 1, purl 1 *. Repeat from * - *. Mitten: Knit the mittens without thumbs for the two smallest sizes. Cast on 44-48-48 (52-52-56) sts on smaller double pointed needles with light blue. Join, being careful not to twist the sts. Place a marker at the join and knit rib for 6 cm or to desired length. Change to larger needles and knit pattern back and forth on the needle and at the same time decrease 9-9-9 (11-11-13) sts evenly distributed on the 1st row. 35-39-39 (41-41-43) sts. When the hand (measured after the rib) measures x - x -3 (3-3-3.5) cm (do not knit thumb on the 2 smallest sizes) put 6 sts on a holder for thumb. Cast on 6 sts over the sts on the holder on the next row. When the work measures 14.5-15.5-16.5 (17.5-17.5-18.5) cm , knit 2 rows of rib. Pull the strand through the sts, pull together and sew. Thumb: Pick up 6 sts in new sts at the thumb hole in rib. Inc 1 st on each side in the transition from the sts on the holder and the picked-up sts. 14 sts. Join and knit approximately 3 (3.5-4-4.5) cm thumb in rib. Knit 2 sts together across the row every other row twice and then pull the strand through the remaining sts and sew. ________________________________________ HAT Circumference of the hat: 41-41-44 (46-48-48) cm . DROPS 2.5 mm and 3 mm circular needles and 3 mm straight needles, or sizes needed to obtain correct gauge. Gauge: 24 sts and 64 rows on larger needles in pattern = 10 x 10 cm Pattern: Pattern as knit back and forth: see above. Pattern as knit in the round: (must be over a multiple of 2 sts). Round 1: * K 1, yo, sl 1*. Repeat from * - *. Round 2: * purl the yarn over and the slipped st tog, yo, sl 1*. Repeat from * - *. Round 3: * knit the yarn over and the slipped st tog, yo, sl 1 *. Repeat from * - *. Repeat rows 2 and 3 throughout. Garter Stitch, when knitting flat: Knit all sts all rows. Garter Stitch, when knitting in the round: *Rnd 1, knit. Rnd 2, purl*. Repeat from *-*. Rib: * knit 1, purl 1 *. Repeat from * - *. EDITOR’S NOTE: This hat goes completely over the head and around the neck, with an opening for the face. This is a confusing design to read and there is no diagram to show you how it goes together. But it’s a great hat for children in cold climates! Just follow the instructions and it will all make sense as you go along. Front: Cast on 35-35-41 (43-45-45) sts on larger needles and knit 2 rows in garter st. Then knit in pattern with 1 edge st on each side which is kept in garter st. When the work measures 7-8-9 (10-11-12) cm , put it aside. Back: Knit like the front. Hat: Put all sts on the same smaller circular needle (70-70-82 (86-90-90) sts) and work back and forth on the needles. Place a marker at the join. Increase 20-20-10 (8-6-6) sts evenly distributed on the 1st row. 90-90-92 (94-96-96) sts. Knit 3 cm in rib. Measure the work from here. Change to larger circular needles, join the work and place a marker at the join. Knit in pattern in the round on circular needles, increasing 8-8-14 (16-20-20) sts evenly distributed on the 1st row. 98-98-106 (110-110-116) sts. After 2-2-3 (3-3-3) cm , place the center front 7-7-9 (11-13-13) sts on a stitch holder and continue to knit back and forth on the needle. Dec 1 st each side at the front opening every 4th row 2 times. 87-87-93 (95-99-99) sts. When the work measures 10-11-12 (13-14-15) cm , measured from the rib, bind off 22-22-24 (26-28-28) sts on each side (this makes the seam you see in the picture along each side of the head). Continue in pattern over the 43-43-45 (43-43-43) sts at center back for 9-10-11 (12-13-13) cm (this makes the piece for the top of the head). Bind off. Assembly: Sew the parts together on each side of the head. Pick up approx. 120 to 148 sts (include the sts on the holder) around the face-opening on smaller circular needles and knit in rib for 4 cm . Bind off. Fold the edge over against the wrong side and sew. ________________________________________ SOCKS Foot length = approx. 10-11-12 (14-15) cm DROPS 2.5 mm and 3 mm double pointed needles, or sizes to obtain gauge. Gauge: 24 sts and 64 rows on larger needles in pattern = 10 x 10 cm (4" x 4") Rib: * knit 1, purl 1 *. Repeat from * - *. Pattern: (back and forth on needles): The pattern is divisible by 2 + 3 sts. Row 1 (right side): K 1, * yo, sl 1, P 1*. Repeat from * - * until 2 sts remain, yo, sl 1, K 1. Row 2 (wrong side): K 1, * K the slipped st and the yarn over tog, K 1*. Repeat from * - * until 3 sts remain, purl the slipped st and the yo tog, K 1. Repeat the 1st and 2nd rows throughout. SOCK Cast on 54-56-58 (60-62) sts on smaller double pointed needles. Join, being careful not to twist the sts. Place a marker at the join and knit rib for 4-5-5 (6-6) cm . Knit 3 sts together at the center back. 52-54-56 (58-60) sts. When the work measures 6-7.5-7.5 (9-9) cm , knit 3 sts together at the center back. 50-52-54 (56-58) sts. Change to larger double pointed needles and knit in pattern back and forth on the needle from the center of the back and at the same time dec 7-5-7 (5-7) sts evenly distributed on the 1st row. 43-47-47 (51-51) sts. Knit 1-1-1 (2-2) cm then knit the center 11-13-13 (15-15) sts (for upper part, putting the remaining 32-34-34 (36-36) sts on a holder). After 4-5-5.5 (7-7.5) cm , pick up 10-12-14 (14-16) sts on each side of the upper part. 63-71-75 (79-83) sts (including the sts from the holder). Knit in pattern back and forth over all sts from the center back for 1.5-2-2 (3-3.5) cm . Bind off all sts except the foremost 11-13-13 (15-15) sts. Knit 9-10-11 (13-14) cm in pattern for the sole over these sts. Bind off and sew the sole to the sock. |
|||||||||||||||||||
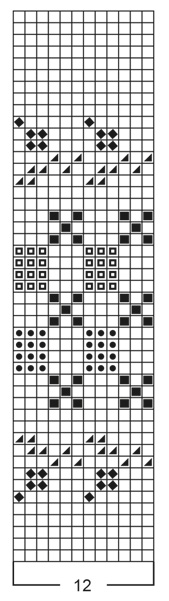
Diagram explanations |
|||||||||||||||||||
|
|||||||||||||||||||
|
|||||||||||||||||||
|
|||||||||||||||||||
Have you finished this pattern?Tag your pictures with #dropspattern or submit them to the #dropsfan gallery. Do you need help with this pattern?You'll find 27 tutorial videos, a Comments/Questions area and more by visiting the pattern on garnstudio.com. © 1982-2025 DROPS Design A/S. We reserve all rights. This document, including all its sub-sections, has copyrights. Read more about what you can do with our patterns at the bottom of each pattern on our site. |
|||||||||||||||||||


With over 40 years in knitting and crochet design, DROPS Design offers one of the most extensive collections of free patterns on the internet - translated to 17 languages. As of today we count 314 catalogues and 11822 patterns translated into English (UK/cm).
We work hard to bring you the best knitting and crochet have to offer, inspiration and advice as well as great quality yarns at incredible prices! Would you like to use our patterns for other than personal use? You can read what you are allowed to do in the Copyright text at the bottom of all our patterns. Happy crafting!
Post a comment to pattern DROPS Baby 5-11
We would love to hear what you have to say about this pattern!
If you want to leave a question, please make sure you select the correct category in the form below, to speed up the answering process. Required fields are marked *.