
Popular categories
Looking for a yarn?


Comments / Questions (10)
![]() Jocelyn Hicks wrote:
Jocelyn Hicks wrote:
Looks amazing. Can't wait to try it
20.04.2024 - 03:47
![]() Madeleine Ruffieux wrote:
Madeleine Ruffieux wrote:
Dimension de l'échantillon de ce modèle 3?
18.03.2022 - 22:33DROPS Design answered:
Bonjour Mme Ruffieux, pour ce modèle, l'échantillon est de 26 mailles et 35 rangs en jersey endroit (et en jacquard) avec les aiguilles 2,5 = 10 x 10 cm. Bon tricot!
21.03.2022 - 07:47
![]() Isabel wrote:
Isabel wrote:
Me encanta el conjunto y estoy pensando en hacerlo pero no entiendo bien las explicaciones. Por ejemplo, la chaqueta dice trabajar en redondo, ¿como si fuera un jersey????? aberturas después de los elásticos???? hay algún video tutorial con ejemplos? Gracias
19.02.2018 - 10:18DROPS Design answered:
Hola Isabel, al lado del patrón tienes unos vídeos que pueden ayudarte a realizar la labor. Sí, la chaqueta se trabaja como un jersey en redondo y se corta posteriormente para las sisas y el centro del delantero. El elástico se trabaja de ida y vuelta. Después del elástico, se une y se trabaja en redondo debido al motivo noruego.
24.02.2018 - 19:39Martha wrote:
It would be so useful and helpful to categorize the patterns into difficulty levels.
05.02.2016 - 01:21Karin wrote:
Baby-drops 5-5!
23.02.2014 - 13:04
![]() Mariann wrote:
Mariann wrote:
Hei,kan ikke se bilde av genseren som hører til denne oppskriften
22.02.2014 - 22:27DROPS Design answered:
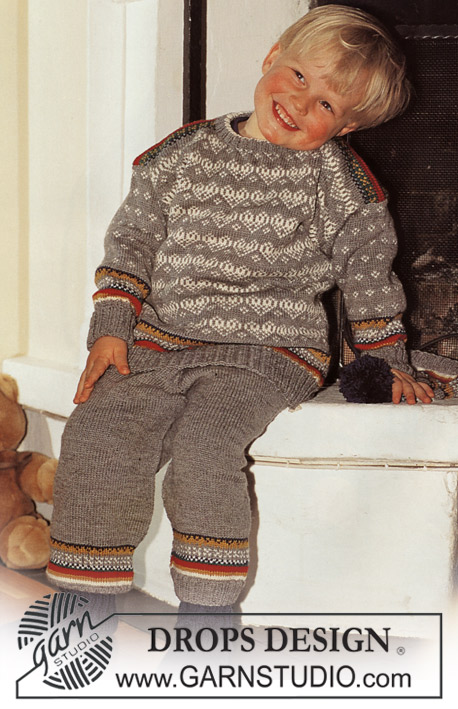
Genseren er den ensfarget som hon har på under Jakken. Det finnes ikke en separat bilde. Det er en enkel basis genser.
01.03.2014 - 01:24
![]() DROPS Deutsch wrote:
DROPS Deutsch wrote:
Die 3 M. stehen hier für "Markierung". Also mit 64-64-69 (69-75-75) M. Abstand 3 Markierungen einziehen. Ich habe den Satz umgeschrieben.
01.12.2011 - 08:29
![]() Birgit wrote:
Birgit wrote:
Bei dem Rock sollen Markierungsfäden angelegt werden und daneben jeweils Maschen aufgenommen werden. An welcher Stelle sollen die Markierungsfäden und wieviel?? Jetzt 3 M. mit je 64-64-69 (69-75-75) M. Zwischenraum einziehen - heisst das 3 M aufnehmen?? Ich würde mich über eine Antwort sehr freuen
30.11.2011 - 11:57
![]() Nanna wrote:
Nanna wrote:
Hvor er opskriften? for det er da vildt sødt
04.04.2011 - 23:48
![]() Jonna S. Petersen wrote:
Jonna S. Petersen wrote:
Mangler der ikke en strikkevejledning til denne model.
06.11.2008 - 15:51
|
|||||||||||||||||||
Alpine Joy#alpinejoycardigan |
|||||||||||||||||||
 |
 |
||||||||||||||||||
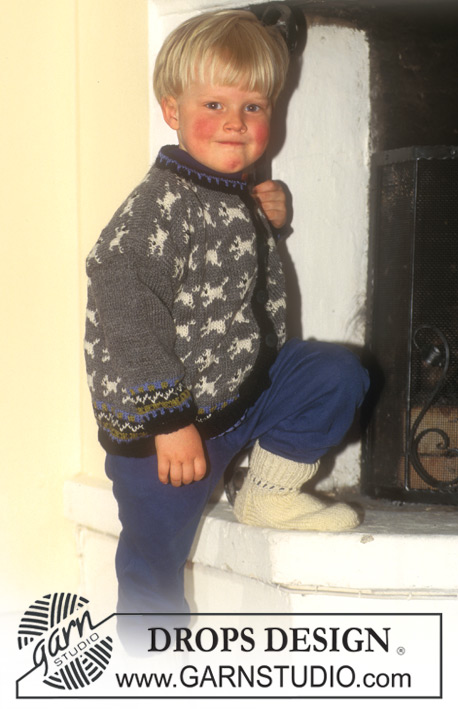
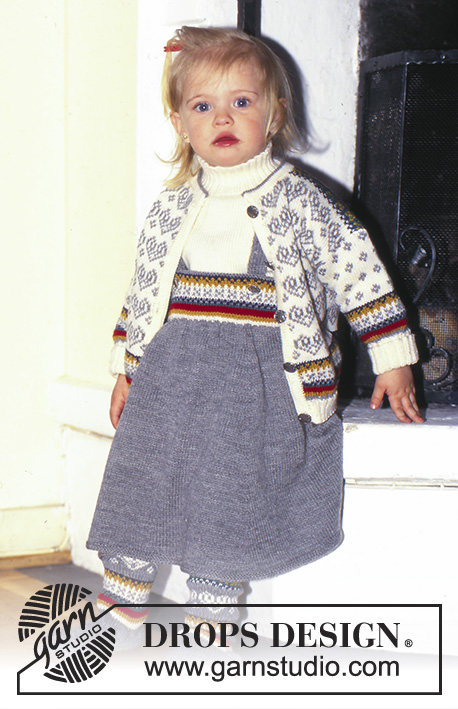
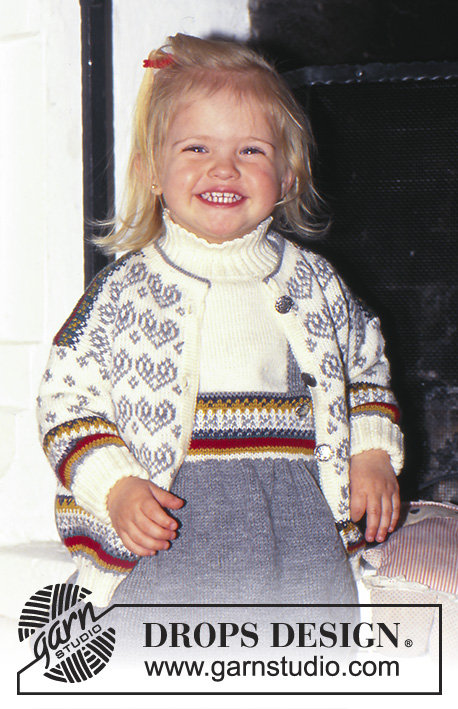
Cardigan, Sweater, Skirt, and Socks in Alpaca with Norwegian Pattern
DROPS Baby 5-6 |
|||||||||||||||||||
|
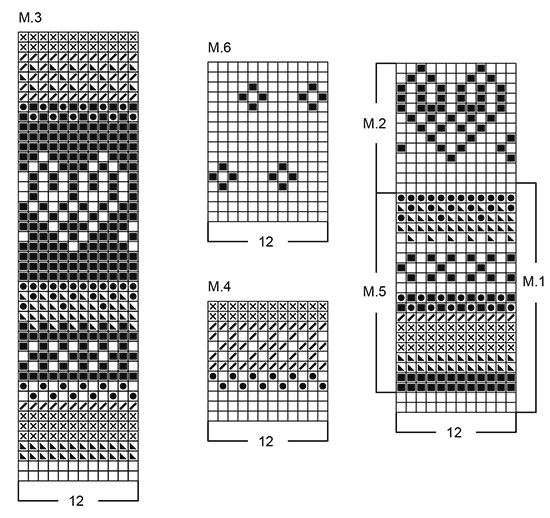
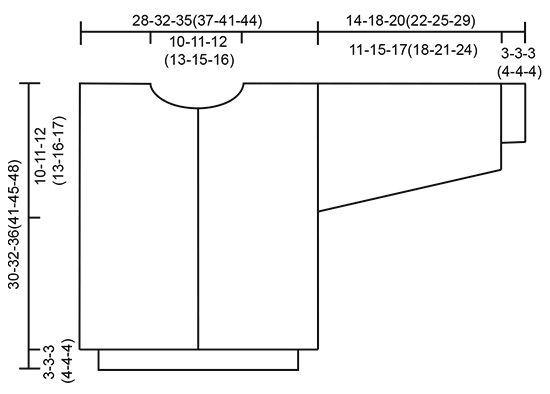
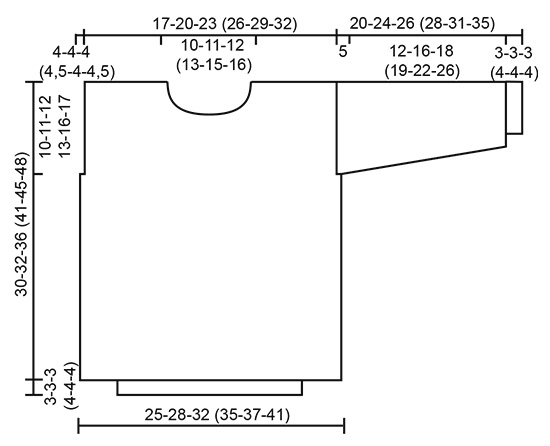
CARDIGAN 5-5-5 (6-6-6) DROPS tin buttons (No. 606, troll). DROPS 2 mm and 2.5 mm circular needles and double pointed needles, or sizes needed to obtain correct gauge. Gauge: 26 sts and 35 rows on larger needles in stockinette st = 10 x 10 cm Rib: * knit 2, purl 2 *. Repeat from * - *. Pattern: See chart. One chart equals one repeat of the pattern. The patterns are seen from the right side and are knit entirely in stockinette stitch. Body: The cardigan is knit in the round with steeks after the rib and cut up for armholes and at the center front. Cast on 144-168-180 (192-216-228) sts with natural on smaller circular needles and knit rib for 3-3-3 (4-4-4) cm back and forth on the needles. Change to larger circular needles and cast on 5 sts at the center front for the steek (these sts are not knit into the pattern). Join, being careful not to twist the sts. Place a marker at the join and knit Pattern 5 once. Continue in Pattern 2. When the work measures 20-21-24 (28-29-31) cm , cast on 5 sts on each side for armhole steeks (these sts are not knit into the pattern). Back = 72-84-90 (96-108-114) sts and each front piece = 36-42-45 (48-54-57) sts + the steek sts). When the work measures 26-28-31 (35-40-43) cm (adjust if necessary to get a whole heart vertically) bind off 14-16-18 (22-28-30) sts (+ 5 steek sts) at the center front for the neck and knit the rest of the work back and forth on the needles. Knit Pattern 4 and then knit the rest with gray. At the same time continue binding off at the neck edge every other row: 3 sts 1 time, 2 sts 1 time, 1 st 1 time. At the same time, when 7 rows of Pattern 4 remain, bind off the center 22-24-26 (30-36-38) sts in the back for the neck. Bind for the neck on the next row: 2 sts 1 time. Bind off all sts when the work measures 30-32-36 (41-45-48) cm . Sleeves: Cast on 44-44-48 (52-52-56) sts on smaller double pointed needles with natural white. Join, being careful not to twist the sts. Place a marker at the join and knit in rib for 6-6-6 (8-8-8) cm . The rib will be folded double and is therefore measured as 3-3-3 (4-4-4) cm . Change to larger double pointed needles and knit Pattern 5 (on the 2 smallest sizes knit only the 10 first rows of Pattern 5.) and at the same time inc 1 st on each side of the marker 4-7-7 (8-16-16) times: Size 0/3: every 8th row. Sizes 6/9 + 12/18: every 6th row. Size 2 years: every 7th row. Size 3/4 years: every 4th row. Size 5/6 years: alternately every 4th and 5th row. = 52-58-62 (68-84-88) sts. After Pattern 5, knit the rest with Pattern 6. When the work measures 14-18-20 (22-25-29) cm , knit 1 cm in reverse stockinette st for a seam allowance over the cut steek edge on the body. Bind off. Assembly: Sew a marker down into the center of the steek sts on each side and at the center front. Sew two machine seams on each side of the marker 1/2 stitch away. Cut up for armholes and at the center front. Sew shoulder seams. Pick up approx. 80-100 sts along the left button band on smaller needles with natural and knit 2 cm in stockinette st, purl 1 row (for folding edge), knit 2 cm in stockinette st and bind off. Fold the edge over against the wrong side and sew. Repeat along the right button band, but after 1 cm make 5-5-5 (6-6-6) buttonholes evenly distributed. (1 buttonhole = bind off 3 sts and cast on 3 new sts over the bound-off sts on the next row -- remember buttonholes on the folding edge). Pick up approx. 80-100 sts around the neck on smaller needles with natural and knit 1.5 cm in stockinette st, change to gray, knit 1 row stockinette st, purl 1 row, knit 1 row stockinette st, change to natural, knit 1.5 cm in stockinette st, bind off, fold the edge over against the wrong side and sew. Sew the sleeves to the body from the right side as follows: Sew alternately a stitch in the last row on the sleeve before the seam allowance and a stitch on the body after the machine seam. Turn the sweater out and sew the seam allowance from the sleeve over the cut steek edge on the body by hand. Sew on the buttons. ________________________________________ PULLOVER SWEATER 2-2-2 (0-0-0) DROPS tin buttons (No. 606, troll). DROPS 2 mm and 2.5 mm circular needles and double pointed needles, or sizes needed to obtain correct gauge. Gauge: 26 sts and 35 rows on larger needles in stockinette st = 10 x 10 cm . Rib: * knit 2, purl 2*. Repeat from * - *. Body: Cast on 132-144-168 (180-192-216) sts on smaller circular needles. Join, being careful not to twist the sts. Place a marker at the join and knit in rib for 3-3-3 (4-4-4) cm . Change to larger circular needles and purl 1 row, then knit stockinette st. When the work measures 20-21-24 (28-29-31) cm , knit the next row as follows: knit 60-66-78 (84-90-102) sts for the front, bind off 6 sts for armhole, knit 60-66-78 (84-90-102) sts for the back, bind off 6 sts for armhole. Knit the rest of the front and back separately from this point. Front: 60-66-78 (84-90-102) sts. Bind off for armholes every other row: 3 sts 2 times, 2 sts 2-1-2 (2-1-2) times, 1 st 1-3-2 (1-3-2) times. 44-52-60 (68-76-84) sts. When the work measures 26-28-31 (35-40-43) cm , bind off the center 14-16-18 (22-28-30) sts for the neck. Bind off at each neck edge every other row: 3 sts 1 time, 2 sts 1 time, 1 st 1 time. Bind off when the work measures 30-32-36 (41-45-48) cm . Back: 60-66-78 (84-90-102) sts. Bind off for armholes every other row: 3 sts 2 times, 2 sts 2-1-2 (2-1-2) times, 1 st 1-3-2 (1-3-2) times. 44-52-60 (68-76-84) sts. Sizes 0/3 - 6/9 - 12/18 months: Bind off the 8 center sts at the center back for a split when the work measures 25-27-31 cm . When the work measures 28-30-34 cm , continue to bind off at the neck edge every other row: 7-8-9 sts 1 time, 2 sts 1 time. Sizes 2 - 3/4 - 5/6 years: When the work measures 39-43-46 cm , bind off the center (30-36-38) sts for the neck. Bind off 2 sts at each neck edge every other row 1 time. All sizes: Bind off all sts when the work measures 30-32-36 (41-45-48) cm . Sleeves: Cast on 44-44-48 (52-52-56) sts on smaller double pointed needles. Join, being careful not to twist the sts. Place a marker at the join and knit rib for 6-6-6 (8-8-8) cm . The rib will be folded double and is therefore measured as 3-3-3 (4-4-4) cm . Change to larger double pointed needles and purl 1 row, then knit stockinette st. At the same time inc 1 st on each side of the marker 4-7-7 (8-16-16) times: Size 0/3: every 9th row. Sizes 6/9 + 12/18: every 7th row. Size 2 years: every 7th row. Size 3/4 years: every 4th row. Size 5/6 years: every 5th row. = 52-58-62 (68-84-88) sts. When the work measures 15-19-21 (23-26-30) cm , bind off 3 sts on each side of the marker and knit the rest of the work back and forth on the needles. Bind off on each side every other row: 3 sts 1 time, and then 2 sts every other row until the work measures 20-24-26 (28-31-35) cm . Bind off the remaining sts. Assembly: Sew shoulder seams. Pick up approx. 90-110 sts (divisible by 4 sts) around the neck on smaller double pointed needles and knit (back and forth on the 3 smallest sizes and in the round on the 3 largest sizes): purl 1 row, then knit 3-5 cm in rib. Bind off. On the 3 smallest sizes knit placket as follows: Pick up approx. 30 sts on smaller needles along the left placket and knit 3 cm in rib. Bind off. Repeat along the right placket but after 1 cm make 2 buttonholes evenly distributed along the row (1 buttonhole = bind off 3 sts and cast on 3 new sts on the next row). Sew the sleeves to the body and sew on the buttons. ________________________________________ SKIRT Waist measurement = 40-43-48 (52-54-57) cm . Length of the skirt = 28-32-37 (42-46-48) cm 2 DROPS tin buttons (troll, button No. 606). DROPS 2.5 mm circular needles, or size needed to obtain correct gauge. Gauge: 26 sts and 35 rows in stockinette st = 10 x 10 cm . Pattern: See chart. One chart equals one repeat of the pattern. The pattern is seen from the right side and is knit entirely in stockinette stitch. Rib: * knit 1, purl 1*. Repeat from * - *. Skirt: Knit the skirt in the round from the top down. Cast on 104-112-124 (136-140-148) sts on circular needles with gray. Join, being careful not to twist the sts. Place a marker at the join and knit in stockinette st for 4.5 cm . Make 2 buttonholes at the center front on each side of the center 20-20-20 (22-22-24) sts. (1 buttonhole = bind off 3 sts and cast on 3 new sts on the next row.) Continue with stockinette st until the work measures 6.5 cm . Then purl 1 row for folding edge. Measure the work from here. Knit 1 row and then Pattern 1 knitting the pattern from the top down. Make corresponding buttonholes as on the folding edge. After Pattern 1 continue with stockinette st and gray and at the same time inc 88-80-83 (71-85-77) sts evenly distributed on the 1st row. 192-192-207 (207-225-225) sts. Place 3 markers evenly distributed with 64-64-69 (69-75-75) sts between them. Inc 1 st on each side of the markers: Size 1/3 months: every 8th row. Sizes 6/9 + 12/18 months + 3/4 years: alternately every 5th and 6th row. Size 2 years: every 5th row. Size 5/6 years: alternately every 4th and 5th row. = 258-300-339 (363-387-417) sts. Knit until the work measures 28-32-37 (42-46-48) cm . Then purl 1 row, knit 1 row, purl 1 row, and bind off. Fold the waist edge over against the wrong side and sew. Suspenders: Knit 2 of these. Cast on 11 sts with gray and knit in rib for 35-50 cm . Bind off. Sew the suspenders to the back at the center back with 2 cm in between. Sew buttons on the suspenders. Socks: Sizes: 0/3 - 6/9 - 12/18 months (2 - 3/4 - 5/6 years) Sock's foot length: 10-11-12 (14-15-16) cm DROPS 2 mm and 2.5 double pointed needles, or sizes needed to obtain correct gauge. Gauge: 26 sts and 35 rows on larger needles in stockinette st = 10 x 10 cm. . Pattern: See chart. One chart equals one repeat of the pattern. Rib: * knit 1, purl 1*. Repeat from * - *. ________________________________________ SOCKS Cast on 48-48-48 (48-60-60) sts on smaller double pointed needles with gray. Join, being careful not to twist the sts and knit rib for 2 cm . Knit all pattern repeats from the top down! Change to larger double pointed needles and knit Pattern 3 until the work measures 10-12-15 (16-18-20) cm . Adjust for the pattern if necessary. Continue with gray. Heel: Knit 3-3.5-4 (4.5-5-5.5) cm in stockinette st back and forth over 22 sts at the center back. Turn the heel as follows: Row 1: K 12, K 2 tog into back of st, K 1, turn. Row 2: Sl 1, P 4 sts, P 2 tog, P 1, turn . Row 3: Sl 1, K 5, K 2 tog into back of st, K 1, turn. Row 4: Sl 1, P 6, P 2 tog, P 1, turn. Row 5: Sl 1, K 7, K 2 tog into back of st, K 1 st, turn. Row 6: Sl 1, P 8, P 2 tog, P 1, turn. Row 7: Sl 1, P 9, K 2 tog into back of st, K 1, turn. Row 8: Sl 1, P 10, K 2 tog, P 1, turn. Row 9: K 2 tog, K 10, K 2 tog into back of st. There should be 12 sts on the needle (= 38-38-38 (38-50-50) sts in all). Pick up 8 sts on each side of the heel (along the instep) and put all sts evenly distributed on 4 needles. 54-54-54 (54-66-66) sts. Dec 1 st on each side of the uppermost 24-24-24 (24-30-30) sts: 7-7-7 (7-7-7) times every other row. 40-40-40 (40-52-52) sts. When the foot measures 8-9-10 (12-13-14) cm from the start of the binding off for the heel, place a marker on each side. Decrease for toe on each side of the marker (4 sts decreased on each row) every row: 1 st 8-8-8 (9-9-9) times. Pull the yarn through the remaining sts and sew. |
|||||||||||||||||||
Diagram explanations |
|||||||||||||||||||
|
|||||||||||||||||||
|
|||||||||||||||||||
|
|||||||||||||||||||
|
|||||||||||||||||||
Have you finished this pattern?Tag your pictures with #dropspattern #alpinejoycardigan or submit them to the #dropsfan gallery. Do you need help with this pattern?You'll find 30 tutorial videos, a Comments/Questions area and more by visiting the pattern on garnstudio.com. © 1982-2025 DROPS Design A/S. We reserve all rights. This document, including all its sub-sections, has copyrights. Read more about what you can do with our patterns at the bottom of each pattern on our site. |
|||||||||||||||||||


With over 40 years in knitting and crochet design, DROPS Design offers one of the most extensive collections of free patterns on the internet - translated to 17 languages. As of today we count 314 catalogues and 11821 patterns translated into English (UK/cm).
We work hard to bring you the best knitting and crochet have to offer, inspiration and advice as well as great quality yarns at incredible prices! Would you like to use our patterns for other than personal use? You can read what you are allowed to do in the Copyright text at the bottom of all our patterns. Happy crafting!
Post a comment to pattern DROPS Baby 5-6
We would love to hear what you have to say about this pattern!
If you want to leave a question, please make sure you select the correct category in the form below, to speed up the answering process. Required fields are marked *.