
Popular categories
Looking for a yarn?


Comments / Questions (13)
![]() May-Brit wrote:
May-Brit wrote:
Hei. Jeg leser at raglandsøkningene (kastene) skal strikkes vridd vrang fra vrangen. Dette synes jeg er unø klønete, og jeg lurer på om det vil gjøre noe forskjell om jeg øker mellom maskene fra retten i stedet, altså ikke kast men plukker opp tråden mellom maskene og strikker hhv høyre og venstre vridd rett.
09.06.2025 - 21:58DROPS Design answered:
Hei May-Brit, Selvfølgelig kan du øker sånn som du beskriver, så lenge det ikke strammer maskene når du plukker opp tråden mellom dem. Hilsen Drops team.
10.06.2025 - 06:38
![]() Manetsch Barbara wrote:
Manetsch Barbara wrote:
Ich hab die Halsblende gestrickt. Nun versuche ich die Passe einzuteilen. Mit der Mascheneinteilung stimmt was nicht.
10.04.2025 - 18:55DROPS Design answered:
Liebe Frau Manetsch, bei der 1. Reihe der Passe wird man regelmäßig verteilt zunehmen und dazu die 9 oder 11 Maschen (siehe Größe ) A.1 bei jeder Raglanlinie stricken. Gerne schreiben Sie hier Ihre Größe, damit wir Ihnen weiterhelfen können. Viel Spaß beim Stricken!
11.04.2025 - 08:58
![]() Anne Langeland wrote:
Anne Langeland wrote:
Hei! Hvordan kan jeg laste denne gratis ned? Mvh Anne
07.04.2025 - 17:24DROPS Design answered:
Hej Anne, du kan skrive den ud helt gratis hvis du vil det, eller så strikker du efter den opskrift som ligger online på vores hjemmeside :)
09.04.2025 - 14:22
![]() Adel18 wrote:
Adel18 wrote:
Creo que hay un error en el reparto de los puntos para el canesu. No coinciden con los del cuello. Gracias.
16.01.2025 - 19:02DROPS Design answered:
Hola Adel18, ¿puedes indicar qué talla estás trabajando? El número de pts es correcto, por ejemplo, para la talla S: tienes 8 pts de la cenefa, 8 pts en pt jersey, A.1 (= 9 pts), 21 pts en pt jersey, A.1 (= 9 pts), 15 pts en pt jersey, A.1 (= 9 pts), 21 pts en pt jersey, A.1 (= 9 pts), 9 pts en pt jersey, 8 pts de la cenefa. Esos son 125 pts, más los 2 pts aumentados en cada sección de 21 pts = 129 pts. Por lo tanto, el número inicial sin aumentos debería coincidir con el cuello y luego le añades los aumentos para llegar al número indicado para el canesú. Recuerda que A.1 son 9 pts para las 3 primeras tallas y 11 para las tallas grandes.
19.01.2025 - 15:47
![]() D Hansen wrote:
D Hansen wrote:
Hej Drops. Hvis jeg følger fremgangsmåden til halskant, får jeg ikke rib, men perlestrik. Er der en fejl i opskriften? Starten af forkant med I-cord strikes over 8 masker, dernæst (r,v) indtil 9 masker tilbage, dernæst 1 r og I-cord over 8 masker. Alle pinde skal strikkes på samme måde. Skal der mon i stedet gøres noget andet på efter I-cord på næste pind - den retmaske fra omgangen før, der ligger mellem (r,v) og I-cord? Eller hvad er løsningen?
05.12.2024 - 12:14DROPS Design answered:
Hei D. Du strikker de 8 stolpemaskene med i-cord som forklart øverst i oppskriften (de 2 først og de 2 siste maskene strikkes i-cord, men de 6 andre maskene strikkes rett, både fra retten og fra vrange). Når du skal strikke vrangborden fra vrangen strikker du vrangmasker over vrangmasker og rettmasker over rettmasker, slik du får en vrangbord. Skal ikke bli perlestrikk. mvh DROPS Design
09.12.2024 - 13:11
![]() Monique wrote:
Monique wrote:
J'ai du mal à comprendre la séparation qui est faite après l'empiècement pourriez-vous svp me préciser ce que vous entendez dans prendre les aiguilles 3 alors que tout l'empiècement est tricoté au 4 ? et la suite de votre explication. merci
30.11.2024 - 12:58DROPS Design answered:
Bonjour Monique, pour ce gilet, on a une fente sur les côtés, ainsi, après 20-21 cm après l'empiècement, on termine chaque partie séparément en commençant par le devant gauche, on va d'abord augmenter à intervalles réguliers puis continuer en côtes avec les aiguilles 3. Bon tricot!
02.12.2024 - 08:49
![]() Tina wrote:
Tina wrote:
Utrolig dårlig kvalitet, nupper helt ekstremt. Votter i dette garnet ser fullstendig tovet ut etter en måneds veldig forsiktig bruk av en voksen dame , og de ble brukt mest til pynt egentlig. Lille skjerfet gikk det litt bedre med, men vil absolutt ikke anbefale garnet til noen som helst plagg som skal brukes fremfor å bli utstilt . Nylaget ser det veldig flott ut. Men i bruk er det ikke.
15.11.2024 - 14:02
![]() Hanne wrote:
Hanne wrote:
Når jeg er færdig med udtagningerne på bærestykket måler det ikke de højde cm det skal selvom min strikkefasthed er rigtig. Skal jeg så ikke bare blive ved uden udtagning til det ønskede antal cm?
13.07.2024 - 16:17DROPS Design answered:
Hej Hanne. Ja sticka då vidare uden udtagning till önskat antal cm. Mvh DROPS Design
18.07.2024 - 11:04
![]() Daniela wrote:
Daniela wrote:
Buongiorno, ho due domande a proposito del collo. Cosa significa " lavorare 1 ferro rovescio DAL ROVESCIO del lavoro"? Posso montare meno maglie per fare in modo che il bordo del collo non si allenti? Grazie
18.06.2024 - 09:16DROPS Design answered:
Buongiorno Daniela, il modello è lavorato in piano, deve avviare le maglie, girare il lavoro e lavorare a rovescio sul rovescio del lavoro. Può apportare le modifiche che preferisce al modello. Buon lavoro!
18.06.2024 - 16:48
![]() Catherine wrote:
Catherine wrote:
For pattern 248-9, please clarify: 1. The buttonhole should be made at the beginning of the row when work at right side (for female), 2. For yoke, after the collar band is worked, when dividing the front (right), then sleeve, body , sleeve & front(left) when work from the right side. Thank you very much.
19.02.2024 - 08:18DROPS Design answered:
Dear Catherine, as this jacket is worked top down you start with left front piece and end with right front piece from right side, that's why the buttonholes will be worked at the end of a row from RS. The first row on yoke including increases worked evenly and first row in A.1 is worked from the right side. Happy knitting!
19.02.2024 - 09:56
|
|||||||
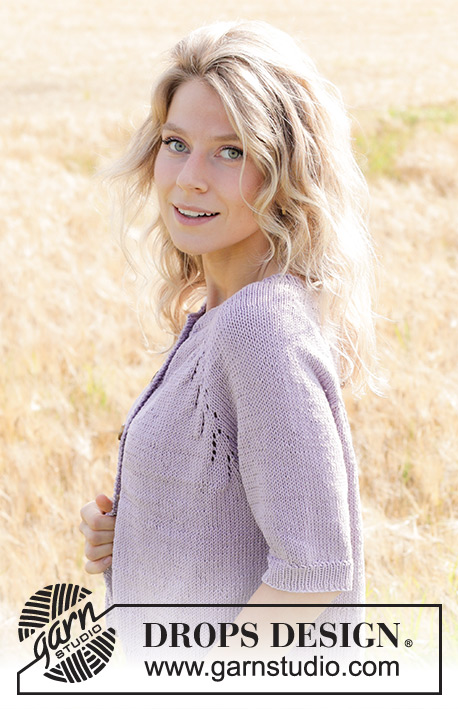
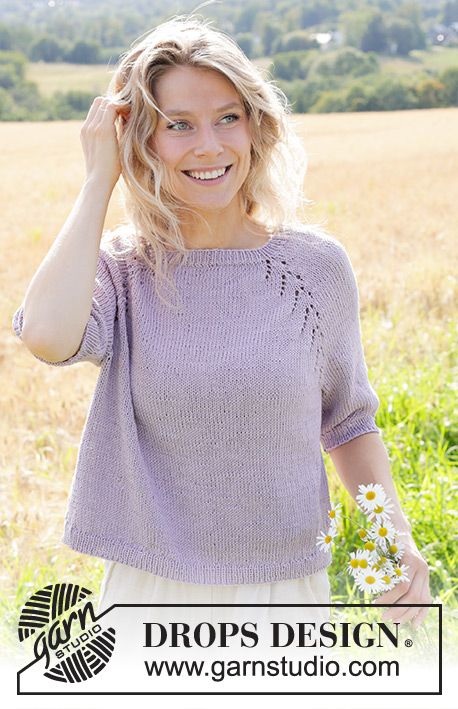
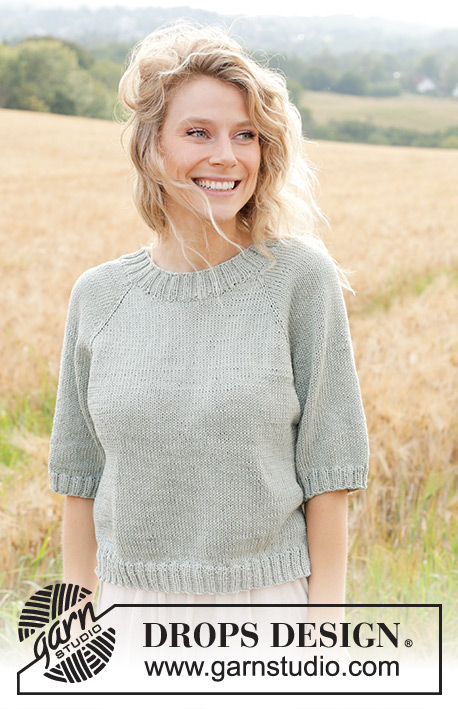
Red Sunrise Cardigan#redsunrisecardigan |
|||||||
 |
 |
||||||
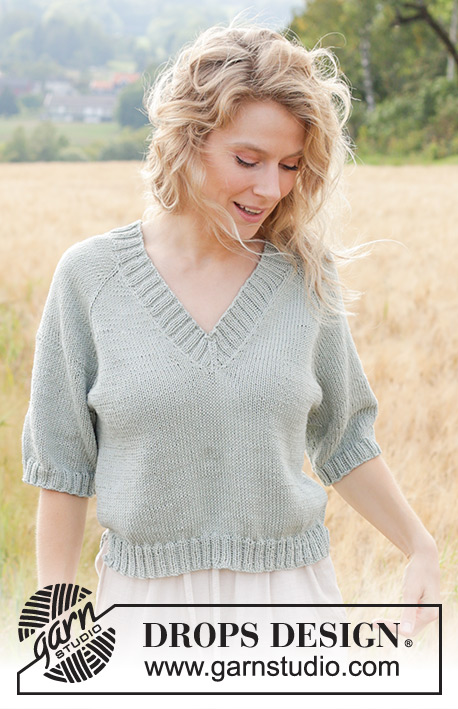
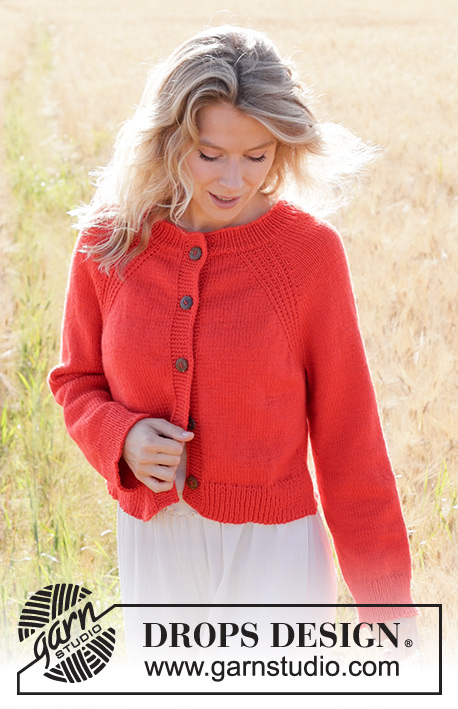
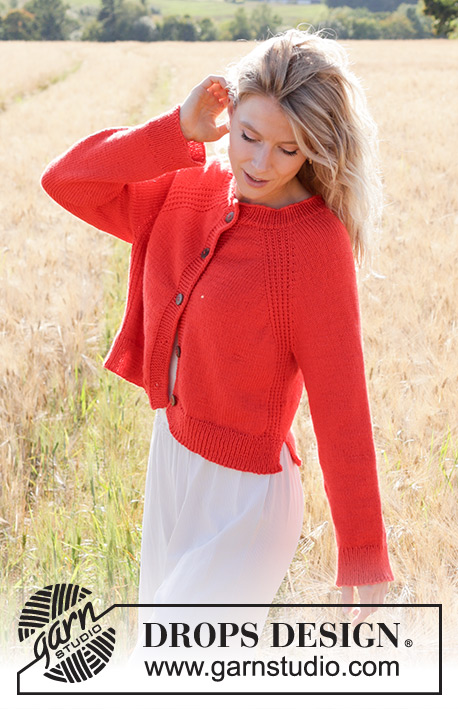
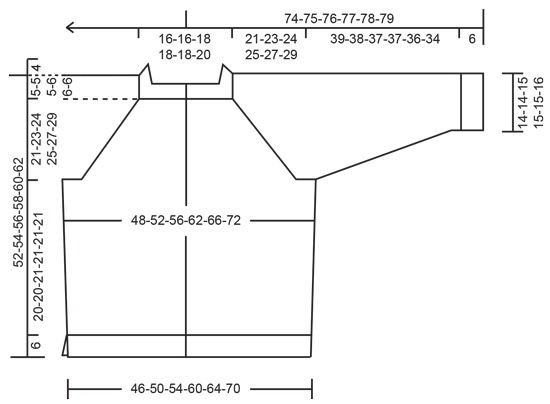
Knitted jacket in DROPS Daisy. The piece is worked top down with raglan, relief-pattern, split in sides and I-cord. Sizes S - XXXL.
DROPS 248-9 |
|||||||
|
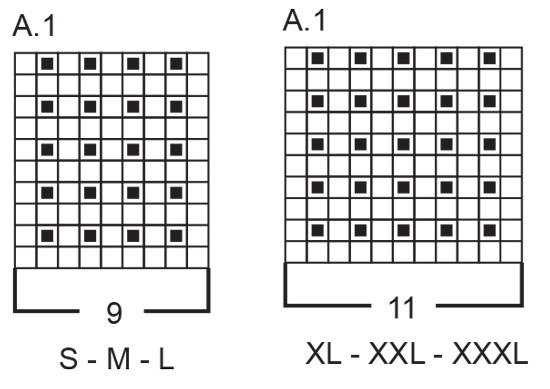
------------------------------------------------------- EXPLANATIONS FOR THE PATTERN: ------------------------------------------------------- GARTER STITCH (worked back and forth): Knit all rows. 1 ridge in height = knit 2 rows. PATTERN: See diagram A.1. Choose diagram for your size. The diagram shows all rows in the pattern from the right side. BANDS WITH I-CORD: START OF ROW: Work the band as follows: Slip 1 stitch purl-wise, with yarn in front, knit 1, work 6 garter stitches. END OF ROW: Work the band as follows: Work until there are 8 stitches left on the row, work 6 garter stitches, slip 1 stitch purl-wise with yarn in front, knit 1. Work in the same way from both the right and wrong side. INCREASE TIP (evenly spaced): Increase 1 stitch by making 1 yarn over, which is worked twisted on the next row to avoid a hole. RAGLAN: All increases are worked from the right side! Increase 1 stitch before/after A.1, in each transition between body and sleeves. Increase by making 1 yarn over, which is worked as follows on the next row (wrong side). BEFORE A.1: Purl the back loop, no hole. AFTER A.1: Slip the yarn-over off the left needle and replace it the other way round (insert the left needle through the back when replacing it). Purl the front loop. No hole. DECREASE TIP-1 (for sides of body): All decreases are worked from the right side! Decrease on each side of the body, on both sides of the stocking stitch section between A.1 on the front and back pieces: Begin straight after A.1 on the left front piece, slip 1 stitch knit-wise, knit 1, pass the slipped stitch over the knitted stitch, work until there are 2 stitches left before the next A.1, knit 2 together. Repeat on the other side of the body (4 stitches decreased). DECREASE TIP-2 (for sleeves): Decrease 1 stitch on each side of the marker-thread as follows: Work until there are 3 stitches left before the marker-thread, knit 2 together, knit 2 (marker-thread sits between these 2 stitches), slip 1 stitch knit-wise, knit 1 and pass the slipped stitch over the knitted stitch (2 stitches decreased). BUTTONHOLES: Work buttonholes on the right band (when the garment is worn). Work from the right side when there are 5 stitches left on the row as follows: Make 1 yarn over, knit 2 together, knit 1, slip 1 stitch purl-wise with the strand in front, knit 1. On the next row (wrong side), knit the yarn over to leave a hole. The first buttonhole is worked on the first row from the right side after the neck. The other 4-4-5-5-5-5 buttonholes are then worked with approx. 10-11-9-9-9½-10 cm between each one. The bottom buttonhole is worked in the transition between the stocking stitch and rib. ------------------------------------------------------- START THE PIECE HERE: ------------------------------------------------------- JACKET – SHORT OVERVIEW OF THE PIECE. The pattern uses both long and short circular needles; start with the length which fits the number of stitches and change when necessary. The neck and yoke are worked back and forth with circular needle, from mid front and top down. The yoke is divided for body and sleeves and the body continued back and forth with circular needle, while the sleeves wait. The body is divided for the split in each side and the front and back pieces are then finished separately. The sleeves are worked in the round, top down. NECK: Cast on 125-127-133-141-143-149 stitches with circular needle size 3 mm and DROPS Daisy. Purl 1 row from the wrong side. Work as follows from the right side: 8 BAND STITCHES WITH I-CORD – read description above, * knit 1, purl 1 *, work from*-* until there are 9 stitches left, knit 1 and 8 band stitches with I-cord. Continue this rib for 4 cm. Insert 1 marker inside one band. The yoke is measured from this marker. YOKE: Change to circular needle size 4 mm and work the first row from the right side as follows: 8 band stitches as before, 8-8-10-10-10-12 stocking stitches and increase 0-0-0-1-1-2 stitches evenly over these stitches – read INCREASE TIP, work A.1 (left front piece), 21 stocking stitches and increase 2-2-2-4-4-4 stitches evenly over these stitches (sleeve), work A.1, 15-17-19-19-21-23 stocking stitches and increase 0-0-0-2-2-4 stitches evenly over these stitches, work A.1 (back piece), 21 stocking stitches and increase 2-2-2-4-4-4 stitches evenly over these stitches (sleeve), work A.1, 8-8-10-10-10-12 stocking stitches and increase 0-0-0-1-1-2 stitches evenly over these stitches, 8 band stitches as before (right front piece). Remember the BUTTONHOLES on the right band – read description above = 129-131-137-153-155-165 stitches. Work back from the wrong side with 8 band stitches as before, stocking stitch and A.1 in each transition between the body and sleeves (remember the yarn overs are worked twisted to avoid holes). Continue the pattern and begin to increase for RAGLAN – read description above. REMEMBER THE KNITTING TENSION! Increase for raglan on each side of each A.1 (8 increased stitches) every 2nd row (each row from the right side) a total of 5-6-10-13-12-11 times = 169-179-217-257-251-253 stitches. Continue increasing for raglan, but every 2nd increase is only on the front and back pieces, i.e., increase on the front and back pieces every 2nd row and on the sleeves every 4th row (alternately 4 and 8 stitches increased). Increase like this 24-26-24-22-26-30 times on the front and back pieces (12-13-12-11-13-15 times on the sleeves). After the last increase there are 313-335-361-389-407-433 stitches and the yoke measures approx. 21-23-24-25-27-29 cm from the marker. Now divide for the body and sleeves: Work 54-57-61-65-68-74 stitches as before (front piece), place the next 57-61-67-73-75-77 stitches on 1 thread for the sleeve, cast on 10-10-12-16-18-20 stitches (in side under sleeve), work 91-99-105-113-121-131 stitches (back piece), place the next 57-61-67-73-75-77 stitches on 1 thread for the sleeve, cast on 10-10-12-16-18-20 stitches (in side under sleeve), work the last 54-57-61-65-68-74 stitches as before (front piece). The body and sleeves are finished separately. The piece is now measured from here. BODY: = 219-233-251-275-293-319 stitches. Insert 1 marker-thread 59-62-67-73-77-84 stitches in from each side, with 101-109-117-129-139-151 stitches between the marker-threads on the back piece. Allow the threads to follow your work onwards; they are used to mark the split in each side. Work stocking stitch with 8 band stitches as before on each side, continuing A.1 on the front and back pieces and working the 10-10-12-16-18-20 cast-on stitches under each sleeve in stocking stitch. When the body measures 6 cm from the division, decrease 2 stitches on each side – read DECREASE TIP-1. Repeat the decrease when the body measures 12 cm = 211-225-243-267-285-311 stitches. Work until the body measures 20-20-21-21-21-21 cm, finishing after a row from the wrong side. Now divide at each marker-thread and finish each piece separately. LEFT FRONT PIECE: = 57-60-65-71-75-82 stitches. Work 1 row as before from the right side and increase 7-10-8-10-9-9 stitches evenly between the band and A.1 and 2-2-3-3-4-5 stitches evenly between A.1 and the marker-thread – remember INCREASE TIP = 66-72-76-84-88-96 stitches. Change to circular needle size 3 mm. Work as follows from the wrong side: Slip 1 stitch purl-wise with the strand in front, knit 1, * knit 1, purl 1 *, work from *-* until there are 8 stitches left, work 8 band stitches as before (the rib should neatly match the stitches in A.1). Continue this rib back and forth for 6 cm (the outermost 2 stitches towards the side are worked in the same way as the band stitches without the garter stitches). Cast off. The jacket measures approx. 52-54-56-58-60-62 cm from the shoulder. RIGHT FRONT PIECE: = 57-60-65-71-75-82 stitches. Work 1 row as before from the right side and increase 2-2-3-3-4-5 stitches evenly between the marker-thread in the side and A.1 and 7-10-8-10-9-9 stitches evenly between A.1 and the band = 66-72-76-84-88-96 stitches. Change to circular needle size 3 mm. Work as follows from the wrong side: 8 band stitches as before, * purl 1, knit 1 *, work from *-* until there are 2 stitches left, slip 1 stitch purl-wise with the strand in front, knit 1. Continue this rib back and forth for 6 cm. Cast off. BACK PIECE: = 97-105-113-125-135-147 stitches. Work 1 row as before from the right side and increase 2-2-3-3-4-5 stitches on each side between the marker-threads and A.1 and 16-18-18-20-18-20 stitches evenly between each A.1 = 117-127-137-151-161-177 stitches. Change to circular needle size 3 mm. Work as follows from the wrong side: Slip 1 stitch purl-wise with the strand in front, knit 1, * knit 1, purl 1 *, work from *-* until there are 3 stitches left, knit 1, slip 1 stitch purl-wise with the strand in front, knit 1. Continue this rib back and forth for 6 cm (the outermost 2 stitches on each side are worked in the same way as the band stitches, without the garter stitches). Cast off. SLEEVES: Place the 57-61-67-73-75-77 stitches from the thread on the one side of the piece on short circular needle/double pointed needles size 4 mm and knit up 1 stitch in each of the 10-10-12-16-18-20 stitches cast on under the sleeve = 67-71-79-89-93-97 stitches. Insert a marker-thread in the middle of the 10-10-12-16-18-20 stitches under the sleeve. Start at the marker-thread and work stocking stitch in the round. When the sleeve measures 4-4-4-3-2-2 cm from the division, decrease 2 stitches under the sleeve – read DECREASE TIP-2. Decrease like this every 7-5½-3½-2½-2½-2 cm a total of 5-6-9-13-14-15 times = 57-59-61-63-65-67 stitches. Work until the sleeve measures 39-38-37-37-36-34 cm from the division. There is 6 cm left. Try the jacket on and work to desired length before the rib. Knit 1 round and increase 11-11-13-13-13-13 stitches evenly spaced = 68-70-74-76-78-80 stitches. Change to double pointed needles size 3 mm. Work rib (knit 1, purl 1) for 6 cm. Cast off. The sleeve measures approx. 45-44-43-43-42-40 cm from the division. ASSEMBLY: Sew the buttons onto the left band. |
|||||||
Diagram explanations |
|||||||
|
|||||||
|
|||||||
|
|||||||
Have you finished this pattern?Tag your pictures with #dropspattern #redsunrisecardigan or submit them to the #dropsfan gallery. Do you need help with this pattern?You'll find 33 tutorial videos, a Comments/Questions area and more by visiting the pattern on garnstudio.com. © 1982-2025 DROPS Design A/S. We reserve all rights. This document, including all its sub-sections, has copyrights. Read more about what you can do with our patterns at the bottom of each pattern on our site. |
|||||||


With over 40 years in knitting and crochet design, DROPS Design offers one of the most extensive collections of free patterns on the internet - translated to 17 languages. As of today we count 314 catalogues and 11821 patterns translated into English (UK/cm).
We work hard to bring you the best knitting and crochet have to offer, inspiration and advice as well as great quality yarns at incredible prices! Would you like to use our patterns for other than personal use? You can read what you are allowed to do in the Copyright text at the bottom of all our patterns. Happy crafting!
Post a comment to pattern DROPS 248-9
We would love to hear what you have to say about this pattern!
If you want to leave a question, please make sure you select the correct category in the form below, to speed up the answering process. Required fields are marked *.