
Popular categories
Looking for a yarn?


|
|||||||||||||||||||||||||
Forest Mystery |
|||||||||||||||||||||||||
 |
 |
||||||||||||||||||||||||
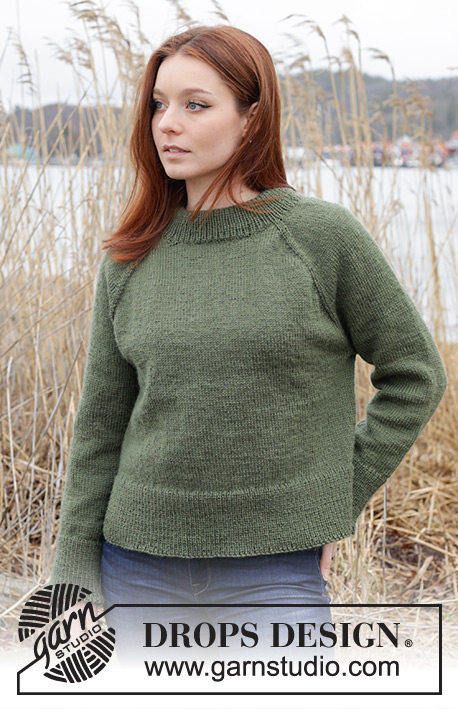
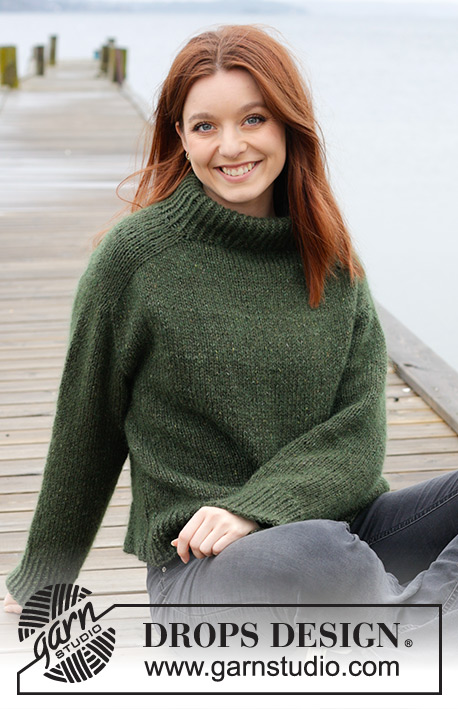
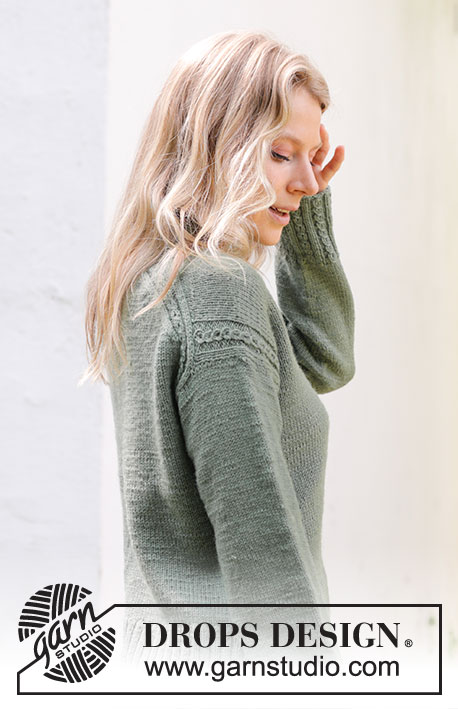
Knitted jumper in DROPS Lima. The piece is worked top down with European/diagonal shoulders, lace pattern and split in sides. Sizes S - XXXL.
DROPS 243-11 |
|||||||||||||||||||||||||
|
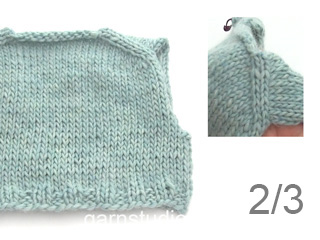
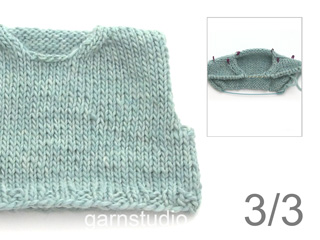
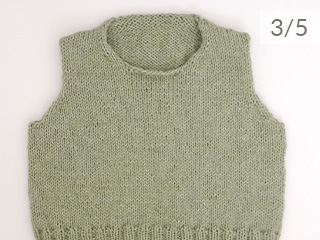
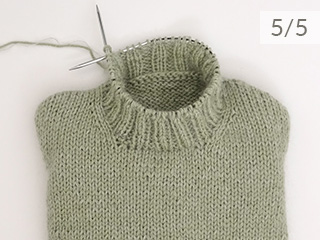
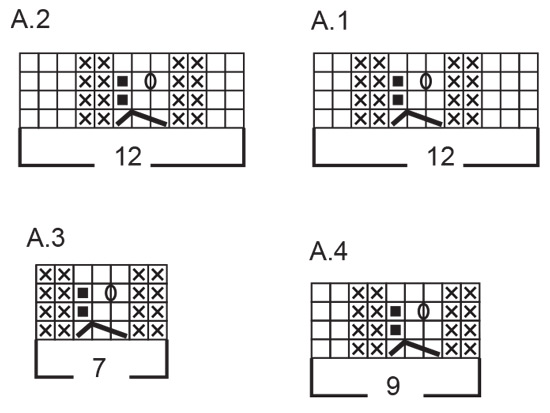
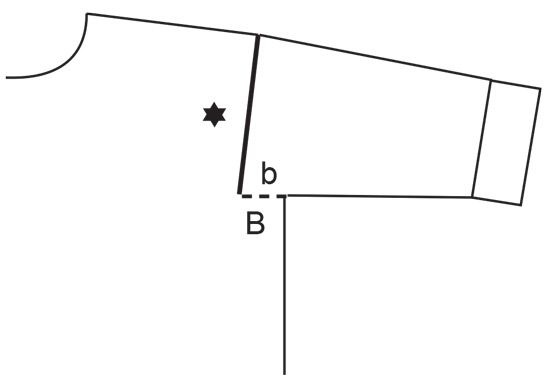
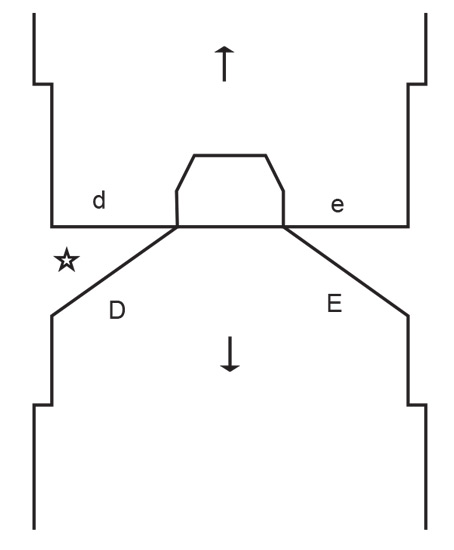
------------------------------------------------------- EXPLANATIONS FOR THE PATTERN: ------------------------------------------------------- INCREASE TIP FROM RIGHT SIDE: Increase to the left AFTER A.1 or 3 stitches by neck: Use left needle to pick up thread between 2 stitches from row below, pick up thread from front and knit stitch in back loop. Increase to the right BEFORE A.2 or 3 stitches by neck: Use left needle to pick up thread between 2 stitches from row below, pick up thread from behind and knit stitch in front loop. INCREASE TIP FROM WRONG SIDE: Increase to the left AFTER A.2 Use left needle to pick up thread between 2 stitches from row below, pick up thread from behind and purl stitch in front loop. Increase to the right BEFORE A.1: Use left needle to pick up thread between 2 stitches from row below, pick up thread from front and purl stitch in back loop. GARTER STITCH (worked back and forth): Knit all rows. 1 ridge = knit 2 rows. DECREASE TIP (for sleeves): Decrease 1 stitch on each side of the marker-thread as follows: Work until there are 3 stitches left before the marker-thread, knit 2 together, knit 2 (marker-thread sits between these 2 stitches), slip 1 stitch knit-wise, knit 1 and pass the slipped stitch over the knitted stitch. ------------------------------------------------------- START THE PIECE HERE: ------------------------------------------------------- JUMPER – SHORT OVERVIEW OF THE PIECE: The top of the back piece is worked back and forth until the armholes are finished. Stitches are knitted up along each back shoulder for the front piece, stitches are increased for the neck and the front piece is worked back and forth until the armholes are finished. The 2 pieces are joined and the body worked in the round as far as the split in each side. Stitches are knitted up around the armholes and the sleeves worked in the round with short circular needle/double pointed needles. The neck is worked in the round to finish. BACK PIECE: Cast on 39-39-43-43-47-47 stitches with circular needle size 4 mm and DROPS Lima. Purl 1 row from the wrong side. Work as follows from the right side: A.1, 15-15-19-19-23-23 stocking stitches, A.2. AT THE SAME TIME increase AFTER A.1 (from the right side) and BEFORE A.2 – read INCREASE TIP FROM RIGHT SIDE. On the next row (wrong side) increase after A.2 and before A.1 – read INCREASE TIP FROM WRONG SIDE. Continue increasing from both the right and wrong side a total of 34-38-40-44-46-50 times. After the last increase there are 107-115-123-131-139-147 stitches. Continue with stocking stitch, A.1 and A.2 on each side. When you have worked 4 rows, insert 1 marker in each side. Continue the pattern until the piece measures 15-16-16-17-18-19 cm from the marker. Cut the strand, place the stitches on a thread or another needle, and knit the front piece as explained below. FRONT PIECE: Start on the left shoulder (when the garment is worn) – see sketch. Knit up 34-38-40-44-46-50 stitches inside 1 stitch along the left shoulder on back piece (knit up evenly between the neck and the marker in the side). Purl 1 row from the wrong side then work as follows from the right side: Work stocking stitch until there are 12 stitches left, A.2. When the piece measures 7 cm from the knitted-up stitches, increase for the neck at the beginning of each row from the right side as above, increasing after 3 stitches (increase only from right side). Increase 1 stitch 4 times = 38-42-44-48-50-54 stitches. Purl back from the wrong side, cut the strand and place the stitches on a thread or another needle. Work the right front shoulder as follows: Knit up 34-38-40-44-46-50 stitches inside 1 stitch along the back right shoulder (knit up evenly between the marker in the side and the neck). Purl 1 row from the wrong side, then work as follows from the right side: Work A.1, then stocking stitch to the end of the row. When the piece measures 7 cm from the knitted-up stitches, increase for the neck at the end of each row from the right side as above, increasing before 3 stitches (increase only from right side). Increase 1 stitch 4 times = 38-42-44-48-50-54 stitches. Purl back from the wrong side. Work next row from the right side as follows: Work as before over the 38-42-44-48-50-54 stitches on the right front shoulder, cast on 31-31-35-35-39-39 stitches for the neck, work as before over the 38-42-44-48-50-54 stitches from the front left shoulder = 107-115-123-131-139-147 stitches. Continue with stocking stitch and pattern back and forth until the front piece measures 25-26-28-29-30-31 cm, finishing after a row from the wrong side. Now join the front and back pieces for the body. BODY: Work the 107-115-123-131-139-147 stitches from the front piece, cast on 6-6-10-10-14-18 stitches (under the sleeve), work the 107-115-123-131-139-147 stitches from the back piece, cast on 6-6-10-10-14-18 stitches = 226-242-266-282-306-330 stitches. Continue in the round, with stocking stitch, A.1 and A.2 until the piece measures approx. 44-46-48-50-52-54 cm, measured from the top of the shoulder (finish after a repeat of A.1/A.2 in height). Place the last 113-121-133-141-153-165 stitches on a thread for the back piece and work the front piece back and forth as follows: Change to circular needle size 3 mm, work 2 GARTER STITCHES – read description above, knit 0-0-2-2-0-2, purl 2-2-2-2-2-2, knit 2-2-2-2-2-2, purl 0-0-0-0-2-2, knit 0-0-0-0-2-2, A.3, work stocking stitch over the next 87-95-103-111-119-127 stitches and increase 47-51-55-59-63-71 stitches evenly spaced (= 134-146-158-170-182-198 stitches after increases), A.3, knit 0-0-0-0-2-2, purl 0-0-0-0-2-2, knit 2-2-2-2-2-2, purl 2-2-2-2-2-2, knit 0-0-2-2-0-2 and 2 garter stitches = 160-172-188-200-216-236 stitches. Work back from the wrong side: 2 garter stitches, purl 0-0-2-2-0-2, knit 2-2-2-2-2-2, purl 2-2-2-2-2-2, knit 0-0-0-0-2-2, purl 0-0-0-0-2-2, A.3, * purl 2, knit 2 *, work from *-* until there are 15-15-17-17-19-21 stitches left, purl 2, A.3, purl 0-0-0-0-2-2, knit 0-0-0-0-2-2, purl 2-2-2-2-2-2, knit 2-2-2-2-2-2, purl 0-0-2-2-0-2 and 2 garter stitches. Continue this rib for 16 cm. Cast off. Work the back piece in the same way. LEFT SLEEVE: Using circular needle size 4 mm, knit up from the right side 53-55-59-61-63-65 stitches from the bottom of the armhole and up the front piece to the shoulder, then 32-34-34-36-38-40 stitches from the shoulder and down the back piece = 85-89-93-97-101-105 stitches. Insert 1 marker in the middle of the stitches picked up. Work now back and forth in stocking stitch with short rows for the sleeve cap, to gives a better shape to the sleeve. 1st row (from wrong side): work to 18 stitches after marker, turn. 2nd row (from right side): work to 18 stitches after marker, turn. 3rd row (from wrong side): work to 22 stitches after marker, turn. 4th row (from right side): work to 22 stitches after marker, turn. 5th row (from wrong side): work to 26 stitches after marker, turn. 6th row (from right side): work to 26 stitches after marker, turn. 7th row (from wrong side): work to the beginning of the row. Work stocking stitch back and forth until sleeve measures 4-4-5-5-6-7 cm, measure from where the stitches were picked up (all length are measured mid on top of sleeve). Now join the sleeve and continue in the round with short circular needle/double pointed needles size 4 mm. Insert 1 marker-thread at the beginning of the round (mid-under sleeve). Allow the thread to follow your work onwards. Start at the marker-thread and work stocking stitch. When the sleeve measures 6-6-7-7-8-9 cm, decrease 2 stitches under the sleeve – read DECREASE TIP. Decrease like this every 2½-2-1½--1½-1½-1 cm a total of 12-13-14-15-16-17 times = 61-63-65-67-69-71 stitches. Continue working until the sleeve measures 37-36-34-34-32-30 cm from the knitted-up stitches. There is approx. 10 cm left; try the jumper on and work to desired length before the rib. Knit 1 round and increase 20-18-16-23-21-19 stitches evenly spaced = 81-81-81-90-90-90 stitches. Change to double pointed needles size 3 mm. Work A.4 for 10 cm. Cast off a little loosely. The sleeve measures approx. 48-47-46-46-45-44 cm. RIGHT SLEEVE: Work the other sleeve in the same way but, when knitting up stitches, knit up 32-34-34-36-38-40 stitches from the bottom of the armhole and up the back piece, then 53-55-59-61-63-65 stitches from the shoulder down the front piece. Sew together the openings under each sleeve – see sketch. NECK: Start on one shoulder and knit up from the right side (inside 1 stitch) 104 to 120 stitches, using short circular needle size 3 mm. The stitch count must be divisible by 4. Work rib in the round (knit 2, purl 2) for 9 cm. Cast off. If you want a double neck, fold the neck to the inside and fasten with a couple of stitches by each shoulder. |
|||||||||||||||||||||||||
Diagram explanations |
|||||||||||||||||||||||||
|
|||||||||||||||||||||||||
|
|||||||||||||||||||||||||
|
|||||||||||||||||||||||||
|
|||||||||||||||||||||||||

|
|||||||||||||||||||||||||
|
Have you made this or any other of our designs? Tag your pictures in social media with #dropsdesign so we can see them! Do you need help with this pattern?You'll find tutorial videos, a Comments/Questions area and more by visiting the pattern on garnstudio.com. © 1982-2024 DROPS Design A/S. We reserve all rights. This document, including all its sub-sections, has copyrights. Read more about what you can do with our patterns at the bottom of each pattern on our site. |
|||||||||||||||||||||||||


With over 40 years in knitting and crochet design, DROPS Design offers one of the most extensive collections of free patterns on the internet - translated to 17 languages. As of today we count 304 catalogues and 11422 patterns - 11422 of which are translated into English (UK/cm).
We work hard to bring you the best knitting and crochet have to offer, inspiration and advice as well as great quality yarns at incredible prices! Would you like to use our patterns for other than personal use? You can read what you are allowed to do in the Copyright text at the bottom of all our patterns. Happy crafting!
Comments / Questions (32)
Hallo! Ich bin jetzt da wo rechtes und linkes Vorderteil zusammen auf eine Nadel kommen (mit Halsausschnitt in der Mitte), da heißt es in der Anleitung: Dann glatt rechts und im Muster wie zuvor in Hin- und Rück-Reihen stricken. In dieser Weise weiterarbeiten, bis die Arbeit eine Länge von 25-26-28-29-30-31 cm hat, nach einer Rück-Reihe enden. Von wo werden die 26 cm (bei Größe M) gemessen? Vom Halsausschnitt? VG Birgit
04.05.2024 - 17:32DROPS Design answered:
Liebe Frau Jessen, die 26 cm messen Sie an der Kante beim Armloch, vom Anfang der Schulter an; siehe auch 14. Foto bei dieser Lektion (15 cm in der Lektion). Viel Spaß beim Stricken!
06.05.2024 - 08:12Ich verstehe nicht wo genau die Markierung am Ärmel angebracht werden soll. In der Anleitung steht „1 Markierer in der mittleren der aufgefassten Masche anbringen“ Soll das heißen oben an der Schulter mittig aller aufgefassten Maschen ? Vielen Dank
04.04.2024 - 19:12DROPS Design answered:
Liebe Janna, ja genau, dh in der mittleren Maschen von den 85-89-93-97-101-105 Maschen die aufgefassen wurde, die Markierung wird ganz oben am Schulter sein. Viel Spaß beim Stricken!
05.04.2024 - 08:05I think the key for the chart is incorrect. The mock cable should be flanked by 2 reverse stockinette stitches each side and therefore the X in the key for the chart should read "purl on right side, knit on wrong side" Can you confirm please? Thanks
26.02.2024 - 09:43DROPS Design answered:
That's the case, the x are for the reversed stocking stitch, so that there are P2 on each side of the mock cable, then depending of the diagram (eg where you will work the mock cables) you will have a different number of sts in stocking stitch on either side of these P2. Happy knitting!
26.02.2024 - 13:45Hej! Jag gör den minsta storleken S. Har nu kommit till framstycket och gjort halsringningen fram. Man ska sedan fortsätta tills \"arbetet mäter 25 cm\" och sedan sätta ihop fram- och bakstycket. Jag undrar varifrån man ska mäta, från axeln halsringningen eller vad? Verkar mest rimligt att man ska mäta från halsringningen, eftersom bakstyckets övre fläta på bilderna ligger bakom axeln. Men jag blir lite osäker, tacksam för hjälp!
07.02.2024 - 13:45DROPS Design answered:
Hei Liliane. Ja, fra halsringningen :) mvh DROPS Design
16.02.2024 - 09:11Bonjour, après les rangs raccourcis du haut de la manche, il est dit de continuer en aller-retour en commençant par un rang envers (dans la traduction française). Or le rang précédent (7) se faisant déjà sur l'envers, le suivant (8) ne devrait-il pas être logiquement un rang sur l'endroit ? Merci pour votre réponse.
25.01.2024 - 17:24DROPS Design answered:
Bonjour Emmanuelle, c'est exact, après les rangs raccourcis, on continue en jersey, en commençant sur l'endroit, merci pour l'info, correction faite. Bon tricot!
26.01.2024 - 08:39I don’t think my question was clear: are there increases before the ribbing on the back the same as the front? Same number of stitches? The pattern does not indicate an ncrease. Many thanks
09.12.2023 - 01:57DROPS Design answered:
Dear Jessie, yes, you knit the back like you have knitted the front. Same number of stitches and the same increases. Happy Knitting!
10.12.2023 - 21:19Zitat : "PULLOVER – KURZBESCHREIBUNG DER ARBEIT: Der Pullover wird glatt rechts mit 1 Faden von jeder Garnqualität in Streifen gestrickt." Da stimmt doch der Text nicht. Wir haben weder 2 Garne, noch Streifen bei diesem Modell. Oder ?
05.12.2023 - 09:46Body there is an increase of stitches just before the ribbing for the front. Is there a similar increase for the back or stay with the same number of stitches?
03.12.2023 - 23:10DROPS Design answered:
Dear Mrs Davies, correct you will work the back piece the same way as you worked the rib for front piece. Happy knitting!
04.12.2023 - 08:40Hallo! Mir ist da was aufgefallen und wollte fragen, ob das korrekt ist. Ich stricke den Pullover in L und bin gerade bei dem Abschnitt, wo man im Rumpfteil auf Nadelgr. 3 gewechselt hat. Ich habe die Zunahmen gemacht und nun das erste Mal A4 gestrickt. Müsste es nun nicht mit 2Ma li weitergehen? So, wie es angegeben ist, hätte man am Übergang von A4 zum Rippenmuster nun 4 Ma re hintereinander, weil A4 ja bereits 2Ma re enthält.
12.11.2023 - 11:52DROPS Design answered:
Liebe Elisabeth, eine Korrektur erfolgt hier bei der Zunahmen kurz vor der Passe, und dann im Diagram A.5 sowie die Maschenanzahl bei der 1. Reihe der Passe. Viel Spaß beim stricken!
07.12.2023 - 08:32Hello! I need some clarification please I am at the back piece. When I increase on both RS and WS. Do I continue to increasing and repeat the A1 and A2 pattern from 1row to 4row too ? OR do I just do increases until my 115 stitches? Thank you! "Continue increasing from both the right and wrong side a total of 34-38-40-44-46-50 times. After the last increase there are 107-115-123-131-139-147 stitches. Continue with stocking stitch, A.1 and A.2 on each side. "
01.11.2023 - 20:12DROPS Design answered:
Dear Mimi, you will continue increasing from both right side and wrong side = every row until you have increased a total of 38 times in size M, you will have then 115 sts on needle. At the same time continue working A.1 and A.2, repeat the 4 rows in diagram. Happy knitting!
02.11.2023 - 17:32