
Popular categories
Looking for a yarn?


|
||||||||||||||||||||||||||||||||||||||||
Variety |
||||||||||||||||||||||||||||||||||||||||
 |
 |
|||||||||||||||||||||||||||||||||||||||
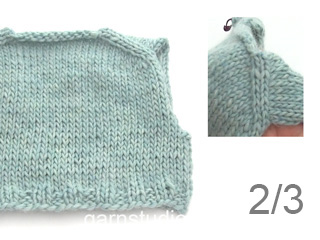
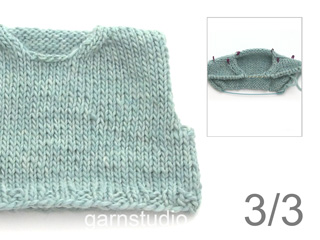
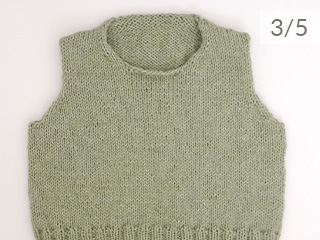
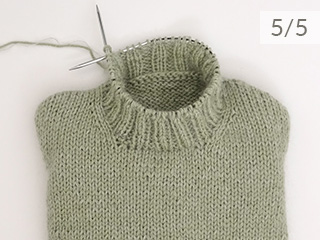
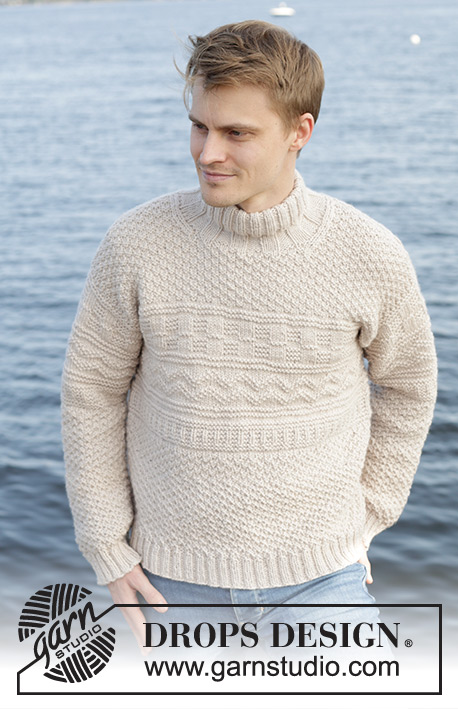
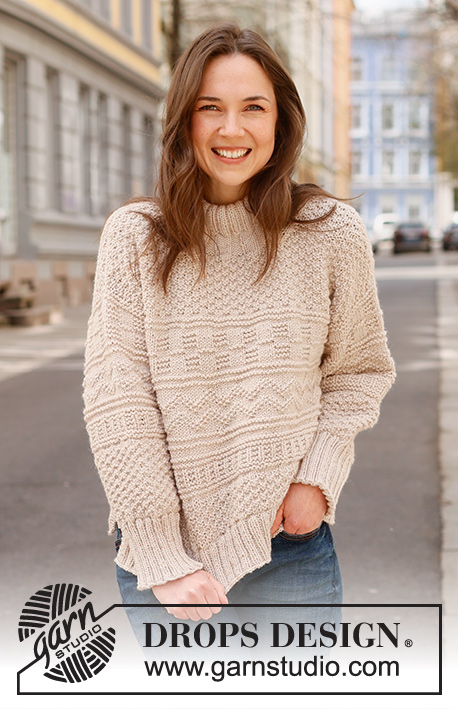
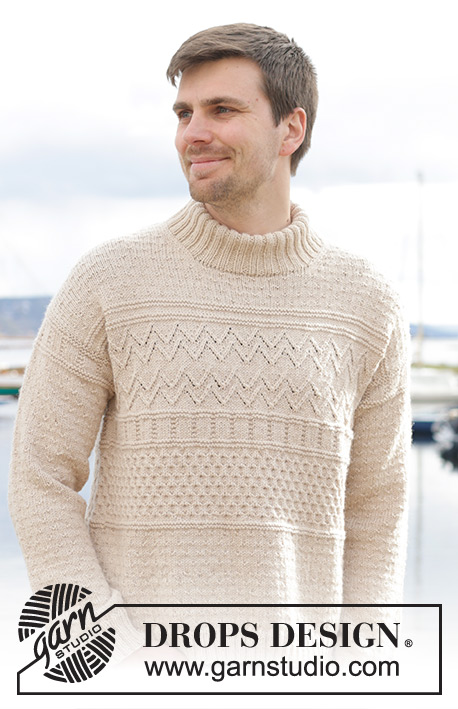
Knitted jumper for men in DROPS Lima or DROPS Karisma. The piece is worked top down, with European/diagonal shoulders, relief pattern and double neck. Sizes S - XXXL.
DROPS 233-24 |
||||||||||||||||||||||||||||||||||||||||
|
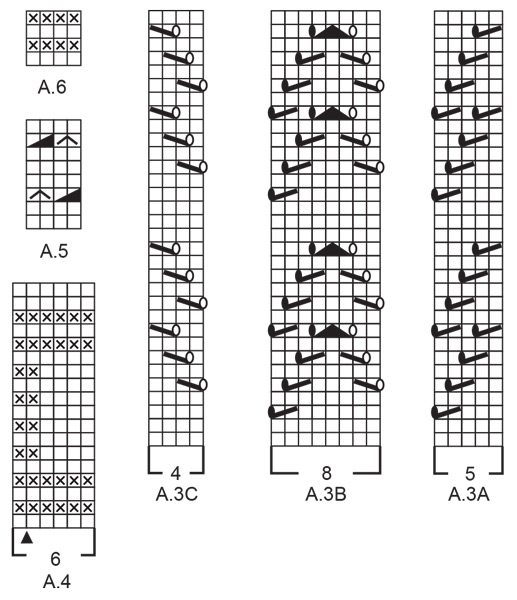
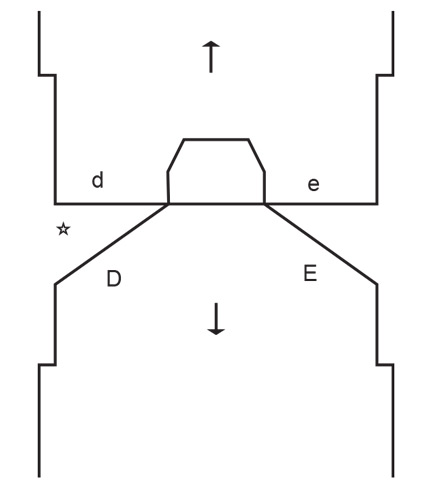
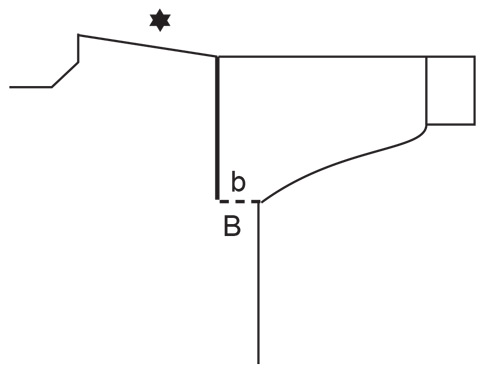
------------------------------------------------------- EXPLANATIONS FOR THE PATTERN: ------------------------------------------------------- PATTERN: See diagrams A.1 to A.6. The diagrams show all rows in the pattern from the right side. INCREASE TIP FROM THE RIGHT SIDE: AFTER MARKER: The new stitch twists to the left. Use the left needle to pick up the strand between 2 stitches from the previous row, pick up strand from the front and knit the back loop. BEFORE MARKER: The new stitch twists to the right. Use the left needle to pick up the strand between 2 stitches from the previous row, pick up strand from behind and knit the front loop. INCREASE TIP FROM THE WRONG SIDE: AFTER MARKER: The new stitch twists to the left. Use the left needle to pick up the strand between 2 stitches from the previous row, pick up strand from the back and purl the front loop. BEFORE MARKER: The new stitch twists to the right. Use the left needle to pick up the strand between 2 stitches from the previous row, pick up strand from the front and purl the back loop. DECREASE TIP (for sleeves): Decrease 1 stitch on either side of the marker-thread as follows: Work until there are 3 stitches left before the marker-thread, knit 2 together, knit 2 (marker-thread sits between these 2 stitches), slip 1 stitch knit-wise, knit 1 and pass the slipped stitch over the knitted stitch. ------------------------------------------------------- START THE PIECE HERE: ------------------------------------------------------- JUMPER – SHORT OVERVIEW OF THE PIECE: The upper part of back piece is worked back and forth with circular needle, top down until the armholes are finished. Stitches are knitted up along each shoulder for the front piece, then cast on for the neck and the front piece continued back and forth with circular needle until the armholes are finished. The front and back pieces are joined and the body is continued in the round with circular needle. Stitches are knitted up around the armholes, the sleeve caps worked back forth, then the sleeves are continued in the round with short circular needle/double pointed needles. The neck is worked to finish. BACK PIECE: Cast on 39-39-43-43-47-47 stitches with circular needle size 4 mm and DROPS Lima or DROPS Karisma. Purl 1 row from the wrong side. Insert 1 marker, inside the outermost 3 stitches on each side. The markers remain inside these 3 stitches onwards. Work the first row from the right side as follows: Work A.1A, increase AFTER the marker at the beginning of the row – read INCREASE TIP FROM THE RIGHT SIDE, work A.1B 8-8-9-9-10-10 times, A.1C and increase BEFORE the marker at the end of the row – remember INCREASE TIP FROM THE RIGHT SIDE. On the next row (wrong side) increase in the same way – read INCREASE TIP FROM THE WRONG SIDE. Continue the pattern and increase both from the right and wrong side a total of 30-34-36-40-42-46 times – work the increased stitches into A.1B, making sure there are at least 3 stocking stitches outermost on each side. REMEMBER THE KNITTING TENSION! NOTE: When A.1A, A.1B and A.1C are finished in height, repeat A.1 in height, with room for 4 more repeats of A.1B in width each time A.1 is repeated. After the last increase there are 99-107-115-123-131-139 stitches and the piece measures approx. 11-12-13-14-15-16 cm from the cast-on edge. Continue the pattern until the armholes measure 10-10-10-10-11-12 cm (the piece measures approx. 21-22-23-24-26-28 cm from the cast-on edge mid-back) – finish after a row from the wrong side. Work A.2 back and forth over all stitches. When A.2 is finished, work as follows from the right side: 1 stocking stitch, A.3A, A.3B 11-12-13-14-15-16 times, A.3C, 1 stocking stitch. Continue this pattern. When the armhole measures 19-20-20-21-22-23 cm, cut the strand and place the stitches on an extra needle or thread. The armholes are finished (A.3 is continued on the body). FRONT PIECE: Start on the right shoulder (when the garment is worn). Knit up from the right side 30-34-36-40-42-46 stitches inside 1 stitch along the right shoulder on back piece (i.e. knit up 1 stitch in each row along the top edge). Purl 1 row from the wrong side. Work the next row from the right side as follows (from the armhole): S, M, XXL and XXXL: 3 stocking stitches, work A.1B until there are 3 stitches left, 3 stocking stitches. L and XL: 3 stocking stitches, work A.1B until there are 5 stitches left, work the first 2 stitches in A.1B, 3 stocking stitches. ALL SIZES: Continue the pattern back and forth. When the piece measures 5 cm from the shoulder, increase 1 stitch for the neck before the 3 last stitches on each row from the right side, remember INCREASE TIP FROM THE RIGHT SIDE! Increase like this a total of 6-6-7-7-8-8 times – work the increased stitches into A.1B, making sure you have at least 3 stocking stitches outermost by the neck. After the last increase there are 36-40-43-47-50-54 stitches. Cut the strand after the final increase from the right side. Place the stitches on an extra needle or thread and work the left front shoulder. Knit up from the right side 30-34-36-40-42-46 stitches inside 1 stitch along the left back shoulder (i.e. knit up 1 stitch in each row along the top edge). Purl 1 row from the wrong side. Work the next row from the right side as follows (from the neck): S, M, XXL and XXXL: 3 stocking stitches, work A.1D until there are 3 stitches left, 3 stocking stitches. L and XL: 3 stocking stitches, work A.1E until there are 5 stitches left, work the first 2 stitches in A.1E, 3 stocking stitches. ALL SIZES: Continue the pattern back and forth. When the piece measures 5 cm from the shoulder, increase 1 stitch for the neck after the 3 first stitches on each row from the right side, remember INCREASE TIP FROM THE RIGHT SIDE! Increase like this a total of 6-6-7-7-8-8 times – work the increased stitches into A.1D/A.1E, making sure you have at least 3 stocking stitches outermost by the neck. After the last increase there are 36-40-43-47-50-54 stitches. Work the next row from the wrong side as follows: Work pattern as before over the 36-40-43-47-50-54 stitches from the left front piece, cast on 27-27-29-29-31-31 stitches for the neck, work pattern as before over the 36-40-43-47-50-54 stitches from the right front piece = 99-107-115-123-131-139 stitches. Continue A.1 back and forth until the piece measures 16-16-18-18-19-20 cm from the shoulder – finish after a row from the wrong side as on the back piece. Insert 1 marker outermost on the armhole, 3-3-4-4-4-4 cm below the knitted up stitches on the shoulder. Control the length of the garment by folding it at the longest point, innermost on the shoulder and the marker on the armhole, to make sure A.1 matches in length on the front and back pieces. This is important so the pattern matches at the sides when the pieces are joined. Adjust the length of A.1 if necessary. Work A.2 back and forth over all stitches. When A.2 is finished, work the next row from the right side as follows: 1 stocking stitch, A.3A, A.3B 11-12-13-14-15-16 times, A.3C, 1 stocking stitch. Continue this pattern until the piece measures 25-26-28-29-30-31 cm, measured along the armhole (A.3 is continued on the body, finish on the same row as on the back piece so the pattern matches when the pieces are joined). The pieces are now joined for the body as described below. BODY: Work pattern as before over the 99-107-115-123-131-139 stitches on the front piece, cast on 6-6-8-8-10-14 stitches (in side under sleeve), work pattern as before over the 99-107-115-123-131-139 stitches from the back piece, cast on 6-6-8-8-10-14 stitches (in side under sleeve) = 210-226-246-262-282-306 stitches. Finish A.3 in the round – the cast-on stitches under each sleeve are worked in stocking stitch until A.3 is finished. Work A.4 – AT THE SAME TIME, on the first round increase 0-2-0-2-0-0 stitches evenly spaced = 210-228-246-264-282-306 stitches. On the next-to-last round in A.4, increase 30-32-34-36-38-38 stitches evenly spaced = 240-260-280-300-320-344 stitches (this is because the pattern contracts the piece). When A.4 is finished, work A.5 over all stitches. Repeat A.5 in height until the piece measures 41-43-45-46-46-48 cm from the highest part of the shoulder by the neck (A.5 is worked approx. 3-4-4-4-4-4 times in height and the body measures approx. 19-21-21-20-20-20 cm from the cast-on stitches in each side). On the last round in A.5, decrease 28-32-36-36-40-40 stitches evenly spaced = 212-228-244-264-280-304 stitches. Work A.6 over all stitches. When A.6 is finished, work A.1B over all stitches and until the piece measures 57-59-61-63-65-67 cm from the highest part of the shoulder by the neck – finish after 2 or 3 rounds of stocking stitch after a purled round. Knit 1 round and increase 40-44-48-52-60-60 stitches evenly spaced = 252-272-292-316-340-364 stitches. Change to circular needle size 3 mm. Work rib (knit 2, purl 2) for 5 cm. Cast off a little loosely. The jumper measures approx. 62-64-66-68-70-72 cm, measured from the highest point on the front piece. RIGHT SLEEVE: Use circular needle size 4 mm and knit up, from the right side, 40-42-42-44-46-48 stitches from the bottom of the armhole, up the back piece to the top of the shoulder and 52-54-58-60-62-64 stitches from the shoulder, down the front piece to the bottom of the armhole = 92-96-100-104-108-112 stitches. Insert 1 marker-thread in the middle of the row – this is used when counting out for the start of the pattern and also to measure from. Start on the wrong side with row 2 in A.4, work back and forth – the marker-thread should match the symbol in A.4. When the sleeve measures 1-1-2-2-2-3 cm, join the piece and finish the sleeve in the round with short circular needle/double pointed needles. When A.4 is finished, work A.1B. When the sleeve measures 3-5-3-6-5-2 cm from the join, decrease 2 stitches mid-under the sleeve – read DECREASE TIP. Decrease like this every 2½-2-2-1½-1½-1½ cm a total of 19-21-22-23-25-26 times = 54-54-56-58-58-60 stitches. Work until the sleeve measures 51-50-48-47-46-44 cm from the join. There is 5 cm left; try the jumper on and work to desired length before the rib. Knit 1 round and increase 18-18-20-18-18-20 stitches evenly spaced = 72-72-76-76-76-80 stitches. Change to double pointed needles size 3 mm. Work rib (knit 2, purl 2) for 5 cm. Cast off a little loosely. The sleeve measures approx. 57-56-55-54-53-52 cm from the knitted-up stitches. Sew the bottom of the armhole – see sketch. LEFT SLEEVE: Use circular needle size 4 mm and knit up from the right side 52-54-58-60-62-64 stitches from the bottom of the armhole and up the front piece, then 40-42-42-44-46-48 stitches from the shoulder down the back piece = 92-96-100-104-108-112 stitches. Insert a marker-thread in the middle of the row. Now work the sleeve in the same way as the right sleeve. NECK: Start on one shoulder and knit up from the right side, inside 1 edge stitch, 116 to 136 stitches with short circular needle size 3 mm. The stitch-number should be divisible by 4. Work rib in the round (knit 2, purl 2) for 12 cm. Fold the neck double to the inside and fasten with 1 stitch at each shoulder. |
||||||||||||||||||||||||||||||||||||||||
Diagram explanations |
||||||||||||||||||||||||||||||||||||||||
|
||||||||||||||||||||||||||||||||||||||||

|
||||||||||||||||||||||||||||||||||||||||
|
||||||||||||||||||||||||||||||||||||||||
|
||||||||||||||||||||||||||||||||||||||||
|
||||||||||||||||||||||||||||||||||||||||

|
||||||||||||||||||||||||||||||||||||||||
|
Have you made this or any other of our designs? Tag your pictures in social media with #dropsdesign so we can see them! Do you need help with this pattern?You'll find tutorial videos, a Comments/Questions area and more by visiting the pattern on garnstudio.com. © 1982-2024 DROPS Design A/S. We reserve all rights. This document, including all its sub-sections, has copyrights. Read more about what you can do with our patterns at the bottom of each pattern on our site. |
||||||||||||||||||||||||||||||||||||||||


With over 40 years in knitting and crochet design, DROPS Design offers one of the most extensive collections of free patterns on the internet - translated to 17 languages. As of today we count 304 catalogues and 11422 patterns - 11422 of which are translated into English (UK/cm).
We work hard to bring you the best knitting and crochet have to offer, inspiration and advice as well as great quality yarns at incredible prices! Would you like to use our patterns for other than personal use? You can read what you are allowed to do in the Copyright text at the bottom of all our patterns. Happy crafting!
Comments / Questions (10)
Quand c’est écrit de continuer À.1 , quel est ce À. 1 ?
30.03.2024 - 16:04DROPS Design answered:
Bonjour Mme Dufresne, les diagrammes sont numérotés à partir de A.1 jusqu'à A.6, autrement dit, lorsque vous tricotez A.1, reportez-vous au diagramme correspondant en bas de la page: soit A.1A, A.1B, A.1C. Bon tricot!
02.04.2024 - 14:28Bonjour, j'ai un doute concernant le relevage des mailles de l'emmanchure. Je pars du bas, mais nous avons une dizaine de mailles horizontales sous l'emmanchure. Doit on partir du milieu de ce "plat" pour remonter en relevant les mailles de la manche ? Merci :)
28.03.2024 - 14:33DROPS Design answered:
Bonjour Mme Billat, on ne relève pas de mailles dans celles montées lorsque l'on a réunit le dos et le devant, les premiers centimètres de la manche seront ensuite cousu le long de ces mailles - cf b et B dans le schéma. Bon tricot!
02.04.2024 - 13:46Hello again, thank you for your reply to my first question. I have another problem. I have followed instructions for the back until the armhole measures 20cm (finishing after row 18 of A3) and have knitted the front until the armhole measures 16cm. I don’t understand instructions to control the length? On the back the armhole knitted in A1 is 10cm but on the front it is 16cm. How can the pattern match? Please help!
20.01.2024 - 17:38DROPS Design answered:
Dear Alison, the front piece is longer than the back piece, armhole on front piece will be 26 cm (to get a total of 23 cm for the armhole when jumper is done), work the different diagram exactly as explained to get the pattern matching. Happy knitting!
22.01.2024 - 08:28Hello Can you please help me with A3A, A3B and A3C? I don’t understand the pattern. What do I do when there is a black line over two stitches before make 1 yarn over?
10.01.2024 - 20:46DROPS Design answered:
Hi Alison, The diagonal lines over 2 squares mean "K2 together" when the line goes from bottom left to top right, and "slip 1 stitch knit-wise, knit 1 and pass slipped stitch over" when the line goes from top left to bottom right. Happy knitting!
11.01.2024 - 07:44Det står att halskanten ska vikas in och sys med ”en maska i varje axel”. Halskanten ska väl sys fast hela vägen runt om?
06.01.2024 - 14:03DROPS Design answered:
Hej Carina, det har vi ikke gjort, men det må du selvfølgelig gerne, sørg for at du ikke syr for stramt i så fald :)
11.01.2024 - 14:34Under afsnittet \"forstykket\" \"alle størrelser\" styr der følgende \"Fortsæt A.1 frem og tilbage til arbejdet måler ca 16-16-18-18-19-20 cm fra hvor der blev strikket masker op – afslut efter en pind fra vrangen som på bagstykket. \" \r\nMen der er ikke noget diagram A.1 når jeg kigger i diagrammerne? hvad menes der med dette? \r\nmvh Kim
30.11.2023 - 18:38Jeg har strikket trøjen i str. Xl i Drops Karisma og har 5 nøgler til overs, trods det, at jeg "kun" købte 22 nøgler (opskriften siger 1150 gr svarende til 23 nøgler) Var omkring virkelig mange webshops for at få 22 nøgler i samme indfarvning, hvilket så overhovedet ikke var nødvendigt.... Men trøjen blev mega flot (mærk lilla) og er til stor glæde for yngste - sønnen ❤️
09.11.2023 - 21:42What chest sizes are S -M - L - XL - XXL - XXXL? I would like to knit this jumper for size 38 / 40 inch chest and not sure which size to use. Also, can you advise me how much wool is needed? eg is 1000g (ie 20 x 50g balls) the right amount to buy in yarn group B?
08.08.2023 - 17:44DROPS Design answered:
Dear Mrs Riley, you will find the finished measurements in the measurement chart at the bottom of the pattern page; all measurements are taken flat from side to side - measure a similar garment he likes the shape and compare to the measurements in the chart to find out the appropriate size. Read more here. To get the correct amount of balls you have to divide the total weight with 50 g, but if you like to use another yarn group B, make sure you will get enough yarn by using the yarn converter. Happy knitting!
09.08.2023 - 08:04Kære DropsDesign Jeg skal til at strikke denne trøje, men kan ikke finde: 1: måleskitsen, som plejer at være nederst i opskriften. 2: samt diagram A1-A6 (under afsnittet med Halskant står der Diagram, men jeg kan ikke åbne disse diagrammer, hvis det er disse som skal bruges) Kan I hjælpe vil det glæde mig meget - tak vh Mette
23.07.2023 - 14:55DROPS Design answered:
Hei Mette. Ja, her manglet det tekst/målskisse/diagrammer på den danske siden. Takk for at du gjorde oss oppmerksom på dette. Dette er nå fikset. mvh DROPS Design
25.07.2023 - 09:25Bonjour, Continuer ainsi jusqu'à ce que l'emmanchure mesure 10-10-10-10-11-12 cm (l'ouvrage mesure environ 21-22-23-24-26-28 cm à partir du rang de montage au milieu dos) – arrêter après un rang sur l'envers. Pendant que je tricote jusqu’à l’emmanchure, est-ce que je continue à faire des augmentations? Merci d’avance! :)
27.05.2023 - 22:23DROPS Design answered:
Bonjour Phi, quand les augmentations sont terminées, vous devez avoir 99-107-115-123-131-139 mailles sur l'aiguille, vous tricotez maintenant sans augmenter la partie emmanchure sans augmenter davantage. Bon tricot!
30.05.2023 - 10:36