
Popular categories
Looking for a yarn?


Comments / Questions (18)
![]() Kathryn wrote:
Kathryn wrote:
Please disregard my last question. I have just followed the instructions and it works perfectly. Sorry...I panic very easily!
22.11.2024 - 21:16
![]() Kathryn wrote:
Kathryn wrote:
Hi there. In the A1 chart, is it really start with a purl? If I do that, I seem to be purling where there is a knit on the previous row. On the picture, it looks as if there if a column of knit between the hole made by the K3 tog and I can`t see how that works if you purl it on a knit stitch on the previous rib. Please clarify/convince me that it will work out. Thank you!
16.10.2024 - 22:58DROPS Design answered:
Dear Kathryn, I'll forward this to our design team but I would say you are right, at the beg of the row first knit the first stitch then repeat A.1 in the round so that A.1 is lined up with rib before. Thanks for noticing. Happy knitting!
17.10.2024 - 09:33
![]() Ugette Pronovost wrote:
Ugette Pronovost wrote:
J’ai un probleme avec l’echantillon… si 26 m= 10 cm.. comment se fait ‘ il que les 282 mailles du dos et devant donnent 92cm( 46x2) ? Ca devrait donner 108cm
28.08.2024 - 22:07DROPS Design answered:
Bonjour Mme Pronovost, les 282 mailles du montage sont tricotées en côtes avec les aiguilles 2,5, comme il faut davantage de mailles pour les côtes avec les petites aiguilles qu'en jersey avec les aiguilles 3, on va diminuer après A.1, il ne reste alors que 240 mailles soit 92 cm de circonférence et 46 cm quand on mesure à plat. Bon tricot!
29.08.2024 - 09:57
![]() Sylvie wrote:
Sylvie wrote:
Pour la 1ere augmentation des manches qui doit etre faite à 18 cm pour la taille M, faut-il mesurer les 18 cm à partir du rang de montage des manches ou à partir du 1er rang de jersey (le rang avec le fil marqueur)
18.06.2024 - 14:26
![]() Sylvie wrote:
Sylvie wrote:
Pour la 1ere augmentation des manches qui doit etre faite à 18 cm pour la taille M, faut-il mesurer les 18 cm à partir du rang de montage des manches ou à partir du 1er rang de jersey (le rang avec le fil marqueur)
18.06.2024 - 13:45DROPS Design answered:
Bonjour Sylvie, on mesure à partir du rang de montage. Bon tricot!
18.06.2024 - 15:22
![]() DOMINIQUE AMBROSET wrote:
DOMINIQUE AMBROSET wrote:
Bonjour Pour faire les manches j'ai pris deux aiguilles droites, faut il que je fasse aussi la fente à 47 cm et finir chaque côté jusqu'à 50 cm Merci pour votre réponse Mme AMBROSET
10.04.2024 - 17:50DROPS Design answered:
Bonjour Mme Ambroset, si vous avez choisi de tricoter les manches en allers et retours, placez un marqueur à 47 cm de hauteur totale (repère pour la couture de la tête de manche) et tricotez encore 3 cm (jusqu'à 50 cm de hauteur totale). Assemblez ensuite la manche comme dans le schéma + faites la couture sous la manche. Bon tricot!
11.04.2024 - 07:05
![]() DOMINIQUE AMBROSET wrote:
DOMINIQUE AMBROSET wrote:
Bonjour les manches se tricotent elles avec 4 aiguilles doubles pointes ? si ou je ne sais pas faire est il possible de les faire avec 2 aiguilles 2.5 et 3.5 et je ferai une couture Merci pour votre réponse. Mme AMBROSET
30.03.2024 - 17:54DROPS Design answered:
Bonjour Mme Ambroset, vous pouvez aussi tricoter les manches en rond, avec la technique du magic loop ou bien en rangs, montez alors 1 m lisière en plus de chaque côté pour les coutures (plus d'infos ici). Bon tricot!
02.04.2024 - 14:35
![]() DOMINIQUE AMBROSET wrote:
DOMINIQUE AMBROSET wrote:
Bonjour Je ne comprends pas le devant pour l'encolure, faut il que je fasse les 4 mailles sur l'aiguille annexe à chaque rang, le nombre ne correspond pas. et en même temps je dois diminuer pour les épaules. Merci pour vos explications. Mme AMBROSET
26.02.2024 - 17:56DROPS Design answered:
Bonjour Mme Ambroset, la division pour l'encolure V se fait via une torsade sur les 8 mailles centrales, ainsi vous tricotez les 55-73 premières mailles (cf taille), vous mettez les 4 m suivantes en attente sur une aiguille à torsades, tricotez les 4 mailles suivantes à l'endroit = devant gauche; vous tricotez maintenant le devant droit: tricotez les 4 mailles sur l'aiguille à torsades et terminez le rang, vous tricotez maintenant le devant droit en diminuant pour l'encolure puis rabattez les mailles de l'épaule comme indiqué, tricotez encore les 5 dernières mailles pour la bordure d'encolure, et reprenez le devant gauche pour le tricoter de la même façon. Bon tricot!
27.02.2024 - 08:02
![]() Lorelie wrote:
Lorelie wrote:
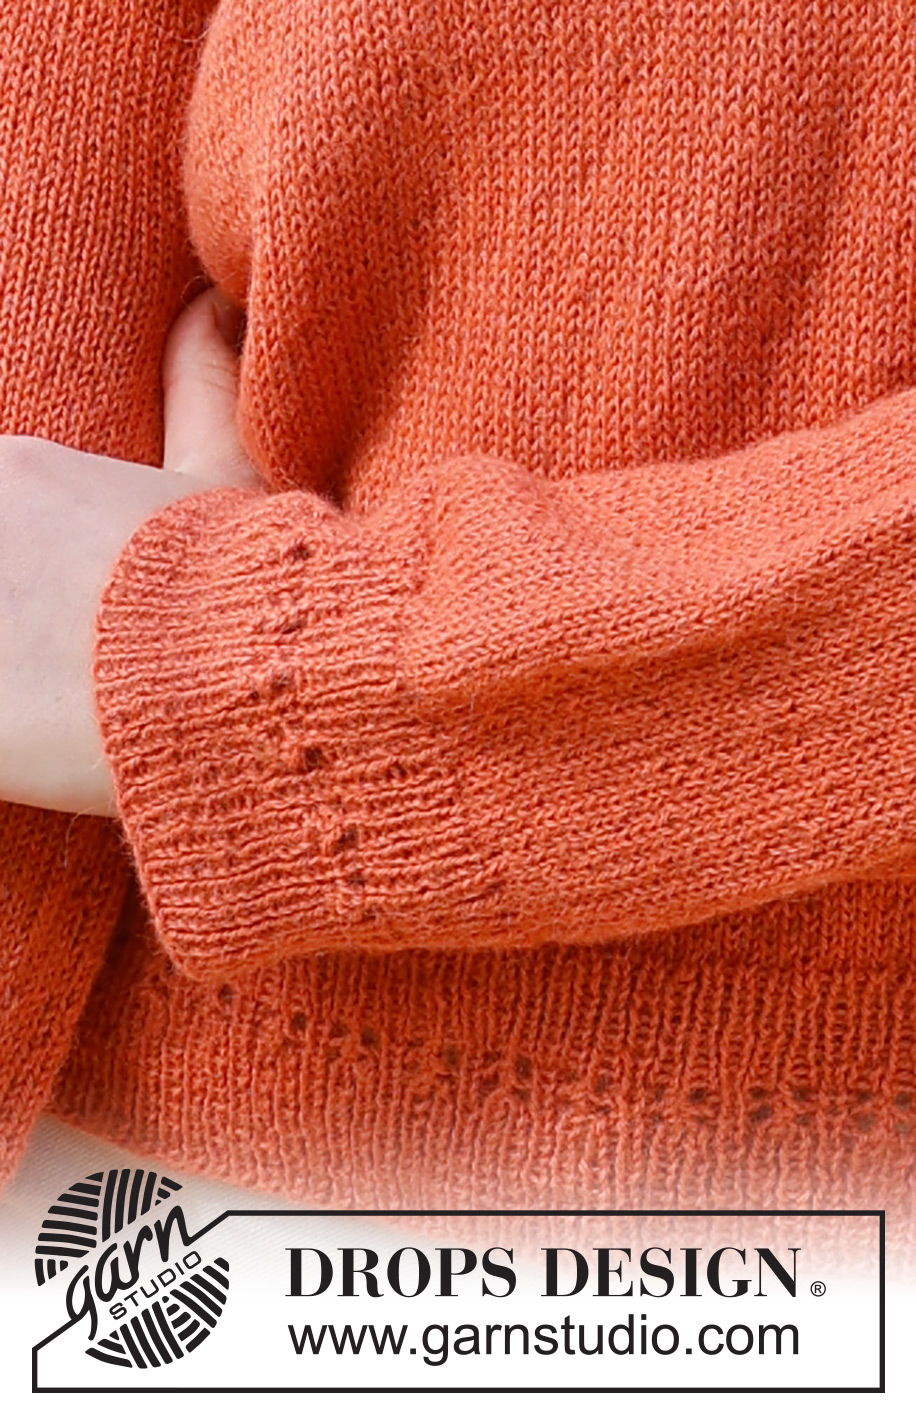
The simplicity drops pattern in the ribbing it has knit 3 together vertically, I believe it’s a decorative stitch. I would like a tutorial on how to do that. I would know how to knit 3 together but not vertically and also how to continue with the ribbing. Thank you, Lorelie
13.06.2023 - 16:34DROPS Design answered:
Dear Lorelie, the first row of A.1 is worked: *P1, K1, P1,K1,P1,K1* (over 6 sts), on 2nd row work: *P1, YO, K3 tog (see this video, time code 0:20), YO, P1, K1*, repeat from *-*. On next row work rib as on first row. And repeat the last 2 rows one more time. Happy knitting!
14.06.2023 - 07:25
![]() DOMINIQUE AMBROSET wrote:
DOMINIQUE AMBROSET wrote:
Bonjour Une fois que j'ai monté mes mailles sur l'aiguille circulaire il ne faut pas que mes mailles tournent. Quand je veux les mettre toutes dans le même sens, arrivée au début de mes mailles je suis obligée de tourner mon tricot et cela tourne mes mailles Comment faire pour que cela ne tourne pas ? Merci beaucoup pour votre réponse Mme AMBOSET
14.05.2023 - 17:05DROPS Design answered:
Bonjour Mme Ambroset, avant de tricoter la 1ère maille du tour, placez bien toutes vos mailles dans le même sens pour ne pas former de vrille, vérifiez le cas échéant encore une fois avant de tricoter la dernière maille (vous pourrez alors corriger toute vrille éventuelle) - votre magasin a peut-être une astuce qu'il saura vous partager (même par mail ou téléphone), c'est la technique que j'utilise personnellement. Bon tricot!
15.05.2023 - 08:50
|
|||||||||||||||||||
Simplicity#simplicitysweater |
|||||||||||||||||||
 |
 |
||||||||||||||||||
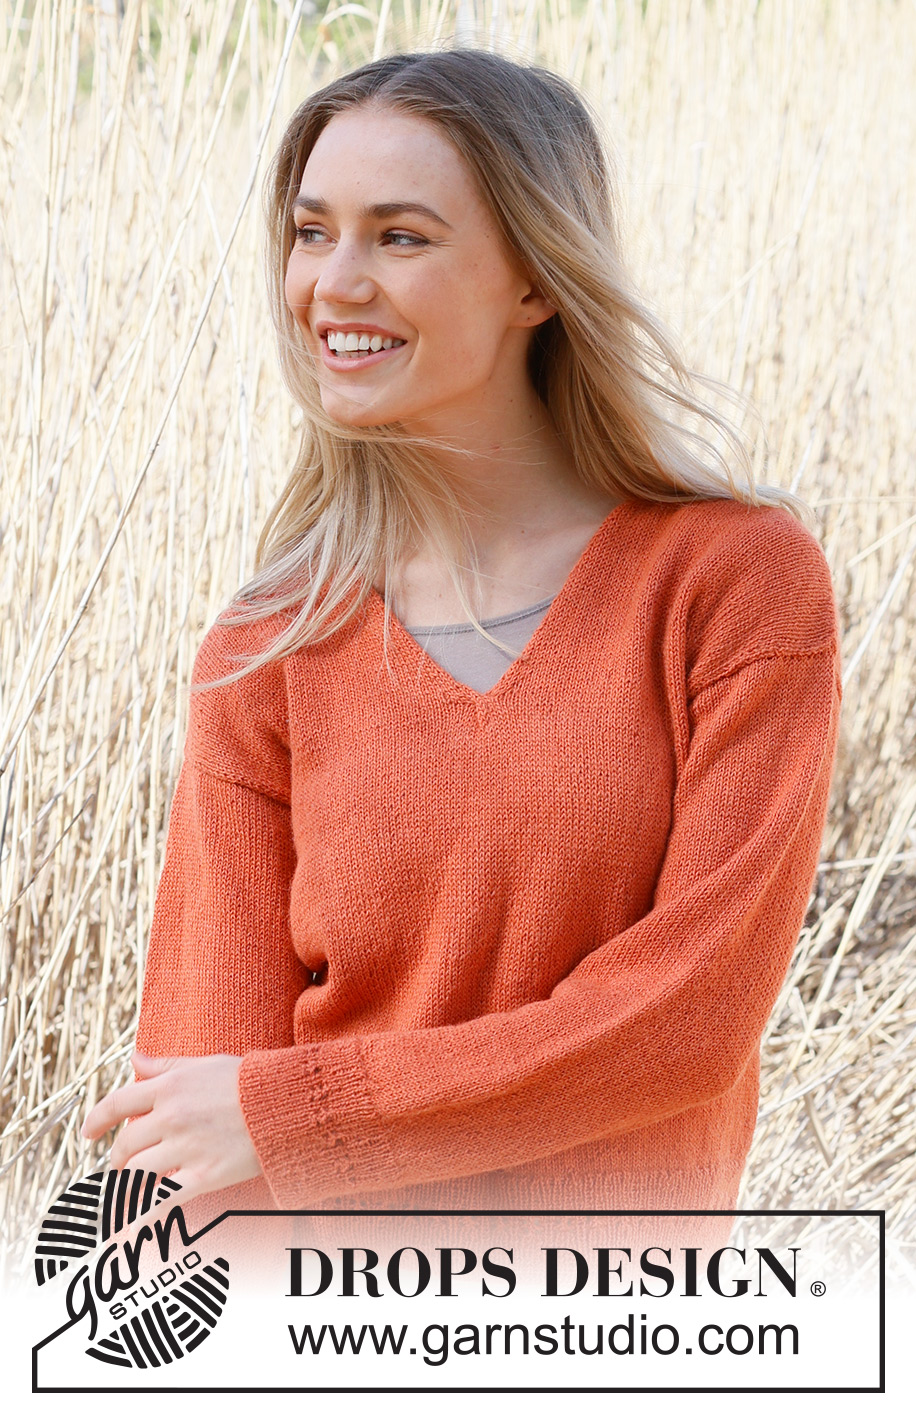
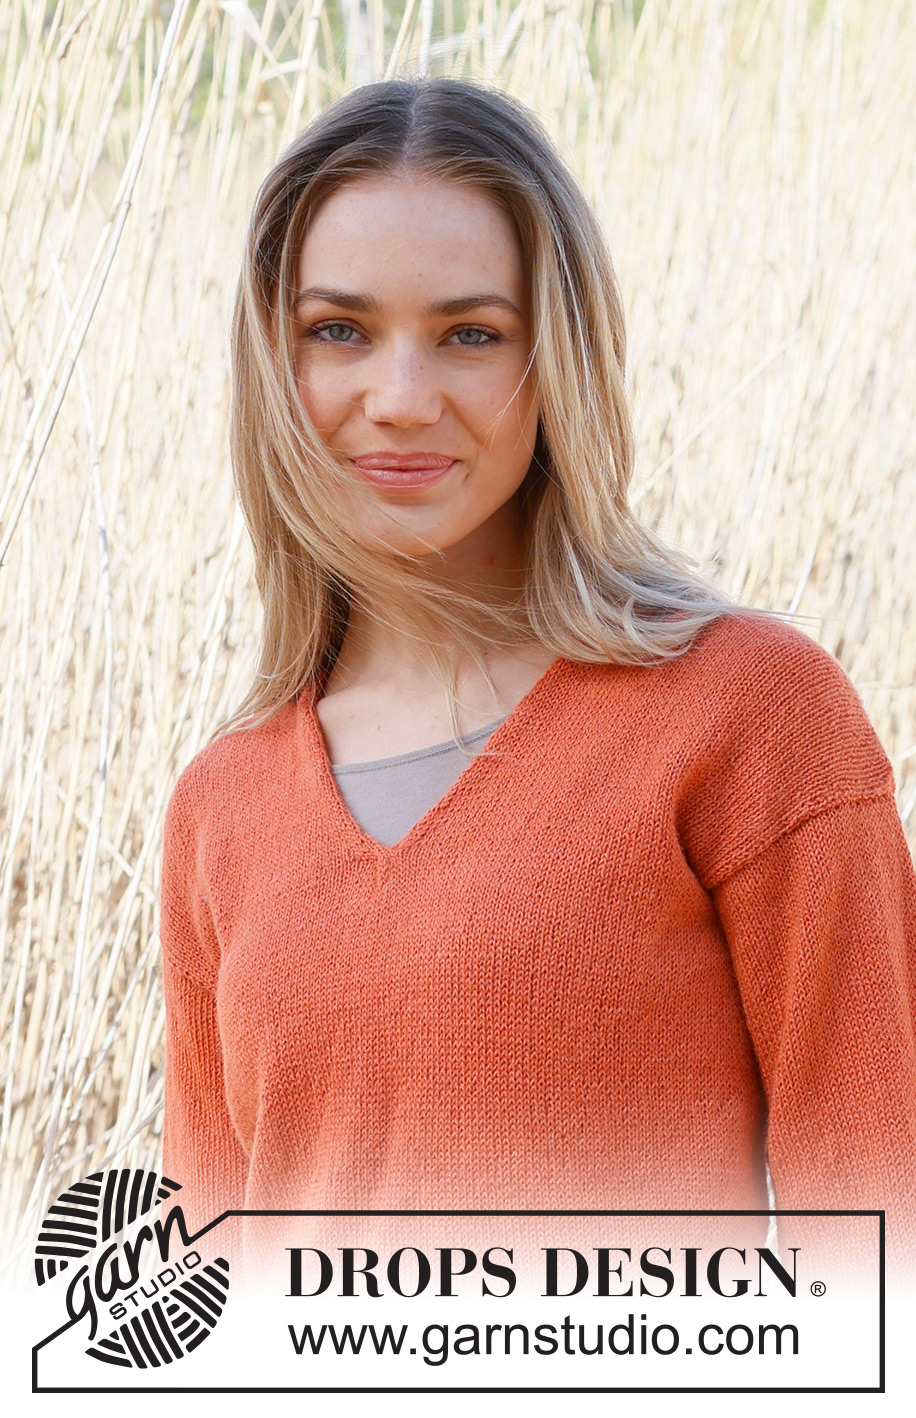
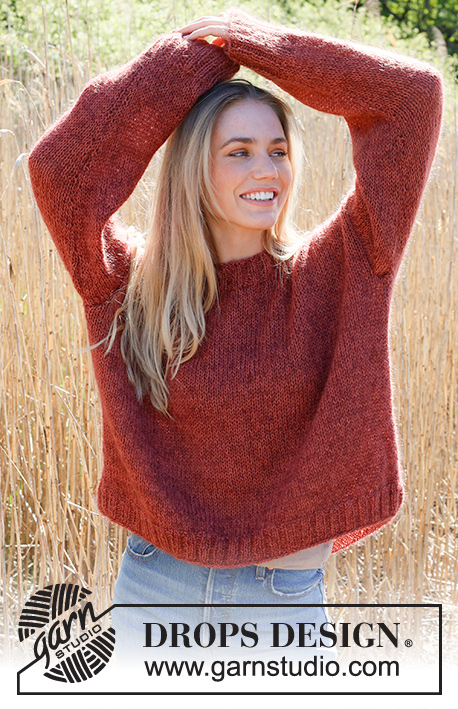
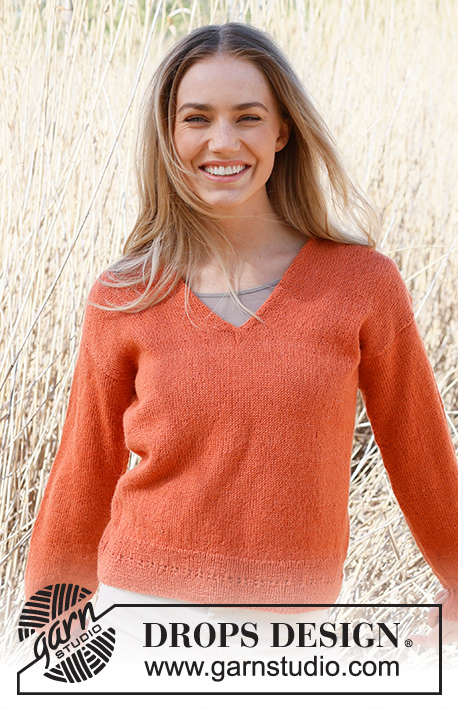
Knitted jumper in DROPS Alpaca. Piece is knitted bottom up in stocking stitch with V-neck. Size: S - XXXL
DROPS 236-38 |
|||||||||||||||||||
|
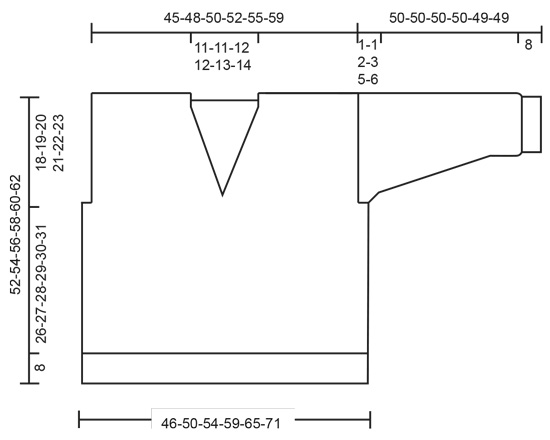
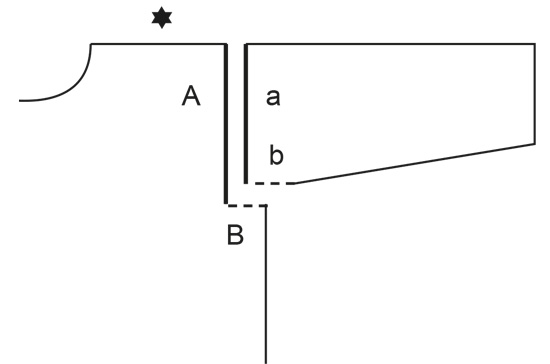
---------------------------------------------------------- EXPLANATION FOR THE PATTERN: ---------------------------------------------------------- PATTERN: See diagram A.1. GARTER STITCH (back and forth): Knit all rows. 1 ridge vertically = knit 2 rows. DECREASE TIP (applies to decreases for V-neck): All decreases are done from the right side! DECREASE AT BEGINNING OF ROW: Knit 4, slip 1 stitch over to right needle knitwise, knit 1, pass slipped stitch over stitch worked. DECREASE AT END OF ROW: Work until 6 stitches remain, knit 2 together, knit 4. INCREASE TIP (applies to sleeves): Knit 1 past marker thread, make 1 yarn over, knit until 1 stitch remain before marker thread, make 1 yarn over. On next row knit yarn overs twisted. ---------------------------------------------------------- START THE PIECE HERE: ---------------------------------------------------------- JUMPER - SHORT OVERVIEW OF THE PIECE: Worked in the round on circular needle, from the bottom and up to armholes. Then divide the piece for back piece and front piece, and work parts back and forth on circular needle separately. Work sleeves in the round on double pointed needles/short circular needle up to where sleeve cap begins, then work back and forth on circular needle. BODY: Cast on 282-306-330-360-396-432 stitches on circular needle size 2.5 mm with DROPS Alpaca. Work rib (knit 1/purl 1) over all stitches When piece measures 4½ cm, work A.1 over all stitches. When A.1 has been worked 1 time vertically, continue with knit over knit and purl over purl until piece measures 8 cm. On next round knit and decrease 42-46-50-52-56-64 stitches evenly = 240-260-280-308-340-368 stitches. Switch to circular needle size 3 mm. Work in stocking stitch in the round. REMEMBER THE KNITTING TENSION! When piece measures 34-35-36-37-38-39 cm, cast off for armholes as follows: Work 119-127-135-145-156-169 stitches, cast off 2-6-10-18-28-30 stitches, work 118-124-130-136-142-154 stitches and cast off 2-6-10-18-28-30 stitches (i.e. the last 1-3-5-9-14-15 stitches on round and the first 1-3-5-9-14-15 stitches on next round) = 118-124-130-136-142-154 stitches on each front piece/back piece. Now finish each part separately. BACK PIECE: Continue back and forth in stocking stitch. When piece measures 50-52-54-56-58-60 cm, cast off the middle 26-26-30-30-32-34 stitches for neck (46-49-50-53-55-60 stitches remain on each shoulder). Finish each shoulder separately. On next row from the neck cast off 1 stitch for neck = 45-48-49-52-54-59 stitches. Cast off when piece measures 52-54-56-58-60-62 cm. Work the other shoulder the same way. FRONT PIECE: = 118-124-130-136-142-154 stitches. Work in stocking stitch. When piece measures 34-36-37-39-40-41 cm, divide front piece and decrease for V-neck on next row from right side as follows: Work 1 edge stitch in garter stitch, 54-57-60-63-66-72 stitches, slip 4 stitches on cable needle in front of piece, knit 4, knit 4 from cable needle, knit 54-57-60-63-66-72 stitches and 1 edge stitch in garter stitch. Turn and work 1 edge stitch in garter stitch and 58-61-64-67-70-76 stitches in stocking stitch, turn (59-62-65-68-71-77 stitches on each shoulder). Finish each shoulder separately. Continue back and forth in stocking stitch and decrease for neck - read DECREASE TIP, as follows: Decrease 1 stitch every 4th row 4-4-6-6-8-9 times in total then 1 stitch every 6th row 5-5-5-5-4-4 times in total = 50-53-54-57-59-64 stitches. Work until piece measures 52-54-56-58-60-62 cm. On next row from shoulder, cast off the first 45-48-49-52-54-59 stitches = 5 stitches remain. Work in stocking stitch over these 5 stitches for approx. 7-7-8-8-8-9 cm. Cast off. Work the other shoulder the same way. SLEEVES: Cast on 90-90-90-96-96-102 stitches on double pointed needles size 2.5 mm with DROPS Alpaca. Work rib (purl 1/knit 1). When piece measures 4½ cm, work A.1 over all stitches. When A.1 has been worked 1 time vertically, continue with knit over knit and purl over purl until piece measures 8 cm. Switch to double pointed needles size 3 mm. Continue piece in stocking stitch. On first round decrease 18-16-16-18-18-22 stitches evenly = 72-74-74-78-78-80 stitches. Insert a marker thread at beginning of round (mid under sleeve). Move the marker thread upwards when working - marker thread should be used for increase mid under sleeve. When sleeve measures 16-18-16-16-16-13 cm, increase 1 stitch on each side of marker thread - read INCREASE TIP. Increase like this every 3-2½-2-2-1½-1½ cm 11-12-15-16-18-20 times in total = 94-98-104-110-114-120 stitches. When sleeve measures 49-49-48-47-44-43 cm, divide piece at the marker thread and work back and forth on circular needle until finished measurements. Work until sleeve measures approx. 50-50-50-50-49-49 cm, i.e. there is a vent of 1-1-2-3-5-6 cm at the top of sleeve. Work the other sleeve the same way. ASSEMBLY: Sew shoulder seams inside cast-off edges. Sew vent at the top of sleeve to bottom of armhole. Then sew sleeve into body - see chart. Sew the 5 stitches on each front piece together and sew them to neck line on back piece. |
|||||||||||||||||||
Diagram explanations |
|||||||||||||||||||
|
|||||||||||||||||||

|
|||||||||||||||||||
|
|||||||||||||||||||
|
|||||||||||||||||||
Have you finished this pattern?Tag your pictures with #dropspattern #simplicitysweater or submit them to the #dropsfan gallery. Do you need help with this pattern?You'll find 30 tutorial videos, a Comments/Questions area and more by visiting the pattern on garnstudio.com. © 1982-2025 DROPS Design A/S. We reserve all rights. This document, including all its sub-sections, has copyrights. Read more about what you can do with our patterns at the bottom of each pattern on our site. |
|||||||||||||||||||


With over 40 years in knitting and crochet design, DROPS Design offers one of the most extensive collections of free patterns on the internet - translated to 17 languages. As of today we count 314 catalogues and 11822 patterns translated into English (UK/cm).
We work hard to bring you the best knitting and crochet have to offer, inspiration and advice as well as great quality yarns at incredible prices! Would you like to use our patterns for other than personal use? You can read what you are allowed to do in the Copyright text at the bottom of all our patterns. Happy crafting!
Post a comment to pattern DROPS 236-38
We would love to hear what you have to say about this pattern!
If you want to leave a question, please make sure you select the correct category in the form below, to speed up the answering process. Required fields are marked *.