DROPS Brushed Alpaca Silk
77% Alpaca, 23% Silk
from 2.90 £ /25g
Get the yarn to make this pattern from 14.50£.

The yarn cost is calculated from the pattern’s smallest size and the yarn’s cheapest product type. Looking for an even better price? You might find it on the DROPS Deals!

DROPS SS24

Piece of Sky

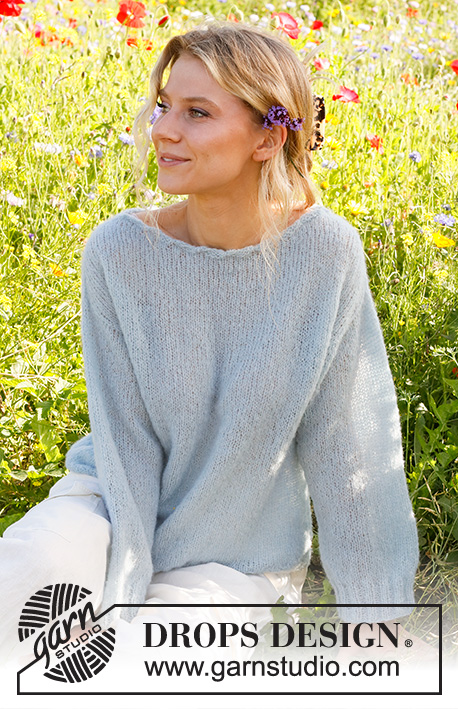
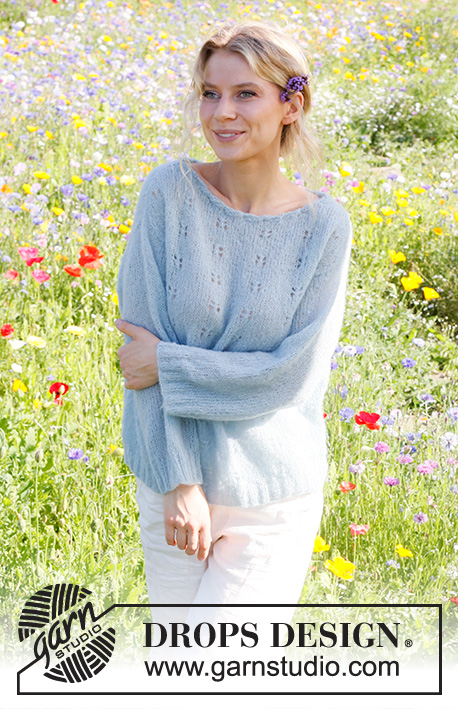
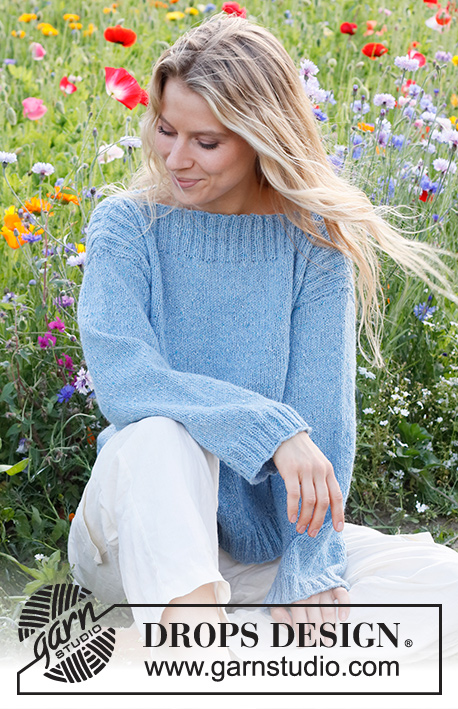
Knitted jumper in DROPS Brushed Alpaca Silk. The piece is worked top down, with increases for shoulders and decorative neck. Sizes S - XXXL.

DROPS 230-50
DROPS Design: Pattern as-169
Yarn group C or A + A
-------------------------------------------------------

SIZES:
S - M - L - XL - XXL - XXXL

MATERIALS:
DROPS BRUSHED ALPACA SILK from Garnstudio (belongs to yarn group C)
125-125-150-150-175-200 g colour 14, Morning mist

NEEDLES:
DROPS CIRCULAR NEEDLE SIZE 5 MM: Length 40 cm and 80 cm.
DROPS CIRCULAR NEEDLE SIZE 4 MM: Length 40 cm and 80 cm.
The technique MAGIC LOOP can be used – you then only need circular needle of 80 cm in each size.

KNITTING TENSION:
17 stitches in width and 22 rows in height with stocking stitch = 10 x 10 cm.
NOTE: Needle size is only a guide. If you get too many stitches on 10 cm, change to a larger needle size. If you get too few stitches on 10 cm, change to a smaller needle size.

-------------------------------------------------------

Alternative Yarn – See how to change yarns here
Yarn Groups A to F – Use the same pattern and change the yarn here
Yarn usage using an alternative yarn – Use our yarn converter here

-------------------------------------------------------

DROPS Brushed Alpaca Silk
77% Alpaca, 23% Silk
from 2.90 £ /25g
Get the yarn to make this pattern from 14.50£.

The yarn cost is calculated from the pattern’s smallest size and the yarn’s cheapest product type. Looking for an even better price? You might find it on the DROPS Deals!

Pattern instructions

NOTE: This pattern is written in British English. All measurements in charts are in cm. For conversion from cm to inches - click here. There are different terms for crocheting in British and American English. If this pattern includes crochet, click for "crochet terms" here. For this pattern in American English, please click here.
-------------------------------------------------------

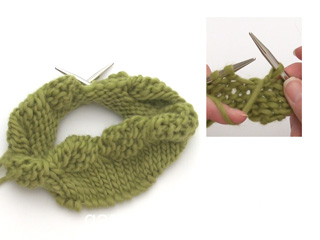
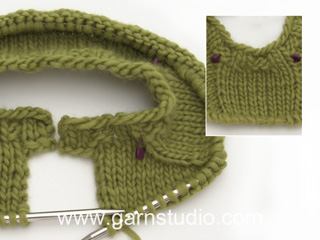
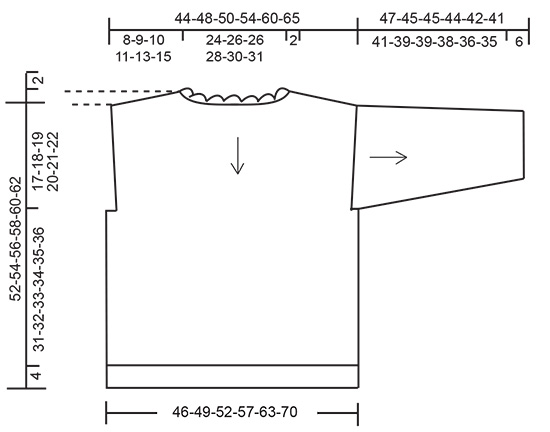
EXPLANATIONS FOR THE PATTERN:

-------------------------------------------------------

RIDGE/GARTER STITCH (worked back and forth):
Knit all rows.
1 ridge = knit 2 rows.

INCREASE TIP (shoulders):
RIGHT SIDE:
Increase after markers 1 and 3 and before markers 2 and 4.
BEFORE MARKER:
The new stitch twists to the right.
Use the left needle to pick up the strand between 2 stitches from the previous round/row, pick the strand up from the back and knit in the front loop.
AFTER MARKER:
The new stitch twists to the left.
Use the left needle to pick up the strand between 2 stitches from the previous round/row, pick the strand up from the front and knit in the back loop.

WRONG SIDE:
Increase after markers 4 and 2 and before markers 3 and 1.
BEFORE MARKER:
The new stitch twists to the right.
Use the left needle to pick up the strand between 2 stitches from the previous row, pick the strand up from the front and purl in the back loop.
AFTER MARKER:
The new stitch twists to the left.
Use the left needle to pick up the strand between 2 stitches from the previous row, pick the strand up from the back and purl in the front loop.


DECREASE TIP:
All decreases are worked from the right side!
Work 1 garter stitch, slip 1 stitch as if to knit, knit 1, pass the slipped stitch over the knitted stitch, work until there are 3 stitches left on the row, knit 2 together and 1 garter stitch.

-------------------------------------------------------

START THE PIECE HERE:

-------------------------------------------------------

JUMPER – SHORT OVERVIEW OF THE PIECE:
The jumper is worked top down. The neck is worked back and forth, then the yoke in the round. The yoke is divided for the body and sleeves. Front and back pieces are worked separately back and forth with circular needle. The sleeves are worked back and forth with circular needle.

NECK:
Cast on 98-104-104-110-116-122 stitches with circular needle size 4 mm and DROPS Brushed Alpaca Silk.
Work 3 RIDGES – read description above, back and forth.
To create a rolling-edge work as follows from the right side: 1 edge stitch in garter stitch, knit 3, * twist the stitches on the right needle 360 degrees as follows: Take the strand to the right side and take the right needle under the piece and up to the right side, knit 6 *, work from *-* until there are 4 stitches left, knit 3 and 1 edge stitch in garter stitch.
Now join the piece and continue in the round.
Knit 1 round and decrease 14-16-10-12-14-16 stitches evenly spaced = 84-88-94-98-102-106 stitches.
Insert 1 marker at the beginning of the round; the yoke is measured from this marker.

YOKE:
Change to circular needle size 5 mm.
Insert 4 markers without working the stitches and insert them between 2 stitches: Count 1 stitch (shoulder-stitch), insert marker-1, count 40-42-45-47-49-51 stitches (back piece), insert marker-2, count 2 stitches (shoulder-stitches), insert marker-3, count 40-42-45-47-49-51 stitches (front piece), insert marker-4, there is 1 stitch left (shoulder-stitch).

Now work short rows in stocking stitch over one shoulder AT THE SAME TIME as you increase 2 stitches for the shoulder on each row – read INCREASE TIP, as follows:
Work 3 stitches past marker-1 – remember to increase on the shoulder, turn, tighten the strand and work 3 stitches past marker-4 – remember to increase, turn, tighten the strand, * work 3 stitches past the previous short row – remember to increase, turn, tighten the strand, work 3 stitches past the previous short row on the other side, turn, tighten the strand *, work from *-* until you have worked 10 short rows on each side, finish the last row at the beginning of the round (between the 2 stitches between markers 1 and 4). You have increased 10 stitches at each marker.
Cut the strand. Move the start of the round to between the 2 stitches between markers 2 and 3 and work short rows here in the same way as on the first shoulder.
When the short rows are finished, there are 124-128-134-138-142-146 stitches. REMEMBER THE KNITTING TENSION!
Work the next round as follows (the start of the round is still between markers 2 and 3):
Knit 1, increase 1 stitch for the shoulder, knit 60-62-65-67-69-71, increase 1 stitch for the shoulder, knit 2, increase 1 stitch for the shoulder, knit 60-62-65-67-69-71, increase 1 stitch for the shoulder, knit 1.
Continue working and increase for the shoulders each round. The increased stitches are worked in stocking stitch.
When you have increased 17-19-21-24-28-33 times (including the short rows) there are 152-164-178-194-214-238 stitches. The piece measures approx. 8-9-10-11-13-15 cm.

Now divide for the front and back pieces as follows:
Knit 1 stitch and place it on a thread for the sleeve, work 74-80-87-95-105-117 stitches in stocking stitch (front piece), knit 2, place these 2 stitches on a thread for the sleeve, work 74-80-87-95-105-117 stitches in stocking stitch and place these stitches on a thread for the back piece, knit 1 and place this stitch on the thread for the sleeve. Cut the strand.

FRONT PIECE:
= 74-80-87-95-105-117 stitches. Continue back and forth with stocking stitch and 1 edge stitch in GARTER STITCH – read description above, on each side. The front is measured from the division.
When the piece measures 4 cm, decrease 1 stitch on each side – read DECREASE TIP! Decrease like this every 4 cm a total of 3-3-4-4-4-4 times = 68-74-79-87-97-109 stitches.
When the piece measures 17-18-19-20-21-22 cm from the division, cast on 6 stitches at the end of the next 2 rows = 80-86-91-99-109-121 stitches.
Continue with stocking stitch and 1 stitch in garter stitch on each side.
When the piece measures approx. 31-32-33-34-35-36 cm from the 6 cast-on stitches, knit 1 row from the right side and increase 6-8-11-11-13-13 stitches evenly spaced = 86-94-102-110-122-134 stitches.
Change to circular needle size 4 mm and work rib from the wrong side as follows:
1 garter stitch, knit 1, * purl 2, knit 2 *, work from *-* until there are 4 stitches left, purl 2, knit 1 and 1 garter stitch.
Cast off when the rib measures 4 cm.

BACK PIECE:
Place the 74-80-87-95-105-117 stitches for the back piece on circular needle size 5 mm and work in the same way as the front piece.

SLEEVES:
Start at the cast-on stitches for the armhole on the back piece. Using circular needle size 5 mm, work as follows from the right side:
Knit up 1 stitch in each of the 6 cast-on stitches under sleeve, knit up 23-25-26-28-30-31 stitches as far as the 2 stitches on the thread (shoulder-stitches), place these 2 stitches on the needle and knit them, knit up 23-25-26-28-30-31 stitches to the cast-on stitches under sleeve on the front piece and knit up 1 stitch in each of these 6 stitches = 60-64-66-70-74-76 stitches.
Work stocking stitch back and forth, with 1 edge stitch in garter stitch on each side.
When the sleeve measures 4 cm, decrease 1 stitch on each side.
Decrease like this every 12-12-8-6-4-4 cm a total of 3-3-4-5-7-7 times = 54-58-58-60-60-62 stitches.
When the sleeve measures 41-39-39-38-36-35 cm, knit 1 row from the right side and increase 0-0-0-2-2-0 stitches evenly spaced = 54-58-58-62-62-62 stitches. Change to circular needle size 4 mm and work rib from the wrong side as follows:
1 garter stitch, * knit 2, purl 2 *, work from *-* and 1 garter stitch.
Cast off when the rib measures 6 cm. The sleeve measures approx. 47-45-45-44-42-41 cm.
Work the other sleeve in the same way, but starting at the cast-on stitches for the armhole on the front piece.

ASSEMBLY:
Sew the sleeve and side seams in one go, inside the 1 edge stitch. Sew the neck together mid-back, inside the 1 edge stitch.

Diagram

diagram measurements

Each of our patterns has specific tutorial videos to help you.

Do you have a question? See a list of frequently asked questions (FAQ)

Knitting tension is what determines the final measurements of your work, and is usually measured per 10 x 10 cm. It is provided like so: number of stitches in width x number of rows in height - eg: 19 stitches x 26 rows = 10 x 10 cm.

The knitting tension is very individual; some people knit/crochet loosely while others work tightly. You adjust the knitting tension with the needle size, which is why the suggested needle size is only meant as a guide! You need to adjust this (up or down) to ensure that YOUR knitting tension matches the knitting tension provided in the pattern. If you work with a different knitting tension than provided you will have a different yarn consumption, and your work will have different measurements than what the pattern suggests.

The knitting tension also determines which yarns can replace each other. As long as you achieve the same knitting tension you can replace one yarn with another.

See DROPS lesson: How to measure your tension/gauge

See DROPS video: How to make a gauge tension swatch

The required amount of yarn is provided in grams, eg: 450 g. To calculate how many balls you’ll need you first need to know how many grams are in 1 ball (25g, 50g or 100g). This information is available if you click on the individual yarn quality on our pages. Divide the amount required with the amount of each ball. For example, if each ball is 50g (the most common amount), the calculation will be as follows: 450 / 50 = 9 balls.

The important thing when changing from one yarn to another is that the knitting/crochet tension remains the same. This is so that the measurements of the finished piece will be the same as on the sketch provided. It is easier to achieve the same knitting tension using yarns from the same yarn group. It is also possible to work with multiple strands of a thinner yarn to achieve the knitting tension of a thicker one. Please try our yarn converter. We recommend you to always work a test swatch.

Please NOTE: when changing yarn the garment might have a different look and feel to the garment in the photo, due to individual properties and qualities of each yarn.

See DROPS lesson: Can I use a different yarn than the one mentioned in the pattern?

All our yarns are categorised into yarn groups (from A to F) according to thickness and knitting tension – group A contains the thinnest yarns and group F the thickest. This makes it easier for you to find alternative yarns to our patterns, should you wish to switch yarn. All yarns within the same group have a similar knitting tension and can easily replace each other. However, different yarn qualities have different structures and properties which will give the finished work a unique look and feel.

Click here for an overview of the yarns in each yarn group

At the top of all our patterns you’ll find a link to our yarn calculator, which is a helpful tool should you wish to use a different yarn than suggested. By filling in the yarn quality you wish to replace, the amount (in your size) and number of strands, the calculator will present good alternative yarns with the same knitting tension. Additionally it will tell you how much you’ll require in the new qualities and whether you’ll need to work with multiple strands. Most skeins are 50g (some are 25g or 100g).

If the pattern is worked with multiple colours, every colour will have to be calculated separately. Similarly, if the pattern is worked with several strands of different yarns (for example 1 strand Alpaca and 1 strand Kid-Silk) you will have to find alternatives for each, individually.

Click here to see our yarn calculator

Since different yarns have different qualities and textures we have chosen to keep the original yarn in our patterns. However, you can easily find options among our available qualities by using our yarn calculator, or simply pick a yarn from the same yarn group.

It is possible that some retailers still have discontinued yarns in stock, or that someone has a few skeins at home that they would like to find patterns for.

The yarn calculator will provide both alternative yarn as well as required amount in the new quality.

If you think it's hard to decide what size to make, it can be a good idea to measure a garment you own already and like the size of. Then you can pick the size by comparing those measures with the ones available in the pattern's size chart.

You'll find the size chart at the bottom of the pattern.

See DROPS lesson: How to read size chart

The needle size provided in the pattern serves only as a guide, the important thing is to follow the knitting tension. And since knitting tension is very individual, you will have to adjust the needle size to ensure that YOUR tension is the same as in the pattern – maybe you’ll have to adjust 1, or even 2 needle sizes, up or down to achieve the correct tension. For this, we recommend that you work test swatches.

Should you work with a different knitting tension than the one provided, the measurements of the finished garment might deviate from the measurement sketch.

See DROPS lesson: How to measure your tension/gauge

See DROPS video: How to make a tension/gauge swatch

Working a garment top-down provides more flexibility and room for personal adjustment. For example it is easier to try the garment on while working, as well as making adjustments to length of yoke and shoulder caps.

The instructions are carefully explaining every step, in the correct order. Diagrams are adjusted to the knitting direction and are worked as usual.

The diagram depicts all rows/rounds, and every stitch seen from the right side. It is read from bottom to top, from right to left. 1 square = 1 stitch.

When working back and forth, every other row is worked from the right side and every other row is worked from the wrong side. When working from the wrong side, the diagram will have to be worked reversed: from left to right, knit stitches are purled, purl stitches are knit etc.

When working in the round every round is worked from the right side and the diagram are worked from right to left on all rounds.

See DROPS lesson: How to read knitting diagrams

The diagram depicts all rows/rounds, and every stitch seen from the right side. It is worked from bottom to top, from right to left.

When working back and forth every other row is worked from the right side: from right to left and every other row is worked from the wrong side: from left to right.

When working in the round, every row in the diagram are worked from the right side, from right to left.

When working a circular diagram you start in the middle and work your way outwards, counter clockwise, row by row.

The rows usually start with a given number of chain stitches (equivalent to the height of the following stitch), this will either be depicted in the diagram or explained in the pattern.

See DROPS lesson: How to read crochet diagrams

Instructions for working several diagrams after each other on the same row/round, will often be written like so: “work A.1, A.2, A.3 a total of 0-0-2-3-4 times". This means you work A.1 once, then A.2 is worked once, and A.3 is repeated (in width) the number of times provided for your size – in this case like so: S = 0 times, M = 0 times, L=2 times, XL= 3 times and XXL = 4 times.

The diagrams are worked as usual: begin with the first row in A.1, then work the first row in A.2 etc.

See DROPS lesson: How to read knitting diagrams

See DROPS lesson: How to read crochet diagrams

The total width of the garment (from wrist-to-wrist) will be larger in the larger sizes, despite the actual sleeves being shorter. The larger sizes have longer sleeve caps and wider shoulders, so there will be a good fit in all sizes.

The measurement sketch/schematic drawing provides information regarding the full length of the garment. If it’s a jumper or a jacket the length is measured from the highest point on the shoulder closest to the neckline, and straight down to the bottom of the garment. It is NOT measured from the tip of shoulder. Similarly, the length of yoke is measured from the highest point on the shoulder and down to where yoke is split into body and sleeves.

On a jacket measures are never taken along bands, unless specifically stated. Always measure inside band stitches when measuring the length.

See DROPS lesson: How to read a schematic drawing

Diagrams are often repeated on the round or in height. 1 repeat is the diagram the way it appears in the pattern. If it says to work 5 repeats of A.1 in the round, then you work A.1 a total of 5 times after/next to each other in the round. If it says to work 2 repeats of A.1 vertically/in height you work the entire diagram once, then begin again at the start and work the entire diagram one more time.

Chain stitches are slightly narrower than other stitches and to avoid working the cast-on edge too tight, we simply chain more stitches to begin with. The stitch count will be adjusted on the following row to fit the pattern and measurement sketch.

The rib edge is more elastic and will contract slightly compared to, for example, stocking stitch. By increasing before the rib edge, you avoid a visible difference in width between the rib edge and the rest of the body.

It’s very easy to cast off too tightly, and by making yarn overs while casting off (and simultaneously casting these off) you avoid a too tight cast off edge.

See DROPS video: How to bind off with yarn overs (yo)

To achieve an even increase (or decrease) you can increase on, for example: every 3rd and 4th row alternately, like so: work 2 rows and increase on the 3rd row, work 3 rows and increase on the 4th. Repeat this until the increase is complete.

See DROPS lesson: Increase or decrease 1 st on every 3rd and 4th row alternately

Should you prefer to work in the round instead of back and forth, you may of course adjust the pattern. You’ll need to add steeks mid-front (usually 5 stitches), and follow the instructions. When you would normally turn and work from the wrong side, simply work across the steek and continue in the round. At the end you’ll cut the piece open, pick up stitches to work bands, and cover the cut edges.

See DROPS video: How to knit steeks and cut open

Should you prefer to work back and forth instead of in the round, you may of course adjust the pattern so you work the pieces separately and then assemble them at the end. Divide the stitches for the body in 2, add 1 edge stitch in each side (for sewing) and work the front and back pieces separately.

See DROPS lesson: Can I adapt a pattern for circular needles into straight needles?

Pattern repeats can vary slightly in the different sizes, in order to get the correct proportions. If you’re not working the exact same size as the garment in the photo, yours might deviate slightly. This has been carefully developed and adjusted so that the complete impression of the garment is the same in all sizes.

Make sure to follow instructions and diagrams for your size!

If you have found a pattern you like which is available in women’s size it’s not very difficult to convert it to men’s size. The biggest difference will be the length of sleeves and body. Start working on the women size that you think would fit across the chest. The additional length will be worked right before you cast off for the armhole/sleeve cap. If the pattern is worked top-down you can add the length right after the armhole or before the first decrease on sleeve.

Regarding additional yarn amount, this will depend on how much length you add, but it is better with a skein too many than too few.

All yarns will have excess fibres (from production) that might come off as lint or shedding. Brushed yarns (ie hairier yarns) have more of these loose, excess fibres, causing more shedding.

Shedding also depends on what is worn under or over the garment, and whether this pulls at the yarn fibres. It’s therefore not possible to guarantee that there will be no shedding

Below are some tips on how to get the best result when working with hairier yarns:

1. When the garment is finished (before you wash it) shake it vigorously so the looser hairs come off. NOTE: do NOT use a lint roller, brush or any method that pulls at the yarn.

2. Place the garment in a plastic bag and put it in your freezer - the temperature will cause the fibres to become less attached to each other, and excess fibres will come off easier.

3. Leave in the freezer for a few hours before taking it out and shaking it again.

4. Wash the garment according to the instructions on the yarn label.

Pilling is a natural process that happens to even the most exclusive of fibers. It's a natural sign of wear and tear that is hard to avoid, and that is most visible in high friction areas of your garment like a sweater's arms and cuffs.

You can make your garment look as new by removing the pilling, using a fabric comb or a pill/lint remover.

Still can't find the answer you need? Then scroll down and leave your question so one of our experts can try to help you. This will be done normally within 5 to 10 working days.
In the meantime, you can read the questions and answers that others have left to this pattern or join the DROPS Workshop on Facebook to get help from fellow knitters/crocheters!

You might also like...

Post a comment to pattern DROPS 230-50

We would love to hear what you have to say about this pattern!

If you want to leave a question, please make sure you select the correct category in the form below, to speed up the answering process. Required fields are marked *.

Comments / Questions (26)

country flag Sue wrote:

Yes, thank you. Your response to my questions helps. I greatly appreciate you answering my questions.

03.06.2022 - 05:55

country flag Sue wrote:

Thank you for your previous answers. Another question on these short rows. When it says knit 3 stitches past the marker, as you are increasing on some of the rows after the marker, does that increase stitch get included in the count of knit 3 stitches past the marker? Or is it increase after the marker (when called for), and then count 3 stitches further past the marker before turning?

30.05.2022 - 01:24

DROPS Design answered:

Dear Sue, you increase the number of stitches worked, and increase as explained under INCREASE TIP (shoulders): but the increase doesn't count in the number of stitches worked "extra", this means you have to work 3 sts more after the marker (without counting the increased stitches for shoulder). Can this help?

30.05.2022 - 08:19

country flag Sue wrote:

2nd question: Under YOKE, working the short rows over one shoulder at the same time as you increase 2 st for the shoulder on each row, do you increase 1 st in each SHORT row? Or 2 st in each SHORT row? Also are the increased stitches meant to line up, or do they just come at the end of each short row just before you turn? Sorry, the instructions are unclear. So where exactly are the increases placed in this part of the pattern? Thank you.

25.05.2022 - 06:34

DROPS Design answered:

Dear Sue, you increase on each time as explained under INCREASE TIP (shoulders):, this means on the first shoulder, increase from the right side after 1st marker and before 4th marker and from the wrong side after 3rd marker and before 2nd marker, the increased stitches will be lined up on each side of the shoulder sts. Happy knitting!

25.05.2022 - 07:32

country flag Sue wrote:

Under Yoke, where you work short rows as you increase for the shoulder, the pattern states: \"work 3 st past marker 1- remember to increase on the shoulder, turn, tighten the strand, * work 3 st past the previous short row - remember to increase, turn, tighten the strand, work 3 st past the previous short row on the other side, turn, tighten the strand*, work from *-*...\" My question: Is there also an increase in this last short row where it does not tell you to remember to increase?

25.05.2022 - 03:16

DROPS Design answered:

Dear Sue, when working the short rows (10 short rows in total) you have to increase for the shoulder at the same time, ie, you increase on each of the short rows, from both right side and wrong side. Happy knitting!

25.05.2022 - 07:26

country flag Debbie Singh wrote:

I would like to order this pattern when it comes out.. it looks very comfortable and cosy

11.02.2022 - 23:39

country flag Isolde wrote:

Leichtigkeit

18.01.2022 - 09:52