
Popular categories
Looking for a yarn?


Comments / Questions (38)
![]() Magali wrote:
Magali wrote:
Bonjour, ou puis trouver un tuto d explications ?
04.05.2025 - 23:03DROPS Design answered:
Bonjour Magali, vous trouverez les explications de ce modèle ici. Bon crochet!
05.05.2025 - 08:50
![]() Wendy Collett wrote:
Wendy Collett wrote:
Is their a video / help for pattern 232-236 for the A1 and A2
16.04.2025 - 02:21DROPS Design answered:
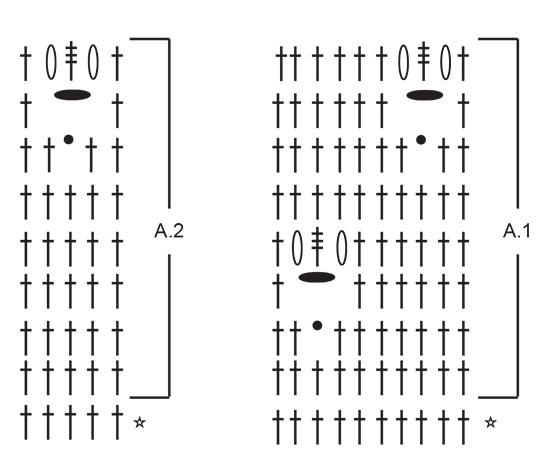
Dear Wendy, the A.1 and A.2 charts consist of treble crochets (UK terms)/double crochets (US terms) and small lace sections worked as follows; 1st row = treble crochet, 2 chain stitches, treble crochet. Over these 4 stitches work 6 chain stitches in the next row. On the next row, work: 2 treble crochets together, triple-treble crochet around the 2 chain stitches 2 rows below (between the treble crochets) and 2 treble crochets together, as before. Happy crochetting!
19.04.2025 - 19:26
![]() Kaylene wrote:
Kaylene wrote:
Hi, I'm enjoying the pattern so far, but I have a question when starting the armholes. The piece has 91 stitches, and then in the next row, I should skip the first 5, and then crochet 77 stitches, that leaves 9 stitches at the end of the row, not 5 like the pattern states. Mathematically, 91 minus 77 equals 14, so shouldn't there be 7 stitches skipped at each side of the armhole beginning row? I'm making size Large. I'd love to get help with this as soon as I can. Thank you
26.03.2025 - 00:33DROPS Design answered:
Hi Kaylene, After you have skipped the first 5 stitches, you work 1 tc, work 3 tcs together, 9 tcs, A.1 x 5 = 50 tcs, A.2 = 5 tcs, 9 tcs, 3 tcs together and 1 tc to finish. 1 + 3 + 9 + 50 + 5 + 9 + 3 + 1 = 81 stitches, leaving 5 stitches at the end of the row. Hope this helps and happy crocheting!
26.03.2025 - 06:49
![]() Christel wrote:
Christel wrote:
Beste Ik heb onlangs bovenstaand patroon besteld samen met het garen. Ik begrijp de uitleg niet zo goed van het patroon. Kan ik een ander patroon bestellen zonder dat ik nog garen moet kopen? Zo ja, hoe doe ik dit?
09.03.2025 - 08:58DROPS Design answered:
Dag Christel,
Al onze patronen zijn gratis af te drukken het print pictogram rechts boven bij het patroon. Klik op het print pictogram en dan op 'Patroon afdrukken'.
09.03.2025 - 13:07
![]() Christel Verstuyft wrote:
Christel Verstuyft wrote:
Ik begrijp rij 3 niet goed. 3 keerlossen, 6 stokjes, 2 lossen (dus 1 steek overslaan), dan haak ik 7 stokjes, 2 lossen, enz... Op de uitleg staat er in totaal 7 keer (voor maat L), bij mij is dat 10 x Wanneer haak ik dan A.2 Kan u rij 3 een beetje preciezer uitleggen aub? Op de patroontekening staat ook een liggend zwart ovaal, betekent dit dat 6 lossen?
26.02.2025 - 16:08DROPS Design answered:
Dag Christel,
Bedoel je rij 2 of rij 3 in A.1? De rij met het sterretje ernaast telt niet mee. Dus rij 3 heeft eerst 6 stokjes, dan 2 lossen, 1 stokje overslaan van de vorige toer, dan 2 stokjes, dit herhaal je steeds. Dus na de 2 stokjes komen weer de 6 stokjes, etc.
02.03.2025 - 10:32
![]() Grażyna wrote:
Grażyna wrote:
Super wzór, bardzo dziękuję 🙂
12.11.2024 - 00:11
![]() Beatrice wrote:
Beatrice wrote:
Je souhaiterais avec une explication plus détaillée pour faire l’arrondi des manches du modèle Hortense au début pour obtenir les 16 mailles. Je ne comprends absolument pas comment je dois procéder. Merci d’avance de votre réponse. Merci d’avance
31.08.2024 - 23:05DROPS Design answered:
Bonjour Béatrice, vous allez crocheter des rangs raccourcis en commençant dans la 5ème maille en l'air à partir de la couture d'épaules, puis vous crochetez 1 ms dans l'arceau, 2 b autour de la ml suivante, crochetez en b (7 au 1er rang = 1 b autour de chacune des 7 ml suivantes) puis terminez par 1 mc dans l'arceau suivant; tournez et crochetez 3 ml (1ère b) puis 1 mc dans l'arceau suivant (pour attacher cette b le long de l'emmanchure), 2 b dans la m suivante, continuez en bries et terminez par 2 b dans la dernière bride et 1 mc dans l'arceau suivant, continuez ainsi jusqu'à ce que vous ayez crocheté tous les arceaux de l'emmanchure. Bon crochet!
02.09.2024 - 08:18
![]() Jutta wrote:
Jutta wrote:
The pattern A.1. and A2, are these the rows for the front side only or also for the back side? If so, how do the backs rows read? From the left side? Would have been easier if the rows would have been numbered. Thank you.
06.05.2024 - 18:12DROPS Design answered:
Dear Jutta, the pattern A.1 and A.2 are both worked on front and back pieces; read the diagrams bottom up and from the right towards the left from right side, from the left towards the right from wrong side, read more about diagrams here. Happy crocheting!
07.05.2024 - 07:43
![]() Gloria wrote:
Gloria wrote:
Bonjour, pour le modèle taille S, lors de la réalisation du dos: « Quand l’ouvrage mesure 15cm, augmenter 1 bride de chaque côté » Nous devons bien être à 71 mailles? De plus, la phrase suivante: « Augmenter ainsi 3 fois au total tous les 6cm = 75 mailles. » Je ne comprends pas s’il faut augmenter 3 fois sur la verticale ou l’horizontale de l’ouvrage. Merci pour votre aide.
05.05.2024 - 18:22DROPS Design answered:
Bonjour Gloria, vous augmentez 1 bride au début du rang + 1 bride à la fin du rang - cf AUGMENTATIONS au début des explications, autrement dit, vous augmentez 3 fois 2 brides, soit 69 brides + 6 = 75 brides. Bon crochet!
06.05.2024 - 08:43
![]() Lisa wrote:
Lisa wrote:
Ich verstehe nicht, wie der Ärmel gehäkelt werden soll nach dem ersten Wenden. Man wendet und soll dann 3 Luftmaschen und 1 Kettmasche um den nächsten Luftmaschenbogen machen. Nach dem Wenden gibt es aber keinen Luftmaschenbogen, der liegt dann auf der rechten Seite, während man nach links häkeln sollte. Wie soll das genau gemacht werden?
05.05.2024 - 09:09DROPS Design answered:
Liebe Lisa, nach der 1. Reihe mit festen Maschen/Luftmaschenbogen wird man verkürzten Reihen häkeln, dh in der 5. Luftmasche ab der Schulternaht beginnen und dann immer mehr Stäbchen am Ende jeder Reihe häkeln bis alle Luftmaschenbogen von der 1. Reihe gehäkelt wurden, dh bis man um den ganzen Armausschnitt gehäkelt hat. Viel Spaß beim Häkeln!
06.05.2024 - 08:20
|
|||||||||||||||||||
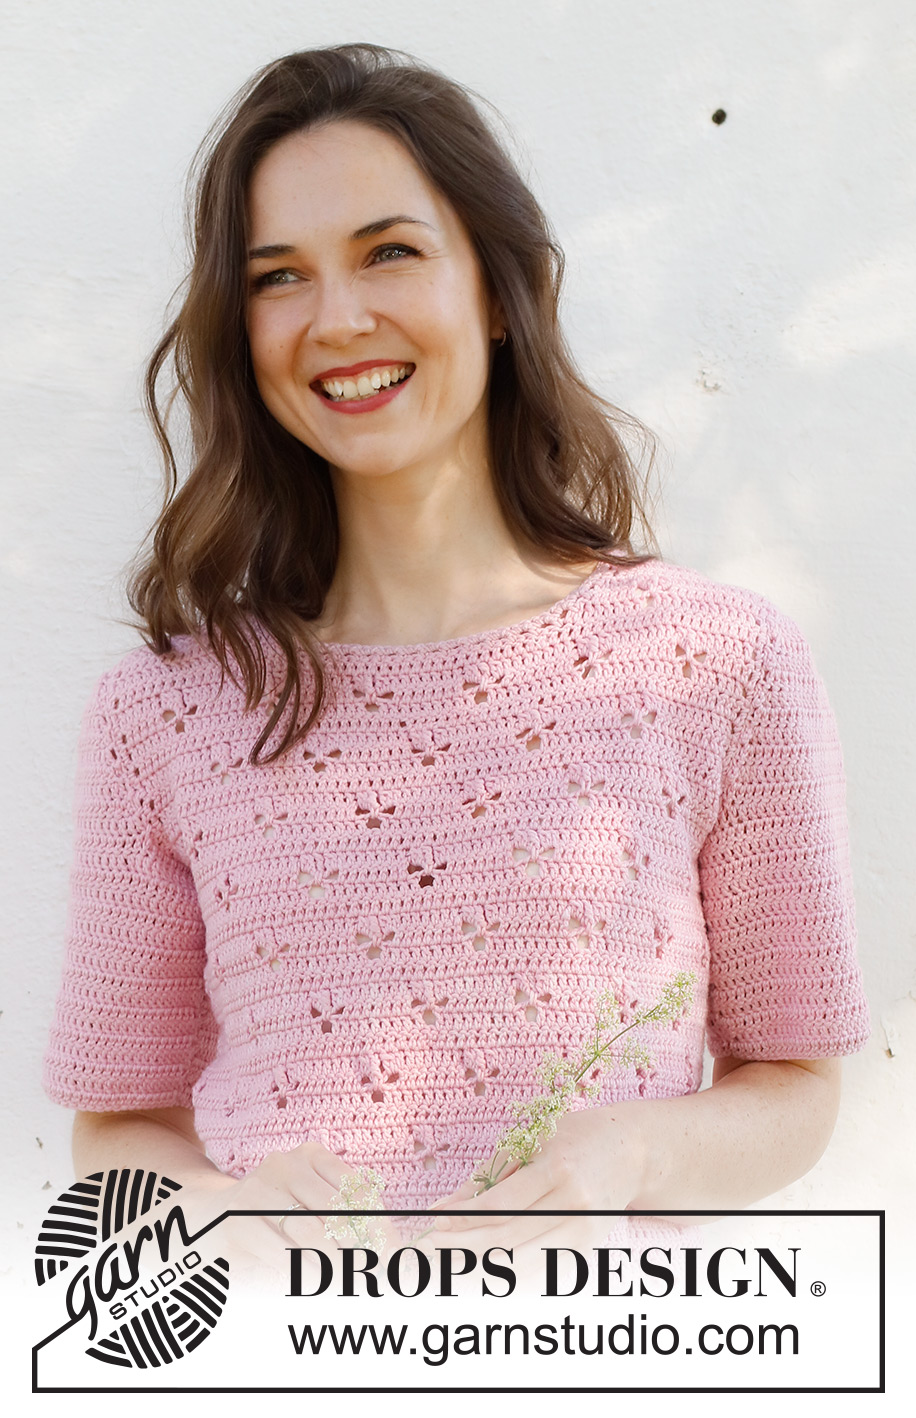
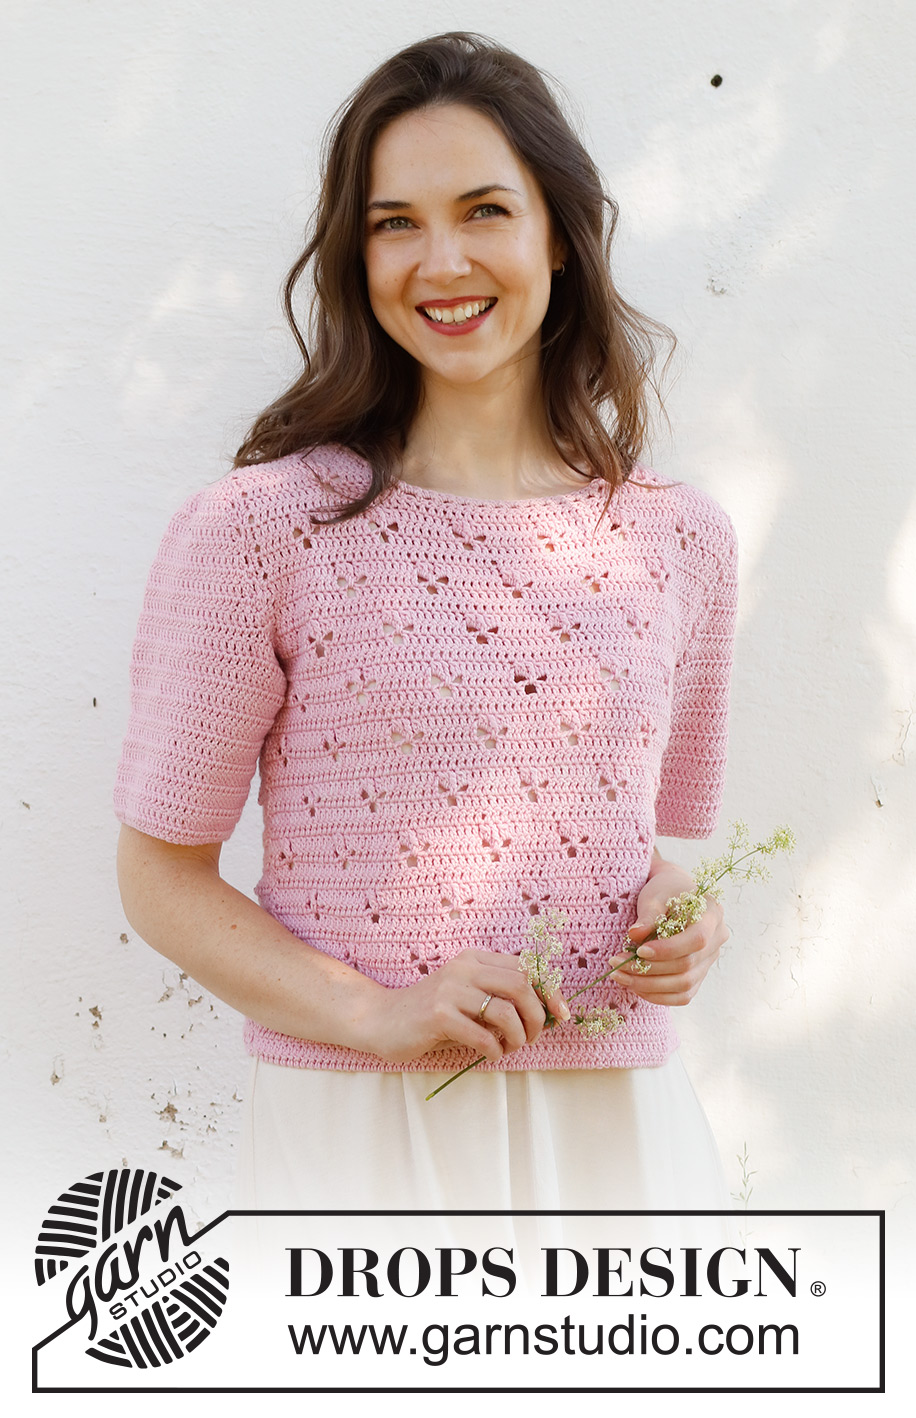
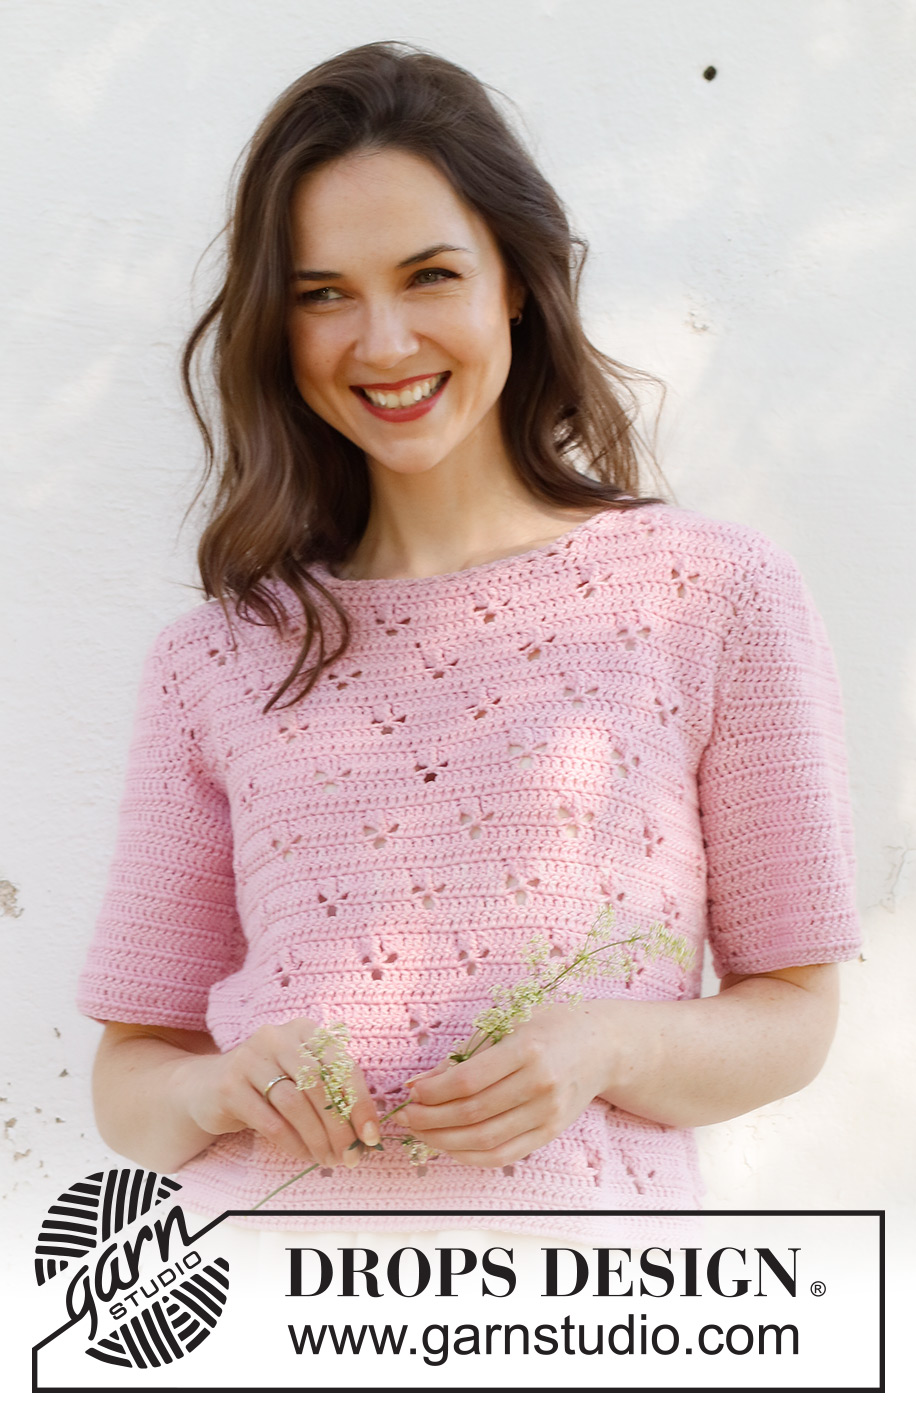
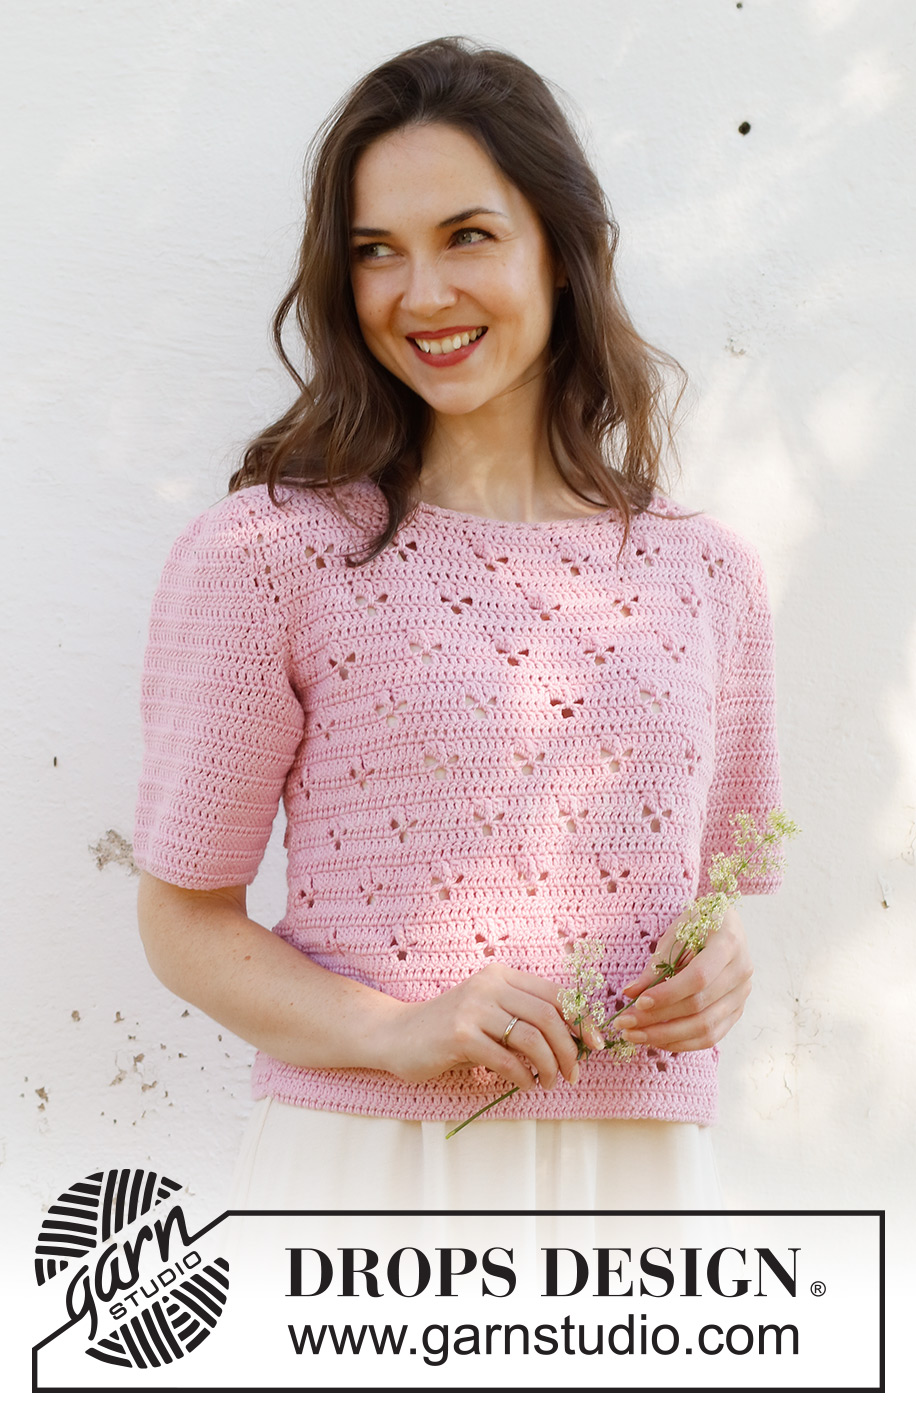
Hortense Top#hortensetop |
|||||||||||||||||||
 |
 |
||||||||||||||||||
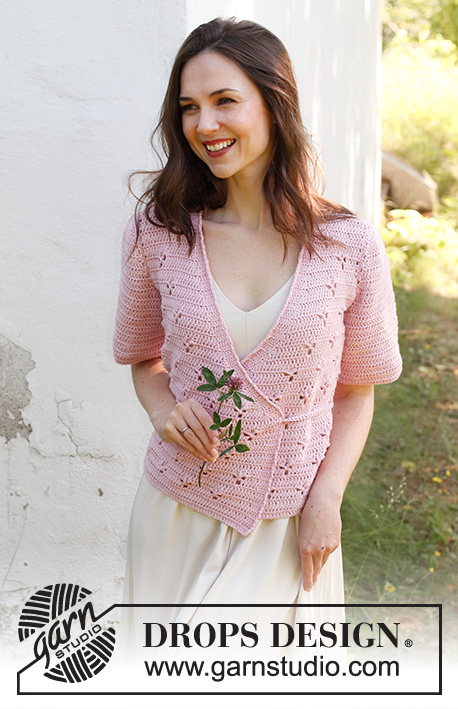
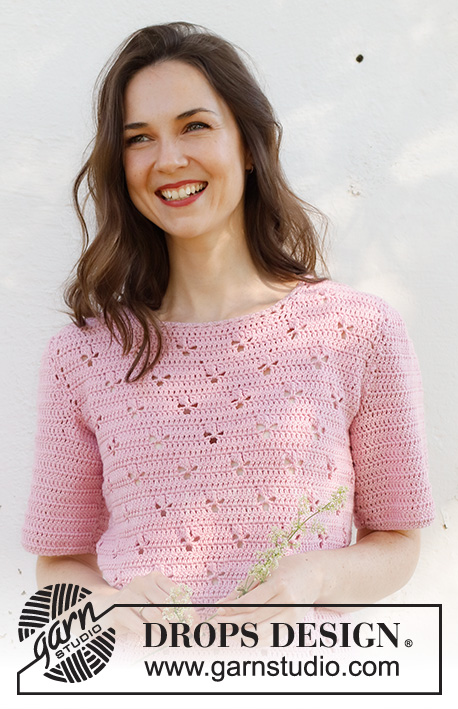
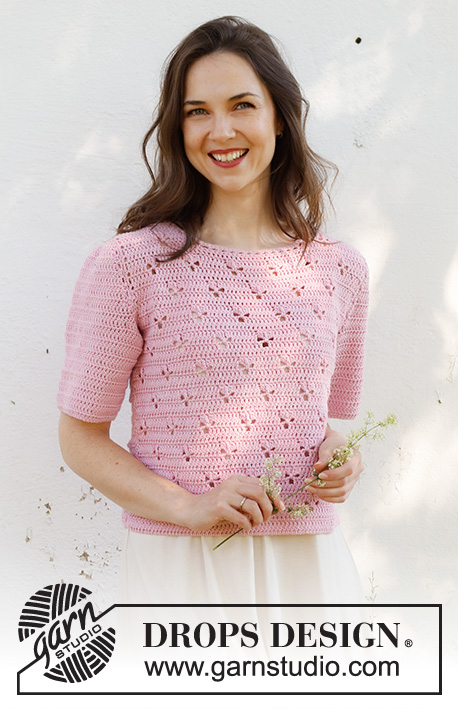
Crocheted short-sleeve jumper in DROPS Cotton Merino. The piece is worked bottom up with lace pattern. Sizes S - XXXL.
DROPS 232-36 |
|||||||||||||||||||
|
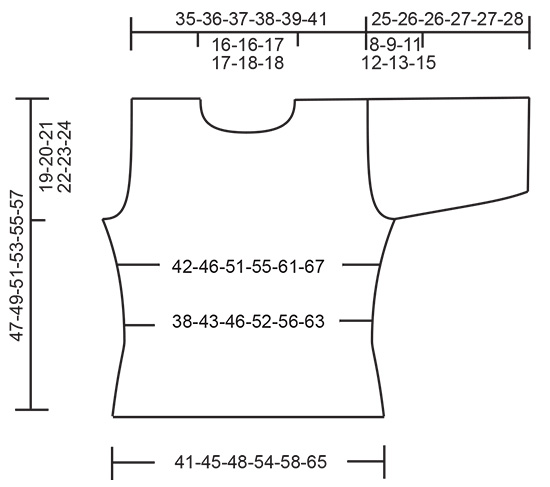
------------------------------------------------------- EXPLANATIONS FOR THE PATTERN: ------------------------------------------------------- CHAIN STITCH: If you work outermost on the hook the chain stitch will often be too tight; 1 chain stitch should be as long as 1 double/treble crochet is wide. PATTERN: See diagrams A.1 and A.2. CROCHET INFORMATION: At the beginning of each row of treble crochets work 3 chain stitches (replaces the first treble crochet), i.e. skip the last stitch on the previous row. Work the last treble crochet of the row in the 3rd chain stitch at the beginning of the previous row. DECREASE TIP: Decrease 1 treble crochet by working 2 treble crochets together: * Make 1 yarn over, insert the hook through the next stitch, pick up the strand, make 1 yarn over and pull it through the first 2 loops on the hook *, work from *-* 1 more time, make 1 yarn over and pull it through all 3 loops on the hook. Decrease 2 treble crochets by working 3 treble crochets together: * Make 1 yarn over, insert the hook through the next stitch, pick up the strand, make 1 yarn over and pull it through the first 2 loops on the hook *, work from *-* 2 more times, make 1 yarn over and pull it through all 4 loops on the hook. INCREASE TIP (for sides): Increase by working 2 treble crochets in the same stitch. The increased stitches are worked in treble crochets. ------------------------------------------------------- START THE PIECE HERE: ------------------------------------------------------- JUMPER – SHORT OVERVIEW OF THE PIECE: The front and back pieces are worked separately, back and forth, then sewn together. Stitches are worked around the armholes, then the sleeves worked back and forth, top down. BACK PIECE: Work 75-83-89-99-107-119 CHAIN STITCHES – read description above, with hook size 4 mm and DROPS Cotton Merino. Work 1 treble crochet in the 4th chain stitch from the hook (2 treble crochets) – read CROCHET INFORMATION, 1 treble crochet in each of the next 71-79-85-95-103-115 chain stitches = 73-81-87-97-105-117 stitches. Work back with 1 treble crochet in each treble crochet. Then work pattern as follows: 1 treble crochet in each of the first 4-3-6-6-5-6 treble crochets, A.1 a total of 6-7-7-8-9-10 times, A.2 and 1 treble crochet in each of the last 4-3-6-6-5-6 treble crochets. Continue this pattern. REMEMBER THE CROCHET TENSION! When the piece measures 8 cm, decrease 1 treble crochet on each side – read DECREASE TIP = 71-79-85-95-103-115 stitches. Repeat the decrease when the piece measures 12 cm = 69-77-83-93-101-113 stitches. When the piece measures 15 cm, increase 1 treble crochet on each side – read INCREASE TIP! Increase like this every 6-6½-4½-7½-5-5 cm a total of 3-3-4-3-4-4 times = 75-83-91-99-109-121 stitches. When the piece measures 28-29-30-31-32-33 cm, cast off for the armholes as described below, cutting the strand and making sure the next row is a row of treble crochets: Skip the first 4-5-5-6-7-9 stitches for the armhole, fasten the strand with 1 slip stitch in the next treble crochet, work 3 chain stitches (first treble crochet), work 2-2-3-3-3-3 treble crochets together, 1 treble crochet in each of the next 8-6-9-7-16-15 treble crochets, A.1 a total of 4-5-5-6-5-6 times, work A.2, 1 treble crochet in each of the next 8-6-9-7-16-15 treble crochets, work 2-2-3-3-3-3 treble crochets together and 1 treble crochet in the last stitch, turn (do not work the last 4-5-5-6-7-9 treble crochets) = 65-71-77-83-91-99 stitches. Continue the pattern back and forth, working 2-2-3-3-3-3 treble crochets together on each side every row a total of 2-4-2-3-5-7 times (including the first decrease when you skipped stitches for the armholes), then work 0-0-2-2-2-2 treble crochets together on each side of each row a total of 0-0-3-3-2-1 times = 63-65-67-69-71-73 stitches. Continue the pattern over the middle stitches and 1 treble crochet in each of the outermost treble crochets on each side. When the piece measures 42-44-46-48-50-52 cm, continue with treble crochets; finish the lace pattern if necessary. When the piece measures 45-47-49-51-53-55 cm, work the neck as follows: 1 treble crochet in each of the first 16-17-17-18-18-19 stitches, work 2 treble crochets together, turn = 17-18-18-19-19-20 stitches on the shoulder. Work 1 treble crochet in each stitch until the piece measures 47-49-51-53-55-57 cm. Cut and fasten the strand. Work the other shoulder as follows: Skip the middle 27-27-29-29-31-31 stitches for the neck, work 2 treble crochets together, 1 treble crochet in each of the last 16-17-17-18-18-19 treble crochets. Work 1 treble crochet in each treble crochet until the piece measures 47-49-51-53-55-57 cm. Cut and fasten the strand. FRONT PIECE: Work in the same way as the back until the piece measures 39-41-42-44-45-47 cm = 63-65-67-69-71-73 stitches. Work the neck as follows: Work as before over the first 19-20-21-22-23-24 stitches (only work lace pattern where it fits in width; the other stitches are worked with treble crochets), work 2 treble crochets together (first decrease for neck) = 20-21-22-23-24-25 stitches. Decrease 1 stitch for the neck on each row 4-4-5-5-6-6 times = 17-18-18-19-19-20 stitches on the shoulder. When the piece measures 42-44-46-48-50-52 cm, continue with treble crochets; finish the lace pattern if necessary. Work 1 treble crochet in each stitch until the piece measures 47-49-51-53-55-57 cm. Cut and fasten the strand. Work the other shoulder in the same way, working the last 21-22-23-24-25-26 stitches from the right side. ASSEMBLY: Sew one shoulder seam and both the side seams. NECK: ROW 1: Work 1 double crochet around the first row after the shoulder seam, work * 2 chain stitches, skip 1 cm, 1 double crochet *, work from *-* around the neck and finish with 1 double crochet around the last row on the shoulder. ROW 2: Work 2 double crochets around each chain-space. Cut and fasten the strand. ASSEMBLY: Sew the other shoulder seam. SLEEVES: Work an edge around the armhole as follows: Fasten the strand with 1 double crochet in the stitch by the side seam, * work 1 chain stitch, skip 1 stitch, 1 double crochet in the next stitch *, work from *-* over the stitches under the sleeve, then work up the armhole as follows: * 1 chain stitch, 1 double crochet around the next row *, work from *-* around the armhole and down to the bottom of the armhole, work the final stitches under the sleeve in the same way as the first stitches. Finish with 1 double crochet in the last stitch. Make sure your work does not tighten the armhole; work extra chain stitches between each double crochet if necessary = approx. 38-41-43-46-49-53 chain-spaces. Cut the strand. The sleeve cap is worked back and forth over more and more chain-spaces until you have worked all the chain-spaces. Work as follows from the right side: Start in the 5th chain stitch from the shoulder seam from the right side, work 1 double crochet around the chain-space, 2 treble crochets around the next chain stitch (up towards the shoulder seam), work 2 treble crochets around each of the next 7 chain stitches and finish with 1 slip stitch around the next chain-space = 16 treble crochets. Turn and work as follows from the wrong side: 3 chain stitches, 1 slip stitch around the next chain-space, 2 treble crochets in each treble crochet and finish with 1 slip stitch around the next chain-space on the other side of the sleeve = 32 treble crochets. Turn. Work 3 chain stitches, 1 slip stitch around the next chain-space, 2 treble crochets in the first treble crochet, 1 treble crochet in each treble crochet until there is 1 treble crochet left, 2 treble crochets in the next treble crochet and finish with 1 slip stitch around the next chain-space = 34 treble crochets. Continue like this and increase 1 treble crochet on each side a total of 5-6-8-9-10-12 times = 42-44-48-50-52-56 stitches. There remain now approx. 16-17-15-16-17-17 chain-spaces. On the next row work alternately 1 and 2 treble crochets around the last chain-spaces down to the side seam. Turn and work 1 treble crochet in each treble crochet and alternately 1 and 2 treble crochets around the remaining chain-spaces on the other side of the sleeve = 66-69-70-74-77-81 treble crochets. On the next row adjust the number of stitches to 62-65-68-74-77-81 stitches. Continue back and forth with 1 treble crochet in each treble crochet. When the sleeve measures 3 cm at the shortest point, decrease 1-1-1-1-0-0 treble crochets on each side. Decrease like this every 3-4-7-0-0-0 cm a total of 4-3-2-1-0-0 times = 54-59-64-72-77-81 stitches. Continue back and forth with 1 treble crochet in each treble crochet until the sleeve measures 15-15-14-14-13-12 cm at the shortest point. Cut and fasten the strand. Work the other sleeve in the same way. Sew the sleeve seams. |
|||||||||||||||||||
Diagram explanations |
|||||||||||||||||||
|
|||||||||||||||||||
|
|||||||||||||||||||
|
|||||||||||||||||||
Have you finished this pattern?Tag your pictures with #dropspattern #hortensetop or submit them to the #dropsfan gallery. Do you need help with this pattern?You'll find 11 tutorial videos, a Comments/Questions area and more by visiting the pattern on garnstudio.com. © 1982-2025 DROPS Design A/S. We reserve all rights. This document, including all its sub-sections, has copyrights. Read more about what you can do with our patterns at the bottom of each pattern on our site. |
|||||||||||||||||||


With over 40 years in knitting and crochet design, DROPS Design offers one of the most extensive collections of free patterns on the internet - translated to 17 languages. As of today we count 314 catalogues and 11822 patterns translated into English (UK/cm).
We work hard to bring you the best knitting and crochet have to offer, inspiration and advice as well as great quality yarns at incredible prices! Would you like to use our patterns for other than personal use? You can read what you are allowed to do in the Copyright text at the bottom of all our patterns. Happy crafting!
Post a comment to pattern DROPS 232-36
We would love to hear what you have to say about this pattern!
If you want to leave a question, please make sure you select the correct category in the form below, to speed up the answering process. Required fields are marked *.