
Popular categories
Looking for a yarn?


|
|||||||||||||||||||
Hortense Top |
|||||||||||||||||||
 |
 |
||||||||||||||||||
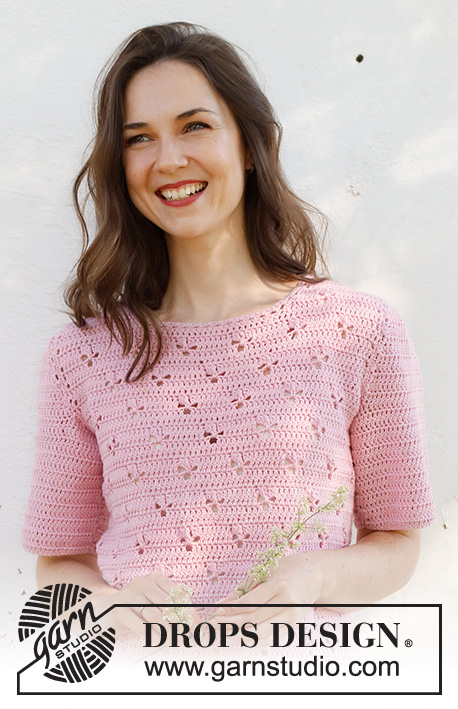
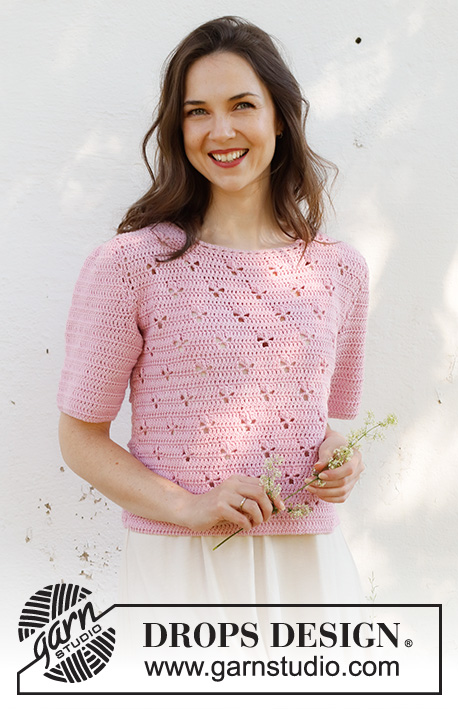
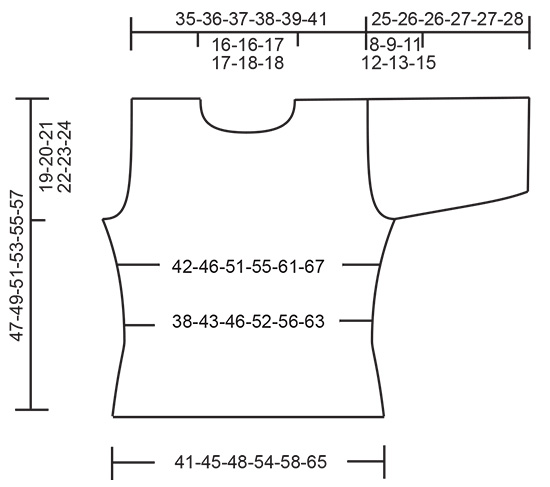
Crocheted short-sleeve jumper in DROPS Cotton Merino. The piece is worked bottom up with lace pattern. Sizes S - XXXL.
DROPS 232-36 |
|||||||||||||||||||
|
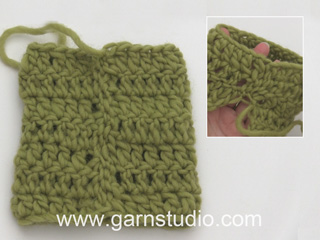
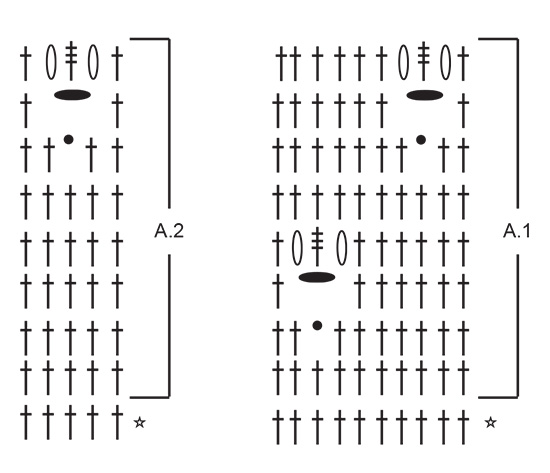
------------------------------------------------------- EXPLANATIONS FOR THE PATTERN: ------------------------------------------------------- CHAIN STITCH: If you work outermost on the hook the chain stitch will often be too tight; 1 chain stitch should be as long as 1 double/treble crochet is wide. PATTERN: See diagrams A.1 and A.2. CROCHET INFORMATION: At the beginning of each row of treble crochets work 3 chain stitches (replaces the first treble crochet), i.e. skip the last stitch on the previous row. Work the last treble crochet of the row in the 3rd chain stitch at the beginning of the previous row. DECREASE TIP: Decrease 1 treble crochet by working 2 treble crochets together: * Make 1 yarn over, insert the hook through the next stitch, pick up the strand, make 1 yarn over and pull it through the first 2 loops on the hook *, work from *-* 1 more time, make 1 yarn over and pull it through all 3 loops on the hook. Decrease 2 treble crochets by working 3 treble crochets together: * Make 1 yarn over, insert the hook through the next stitch, pick up the strand, make 1 yarn over and pull it through the first 2 loops on the hook *, work from *-* 2 more times, make 1 yarn over and pull it through all 4 loops on the hook. INCREASE TIP (for sides): Increase by working 2 treble crochets in the same stitch. The increased stitches are worked in treble crochets. ------------------------------------------------------- START THE PIECE HERE: ------------------------------------------------------- JUMPER – SHORT OVERVIEW OF THE PIECE: The front and back pieces are worked separately, back and forth, then sewn together. Stitches are worked around the armholes, then the sleeves worked back and forth, top down. BACK PIECE: Work 75-83-89-99-107-119 CHAIN STITCHES – read description above, with hook size 4 mm and DROPS Cotton Merino. Work 1 treble crochet in the 4th chain stitch from the hook (2 treble crochets) – read CROCHET INFORMATION, 1 treble crochet in each of the next 71-79-85-95-103-115 chain stitches = 73-81-87-97-105-117 stitches. Work back with 1 treble crochet in each treble crochet. Then work pattern as follows: 1 treble crochet in each of the first 4-3-6-6-5-6 treble crochets, A.1 a total of 6-7-7-8-9-10 times, A.2 and 1 treble crochet in each of the last 4-3-6-6-5-6 treble crochets. Continue this pattern. REMEMBER THE CROCHET TENSION! When the piece measures 8 cm, decrease 1 treble crochet on each side – read DECREASE TIP = 71-79-85-95-103-115 stitches. Repeat the decrease when the piece measures 12 cm = 69-77-83-93-101-113 stitches. When the piece measures 15 cm, increase 1 treble crochet on each side – read INCREASE TIP! Increase like this every 6-6½-4½-7½-5-5 cm a total of 3-3-4-3-4-4 times = 75-83-91-99-109-121 stitches. When the piece measures 28-29-30-31-32-33 cm, cast off for the armholes as described below, cutting the strand and making sure the next row is a row of treble crochets: Skip the first 4-5-5-6-7-9 stitches for the armhole, fasten the strand with 1 slip stitch in the next treble crochet, work 3 chain stitches (first treble crochet), work 2-2-3-3-3-3 treble crochets together, 1 treble crochet in each of the next 8-6-9-7-16-15 treble crochets, A.1 a total of 4-5-5-6-5-6 times, work A.2, 1 treble crochet in each of the next 8-6-9-7-16-15 treble crochets, work 2-2-3-3-3-3 treble crochets together and 1 treble crochet in the last stitch, turn (do not work the last 4-5-5-6-7-9 treble crochets) = 65-71-77-83-91-99 stitches. Continue the pattern back and forth, working 2-2-3-3-3-3 treble crochets together on each side every row a total of 2-4-2-3-5-7 times (including the first decrease when you skipped stitches for the armholes), then work 0-0-2-2-2-2 treble crochets together on each side of each row a total of 0-0-3-3-2-1 times = 63-65-67-69-71-73 stitches. Continue the pattern over the middle stitches and 1 treble crochet in each of the outermost treble crochets on each side. When the piece measures 42-44-46-48-50-52 cm, continue with treble crochets; finish the lace pattern if necessary. When the piece measures 45-47-49-51-53-55 cm, work the neck as follows: 1 treble crochet in each of the first 16-17-17-18-18-19 stitches, work 2 treble crochets together, turn = 17-18-18-19-19-20 stitches on the shoulder. Work 1 treble crochet in each stitch until the piece measures 47-49-51-53-55-57 cm. Cut and fasten the strand. Work the other shoulder as follows: Skip the middle 27-27-29-29-31-31 stitches for the neck, work 2 treble crochets together, 1 treble crochet in each of the last 16-17-17-18-18-19 treble crochets. Work 1 treble crochet in each treble crochet until the piece measures 47-49-51-53-55-57 cm. Cut and fasten the strand. FRONT PIECE: Work in the same way as the back until the piece measures 39-41-42-44-45-47 cm = 63-65-67-69-71-73 stitches. Work the neck as follows: Work as before over the first 19-20-21-22-23-24 stitches (only work lace pattern where it fits in width; the other stitches are worked with treble crochets), work 2 treble crochets together (first decrease for neck) = 20-21-22-23-24-25 stitches. Decrease 1 stitch for the neck on each row 4-4-5-5-6-6 times = 17-18-18-19-19-20 stitches on the shoulder. When the piece measures 42-44-46-48-50-52 cm, continue with treble crochets; finish the lace pattern if necessary. Work 1 treble crochet in each stitch until the piece measures 47-49-51-53-55-57 cm. Cut and fasten the strand. Work the other shoulder in the same way, working the last 21-22-23-24-25-26 stitches from the right side. ASSEMBLY: Sew one shoulder seam and both the side seams. NECK: ROW 1: Work 1 double crochet around the first row after the shoulder seam, work * 2 chain stitches, skip 1 cm, 1 double crochet *, work from *-* around the neck and finish with 1 double crochet around the last row on the shoulder. ROW 2: Work 2 double crochets around each chain-space. Cut and fasten the strand. ASSEMBLY: Sew the other shoulder seam. SLEEVES: Work an edge around the armhole as follows: Fasten the strand with 1 double crochet in the stitch by the side seam, * work 1 chain stitch, skip 1 stitch, 1 double crochet in the next stitch *, work from *-* over the stitches under the sleeve, then work up the armhole as follows: * 1 chain stitch, 1 double crochet around the next row *, work from *-* around the armhole and down to the bottom of the armhole, work the final stitches under the sleeve in the same way as the first stitches. Finish with 1 double crochet in the last stitch. Make sure your work does not tighten the armhole; work extra chain stitches between each double crochet if necessary = approx. 38-41-43-46-49-53 chain-spaces. Cut the strand. The sleeve cap is worked back and forth over more and more chain-spaces until you have worked all the chain-spaces. Work as follows from the right side: Start in the 5th chain stitch from the shoulder seam from the right side, work 1 double crochet around the chain-space, 2 treble crochets around the next chain stitch (up towards the shoulder seam), work 2 treble crochets around each of the next 7 chain stitches and finish with 1 slip stitch around the next chain-space = 16 treble crochets. Turn and work as follows from the wrong side: 3 chain stitches, 1 slip stitch around the next chain-space, 2 treble crochets in each treble crochet and finish with 1 slip stitch around the next chain-space on the other side of the sleeve = 32 treble crochets. Turn. Work 3 chain stitches, 1 slip stitch around the next chain-space, 2 treble crochets in the first treble crochet, 1 treble crochet in each treble crochet until there is 1 treble crochet left, 2 treble crochets in the next treble crochet and finish with 1 slip stitch around the next chain-space = 34 treble crochets. Continue like this and increase 1 treble crochet on each side a total of 5-6-8-9-10-12 times = 42-44-48-50-52-56 stitches. There remain now approx. 16-17-15-16-17-17 chain-spaces. On the next row work alternately 1 and 2 treble crochets around the last chain-spaces down to the side seam. Turn and work 1 treble crochet in each treble crochet and alternately 1 and 2 treble crochets around the remaining chain-spaces on the other side of the sleeve = 66-69-70-74-77-81 treble crochets. On the next row adjust the number of stitches to 62-65-68-74-77-81 stitches. Continue back and forth with 1 treble crochet in each treble crochet. When the sleeve measures 3 cm at the shortest point, decrease 1-1-1-1-0-0 treble crochets on each side. Decrease like this every 3-4-7-0-0-0 cm a total of 4-3-2-1-0-0 times = 54-59-64-72-77-81 stitches. Continue back and forth with 1 treble crochet in each treble crochet until the sleeve measures 15-15-14-14-13-12 cm at the shortest point. Cut and fasten the strand. Work the other sleeve in the same way. Sew the sleeve seams. |
|||||||||||||||||||
Diagram explanations |
|||||||||||||||||||
|
|||||||||||||||||||
|
|||||||||||||||||||
|
|||||||||||||||||||
|
Have you made this or any other of our designs? Tag your pictures in social media with #dropsdesign so we can see them! Do you need help with this pattern?You'll find tutorial videos, a Comments/Questions area and more by visiting the pattern on garnstudio.com. © 1982-2024 DROPS Design A/S. We reserve all rights. This document, including all its sub-sections, has copyrights. Read more about what you can do with our patterns at the bottom of each pattern on our site. |
|||||||||||||||||||


With over 40 years in knitting and crochet design, DROPS Design offers one of the most extensive collections of free patterns on the internet - translated to 17 languages. As of today we count 304 catalogues and 11422 patterns - 11422 of which are translated into English (UK/cm).
We work hard to bring you the best knitting and crochet have to offer, inspiration and advice as well as great quality yarns at incredible prices! Would you like to use our patterns for other than personal use? You can read what you are allowed to do in the Copyright text at the bottom of all our patterns. Happy crafting!
Comments / Questions (28)
Hei I oppskriften står dette: Når ermet måler 3 cm på det korteste, felles det 1-1-1-1-0-0 stav i hver side av arbeidet. Fell slik på hver 3.-4.-7.-0.-0.-0.cm totalt 4-3-2-1-0-0 ganger = 54-59-64-72-77-81 staver. Hekle frem og tilbake med 1 stav i hver stav til arbeidet måler 15-15-14-14-13-12 cm på det korteste. Klipp og fest tråden." Hva menes med den korteste? Hvor måles det fra?
26.07.2022 - 12:52DROPS Design answered:
Hej Tone, ærmet vil være kortest under ærmet (ovenpå har du flere rækker frem og tilbage) :)
04.08.2022 - 08:21Ik begrijp ook de beschrijving van de mouwen niet. de schouderkop heb ik gemaakt. daarna moet ik de laatste lossenlussen tot de zijnaad afwisselend 1 en 2 stokjes haken. drie lossen, werk keren en vervolgens langs de schouderkop naar de andere kant tot de zijnaad. aan deze kant is de mouw dan 1 stokje lang, de andere kant is 2 stokjes lang. dat blijft zo. wat doe ik verkeerd en hoe los ik dat op? dit is dezelfde vraag als Janny Kruimink stelde. maar zij heeft ook geen antwoord gekregen.
24.07.2022 - 23:26Denne forklaringen står om to ulike symboler: «trippelstav om de 2 luftmaskene 2 rader under, dvs det hekles om de 2 luftmaskene og om de 6 luftmaskene på raden under» jeg skjønner ikke dette. Hvis jeg prøver å hekle det, så ligner det ingenting på bildet. Går det an å forklare dette hullmønsteret litt bedre?
10.07.2022 - 22:19DROPS Design answered:
Hej Anne. Tack för info! Det var dessvärre fel i den norska översättningen, detta är nu rättat. Mvh DROPS Design
11.07.2022 - 14:35Ik kom niet uit de mouw. Na de meerderingen aan beide zijdes moet er heen en weer gehaakt naar beneden afw. 1 en 2 stokjes per lossenlus tot aan de zijnaden. Daarna keren en terug tot over de andere kant naar de zijnaad. Ik kom zo nooit gelijk uit. De ene kant heeft dan een toer teveel. Wat doe ik verkeerd?
11.06.2022 - 23:20DROPS Design answered:
Dag Janny,
De ene toer haak je 1 stokje om de laatste lossenlus aan beide kanten en de andere toer haak je 2 stokjes om de laatste lossenlus aan beide kanten. Zo wissel je steeds af.
12.06.2022 - 20:24Hello, I noticed that there are 5 more stitches on the back shoulder than on the front shoulder. I am making size XL and the stitches for the back are 24 and for the front are 19. How do I line up the front and back when sewing the shoulder seam? Is it to the neckline or the shoulders? Or do I center it between them? Thank you.
05.06.2022 - 01:18DROPS Design answered:
Dear Mrs Rae, thanks for your feedback, there was a mistake under back piece, this is now fixed. Happy crocheting!
07.06.2022 - 11:02Top Hortense 232-36. Ik begrijp de werkwijze voor de mouw niet vanaf er voor maat M al 44 stokjes zijn. Er zouden dan 17 lossenlussen over zijn. Bij mij is dat het dubbele.Dan moet je afwisselend 1 en 2 stokjes haken in de lossenlussen tot aan de zijnaad, het werk keren, stokjes haken tot aan de andere kant van de mouwkop en opnieuw 1 en 2 stokjes in de lossenlussen tot aan de zijnaad. Dan haak je toch niet heen en weer ? Op de foto van het topje kan je dat niet zien. Geen duidelijke uitleg.
27.05.2022 - 17:02DROPS Design answered:
Dag Chantal,
De eerste toer haak je in 10 lossenlussen in totaal (in 5 lossenlussen aan elke kant van de schouder) Dan komen er in elke toer aan elke kant 1 lossenlus bij waar je in haakt, dus steeds 2 per toer. Op het moment dat je 34 stokjes hebt, heb je 14 lossenlussen 'opgebruikt' om in te haken en wanneer je 44 stokjes hebt, heb je 24 lossenlussen gebruikt en heb je dus 17 lossenlussen over. Nu haak je niet meer steeds 2 stokjes aan het begin en einde, maar de ene keer 1 stokje en de andere keer 2 stokjes.
03.07.2022 - 14:24Hoe werkt het patroon van het kantpatroon precies. Is daar een video van?
17.05.2022 - 16:03DROPS Design answered:
Dag Lies,
Er is een telpatroon onderaan de beschrijving van het patroon. Hier staat ook een lijst met symbolen bij met een beschrijving. Er is geen video van specifiek van dit kantpatroon, maar wek van alle steken die ervoor gebruikt worden.
19.05.2022 - 20:38Patroon 232-36 : ik begrijp de werkwijze om de mouwen rechtstreeks te haken aan het armsgat. Je moet stokjes haken, eindigen met een halve vaste in een losse, het werk keren, 3 lossen haken en 1 halve vaste om de volgende lossenlus. Dat begrijp ik niet.
01.05.2022 - 16:48DROPS Design answered:
Dag Chantal,
Het is inderdaad een beetje verwarrend, maar het gaat erom dat je als het ware in de ronding haakt om de mouwkop te maken. Je kunt ook het werk pas keren nadat je 3 lossen en 1 halve vaste om de volgende lossenlus hebt gemaakt. Je maakt de 3 lossen dus vast aan de kant waar je het werk keert, zodat het armsgat om de ronding van mouwkop komt te zitten. Hopelijk heb ik het zo goed uitgelegd.
11.05.2022 - 09:30Bonjour Voila 3 ml remplace une bride ok (c'est-à-dire sauter la dernière maille du rang précédent. ) si on fait sa manque une bride Merci de votre réponse Béatrice
27.04.2022 - 14:31DROPS Design answered:
Bonjour Béatrice, lorsque vous tournez et crochetez les 3 mailles en l'air pour remplacer la 1ère bride du rang, crochetez la 1ère bride du nouveau rang dans la 2ème bride du rang précédent (car les 3 mailles en l'air remplacent la 1ère bride et se trouvent juste au-dessus de la dernière bride du rang précédent). Bon crochet!
27.04.2022 - 15:27Si je ne peux pas imprimer, comment télécharger les modèles gratuits ?
13.04.2022 - 17:29DROPS Design answered:
Bonjour Sylvia, pour télécharger un modèle, vous devez cliquer sur le bouton d'impression. Lorsque vous choisissez les options d'impression sur votre ordinateur et que vous pouvez sélectionner une imprimante, vous devez cliquer sur télécharger au format pdf.
14.04.2022 - 18:11