
Looking for a yarn?


Comments / Questions (9)
![]() Jacqueline Parton wrote:
Jacqueline Parton wrote:
Really struggling with the charts is there a written pattern can’t see where a2 goes thank you
10.06.2024 - 22:48DROPS Design answered:
Dear Jacqueline, we do not have a written out pattern, not only because our patterns are available in many languages, but also, because we believe that with diagrams you can see the "bigger picture", in other words, not only the very next step, the very next stitch, but also how stitches and rows relate to each other. HERE we have a lesson on how to read crochet diagrams, and you can always ask for help either over the phone or in person in the store where you bought your DROPS yarn from. Happy crafting!
11.06.2024 - 01:07
![]() Dominique wrote:
Dominique wrote:
Bonjour Comment assemblée les carrés ensemble ? Couture sur l'endroit ou sur l'envers ? Merci
24.04.2024 - 17:17DROPS Design answered:
Bonjour Dominique, il existe différentes façons de faire, vous pouvez les crocheter ensemble (cf vidéo ou bien les coudre, comme dans cette vidéo ou bien comme dans celle-ci, au choix. Bon assemblage!
25.04.2024 - 07:45
![]() Domi wrote:
Domi wrote:
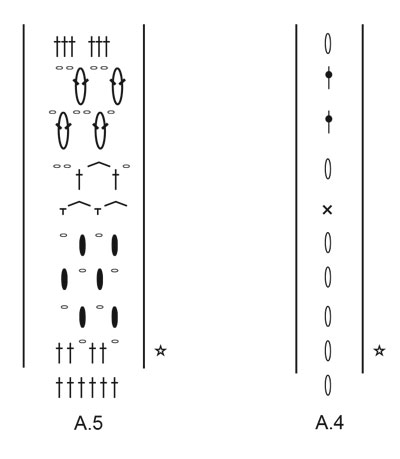
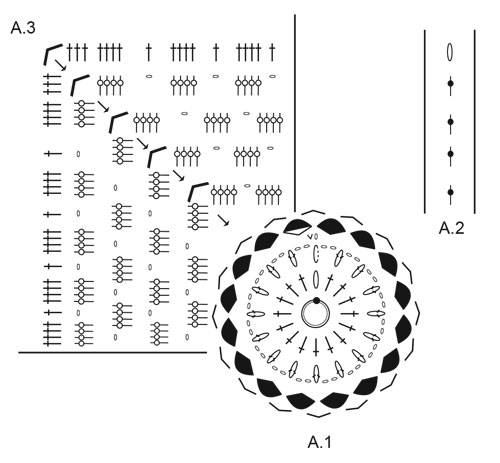
Bonjour Je ne comprends pas le diagramme A2. Que faut il faire ? Merci
26.03.2024 - 11:35DROPS Design answered:
Bonjour Domi, le diagramme A.2 montre le début et la fin des tours, avant de crocheter par ex 4 fois A.3 autour du cercle (pour le carré). Retrouvez comment commencer ces tours en suivant la légende des symboles correspondants. Bon crochet!
02.04.2024 - 10:19
![]() Darlene wrote:
Darlene wrote:
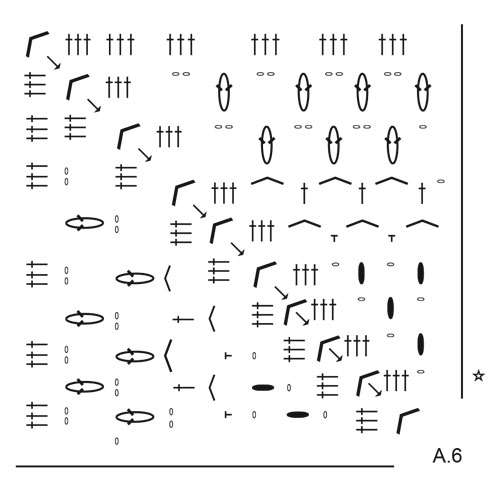
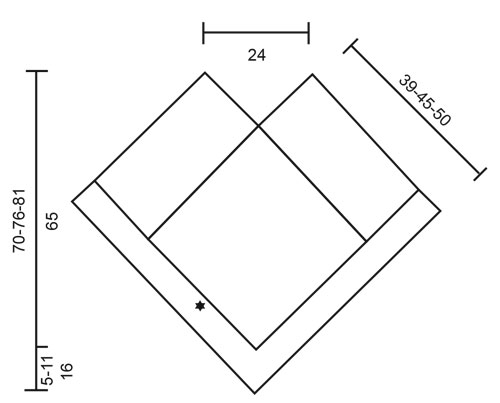
Hi. The instructions for the bottom edge state “Start in the stitch marked with a star in A2. “ The diagram of A2 has no star. Then it says “Work A4 in this stitch…” . What stitch.? These instructions make no sense. Can you please explain? Thank you.
22.04.2023 - 21:07DROPS Design answered:
Dear Darlene, the star is not in A.2, but rather in the measurement schematic. So, you start working A.4 and A.5 over the stitches in A.2 at that position of the poncho. Happy crochetting!
23.04.2023 - 19:39
![]() Sandrine Haudecoeur wrote:
Sandrine Haudecoeur wrote:
Bonjour, je bloque à partir du 5eme rang du diagramme A3, je n'arrive pas à faire correspondre correctement mes groupes de brides pour avoir des angles corrects, comment lire le schéma correctement ?
11.04.2023 - 12:07DROPS Design answered:
Bonjour Mme Haudecoeur, le diagramme A.3 ne comporte que 5 rangs, autrement dit, après le dernier rang du diagramme, vous pouvez couper et rentrer le fil. Pour ce 5ème rang, crochetez A.2 (début du tour), puis 1 bride autour de chaque maille en l'air/arceau et dans chaque bride jusqu'aux coins, dans l'arceau du coin, crochetez 3 brides, 3 mailles en l'air, 3 brides. Ou bien ai-je mal compris votre question?
11.04.2023 - 14:27
![]() Garcia wrote:
Garcia wrote:
Bonjour , Entre le rang deux et 3 du diagramme A1Il y a un sigle VO .Concernant le V=maille coulée autour de l'arceau-De quel arceau s'agit)-il. Faut-il bien commencer par le sigle O puis V. Merci pour votre aide
24.10.2022 - 11:02DROPS Design answered:
Bonjour Mme Garcia, il s'agit du 1er arceau du tour, vous crochetez 1 maille en l'air, puis 1 maille coulée dans le 1er arceau, puis le symbole commençant par les 4 mailles en l'air, 3 double-brides autour du même arceau, etc... (= 14ème symbole). Bon crochet!
24.10.2022 - 16:09
![]() Annabelle Garcia wrote:
Annabelle Garcia wrote:
Bonjour, Je ne comprends pas le démarrage de la deuxième ligne du diagramme A1.Je commence le tour par 4 mailles en l'air mais ensuite que veut dire crocheter une double bride dans la même maille Quelle maille? Le changement de couleur se fait-il avant ou après les 4 mailles en l'air? Merci pour votre aide Annabelle
20.10.2022 - 12:52DROPS Design answered:
Bonjour Mme Garcia, dans la même maille d'où vous avez fait votre maille coulée + les 4 mailles en l'air, autrement dit, dans la 3ème maille en l'air du début du tour précédent (qui remplaçaient la 1ère bride du tour). Quand on change de couleur, on doit crocheter la dernière maille coulée du tour avec la couleur du tour suivant (cf cette vidéo). Bon crochet!
20.10.2022 - 13:14
![]() Betty wrote:
Betty wrote:
Bonjour, j'ai besoin d'explications pour l'assemblage des 4 carrés, je ne comprends pas bien le schéma. Merci de m'aider
30.04.2022 - 17:37DROPS Design answered:
Bonjour Betty, posez un carré à plat comme au milieu devant du schéma, placez un 2ème carré le long du côté gauche en haut de ce carré et assemblez ces 2 carrés entre eux. Placez un autre carré le long du côté droit en haut du 1er carré et assemblez les entre eux. Ils forment maintenant une sorte de grand V. Retournez l'ouvrage sur l'envers, repliez les carrés 2 et 3 en double et placez le dernier carré (milieu dos) au-dessus du 1er et assemblez-le aux carrés pliés en double. Bon assemblage!
02.05.2022 - 08:19
![]() Daphne wrote:
Daphne wrote:
Sweet memories
17.01.2022 - 14:20
|
|||||||||||||||||||||||||||||||||||||||||||||||||||||||
Carefree Feeling#carefreefeelingponcho |
|||||||||||||||||||||||||||||||||||||||||||||||||||||||
 |
 |
||||||||||||||||||||||||||||||||||||||||||||||||||||||
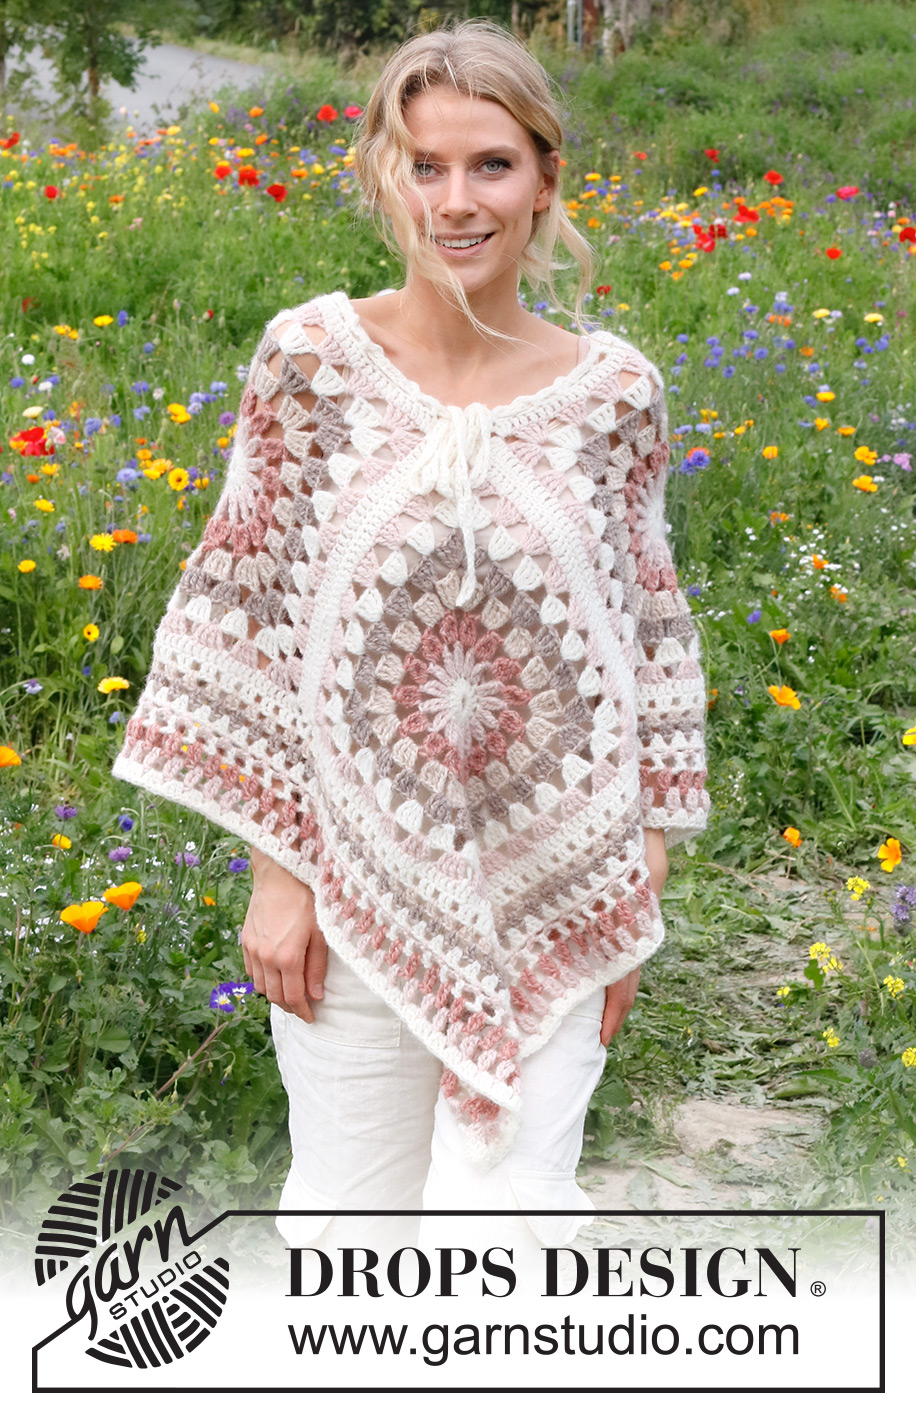
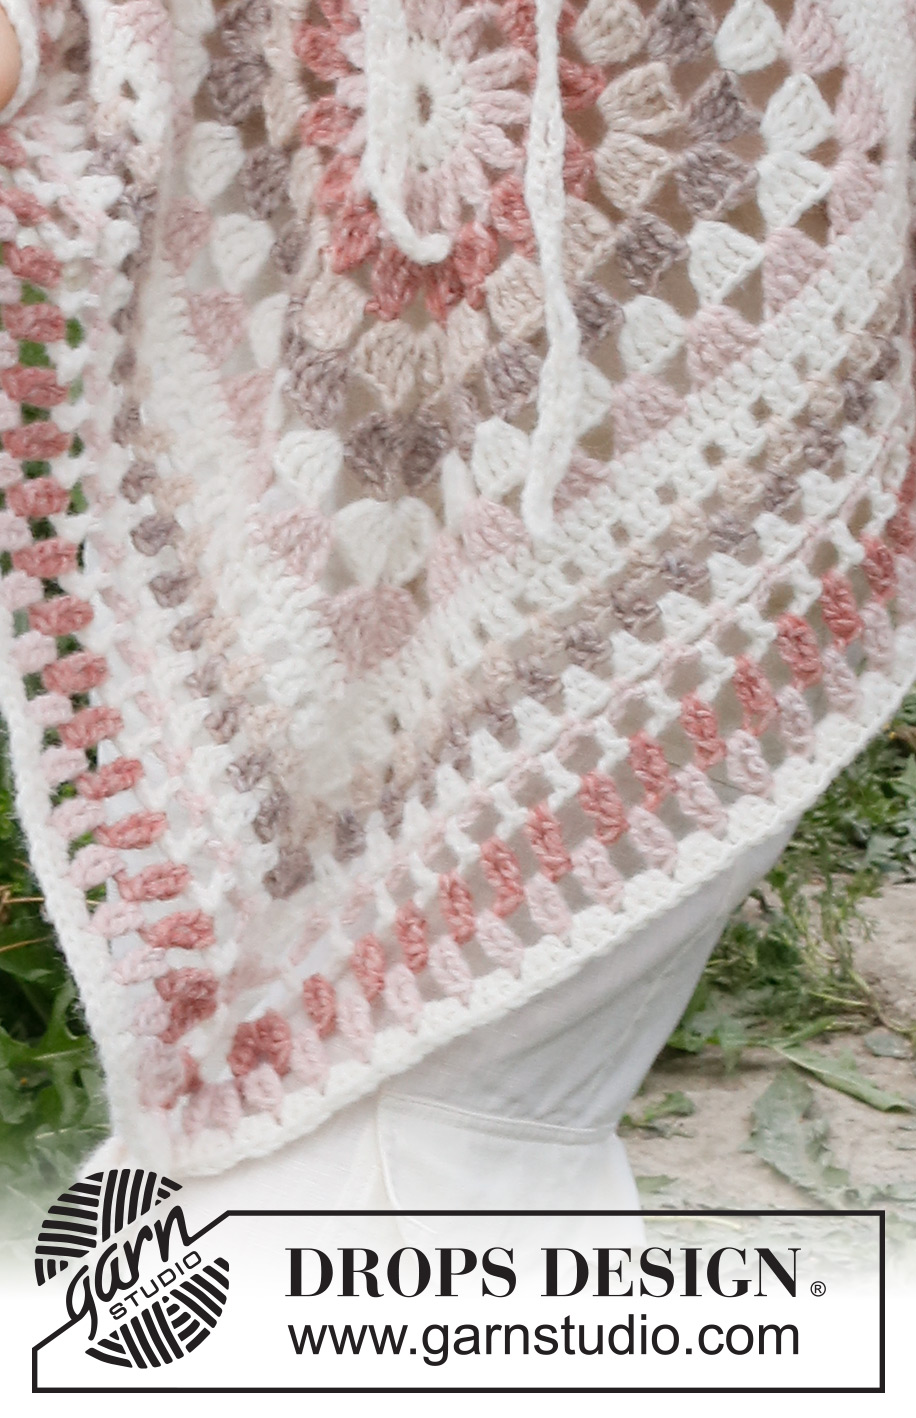
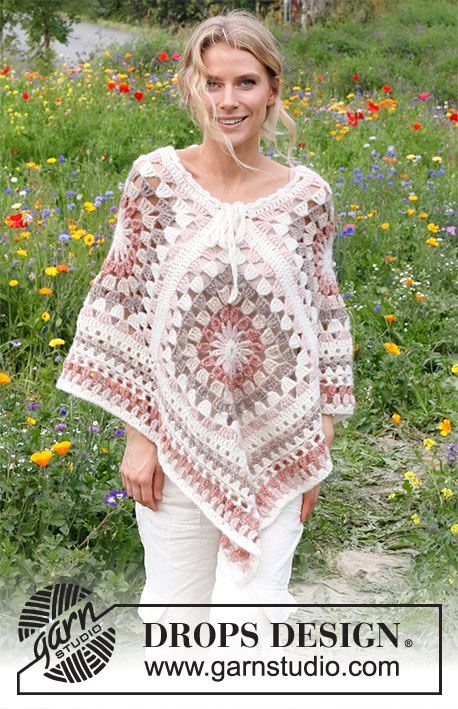
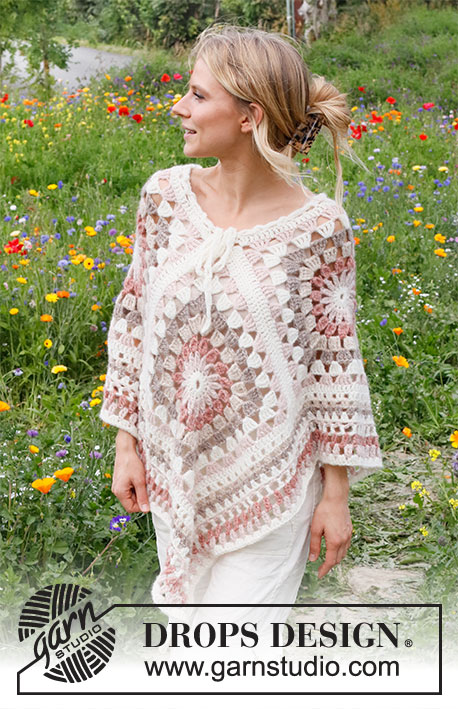
Crocheted poncho with squares in DROPS Air. Sizes S – XL.
DROPS 229-15 |
|||||||||||||||||||||||||||||||||||||||||||||||||||||||
|
------------------------------------------------------- EXPLANATIONS FOR THE PATTERN: ------------------------------------------------------- PATTERN: See diagrams A.1 to A.6. COLORS SQUARE (A.1 to A.3): CAST ON and ROUND 1: off white ROUND 2: pink sand ROUND 3: blush ROUND 4: wheat ROUND 5: beige ROUND 6: off white ROUND 7: pink sand ROUND 8: off white COLORS EDGE (A.4 to A.6): ROUND 1: off white ROUND 2: wheat ROUND 3: beige ROUND 4: off white ROUND 5: pink sand ROUND 6: off white ROUND 7: blush ROUND 8: pink sand ROUND 9: off white COLOR-CHANGE TIP: When changing color work as follows: Work the last stitch on the round with the old color, but wait with the final yarn over and pull-through, change to the next color and work the yarn over and pull-through, then continue as shown in the diagram. ------------------------------------------------------- START THE PIECE HERE: ------------------------------------------------------- PONCHO - SHORT OVERVIEW OF THE PIECE: The poncho is made up of 4 squares sewn together as shown in the sketch. Then a wide edge is worked at the bottom and a narrow edge around the neck. A cord for the neck is worked to finish. 1 SQUARE: Read COLORS SQUARE in explanations above. Start with hook size 5 MM = US H/8 and color off white in DROPS Air. Work 5 chain stitches and form them into a ring with 1 slip stitch in the first chain stitch. Read COLOR-CHANGE TIP, and work diagram A.1 (circle). REMEMBER THE CROCHET GAUGE! When A.1 has been completed, continue as follows: Work A.2 (= beginning and end of the round), A.3 four times around the circle. When A.2 and A.3 are finished, cut and fasten the strands. Work 4 squares. ASSEMBLY: Lay the squares as shown in the sketch. NOTE: Make sure the square marked with a black star lies so the end of the round is towards the outside edge. The star marks the start of the edge to be worked later. Sew the squares together edge to edge so the seam is flat. Cut and fasten the strands. BOTTOM EDGE: Read COLORS EDGE in the explanations above. Start in the stitch marked with a star in A.2. Work A.4 in this stitch, then A.5 three times, work A.6 in the corner/point of the poncho, work A.5 to the next corner – NOTE: In each transition between 2 squares work 1 chain stitch, 2 double crochets around the corner chain-space on the first square, 1 chain stitch, 2 double crochets around the corner chain-space on the second square. Continue like this around the whole poncho. S/M: Finish the edge after round 4 in A.4 to A.6. Cut and fasten the strands. M/L: Work the whole of A.4 to A.6. Cut and fasten the strands. L/XL: Work the whole of A.4 to A.6 but adjust so that the number of double crochets between 2 corners/points on the last round is divisible by 6. Then work rounds 1 to 4 in A.4 to A.6 one more time. Cut and fasten the strands. EDGE AROUND NECK: Start mid-back at the bottom of the neck, work 1 single crochet with off white, * 3 chain stitches, skip 2 double crochets, 1 single crochet in the next stitch *, work from *-* around the neck, finish with 3 chain stitches and 1 slip stitch in the single crochet at the beginning of the round. Cut and fasten the strand. CORD: Work a row of chain stitches, using off white, length 75 to 85 cm = 29½" to 33½" (the number of stitches should be divisible by 4 + 1). Work 1 single crochet in the 9th chain stitch from the hook, * 3 chain stitches, skip 3 chain stitches, 1 single crochet in the next chain stitch *, work from *-* along the whole row. Cut and fasten the strand. Start at the bottom of the neck, mid-front and thread the cord up and down through the row of holes around the neck. Tie a bow mid-front. |
|||||||||||||||||||||||||||||||||||||||||||||||||||||||
Diagram explanations |
|||||||||||||||||||||||||||||||||||||||||||||||||||||||
|
|||||||||||||||||||||||||||||||||||||||||||||||||||||||
|
|||||||||||||||||||||||||||||||||||||||||||||||||||||||
|
|||||||||||||||||||||||||||||||||||||||||||||||||||||||
|
|||||||||||||||||||||||||||||||||||||||||||||||||||||||
|
|||||||||||||||||||||||||||||||||||||||||||||||||||||||
Have you finished this pattern?Tag your pictures with #dropspattern #carefreefeelingponcho or submit them to the #dropsfan gallery. Do you need help with this pattern?You'll find 9 tutorial videos, a Comments/Questions area and more by visiting the pattern on garnstudio.com. © 1982-2025 DROPS Design A/S. We reserve all rights. This document, including all its sub-sections, has copyrights. Read more about what you can do with our patterns at the bottom of each pattern on our site. |
|||||||||||||||||||||||||||||||||||||||||||||||||||||||


With over 40 years in knitting and crochet design, DROPS Design offers one of the most extensive collections of free patterns on the internet - translated to 17 languages. As of today we count 314 catalogs and 11822 patterns - 11812 of which are translated into English (US/in).
We work hard to bring you the best knitting and crochet have to offer, inspiration and advice as well as great quality yarns at incredible prices! Would you like to use our patterns for other than personal use? You can read what you are allowed to do in the Copyright text at the bottom of all our patterns. Happy crafting!
Post a comment to pattern DROPS 229-15
We would love to hear what you have to say about this pattern!
If you want to leave a question, please make sure you select the correct category in the form below, to speed up the answering process. Required fields are marked *.