DROPS Paris
DROPS Paris
100% Cotton
from 1.60 $ /50g
Get the yarn to make this pattern from 20.80$.

The yarn cost is calculated from the pattern’s smallest size and the yarn’s cheapest product type. Looking for an even better price? You might find it on the DROPS Deals!

DROPS SS24

Spring Messenger

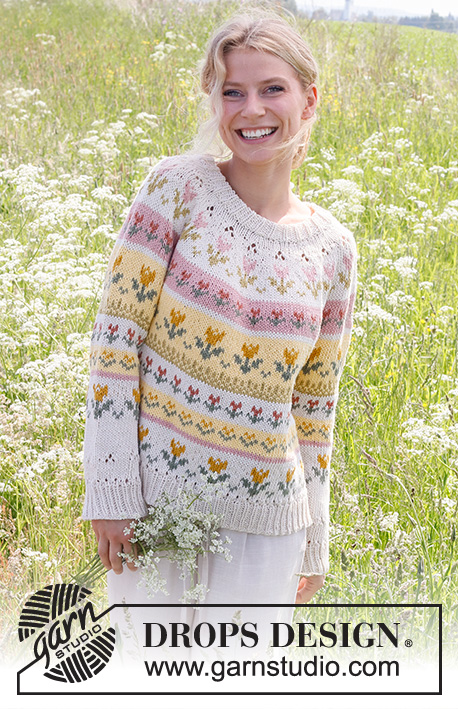
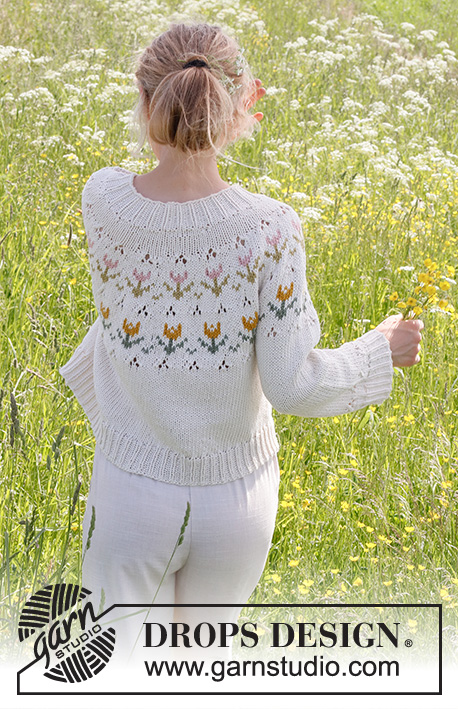
Knitted sweater in DROPS Paris. Piece is knitted top down with round yoke, lace pattern and Nordic pattern with tulips. Size: S - XXXL

DROPS 232-2
DROPS design: Pattern w-861
Yarn group C or A + A
----------------------------------------------------------

SIZE:
S - M - L - XL - XXL – XXXL

Finished measurements:
Chest measurements: 92-102-108-118-130-144 cm = 36¼"-40"-42½"-46½"-51¼"-56½"
Full length: 50-52-54-56-58-60 cm = 19¾"-20½"-21¼"-22"-22¾"-23⅝"
All measurements in charts are in cm.

MATERIALS:
DROPS PARIS from Garnstudio (belongs to yarn group C)
450-500-550-600-650-700 g color no 17, off white
50-50-50-50-50-50 g color 25 moss green
50-50-50-50-50-50 g color 41, mustard
50-50-50-50-50-50 g color 61, lime
50-50-50-50-50-50 g color 63, desert rose

NEEDLES:
DROPS CIRCULAR NEEDLE SIZE 5 MM = US 8: Length 40 and 80 cm = 16" and 32".
DROPS CIRCULAR NEEDLE SIZE 4 MM = US 6: Length 40 and 80 cm = 16" and 32".
DROPS CIRCULAR NEEDLE SIZE 3,5 MM = US 8: Length 40 cm = 16".
DROPS DOUBLE POINTED NEEDLES SIZE 5 MM = US 8
DROPS DOUBLE POINTED NEEDLES SIZE 4 MM = US 6
The technique MAGIC LOOP can be used – you then only need circular needle of 80 cm = 32" in each size.

KNITTING GAUGE:
17 stitches in width and 22 rows vertically in stockinette stitch = 10 x 10 cm = 4" x 4".
NOTE! Remember that needle size is only a suggestion. If you have too many stitches on 10 cm = 4" switch to larger needles. If you have too few stitches on 10 cm = 4" switch to smaller needles.

-------------------------------------------------------

Alternative Yarn – See how to change yarns here
Yarn Groups A to F – Use the same pattern and change the yarn here
Yarn usage using an alternative yarn – Use our yarn converter here

-------------------------------------------------------

DROPS Paris
DROPS Paris
100% Cotton
from 1.60 $ /50g
Get the yarn to make this pattern from 20.80$.

The yarn cost is calculated from the pattern’s smallest size and the yarn’s cheapest product type. Looking for an even better price? You might find it on the DROPS Deals!

Pattern instructions

NOTE: This pattern is written in American English. All measurements in charts are in cm. For conversion from inches to cm - click here. There are different terms for crocheting in American and British English. If this pattern includes crochet, click for "crochet terms" here. For this pattern in British English, please click here.
----------------------------------------------------------

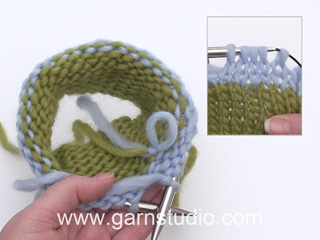
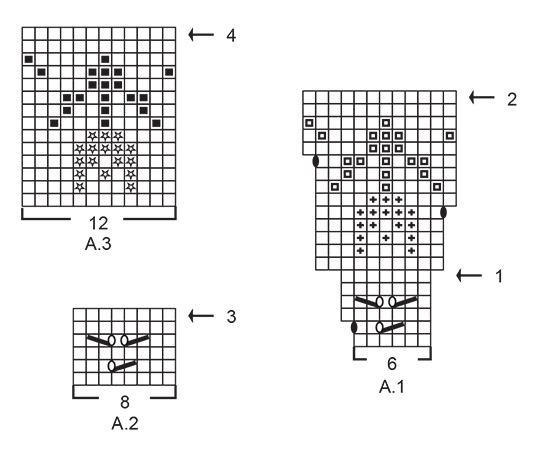
EXPLANATION FOR THE PATTERN:

----------------------------------------------------------

PATTERN:
See diagrams A.1 to A.3.

INCREASE TIP (evenly):
To calculate how to increase evenly, use the total number of stitches on row (e.g. 84 stitches) and divide stitches by number of increases to be done (e.g. 28) = 3.
In this example increase by making 1 yarn over after every 3rd stitch. On next round knit yarns over twisted to avoid holes.

ELEVATION:
To make the sweater higher in the back of neck when working round yoke, knit an elevation. Skip this paragraph if you do not want an elevation.
Insert 1 marker at beginning of round = mid back.
Begin from marker from right side, knit 15-15-16-17-17-18, turn piece, tighten yarn and purl 30-30-32-34-34-36.
Turn piece, tighten yarn and knit 45-45-48-51-51-54, turn piece, tighten yarn and purl 60-60-64-68-68-72.
Turn piece, tighten yarn and knit 75-75-80-85-85-90, turn piece, tighten yarn and purl 90-90-96-102-102-108.
Turn piece, tighten yarn and knit until marker mid back. Then work yoke as explained in pattern.

DECREASE TIP (applies to mid under sleeves):
Decrease 1 stitch on each side of marker thread as follows: Work until 3 stitches remain before marker thread, knit 2 together, knit 2 stitches (marker thread is between these 2 stitches), slip 1 stitch knitwise, knit 1, pass slipped stitch over stitch worked (= 2 stitches decreased).

----------------------------------------------------------

START THE PIECE HERE:

----------------------------------------------------------

SWEATER - SHORT OVERVIEW OF THE PIECE:
Work neck edge and yoke in the round on circular needle from mid back, top down. Work an elevation at the back of neck if you want. Now divide yoke for body and sleeves. Work body in the round on needle, top down. Work sleeves in the round on double pointed needles/short circular needle, top down.

NECK EDGE:
Cast on 87-93-96-102-105-108 stitches on short circular needle size 3,5 MM = US 8 with color off white in DROPS Paris. Knit 1 round. Then work rib (knit 1/purl 2) for 5 cm = 2" – AT THE SAME TIME on last round increase 21-19-20-22-23-28 stitches evenly – read INCREASE TIP = 108-112-116-124-128-136 stitches.
Insert 1 marker middle on round = mid front. Measure yoke from this marker later. Switch to circular needle size 5 MM = US 8.
Now work an ELEVATION at the back of neck - read explanation above. When elevation has been worked, work yoke as explained below.
If you don’t want an elevation, move on to YOKE.

YOKE:
Work in stockinette stitch with color off white for 2-2-3-3-4-4 cm = ¾"-¾"-1⅛"-1⅛"-1½"-1½", measured from marker mid front – AT THE SAME TIME on last round increase 0-2-4-2-4-2 stitches evenly = 108-114-120-126-132-138 stitches. Then work pattern as follows:

A.1:
Work A.1 18-19-20-21-22-23 times in total in the round on yoke. When 2nd round in A.1 has been worked, there are 126-133-140-147-154-161 stitches on needle.
Continue pattern and increase as shown in diagram.
AT THE SAME TIME on round marked with arrow-1 in A.1 increase 34-37-40-33-36-39 stitches evenly – remember INCREASE TIP = 160-170-180-180-190-200 stitches (now work A.1 16-17-18-18-19-20 times in the round on yoke).
Before arrow-2 begins there are 192-204-216-216-228-240 stitches on round.
On round marked with arrow-2 increase 24-28-32-48-52-56 stitches evenly = 216-232-248-264-280-296 stitches.

A.2:
Work A.2 27-29-31-33-35-37 times in total in the round on yoke. On round marked with arrow-3 increase 12-20-16-24-20-28 stitches evenly = 228-252-264-288-300-324 stitches.

A.3:
Work A.3 19-21-22-24-25-27 times in total in the round on yoke. On round marked with arrow-4 increase 12-12-16-24-28-36 stitches evenly = 240-264-280-312-328-360 stitches.

A.2:
Work the first 4 rounds in A.2 30-33-35-39-41-45 times in total in the round on yoke.
Then work in stockinette stitch over all stitches with color off white.
Work until piece measures 22-22-24-26-28-30 cm = 8¾"-8¾"-9½"-10¼"-11"-11¾" from marker mid front.
Now divide yoke for body and sleeves as follows: Work 36-40-42-46-50-56 stitches in stockinette stitch (½ back piece), slip the next 48-52-56-64-64-68 stitches on a stitch holder for sleeve, cast on 6-6-8-8-10-10 new stitches on row (in the side under sleeve), work 72-80-84-92-100-112 stitches in stockinette stitch (front piece), slip the next 48-52-56-64-64-68 stitches on a stitch holder for sleeve, cast on 6-6-8-8-10-10 new stitches on row (in the side under sleeve) and work 36-40-42-46-50-56 stitches in stockinette stitch (½ back piece). Finish body and sleeves separately.

BODY:
= 156-172-184-200-220-244 stitches. Work stockinette stitch in the round with color off white.
When piece measures 19-21-21-21-21-21 cm = 7½"-8¼"-8¼"-8¼"-8¼"-8¼" from division, work 1 round in stockinette stitch while increasing 30-32-35-40-44-47 stitches evenly = 186-204-219-240-264-291 stitches. Switch to circular needle size 4 MM = US 6. Work rib (knit 1/purl 2) for 5 cm = 2". Bind off. Sweater measures approx. 50-52-54-56-58-60 cm = 19¾"-20½"-21¼"-22"-22¾"-23⅝" from shoulder and down.

SLEEVES:
Slip the 48-52-56-64-64-68 stitches from stitch holder in one side of piece on double pointed needles or a short circular needle size 5 MM = US 8 and pick in addition up 1 stitch in each of the 6-6-8-8-10-10 new stitches cast on under sleeve = 54-58-64-72-74-78 stitches.
Insert 1 marker thread mid under sleeve (in the middle of the 6-6-8-8-10-10 stitches that were cast on under sleeve). Move the marker thread upwards when working - marker should be used for decrease stitches mid under sleeve.
Begin round at the marker thread and work stockinette stitch in the round with color off white.
When piece measures 4-4-4-3-2-3 cm = 1½"-1½"-1½"-1⅛"-¾"-1⅛" from division, decrease 2 stitches mid under sleeve - read DECREASE TIP. Decrease like this every 4-6½-3½-2-3-2 cm = 1½"-2½"-1¼"-¾"-1⅛"-¾" 7-5-8-12-9-11 times in total = 40-48-48-48-56-56 stitches.
Work until sleeve 31-31-30-28-27-25 cm = 12¼"-12¼"-11¾"-11"-10⅝"-9¾" from division. 10 cm = 4" remain until finished measurements. Try the sweater and work to desired length.
Work A.2 5-6-6-6-7-7 times in total in the round on sleeve. When A.2 has been worked, work in stockinette stitch until piece measures 35-35-34-32-31-29 cm = 13¾"-13¾"-13⅜"-12½"-12¼"-11⅜" from division - AT THE SAME TIME on last round increase 8-9-9-9-10-10 stitches evenly = 48-57-57-57-66-66 stitches.
Switch to double pointed needles size 4 MM = US 6. Work rib (knit 1/purl 2) for 6 cm = 2⅜". Bind off. Sleeve measures approx. 41-41-40-38-37-35 cm = 16⅛"-16⅛"-15¾"-15"-14½"-13¾" from division. Work the other sleeve the same way.

This pattern has been corrected.

Updated online: 29.03.2022
Correction under Neck Edge.

Diagram

All measurements in charts are in cm.

symbols = off white
symbols = desert rose
symbols = lime
symbols = mustard
symbols = moss green
symbols = knit 2 together with off white
symbols = slip 1 stitch knitwise, knit 1 with off white, pass slipped stitch over stitch worked
symbols = between 2 stitches make 1 yarn over with off white, on next round knit yarn over to make holes
symbols = between 2 stitches make 1 yarn over with off white, on next round knit yarn over twisted to avoid holes
diagram
diagram

Each of our patterns has specific tutorial videos to help you.

Do you have a question? See a list of frequently asked questions (FAQ)

Knitting tension is what determines the final measurements of your work, and is usually measured per 10 x 10 cm. It is provided like so: number of stitches in width x number of rows in height - eg: 19 stitches x 26 rows = 10 x 10 cm.

The knitting tension is very individual; some people knit/crochet loosely while others work tightly. You adjust the knitting tension with the needle size, which is why the suggested needle size only serve as a guide! You need to adjust this (up or down) to ensure that YOUR knitting tension matches the knitting tension provided in the pattern. If you work with a different knitting tension than provided you will have a different yarn consumption, and your work will have different measurements than what the pattern suggests.

The knitting tension also determines which yarns can replace each other. As long as you achieve the same knitting tension you can replace one yarn with another.

See DROPS lesson: How to measure your tension/gauge

See DROPS video: How to make a gauge tension swatch

The required amount of yarn is provided in grams, eg: 450 g. To calculate how many balls you’ll need you first need to know how many grams are in 1 ball (25g, 50g or 100g). This information is available if you click on the individual yarn quality on our pages. Divide the amount required with the amount of each ball. For example, if each ball is 50g (the most common amount), the calculation will be as follows: 450 / 50 = 9 balls.

The important thing when changing from one yarn to another is that the knitting/crochet tension remains the same. This is so that the measurements of the finished piece will be the same as on the sketch provided. It is easier to achieve the same knitting tension using yarns from the same yarn group. It is also possible to work with multiple strands of a thinner yarn to achieve the knitting tension of a thicker one. Please try our yarn converter. We recommend you to always work a test swatch.

Please NOTE: when changing yarn the garment might have a different look and feel to the garment in the photo, due to individual properties and qualities of each yarn.

See DROPS lesson: Can I use a different yarn than the one mentioned in the pattern?

All our yarns are categorised into yarn groups (from A to F) according to thickness and knitting tension – group A contains the thinnest yarns and group F the thickest. This makes it easier for you to find alternative yarns to our patterns, should you wish to switch yarn. All yarns within the same group have a similar knitting tension and can easily replace each other. However, different yarn qualities have different structures and properties which will give the finished work a unique look and feel.

Click here for an overview of the yarns in each yarn group

At the top of all our patterns you’ll find a link to our yarn converter, which is a helpful tool should you wish to use a different yarn than suggested. By filling in the yarn quality you wish to replace, the amount (in your size) and number of strands, the converter will present good alternative yarns with the same knitting tension. Additionally it will tell you how much you’ll require in the new qualities and whether you’ll need to work with multiple strands. Most skeins are 50g (some are 25g or 100g).

If the pattern is worked with multiple colours, every colour will have to be converted separately. Similarly, if the pattern is worked with several strands of different yarns (for example 1 strand Alpaca and 1 strand Kid-Silk) you will have to find alternatives for each, individually.

Click here to see our yarn converter

Since different yarns have different qualities and textures we have chosen to keep the original yarn in our patterns. However, you can easily find options among our available qualities by using our yarn converter, or simply pick a yarn from the same yarn group.

It is possible that some retailers still have discontinued yarns in stock, or that someone has a few skeins at home that they would like to find patterns for.

The yarn converter will provide both alternative yarn as well as required amount in the new quality.

If you think it's hard to decide what size to make, it can be a good idea to measure a garment you own already and like the size of. Then you can pick the size by comparing those measures with the ones available in the pattern's size chart.

You'll find the size chart at the bottom of the pattern.

See DROPS lesson: How to read size chart

The needle size provided in the pattern serves only as a guide, the important thing is to follow the knitting tension. And since knitting tension is very individual, you will have to adjust the needle size to ensure that YOUR tension is the same as in the pattern – maybe you’ll have to adjust 1, or even 2 needle sizes, up or down to achieve the correct tension. For this, we recommend that you work test swatches.

Should you work with a different knitting tension than the one provided, the measurements of the finished garment might deviate from the measurement sketch.

See DROPS lesson: How to measure your tension/gauge

See DROPS video: How to make a gauge tension swatch

Working a garment top-down provides more flexibility and room for personal adjustment. For example it is easier to try the garment on while working, as well as making adjustments to length of yoke and shoulder caps.

The instructions are carefully explaining every step, in the correct order. Diagrams are adjusted to the knitting direction and are worked as usual.

The diagram depicts all rows/rounds, and every stitch seen from the right side. It is read from bottom to top, from right to left. 1 square = 1 stitch.

When working back and forth, every other row is worked from the right side and every other row is worked from the wrong side. When working from the wrong side, the diagram will have to be worked reversed: from left to right, knit stitches are purled, purl stitches are knit etc.

When working in the round every round is worked from the right side and the diagram are worked from right to left on all rounds.

See DROPS lesson: How to read knitting diagrams

The diagram depicts all rows/rounds, and every stitch seen from the right side. It is worked from bottom to top, from right to left.

When working back and forth every other row is worked from the right side: from right to left and every other row is worked from the wrong side: from left to right.

When working in the round, every row in the diagram are worked from the right side, from right to left.

When working a circular diagram you start in the middle and work your way outwards, counter clockwise, row by row.

The rows usually start with a given number of chain stitches (equivalent to the height of the following stitch), this will either be depicted in the diagram or explained in the pattern.

See DROPS lesson: How to read crochet diagrams

Instructions for working several diagrams after each other on the same row/round, will often be written like so: “work A.1, A.2, A.3 a total of 0-0-2-3-4 times". This means you work A.1 once, then A.2 is worked once, and A.3 is repeated (in width) the number of times provided for your size – in this case like so: S = 0 times, M = 0 times, L=2 times, XL= 3 times and XXL = 4 times.

The diagrams are worked as usual: begin with the first row in A.1, then work the first row in A.2 etc.

See DROPS lesson: How to read knitting diagrams

See DROPS lesson: How to read crochet diagrams

The total width of the garment (from wrist-to-wrist) will be larger in the larger sizes, despite the actual sleeves being shorter. The larger sizes have longer sleeve caps and wider shoulders, so there will be a good fit in all sizes.

The measurement sketch/schematic drawing provides information regarding the full length of the garment. If it’s a jumper or a jacket the length is measured from the highest point on the shoulder (usually closest to the neckline), and straight down to the bottom of the garment. It is NOT measured from the tip of shoulder. Similarly, the length of yoke is measured from the highest point on the shoulder and down to where yoke is split into body and sleeves.

See DROPS lesson: How to read a schematic drawing

Diagrams are often repeated on the round or in height. 1 repeat is the diagram the way it appears in the pattern. If it says to work 5 repeats of A.1 in the round, then you work A.1 a total of 5 times after/next to each other in the round. If it says to work 2 repeats of A.1 vertically/in height you work the entire diagram once, then begin again at the start and work the entire diagram one more time.

Chain stitches are slightly narrower than other stitches and to avoid working the cast-on edge too tight, we simply chain more stitches to begin with. The stitch count will be adjusted on the following row to fit the pattern and measurement sketch.

The rib edge is more elastic and will contract slightly compared to, for example, stocking stitch. By increasing before the rib edge, you avoid a visible difference in width between the rib edge and the rest of the body.

It’s very easy to cast off too tightly, and by making yarn overs while casting off (and simultaneously casting these off) you avoid a too tight cast off edge.

See DROPS video: How to bind off with yarn overs (yo)

To achieve an even increase (or decrease) you can increase on, for example: every 3rd and 4th row alternately, like so: work 2 rows and increase on the 3rd row, work 3 rows and increase on the 4th. Repeat this until the increase is complete.

See DROPS lesson: Increase or decrease 1 st on every 3rd and 4th row alternately

Should you prefer to work in the round instead of back and forth, you may of course adjust the pattern. You’ll need to add steeks mid-front (usually 5 stitches), and follow the instructions. When you would normally turn and work from the wrong side, simply work across the steek and continue in the round. At the end you’ll cut the piece open, pick up stitches to work bands, and cover the cut edges.

See DROPS video: How to knit steeks and cut open

Should you prefer to work back and forth instead of in the round, you may of course adjust the pattern so you work the pieces separately and then assemble them at the end. Divide the stitches for the body in 2, add 1 edge stitch in each side (for sewing) and work the front and back pieces separately.

See DROPS lesson: Can I adapt a pattern for circular needles into straight needles?

Pattern repeats can vary slightly in the different sizes, in order to get the correct proportions. If you’re not working the exact same size as the garment in the photo, yours might deviate slightly. This has been carefully developed and adjusted so that the complete impression of the garment is the same in all sizes.

Make sure to follow instructions and diagrams for your size!

If you have found a pattern you like which is available in women’s size it’s not very difficult to convert it to men’s size. The biggest difference will be the length of sleeves and body. Start working on the women size that you think would fit across the chest. The additional length will be worked right before you cast off for the armhole/sleeve cap. If the pattern is worked top-down you can add the length right after the armhole or before the first decrease on sleeve.

Regarding additional yarn amount, this will depend on how much length you add, but it is better with a skein too many than too few.

All yarns will have excess fibres (from production) that might come off as lint or shedding. Brushed yarns (ie hairier yarns) have more of these loose, excess fibres, causing more shedding.

Shedding also depends on what is worn under or over the garment, and whether this pulls at the yarn fibres. It’s therefore not possible to guarantee that there will be no shedding

Below are some tips on how to get the best result when working with hairier yarns:

1. When the garment is finished (before you wash it) shake it vigorously so the looser hairs come off. NOTE: do NOT use a lint roller, brush or any method that pulls at the yarn.

2. Place the garment in a plastic bag and put it in your freezer - the temperature will cause the fibres to become less attached to each other, and excess fibres will come off easier.

3. Leave in the freezer for a few hours before taking it out and shaking it again.

4. Wash the garment according to the instructions on the yarn label.

Pilling is a natural process that happens to even the most exclusive of fibers. It's a natural sign of wear and tear that is hard to avoid, and that is most visible in high friction areas of your garment like a sweater's arms and cuffs.

You can make your garment look as new by removing the pilling, using a fabric comb or a pill/lint remover.

Still can't find the answer you need? Then scroll down and leave your question so one of our experts can try to help you. This will be done normally within 5 to 10 working days.
In the meantime, you can read the questions and answers that others have left to this pattern or join the DROPS Workshop on Facebook to get help from fellow knitters/crocheters!

You might also like...

Spring Messenger

Pauliina, Finland

Spring Messenger

@virginielykins, Norway

Post a comment to pattern DROPS 232-2

We would love to hear what you have to say about this pattern!

If you want to leave a question, please make sure you select the correct category in the form below, to speed up the answering process. Required fields are marked *.

Comments / Questions (37)

country flag Pirkkoliisa Juhala wrote:

Hei! Onkohan ohjeessa virhe? Hihan viimeinen vaihe: "Neulo kunnes työn pituus jakokohdasta mitattuna on 35-35-34-32-31-29 cm, ja lisää SAMALLA tasavälein viimeisellä kerroksella 8-9-9-9-10-10 silmukkaa = 48-57-57-57-66-66 silmukkaa." Ainakin minulle hihansuusta tuli aika suuri ja väljä. Usein saman vahvuisesta langoista tehdyissä hihoissa on 40-48 silmukkaa.

27.05.2023 - 08:54

DROPS Design answered:

Hei, silmukoita lisätään, jotta joustinneuleesta tulisi löyhempi. Voit halutessasi jättää lisäykset tekemättä. Tarkista kuitenkin, että silmukkaluku on kolmella jaollinen ennen kuin neulot joustinneuleen.

29.05.2023 - 16:46

country flag Liliane Maegh wrote:

Wat is recht samen naturel ?

06.05.2023 - 15:00

DROPS Design answered:

Dag Lilianne,

Je breit de steken dan samen met de kleur naturel. Het is eigenlijk een beetje overbodig dat 'naturel' erbij staat, want je bent in dat stuk de hele tijd al in het naturel aan het breien.

17.05.2023 - 17:51

country flag Lene Jensen wrote:

Jeg kan ikke få maskeantallet til at stemme efter diagrammet. I str. XL. Når jeg har strikket 1. Hulrække får jeg 20 mønstre. Jeg strikker maskerne sådan 3 ret masker\r\nSlå om 3 retm o.s.v.\r\nOpskriften er meget svær at forstå

22.02.2023 - 10:50

country flag Dorothy Howarth wrote:

I am currently knitting design 232/2 aand believe there is a mistake once the yolk is finished. It states that I should continue knitting until there are 24 cms from marker mid front before dividing for body and sleeves. My knitting already measures 29 cms so I believe that instruction is incorrect. Can you please let me know the correct length at this point. Many thanks.

05.10.2022 - 17:14

DROPS Design answered:

Dear Mrs Howarth, make sure you get the correct tension in height, ie you should have 22 rows stocking stitch/pattern = 10 cm in height, so that you should have 23 cm on mid front after last row A.2 (= 3 cm stocking stitch + 44 rows (A.1, A.2, A.3, A.2) (= 20 cm)). Happy knitting!

06.10.2022 - 08:13

country flag Janneke wrote:

Storlek M a.1- när man börjar med tulpanerna stämmer det inte med bilden. De blir inte mellan hålmönstret - det är ngt som inte stämmer i diagrammet. Jag har 19 motiv av hålmönster för att få rätt antal enl diagrammet när man börjar sticka tulpanerna blev jag tvungen att öka så det blev 190 maskor inte 170 maskor som ni anger.

08.05.2022 - 11:02

DROPS Design answered:

Hei Janneke. Hsuk det økes både ved den sorte oval prikken i diagrammet og ved pilene. I str. M har du 114 masker når du skal starte å strikke etter diagram. A.1 = 6 masker og du strikker A.1 19 ganger = 114 masker. På 2. omgang av diagrammet skal det økes 1 maske (oval sort prikk) hver gang du strikker A.1, altså du øker med 19 masker + 114 masker = 133 masker. Når du skal strikke 6. omgang (omgang med pil 1) skal det økes med 37 masker jevnt fordelt = 133 + 37 = 170 masker. Bildet der du ser str. S kan avvike bittelitt siden du strikker str. M. mvh DROPS Design

09.05.2022 - 12:04

country flag Janneke wrote:

Storlek M a.1- Jag har 19 motiv av hålmönster för att få rätt antal enl diagrammet när man börjar sticka tulpanerna blev jag tvungen att öka så det blev 190 maskor inte 170 maskor som ni anger.

06.05.2022 - 23:27

country flag Janneke wrote:

Storlek M - när man börjar med tulpanerna stämmer det inte med bilden. De blir inte mellan hålmönstret - det är ngt som inte stämmer i diagrammet.

06.05.2022 - 21:17

country flag Espe wrote:

Talla M, cuando tengo 133 p. al comenzar los tulipanes hay que aumentar 37 puntos, pero no coincide los dibujos con los calados cómo viene en el diseño y resulta poco coordinado. En la foto si se ve perfecto. Y en el jersey tulip season(el parecido a éste) también coincide de manera coordinada. Lo he desecho dos veces buscando una armonía

28.04.2022 - 15:57

DROPS Design answered:

Hola Espe, el patrón de calados se trabaja dentro del patrón A.1, en las vueltas 2 y 4, y en A.2 en la vueltas 2 y 4 también. Los 37 puntos aumentados se trabajan según el TIP PARA LOS AUMENTOS - son los aumentos para el canesú redondo, no para los calados, por lo que no deberían de afectar al dibujo. Estos se trabajan en las filas marcadas con flechas.

05.05.2022 - 22:41

country flag Anita wrote:

Heel raar dat er onder aan de trui- voor de start van het breien van het boord- gemeerderd moet worden. Ik heb hetzelfde aantal steken aangehouden( heb dus niet gemeerderd) en vind het boord nog steeds te wijd. Daar moet iedereen toch last van hebben?

17.04.2022 - 18:49

country flag Nora wrote:

Hi, I'm not sure I understand A1 ->1 I'm working on size small. The pattern says to increase 34 sts when I have 126sts - 126/34 as written in increase tip doesn't make an even increase? Then after that the tulips don't align with the increase pattern like it's shown in the A1 chart. I'm I making a mistake somewhere? Thank you for to help :)

04.04.2022 - 22:19

DROPS Design answered:

Dear Nora, increase as explained under increase tip - read more here - the tulips won't lined up over the lace pattern as you can see on the picture. Happy knitting!

05.04.2022 - 09:40