
Popular categories
Looking for a yarn?


Comments / Questions (43)
![]() Betina wrote:
Betina wrote:
Jeg ved ikke hvor på jeg skal starte halen? Måske I kan sætte et billede af hvor jeg skal starte
30.06.2025 - 14:43DROPS Design answered:
Hei Betina. Se vårt forrige svar. Har dessverre ingen bilder hvor man skal starte. Om man ikke har lukket ryggen underveis har man lett sett hvor man skal starte. mvh DROPS Design
30.06.2025 - 15:36
![]() Betina wrote:
Betina wrote:
Hej Jeg er i gang med at denne herlige dinosaur Jeg forstår ikke helt hvordan jeg skal hækle halen? Jeg har lukket ryggen undervejs 🙈 bliver dette et problem tror I?
30.06.2025 - 14:39DROPS Design answered:
Hei Betina. Begynn i den ene siden av ryggen og hekle 16 masker til du kommer på den andre siden, snu, fell og hekle frem og tilbake. evnt tilpass den med fellinger om du fortsatt ønsker å hekle rundt /lukker ryggen samtidig. mvh DROPS Design
30.06.2025 - 15:34
![]() Betina wrote:
Betina wrote:
Hej Jeg er vild med denne dino, som jeg laver til mit barnebarn. . Jeg forstår ikke helt hvordan jeg skal hækle halen på Dino cuddles. Er det noget I kan hjælpe mig med? Kh Betina
26.06.2025 - 22:36DROPS Design answered:
Hei Betina. Vi skal hjelpe deg så godt vi kan, men hva har du problemer med? Er det hvordan du starten, 1 rad eller 2.rad. Det hekles frem og tilbake. Du starter med å hekle 16 fastmasker (= 1.rad), snu og hekle 1 luftmaske, 2 fastmasker i 1 maske = felt 1 maske, hekle 1 fastmaske i hver maske til det gjenstår 2 masker, de siste 2 masker hekles sammen til 1 maske (= 2 masker felt). Snu. Gjenta 1. rad og 2.rad til det er heklet totalt 12 rader og det er 4 masker på raden. mvh DROPS Design
30.06.2025 - 14:08
![]() Stephanie Krens - De Bruijn wrote:
Stephanie Krens - De Bruijn wrote:
Goedemiddag, ik heb je antwoord gezien op de laatste vraag (mijn vraag). Maar ik begrijp het antwoord echt niet… hopelijk kun je me verder helpen. Groeten Stephanie
06.05.2025 - 16:29DROPS Design answered:
Dag Stephanie,
Als het goed is heb je het gezicht vanaf een bepaald punt heen en weer gebreid. Dus steeds keren en terug breien. Waar je het werk steeds keerde zijn de zijkanten. Daar langs haak je nu de hals. Dus ook weer heen en weer haken maar dan dwars op het gezicht.
07.05.2025 - 21:24
![]() Stephanie Krens - De Bruijn wrote:
Stephanie Krens - De Bruijn wrote:
Goedenavond, ik vind het patroon wat lastig te lezen. Ik moet nu naar de hals, maar het is me niet duidelijk hoe. Door het heen en weer haken van het gezicht, hebben als het ware twee ‘flapjes’ (er zit een opening tussen). Maar hoe haak ik nu de hals? En wat wordt er bedoeld met 16 toeren? En er staat ook: haak toer 2 en 3 totdat je 6 toeren hebt. Is dit de bedoeling: toer 1 - 2 - 3 - 2 - 3 - 2 - 3? Ik zag er al eerder een vraag over maar ik snap het antwoord niet. Bedankt! Groeten Steph
01.05.2025 - 20:31DROPS Design answered:
Dag Stephanie,
De hals haak je als het ware dwars tegen de zijkant van het gezicht. Het gezicht haakte je heen en weer en nu haak je de hals over de zijkanten waar steeds het begin en einde was van het gezicht. (En je haakt onder de neus door naar naar de andere zijkant van het gezicht.) Zoals je de 6 toeren beschrijft klopt precies.
04.05.2025 - 09:21
![]() Anna wrote:
Anna wrote:
W polskiej wersji jest błąd. Zamiast oczek ścisłych powinny być słupki. Sprawdziłam w angielskiej wersji. Miłego dnia:)
15.11.2024 - 14:01DROPS Design answered:
Witaj Aniu, dinozaur jest wykonany oczkami ścisłymi (zwanymi w polskiej terminologii także półsłupkami). Słupki i słupki podwójne (treble crochet / double-treble crochet) występują tylko na grzebieniu na grzbiecie dinozaura. Pozdrawiamy!
15.11.2024 - 15:24
![]() Claudia wrote:
Claudia wrote:
In der Anleitung steht, dass der Dino 48cm hoch ist. Jetzt bin ich mildem Körper fertig, er misst jetzt ca 18cm 🙈 Und:ja, die Maschenprobe war korrekt!! Habe ich etwas falsch gemacht. Oder bleibt das so ein kleiner Dino? Bin verwirrt, weil es ja den kleinen Dino auch gibt.
04.11.2024 - 21:13DROPS Design answered:
Liebe Claudia, sollte Ihre Maschenprobe richtig sein, dann sollte das Dino auch richtig sein. Beachten Sie, daß das 1. Teil vom Kopf von der Schnauze gehäkelt zuerst in Runden dann in Reihen, und ab die SEiten vom 2. Teil Kopf wird der Körper gehäkelt. Viel Spaß beim Häkeln!
05.11.2024 - 09:42
![]() Ana Silva wrote:
Ana Silva wrote:
Muito obrigada pela publicação, está fácil de entender e muito bonito o trabalho.
22.08.2024 - 08:16
![]() Anne-Li Blind wrote:
Anne-Li Blind wrote:
Draken var lätt att göra och beskrivningen lätt att förstå.
30.05.2024 - 00:32
![]() Lisa wrote:
Lisa wrote:
När jag gör nosen, varför behövs en luftmaska i början av varvet? Det känns som att hur jag än gör blir det för många maskor. Gissar att jag virkar lurfätmaskan men den ska jag hoppa över eller?
22.05.2024 - 21:52DROPS Design answered:
Hei Lisa. Du starter med en luftmaske, men du avslutter hver omgang med en kjedemaske i 1. fastmaske (så ja, du "hopper" over luftmasken). mvh DROPS Design
27.05.2024 - 08:14
|
|
Dino Cuddles#dropsdinocuddles |
|
 |
 |
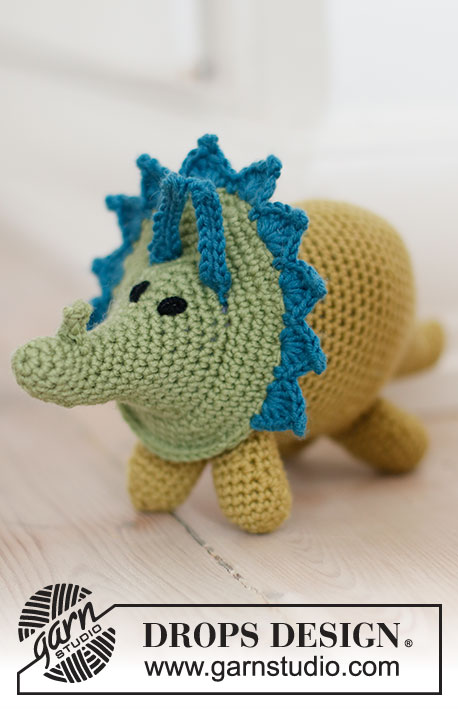
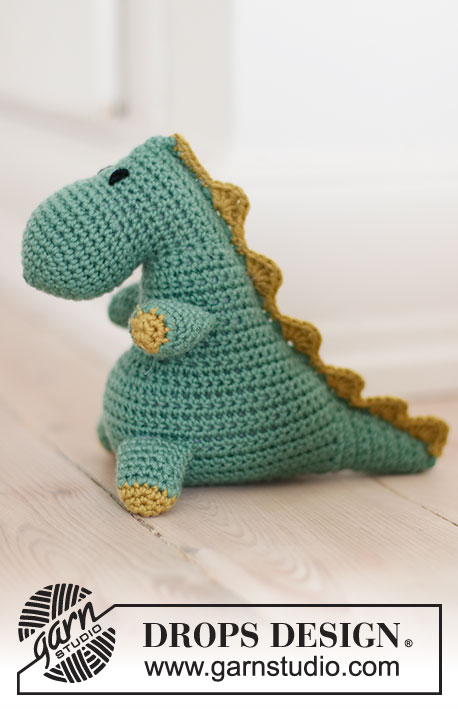
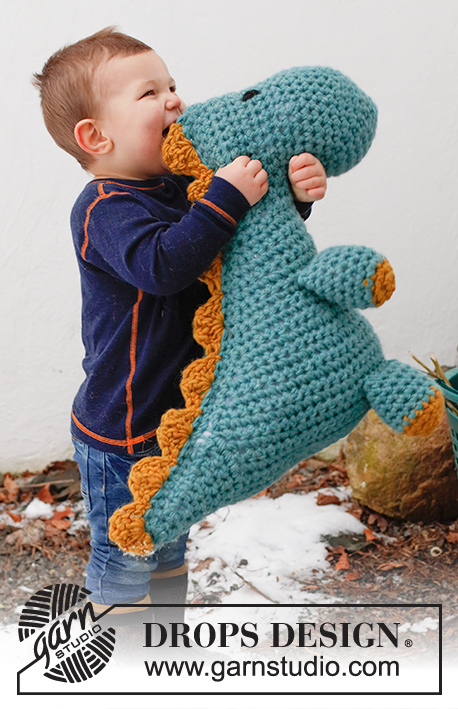
Crocheted Dinosaur (T-Rex) in 2 strands DROPS Snow. The piece is worked from nose to tail with 1 seam. Theme: Soft toys.
DROPS Children 41-29 |
|
|
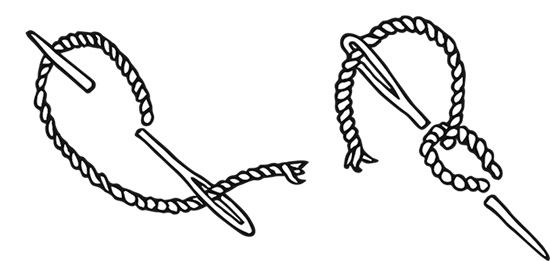
------------------------------------------------------- EXPLANATIONS FOR THE PATTERN: ------------------------------------------------------- CROCHET TIP (chain stitch): 1 chain stitch should equal 1 single crochet in width. Make sure the chain-stitch loop is pushed up the hook so it is not tight. If the chain stitches are tight, the piece will also be tight in sections where there are a lot of chain stitches. WORK 2 SINGLE CROCHETS TOGETHER: Insert the hook through the first stitch and pick up the strand, insert the hook in the next stitch and pick up the strand (= 3 loops), make 1 yarn over and pull it through all 3 loops (= 1 stitch decreased). LOOP STITCH: Sew with a single strand and black. The eye is embroidered over rows 1 and 2 of the face with 5 stitches between each eye. See diagram which shows how to work loop stitch. ------------------------------------------------------- START THE PIECE HERE: ------------------------------------------------------- DINOSAUR – SHORT OVERVIEW OF THE PIECE: The whole piece is worked with 2 strands, from nose to tail and with 1 seam under the body. 4 legs are worked separately, then the head is worked, continued to the neck and body at the same time as the front and back legs are attached. The spines are worked to finish. FRONT LEGS: Work 2 chain stitches with hook size 8 MM = US L/11 and 2 strands curry DROPS Snow – read CROCHET TIP. In the first chain stitch work 5 single crochets, which form a small circle. Finish the circle with 1 slip stitch in the first single crochet. ROUND 1 is finished. ROUND 2: Work 1 chain stitch, then 2 single crochets in each stitch. Finish the round with 1 slip stitch in the first single crochet = 10 stitches. Cut the strands and change to 2 strands sea green. ROUND 3: Work 1 chain stitch, * 2 single crochets in the next stitch, 1 single crochet in the next stitch, * work from *-* to the end of the round (= 15 stitches). Finish with 1 slip stitch in the first single crochet. ROUNDS 4-9: Work 1 chain stitch, 1 single crochet in each stitch. Finish with 1 slip stitch in the first single crochet (= 15 stitches). Cut the strands and pull them through the last loop. Work 1 more leg and fill both with wadding. BACK LEGS: Work in the same way as the FRONT LEGS, but with an extra round of curry before changing to sea green. NOSE: Work 2 chain stitches with hook size 8 MM = US L/11 and 2 strands sea green. In the first chain stitch work 5 single crochets, which form a small circle. Finish the circle with 1 slip stitch in the first stitch. ROUND 1 is finished. ROUND 2: Work 1 chain stitch, then 2 single crochets in each stitch (= 10 stitches). Finish with 1 slip stitch in the first stitch. ROUND 3: Work 1 chain stitch, * 2 single crochets in the next stitch, 1 single crochet in the next stitch, * work from *-* to the end of the round. Finish with 1 slip stitch in the first stitch (= 15 stitches). ROUND 4: Work 1 chain stitch, * 2 single crochets in the next stitch, 1 single crochet in each of the next 2 stitches *, work from *-* to the end of the round. Finish with 1 slip stitch in the first stitch (= 20 stitches). ROUND 5: Work 1 chain stitch, * 2 single crochets in the next stitch, 1 single crochet in each of the next 3 stitches *, work from *-* to the end of the round. Finish with 1 slip stitch in the first stitch (= 25 stitches). ROUND 6: Work 1 chain stitch, * 2 single crochets in the next stitch, 1 single crochet in each of the next 4 stitches *, work from *-* to the end of the round. Finish with 1 slip stitch in the first stitch (= 30 stitches). ROUNDS 7-11: Work 1 chain stitch, then 1 single crochet in each stitch. Finish with 1 slip stitch in the first stitch (= 30 stitches). ROUND 12: Work 1 chain stitch, * 1 single crochet in each of the next 2 stitches, work together the next 2 single crochets– read WORK TOGETHER 2 SINGLE CROCHETS in the explanations above *, work from *-* until there are 2 stitches left, work 1 single crochet in each of the last 2 stitches, finish with 1 slip stitch in the first stitch at the beginning of the round (= 23 stitches). ROUND 13: Work 1 chain stitch, 1 single crochet in each stitch. Finish with 1 slip stitch in the first stitch (= 23 stitches). FACE: Continue working back and forth. ROWS 1-4: Work 1 chain stitch, 1 single crochet in each stitch. Turn. ROWS 5-6: Work 1 chain stitch, 2 single crochets in the first stitch, 1 single crochet in each stitch until there is 1 stitch left and 2 single crochets in the last stitch (= 2 stitches increased) (= 27 stitches). Turn. ROWS 7-8: Work 1 chain stitch, 1 single crochet in each stitch. Turn. Now embroider 2 eyes with LOOP STITCH – read explanation above. NECK: Along the side of the FACE you have 8 rows, continue back and forth along both sides of the face (a total of 16 rows): ROW 1: Work 2 single crochets in the last row worked on the face, * 1 single crochet in each of the next 2 rows, 2 single crochets in the next row *, work from *-* to the end of the 16 rows = 22 stitches. Turn. ROW 2: Work 1 chain stitch, 1 single crochet in each stitch. Turn. ROW 3: Work 1 chain stitch, 2 single crochets in the first stitch, 1 single crochet in each stitch until there is 1 stitch left, 2 single crochets in the last stitch (= 2 stitches increased). Turn. Work ROWS 2 and 3 until you have a total of 6 rows (= 26 stitches on row 6). Turn. BODY: Now the 2 front legs are attached to the body. ROW 1: Work 1 chain stitch, 2 single crochets in the first stitch, 1 single crochet in each of the next 4 stitches, fold one front leg double and lay it onto the body so the next 6 stitches are worked through 3 layers, work 1 single crochet in each of the next 4 stitches (= mid-front/between legs), fold the other front leg double and lay it onto the body so the next 6 stitches are worked through 3 layers, 1 single crochet in each of the next 4 stitches, 2 single crochets in the last stitch (= 28 stitches). Turn. ROW 2: Work 1 chain stitch, 1 single crochet in each stitch. Turn. ROW 3: Work 1 chain stitch, 2 single crochets in the first stitch, 1 single crochet in each stitch until there is 1 stitch left, 2 single crochets in the last stitch (= 2 stitches increased). Turn. Work ROWS 2 and 3 until you have a total of 5 rows (= 32 stitches on ROW 5). Turn. ROW 6: Increase for the stomach as follows: Work 1 chain stitch, 2 single crochets in the first stitch, 1 single crochet in each of the next 8 stitches, * 2 single crochets in the next stitch, 1 single crochet in the next stitch *, work from *-* a total of 7 times, 2 single crochets in the next stitch, 1 single crochet in each of the next 7 stitches, 2 single crochets in the last stitch (= 10 increased stitches, 42 stitches). Turn. ROW 7: Work 1 chain stitch, 1 single crochet in each stitch. Turn. ROW 8: On this row increase for the stomach: Work 1 chain stitch, 2 single crochets in the first stitch, 1 single crochet in each of the next 16 stitches, * 2 single crochets in the next stitch, 1 single crochet in the next stitch *, work from *-* a total of 4 times, 1 single crochet in each of the next 16 stitches, 2 single crochets in the last stitch (= 6 increased stitches, 48 stitches). Turn. ROW 9: Work 1 chain stitch, 1 single crochet in each stitch. Turn. ROW 10: Work 1 chain stitch, 2 single crochets in the first stitch, 1 single crochet in each stitch until there is 1 stitch left and 2 single crochets in the last stitch (= 2 increased stitches, 50 stitches). Turn. ROW 11: Work 1 chain stitch, 1 single crochet in each stitch. Turn. ROW 12: Work 1 chain stitch, 2 single crochets in the first stitch, 1 single crochet in each stitch until there is 1 stitch left and 2 single crochets in the last stitch (= 2 increased stitches, 52 stitches). Turn. ROW 13: Now attach the back legs to the body. Work 1 chain stitch, 1 single crochet in each of the first 15 stitches, fold one back leg double and lay it onto the body so the next 6 stitches are worked through 3 layers, work 1 single crochet in each of the next 10 stitches (= mid-front/between legs), fold the other back leg double and lay it onto the body so the next 6 stitches are worked through 3 layers, 1 single crochet in each of the last 15 stitches. Turn. UNDER-SIDE: ROWS 1-3: Work 1 chain stitch, 1 single crochet in each stitch. Turn. ROW 4: On this row decrease for the flat bottom: Work 1 chain stitch, 1 single crochet in each of the first 18 stitches, * work together the next 2 single crochets *, work from *-* a total of 8 times, 1 single crochet in each of the last 18 stitches (= 8 decreased stitches, 44 stitches). Turn. ROW 5: Work 1 chain stitch, 1 single crochet in each stitch. Turn. ROW 6: Work 1 chain stitch, 1 single crochet in each of the first 14 stitches, work together the next 2 single crochets *, work from *-* a total of 8 times, 1 single crochet in each of the last 15 stitches (= 8 decreased stitches, 36 stitches). Turn. ROW 7: Work 1 chain stitch, 1 single crochet in each stitch. Turn. ROW 8: Work 1 chain stitch, 1 single crochet in each of the next 14 stitches, * work together the next 2 single crochets *, work from *-* a total of 4 times, 1 single crochet in each of the last 14 stitches (= 4 decreased stitches, 32 stitches). Cut and fasten the strands. ASSEMBLY: Fold the bottom length-wise and sew the stitches together edge to edge so the bottom is flat. TAIL: Use hook size 8 MM = US L/11 and 2 strands sea green. Along the side of the UNDER-SIDE you have 8 rows (each side of the seam), you now work back and forth along both sides of the seam, i.e. 16 rows: ROW 1: Work 1 single crochet in each row (= 16 stitches). Turn. ROW 2: Work 1 chain stitch, work together the next 2 single crochets, single crochet in each stitch until there are 2 stitches left and work together the last 2 single crochets (= 2 stitches decreased). Turn. Work ROWS 1 and 2 until you have 12 rows and 4 stitches left. Cut and fasten the strands. BACK: Use hook size 8 MM = US L/11 and 2 strands sea green. Work 1 row of single crochets along the opening for the back, starting at the tail (work 1 side at a time) as follows: ROW 1: Work 1 stitch in each row/stitch – from the tail to the top of the head, then back again along the other side. Approx. 45 stitches on each side, 90 stitches in total. Turn. Fill the dinosaur with wadding. ROW 2: Fold the back double and work single crochets through both layers from the tail to the top, closing the opening = 45 stitches. Cut and fasten the strands. SPINES: Use hook size 8 MM = US L/11 and 2 strands curry. Start at the tip of the tail: * Work 1 single crochet, skip 1 stitch, in the next stitch work: 2 double crochets, 1 treble crochet, 2 chain stitches, 1 treble crochet and 2 double crochets. Skip 1 stitch and work 1 single crochet in the next stitch *, work from *-* a total of 2 times then repeat *-* up the back but skipping 2 stitches instead of 1. When there are too few stitches for a spine on the head, finish the row with single crochets. Cut and fasten the strands. |
|
|
|
Have you finished this pattern?Tag your pictures with #dropspattern #dropsdinocuddles or submit them to the #dropsfan gallery. Do you need help with this pattern?You'll find 11 tutorial videos, a Comments/Questions area and more by visiting the pattern on garnstudio.com. © 1982-2025 DROPS Design A/S. We reserve all rights. This document, including all its sub-sections, has copyrights. Read more about what you can do with our patterns at the bottom of each pattern on our site. |
|


With over 40 years in knitting and crochet design, DROPS Design offers one of the most extensive collections of free patterns on the internet - translated to 17 languages. As of today we count 314 catalogs and 11822 patterns - 11812 of which are translated into English (US/in).
We work hard to bring you the best knitting and crochet have to offer, inspiration and advice as well as great quality yarns at incredible prices! Would you like to use our patterns for other than personal use? You can read what you are allowed to do in the Copyright text at the bottom of all our patterns. Happy crafting!
Post a comment to pattern DROPS Children 41-29
We would love to hear what you have to say about this pattern!
If you want to leave a question, please make sure you select the correct category in the form below, to speed up the answering process. Required fields are marked *.