DROPS Karisma
DROPS Karisma
100% Wool
from 13.00 RON /50g
Get the yarn to make this pattern from 130.00RON.

The yarn cost is calculated from the pattern’s smallest size and the yarn’s cheapest product type. Looking for an even better price? You might find it on the DROPS Deals!

DROPS Super Sale

Deep Sea Diamond

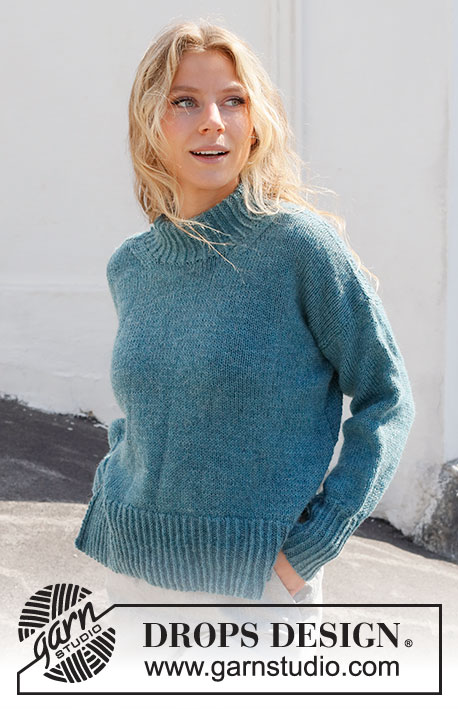
Knitted jumper in DROPS Karisma. Piece is knitted with textured pattern, vents in the sides and high collar. Size: S - XXXL

DROPS 227-3
DROPS design: Pattern u-923
Yarn group B
----------------------------------------------------------

SIZE:
S - M - L - XL - XXL - XXXL

MATERIALS:
DROPS KARISMA from Garnstudio (belongs to yarn group B)
500-550-600-650-750-800 g colour 50, sea green

NEEDLES:
DROPS CIRCULAR NEEDLE SIZE 4.5 mm : Length 40 cm and 60-60-60-60-80-80 cm.
DROPS CIRCULAR NEEDLE SIZE 3.5 mm : Length 40 cm and 60-60-60-60-80-80 cm.
DROPS DOUBLE POINTED NEEDLES SIZE 4.5 mm
DROPS DOUBLE POINTED NEEDLES SIZE 3.5 mm
The technique MAGIC LOOP can be used on the sleeves and neck edge – you then only need circular needle of 80 cm in each size.

KNITTING TENSION:
20 stitches in width and 26 rows vertically in stocking stitch = 10 x 10 cm.
NOTE! Remember that needle size is only a suggestion. If you have too many stitches on 10 cm switch to larger needles. If you have too few stitches on 10 cm switch to smaller needles.

-------------------------------------------------------

Alternative Yarn – See how to change yarns here
Yarn Groups A to F – Use the same pattern and change the yarn here
Yarn usage using an alternative yarn – Use our yarn converter here

-------------------------------------------------------

DROPS Karisma
DROPS Karisma
100% Wool
from 13.00 RON /50g
Get the yarn to make this pattern from 130.00RON.

The yarn cost is calculated from the pattern’s smallest size and the yarn’s cheapest product type. Looking for an even better price? You might find it on the DROPS Deals!

Pattern instructions

----------------------------------------------------------

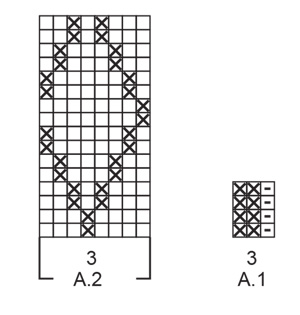
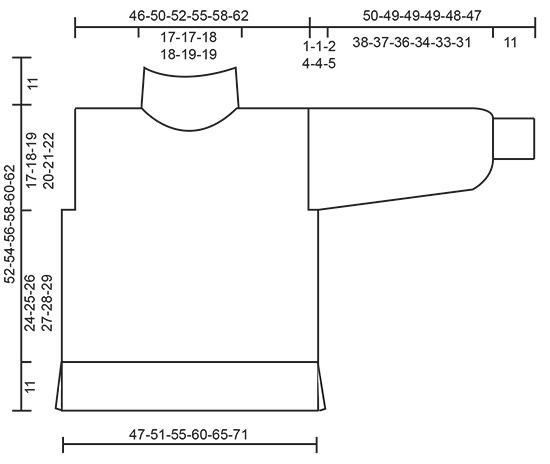
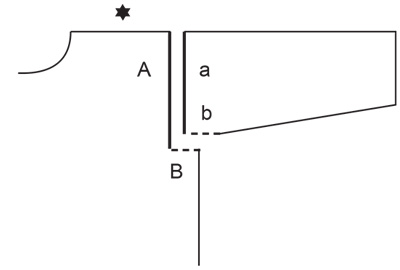
EXPLANATION FOR THE PATTERN:

----------------------------------------------------------

GARTER STITCH (back and forth):
Knit all rows.
1 ridge vertically = knit 2 rows.

PATTERN:
See diagrams A.1 and A.2. Diagrams show all rows in pattern seen from the right side.

INCREASE/DECREASE TIP (evenly):
To calculate how to increase/decrease evenly, use the total number of stitches on row (e.g. 127 stitches), minus edge stitches (e.g. 2 stitches) , and divide the remaining 125 stitches by number of increases/decreases to be done (e.g. 32) = 3.9.
In this example increase by making 1 yarn over after approx. every 4th stitch. Do not increase over edge stitches. On next row work yarn overs twisted to avoid holes.
To decrease in this example knit approx. every 3rd and 4th stitch together.

INCREASE TIP (applies to sleeves):
Work until 2 stitches remain before marker thread, make 1 yarn over, knit 4 (marker thread is in the middle of these 4 stitches), make 1 yarn over. On next round knit yarns over twisted to avoid holes. Then work the new stitches in stocking stitch.

----------------------------------------------------------

START THE PIECE HERE:

----------------------------------------------------------

JUMPER - SHORT OVERVIEW OF THE PIECE:
Work front and back piece back and forth on circular needle in parts. Work sleeves in the round on double pointed needles/a short circular needle. Then assemble the piece by sewing parts together. Finish with a neck edge in round on a circular needle.

BACK PIECE:
Cast on 127-136-148-160-172-190 stitches on circular needle size 3.5 mm with DROPS Karisma.
Work rib as follows: 3 edge stitches in GARTER STITCH – read explanation above, A.1 until 4 stitches remain, work first stitch in A.1, 3 stitches in garter stitch.
Continue back and forth like this until rib measures 11 cm. Knit 1 row from right side while decreasing 32-33-37-39-41-47 stitches evenly - read INCREASE/DECREASE TIP = 95-103-111-121-131-143 stitches.
Switch to circular needle size 4.5 mm.
Purl 1 row from wrong side (knit the outermost edge stitch in each side).
You can work the back piece either in stocking stitch or in pattern just as on front piece. If you work in stocking stitch, continue working in stocking stitch with 1 edge stitch in garter stitch on each side. If you work in pattern as on front piece, work as follows:
1 edge stitch in garter stitch, 6-6-10-11-12-14 stitches in stocking stitch, A.2 over the next 80-88-88-96-104-112 stitches (= 10-11-11-12-13-14 repetitions of 8 stitches), work first stitch in A.2, 6-6-10-11-12-14 stitches in stocking stitch, 1 edge stitch in garter stitch.
This explanation is written with pattern, if you choose to knit without the pattern continue in stocking stitch instead.
Continue pattern back and forth like this.
REMEMBER THE KNITTING TENSION!
When piece measures 35-36-37-38-39-40 cm, cast off 2-2-4-7-8-10 stitches for armholes in each side at the beginning of the next 2 rows = 91-99-103-107-115-123 stitches. Continue with pattern as before over the middle 81-89-89-97-105-113 stitches on needle, 1 edge stitch in garter stitch in each side and stocking stitch over the remaining stitches.
When piece measures 50-52-54-56-58-60 cm, cast off the middle 31-31-33-33-35-35 stitches for neck and finish each shoulder separately. Then cast off 1 stitch on next row from the neck = 29-33-34-36-39-43 stitches remain for shoulder. When piece measures 52-54-56-58-60-62 cm, cast off. Work the other shoulder the same way.

FRONT PIECE:
Cast on 127-136-148-160-172-190 stitches on circular needle size 3.5 mm with DROPS Karisma.
Work rib as follows: 3 edge stitches in garter stitch, A.1 until 4 stitches remain, work first stitch in A.1, 3 edge stitches in garter stitch.
Continue back and forth like this until rib measures 11 cm. Knit 1 row from right side while decreasing 32-33-37-39-41-47 stitches evenly = 95-103-111-121-131-143 stitches.
Switch to circular needle size 4.5 mm.
Purl 1 row from wrong side (knit the outermost edge stitch in each side). Now work pattern as follows: 1 edge stitch in garter stitch, 6-6-10-11-12-14 stitches in stocking stitch, A.2 over the next 80-88-88-96-104-112 stitches (= 10-11-11-12-13-14 repetitions of 8 stitches), work first stitch in A.2, 6-6-10-11-12-14 stitches in stocking stitch, 1 edge stitch in garter stitch. Continue pattern back and forth like this.
When piece measures 35-36-37-38-39-40 cm, cast off 2-2-4-7-8-10 stitches for armholes in each side at the beginning of the next 2 rows = 91-99-103-107-115-123 stitches. Continue with pattern as before over the middle 81-89-89-97-105-113 stitches on needle, 1 edge stitch in garter stitch in each side and stocking stitch over the remaining stitches.
When piece measures 44-46-47-49-50-52 cm, slip the middle 25-25-27-27-29-29 stitches on a stitch holder for neck and finish each shoulder separately. Then cast off stitches on every row from neck as follows: Cast off 1 stitch 4 times = 29-33-34-36-39-43 stitches remain for shoulder. When piece measures 52-54-56-58-60-62 cm, cast off. Work the other shoulder the same way.

SLEEVES:
Cast on 51-54-57-60-63-66 stitches on double pointed needles size 3.5 mm. Work A.1 in the round for 11 cm. Knit 1 round while increasing 13-12-11-10-9-8 stitches evenly - read INCREASE/DECREASE TIP = 64-66-68-70-72-74 stitches. Insert a marker thread at beginning of round (= mid under sleeve). Switch to double pointed needles size 4.5 mm.
Work in stocking stitch in the round. When sleeve measures 15-15-15-15-15-17 cm, increase 1 stitch on each side of marker thread under sleeves - read INCREASE TIP. Increase like this approx. every 15-14-9-6½-5-3½ cm 2-3-4-5-6-7 times in total = 68-72-76-80-84-88 stitches.
When sleeve measures 49-48-47-45-44-42 cm, work sleeve cap back and forth on circular needle until finished measurements. Work until sleeve measures approx. 50-49-49-49-48-47 cm, i.e. there is a vent of 1-1-2-4-4-5 cm at the top of sleeve.

ASSEMBLY:
Sew the shoulder seams together. Sew sleeve cap to armhole. Then sew vent at the top of sleeve to bottom of armhole - see chart. Sew side seams from armhole and down to where rib ends (= 11 cm vent in each side).

NECK EDGE:
Pick up 108 to 126 stitches on a short circular needle size 3.5 mm with DROPS Karisma inside 1 edge stitch around the neck. Work A.1 in the round for 11 cm. Cast off stitches with knit over knit and purl over purl.

Diagram

symbols = knit twisted from the right side, purl twisted from the wrong side
symbols = purl from right side, knit from wrong side
symbols = knit from the right side, purl from the wrong side
symbols = sew sleeve cap to armhole as follows: Sew a against A and b against B.
diagram
diagram
diagram

Each of our patterns has specific tutorial videos to help you.

Do you have a question? See a list of frequently asked questions (FAQ)

Knitting tension is what determines the final measurements of your work, and is usually measured per 10 x 10 cm. It is provided like so: number of stitches in width x number of rows in height - eg: 19 stitches x 26 rows = 10 x 10 cm.

The knitting tension is very individual; some people knit/crochet loosely while others work tightly. You adjust the knitting tension with the needle size, which is why the suggested needle size is only meant as a guide! You need to adjust this (up or down) to ensure that YOUR knitting tension matches the knitting tension provided in the pattern. If you work with a different knitting tension than provided you will have a different yarn consumption, and your work will have different measurements than what the pattern suggests.

The knitting tension also determines which yarns can replace each other. As long as you achieve the same knitting tension you can replace one yarn with another.

See DROPS lesson: How to measure your tension/gauge

See DROPS video: How to make a gauge tension swatch

The required amount of yarn is provided in grams, eg: 450 g. To calculate how many balls you’ll need you first need to know how many grams are in 1 ball (25g, 50g or 100g). This information is available if you click on the individual yarn quality on our pages. Divide the amount required with the amount of each ball. For example, if each ball is 50g (the most common amount), the calculation will be as follows: 450 / 50 = 9 balls.

The important thing when changing from one yarn to another is that the knitting/crochet tension remains the same. This is so that the measurements of the finished piece will be the same as on the sketch provided. It is easier to achieve the same knitting tension using yarns from the same yarn group. It is also possible to work with multiple strands of a thinner yarn to achieve the knitting tension of a thicker one. Please try our yarn converter. We recommend you to always work a test swatch.

Please NOTE: when changing yarn the garment might have a different look and feel to the garment in the photo, due to individual properties and qualities of each yarn.

See DROPS lesson: Can I use a different yarn than the one mentioned in the pattern?

All our yarns are categorised into yarn groups (from A to F) according to thickness and knitting tension – group A contains the thinnest yarns and group F the thickest. This makes it easier for you to find alternative yarns to our patterns, should you wish to switch yarn. All yarns within the same group have a similar knitting tension and can easily replace each other. However, different yarn qualities have different structures and properties which will give the finished work a unique look and feel.

Click here for an overview of the yarns in each yarn group

At the top of all our patterns you’ll find a link to our yarn calculator, which is a helpful tool should you wish to use a different yarn than suggested. By filling in the yarn quality you wish to replace, the amount (in your size) and number of strands, the calculator will present good alternative yarns with the same knitting tension. Additionally it will tell you how much you’ll require in the new qualities and whether you’ll need to work with multiple strands. Most skeins are 50g (some are 25g or 100g).

If the pattern is worked with multiple colours, every colour will have to be calculated separately. Similarly, if the pattern is worked with several strands of different yarns (for example 1 strand Alpaca and 1 strand Kid-Silk) you will have to find alternatives for each, individually.

Click here to see our yarn calculator

Since different yarns have different qualities and textures we have chosen to keep the original yarn in our patterns. However, you can easily find options among our available qualities by using our yarn calculator, or simply pick a yarn from the same yarn group.

It is possible that some retailers still have discontinued yarns in stock, or that someone has a few skeins at home that they would like to find patterns for.

The yarn calculator will provide both alternative yarn as well as required amount in the new quality.

If you think it's hard to decide what size to make, it can be a good idea to measure a garment you own already and like the size of. Then you can pick the size by comparing those measures with the ones available in the pattern's size chart.

You'll find the size chart at the bottom of the pattern.

See DROPS lesson: How to read size chart

The needle size provided in the pattern serves only as a guide, the important thing is to follow the knitting tension. And since knitting tension is very individual, you will have to adjust the needle size to ensure that YOUR tension is the same as in the pattern – maybe you’ll have to adjust 1, or even 2 needle sizes, up or down to achieve the correct tension. For this, we recommend that you work test swatches.

Should you work with a different knitting tension than the one provided, the measurements of the finished garment might deviate from the measurement sketch.

See DROPS lesson: How to measure your tension/gauge

See DROPS video: How to make a tension/gauge swatch

Working a garment top-down provides more flexibility and room for personal adjustment. For example it is easier to try the garment on while working, as well as making adjustments to length of yoke and shoulder caps.

The instructions are carefully explaining every step, in the correct order. Diagrams are adjusted to the knitting direction and are worked as usual.

The diagram depicts all rows/rounds, and every stitch seen from the right side. It is read from bottom to top, from right to left. 1 square = 1 stitch.

When working back and forth, every other row is worked from the right side and every other row is worked from the wrong side. When working from the wrong side, the diagram will have to be worked reversed: from left to right, knit stitches are purled, purl stitches are knit etc.

When working in the round every round is worked from the right side and the diagram are worked from right to left on all rounds.

See DROPS lesson: How to read knitting diagrams

The diagram depicts all rows/rounds, and every stitch seen from the right side. It is worked from bottom to top, from right to left.

When working back and forth every other row is worked from the right side: from right to left and every other row is worked from the wrong side: from left to right.

When working in the round, every row in the diagram are worked from the right side, from right to left.

When working a circular diagram you start in the middle and work your way outwards, counter clockwise, row by row.

The rows usually start with a given number of chain stitches (equivalent to the height of the following stitch), this will either be depicted in the diagram or explained in the pattern.

See DROPS lesson: How to read crochet diagrams

Instructions for working several diagrams after each other on the same row/round, will often be written like so: “work A.1, A.2, A.3 a total of 0-0-2-3-4 times". This means you work A.1 once, then A.2 is worked once, and A.3 is repeated (in width) the number of times provided for your size – in this case like so: S = 0 times, M = 0 times, L=2 times, XL= 3 times and XXL = 4 times.

The diagrams are worked as usual: begin with the first row in A.1, then work the first row in A.2 etc.

See DROPS lesson: How to read knitting diagrams

See DROPS lesson: How to read crochet diagrams

The total width of the garment (from wrist-to-wrist) will be larger in the larger sizes, despite the actual sleeves being shorter. The larger sizes have longer sleeve caps and wider shoulders, so there will be a good fit in all sizes.

The measurement sketch/schematic drawing provides information regarding the full length of the garment. If it’s a jumper or a jacket the length is measured from the highest point on the shoulder closest to the neckline, and straight down to the bottom of the garment. It is NOT measured from the tip of shoulder. Similarly, the length of yoke is measured from the highest point on the shoulder and down to where yoke is split into body and sleeves.

On a jacket measures are never taken along bands, unless specifically stated. Always measure inside band stitches when measuring the length.

See DROPS lesson: How to read a schematic drawing

Diagrams are often repeated on the round or in height. 1 repeat is the diagram the way it appears in the pattern. If it says to work 5 repeats of A.1 in the round, then you work A.1 a total of 5 times after/next to each other in the round. If it says to work 2 repeats of A.1 vertically/in height you work the entire diagram once, then begin again at the start and work the entire diagram one more time.

Chain stitches are slightly narrower than other stitches and to avoid working the cast-on edge too tight, we simply chain more stitches to begin with. The stitch count will be adjusted on the following row to fit the pattern and measurement sketch.

The rib edge is more elastic and will contract slightly compared to, for example, stocking stitch. By increasing before the rib edge, you avoid a visible difference in width between the rib edge and the rest of the body.

It’s very easy to cast off too tightly, and by making yarn overs while casting off (and simultaneously casting these off) you avoid a too tight cast off edge.

See DROPS video: How to bind off with yarn overs (yo)

To achieve an even increase (or decrease) you can increase on, for example: every 3rd and 4th row alternately, like so: work 2 rows and increase on the 3rd row, work 3 rows and increase on the 4th. Repeat this until the increase is complete.

See DROPS lesson: Increase or decrease 1 st on every 3rd and 4th row alternately

Should you prefer to work in the round instead of back and forth, you may of course adjust the pattern. You’ll need to add steeks mid-front (usually 5 stitches), and follow the instructions. When you would normally turn and work from the wrong side, simply work across the steek and continue in the round. At the end you’ll cut the piece open, pick up stitches to work bands, and cover the cut edges.

See DROPS video: How to knit steeks and cut open

Should you prefer to work back and forth instead of in the round, you may of course adjust the pattern so you work the pieces separately and then assemble them at the end. Divide the stitches for the body in 2, add 1 edge stitch in each side (for sewing) and work the front and back pieces separately.

See DROPS lesson: Can I adapt a pattern for circular needles into straight needles?

Pattern repeats can vary slightly in the different sizes, in order to get the correct proportions. If you’re not working the exact same size as the garment in the photo, yours might deviate slightly. This has been carefully developed and adjusted so that the complete impression of the garment is the same in all sizes.

Make sure to follow instructions and diagrams for your size!

If you have found a pattern you like which is available in women’s size it’s not very difficult to convert it to men’s size. The biggest difference will be the length of sleeves and body. Start working on the women size that you think would fit across the chest. The additional length will be worked right before you cast off for the armhole/sleeve cap. If the pattern is worked top-down you can add the length right after the armhole or before the first decrease on sleeve.

Regarding additional yarn amount, this will depend on how much length you add, but it is better with a skein too many than too few.

All yarns will have excess fibres (from production) that might come off as lint or shedding. Brushed yarns (ie hairier yarns) have more of these loose, excess fibres, causing more shedding.

Shedding also depends on what is worn under or over the garment, and whether this pulls at the yarn fibres. It’s therefore not possible to guarantee that there will be no shedding

Below are some tips on how to get the best result when working with hairier yarns:

1. When the garment is finished (before you wash it) shake it vigorously so the looser hairs come off. NOTE: do NOT use a lint roller, brush or any method that pulls at the yarn.

2. Place the garment in a plastic bag and put it in your freezer - the temperature will cause the fibres to become less attached to each other, and excess fibres will come off easier.

3. Leave in the freezer for a few hours before taking it out and shaking it again.

4. Wash the garment according to the instructions on the yarn label.

Pilling is a natural process that happens to even the most exclusive of fibers. It's a natural sign of wear and tear that is hard to avoid, and that is most visible in high friction areas of your garment like a sweater's arms and cuffs.

You can make your garment look as new by removing the pilling, using a fabric comb or a pill/lint remover.

Still can't find the answer you need? Then scroll down and leave your question so one of our experts can try to help you. This will be done normally within 5 to 10 working days.
In the meantime, you can read the questions and answers that others have left to this pattern or join the DROPS Workshop on Facebook to get help from fellow knitters/crocheters!

You might also like...

Post a comment to pattern DROPS 227-3

We would love to hear what you have to say about this pattern!

If you want to leave a question, please make sure you select the correct category in the form below, to speed up the answering process. Required fields are marked *.

Comments / Questions (31)

country flag Col wrote:

I am confused! After the armhole shaping it leaves me with 91 STS but it says to work on the middle 81 STS what am I not understanding?

14.03.2022 - 15:14

DROPS Design answered:

Dear Col, you should work the pattern only over the middle 81 sts, this means you will work: 1 edge stitch in garter stitch, 4 sts in stocking stitch, 81 sts in pattern (= 80 sts in A.2 + first stich in A.2) as before, 4 sts in stocking stitch, 1 edge stitch in garter stitch (= 1+4+81+4+1=91 sts). Happy knitting!

14.03.2022 - 16:55

country flag Anne Mazzella wrote:

Bonjour, merci pour vos nombreux magnifiques modèles avant tout, pourriez vous dans vos prochains modèles, indiquer l'aisance ajoutée par rapport au tour de poitrine ? D'avance merci....D'ailleurs quelle aisance faut il prévoir pour ce modèle ?

07.03.2022 - 10:36

DROPS Design answered:

Bonjour Mme Mazzella, c'est une question de choix personnel: mesurez un vêtement similaire que vous avez et dont vous aimez la forme et comparez ces mesures à celles du schéma pour choisir en conséquence. Retrouvez plus d'infos ici. Bon tricot!

07.03.2022 - 15:45

country flag Karin Sundberg wrote:

Hej! Här gör man "ärmkullen" som står i beskrivningen?

25.02.2022 - 16:52

DROPS Design answered:

Hei Karin. Man gjør som det står i beskrivelsen. Skriv gjerne hva du spesifikk mener / trenger hjelp til, så skal vi hjelpe deg så godt vi kan. mvh DROPS Design

28.02.2022 - 14:27

country flag Maria wrote:

Leyendo nuevamente el patrón ya entendí que hacer, no lo entendí al principio porque esto haciendo la espalda sin patrón, todo en punto jersey... 😁

12.02.2022 - 08:02

country flag Maria wrote:

Estoy tejiendo este modelo en talla S, luego que remato para la sisa me quedan 91. Luego dice trabajar los 81 puntos centrales, que hago los restantes (5 de cada lado)?

12.02.2022 - 07:30

country flag Sharon wrote:

Am not very good at recalculating sts in patterns to get the size i want. This sweater did not have my size so i figured out that I needed 272 to give me a size 54. I have to divide for front and back soon. Is there a size direction I can follow to complete this sweater. There are many sizes in this pattern, but am not sure if i could use, for eks. Size xl to complete the sweater. The sleeves are so long, wondering if i could pick up sts and knit top down.

07.02.2022 - 18:39

DROPS Design answered:

Dear Sharon, we are unfortunately not able to adjust every pattern to every request, but please contact the store where you bought the yarn or any knitting forum to get individual help. Thanks for your comprehension. Happy knitting!

08.02.2022 - 08:43

country flag Anne Mette Graakær Nielsen wrote:

Jeg kan ikke få regnskabet til at passe 1km+12+104mønster+12+1km=130m Jeg skal have 131 m? Har I ikke regnet efter?

06.02.2022 - 19:16

DROPS Design answered:

Hej Anne Mette, Tror du har glemt 1.maske i A.2 (for at det skal være ens i siderne) Se her: 1 kantmaske retstrik, 12 masker glatstrik, A.2 over de næste 104, strik første maske i A.2, 12 masker glatstrik, 1 kantmaske retstrik.

07.02.2022 - 10:12

country flag Sharon wrote:

Hi, did the first row after the cast on and about to start the second row. Am supposed to knit til 4 stitches remain, then it says to work 1 stitch in a1 then knit last 3 stitches in garter stitch. On the next row am supposed to knit last 3 stitches How is the stitch that is worked a1 supposed to be knitted ? On the chart it shows 2 purl stitches on the wrong side. Am. Confused. Thanks for your help and quick response. S

29.01.2022 - 11:56

DROPS Design answered:

Dear Sharon, from WS work as follows: 3 sts in garter stitch, work the first st in A.1 (= last st seen from WS = purl twisted from WS), then read A.1 from the left towards the right (= K2, P1 twisted), ending with 3 sts in garter stitch. Happy knitting!

31.01.2022 - 11:18

country flag Chantal wrote:

Bonjour Peut on tricoter ce modèle en rond de bas en haut et remplacer les emmanchures en raglan Merci pour votre réponse et bonne fête

30.12.2021 - 17:03

DROPS Design answered:

Bonjour Chantal, c'est bien sur possible, mais cela exigera beaucoup de modifications. Nous ne sommes malheureusement pas en mesure de pouvoir ajuster chacun de nos modèles à chaque demande individuelle. Pour toute assistance complémentaire, vous pouvez vous adresser à votre magasin DROPS qui saura vous conseiller et vous renseigner. Bon tricot!

30.12.2021 - 18:58

country flag Christine Vet wrote:

Ik begrijp niet hoe ik de bovenkant van de mouw moet breien en vastmaken aan het voor- en achterpand. Ik snap niet hoe die spit moet.

10.12.2021 - 12:26

DROPS Design answered:

Dag Christine

Het stukje split van 1cm van de mouw komt tegen de horizontale inham van het pand. Hier is een tekening van welke je helemaal onderaan het patroon kunt vinden, dus onderaan de maat tekening. b van de ene kant van de mouw wordt dus tegen B van het voorpand genaaid en b van de andere kant van de mouw wordt tegen B van het achterpand genaaid.

11.12.2021 - 15:33