
Popular categories
Looking for a yarn?


|
|||||||||||||||||||
White Water |
|||||||||||||||||||
 |
 |
||||||||||||||||||
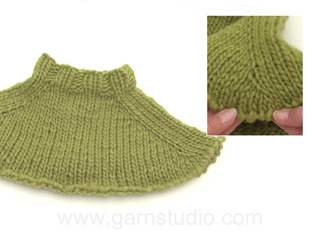
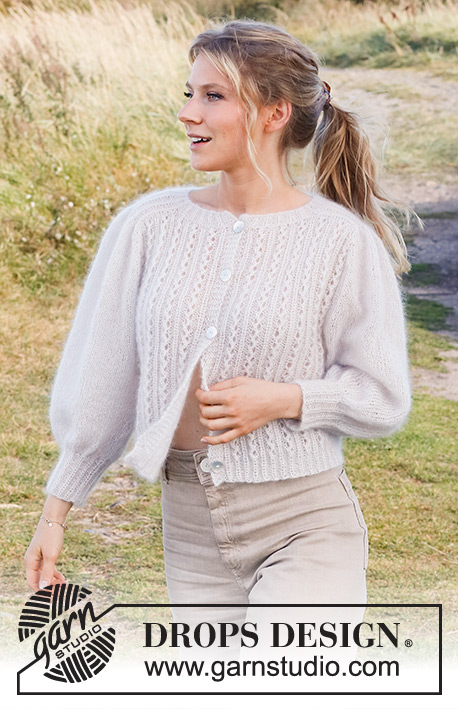
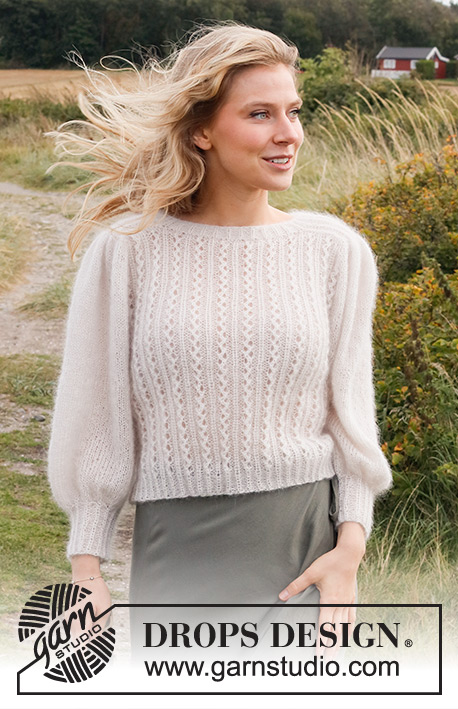
Knitted jumper in 2 strands DROPS Kid-Silk. Piece is knitted top down with round saddle shoulders, lace pattern and pouffe sleeves. Size: S - XXXL
DROPS 222-25 |
|||||||||||||||||||
|
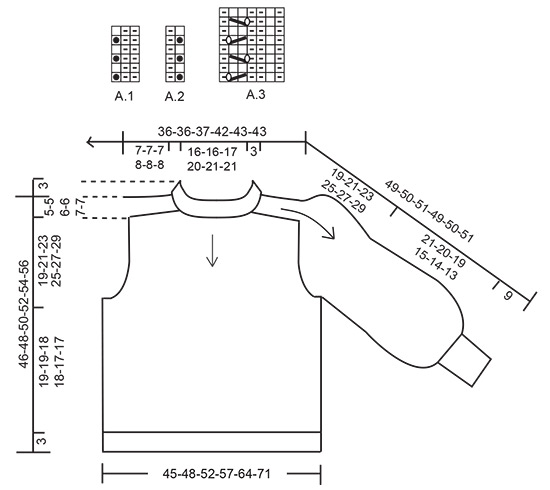
------------------------------------------------------- EXPLANATION FOR THE PATTERN: ------------------------------------------------------- PATTERN: See diagrams A.1 to A.3. Diagrams show all rows in pattern seen from the right side. INCREASE/DECREASE TIP (evenly): To calculate how to increase/decrease evenly, count the stitches to be increased/decreased (e.g. 17 stitches), and divide by stitches of increases/decreases to be done (e.g. 5) = 3.4. In this example increase by making 1 yarn over after alternately approx. every 3rd and 4th stitch. On next row work yarn overs twisted to avoid holes If decreasing knit in this example alternately approx. every 2nd and 3rd stitch and every 3rd and 4th stitch together. INCREASE TIP-1: Increase 1 stitch by making 1 yarn over. On next row (from wrong side) purl yarn over twisted to avoid holes. INCREASE TIP-2: BEFORE MARKER: The stitch is twisted towards the right. Use left needle to pick up thread between 2 stitches from round below, pick up thread from behind and knit stitch in front loop. AFTER MARKER: The stitch is twisted towards the left. Use left needle to pick up thread between 2 stitches from round below, pick up thread from front and knit stitch in back loop. CAST-OFF TIP: To avoid a tight cast-off edge you may use a larger needle size. If this also is too tight, work a 1 yarn over after approx. 3rd or every 6th stitch while casting off (cast off yarn overs as regular stitches). ------------------------------------------------------- START THE PIECE HERE: ------------------------------------------------------- JUMPER - SHORT OVERVIEW OF THE PIECE: Work neck edge in the round on circular needle from mid back, top down. Work shoulders back and forth separately. Then pick up stitches along shoulders, and work in the round over all stitches, at the same time increase for sleeves and for yoke. Now divide yoke for body and sleeves. Body is worked in the round on circular needle, top down. Work sleeves in the round on double pointed needles/short circular needle, top down. NECK EDGE: Cast on 90-90-94-106-110-110 stitches on circular needle size 3 mm with 2 strands Kid-Silk. Knit 1 round. Then work rib as follows: A.1 over the first 15-15-15-18-18-18 stitches, work the first 2 stitches in A.1 (= approx. half back piece), insert a marker here, A.2 over the next 13-13-15-15-17-17 stitches (= shoulder stitches), insert a marker, A.1 over the next 30-30-30-36-36-36 stitches, work the first 2 stitches in A.1 (= front piece), insert a marker here, A.2 over the next 13-13-15-15-17-17 stitches (= shoulder stitches), insert a marker here, A.1 over the last 15-15-15-18-18-18 stitches (= approx. half back piece). Continue in the round like this for 3 cm. Cut the yarn. Now divide the piece for back piece, front piece and saddle shoulders. Slip the first 17-17-17-20-20-20 stitches on a stitch holder (= approx. half back piece), skip the next 13-13-15-15-17-17 stitches (= saddle shoulder), slip the next 32-32-32-38-38-38 stitches on a stitch holder (= front piece), skip the next 13-13-15-15-17-17 stitches (= saddle shoulder), slip the last 15-15-15-18-18-18 stitches on a stitch holder (= approx. half back piece). Now work saddle shoulder in each side, separately. SADDLE SHOULDERS: = 13-13-15-15-17-17 stitches. Work back and forth over shoulder stitches in one side on circular needle size 3 mm, as follows: Cast on 1 stitch on row (= edge stitch), work the 13-13-15-15-17-17 stitches in pattern as before, at the same time increase all 1 purl stitch to 2 purl stitches – read INCREASE TIP-1 (= 6-6-7-7-8-8 stitches increased), cast on 1 stitch at the end of row (= edge stitch) = 21-21-24-24-27-27 stitches. Now work pattern (1 English rib stitch, purl 2) back and forth until piece measures 7-7-7-8-8-8 cm from where all 1 purl stitches were increased to 2 purl stitches, adjust so that last row is worked from wrong side. Slip stitches on a stitch holder. Work the other saddle shoulder the same way. Now work front pieces, back piece and shoulder stitch on to same circular needle size 5 mm, at the same time pick up stitches along the sides on saddle shoulders. Work as follows from right side: Begin approx. mid back and knit over the 17-17-17-20-20-20 stitches on half back piece and increase at the same time 5-5-5-5-5-5 stitches evenly – read INCREASE/DECREASE TIP (= 22-22-22-25-25-25 stitches), pick up 16-16-16-20-20-20 stitches inside edge stitch along the side on saddle shoulder, knit 1 * knit 1 in front and back loop of next stitch, make 1 yarn over *, work from *-* a total of 18-18-21-21-24-24 times, knit 1 in front and back loop of stitch, knit 1 (= 37-37-43-43-49-49 stitches increased to = 58-58-67-67-76-76 stitches on the saddle shoulder), pick up 16-16-16-20-20-20 stitches inside edge stitch along the other side of saddle shoulder, knit over the next 32-32-32-38-38-38 stitches on front piece and increase at the same time 9-9-9-9-9-9 stitches evenly (= 41-41-41-47-47-47 stitches), pick up 16-16-16-20-20-20 stitches inside edge stitch on the other saddle shoulder, knit 1, * knit 1 in front and back loop of next stitch, make 1 yarn over *, work from *-* a total of 18-18-21-21-24-24 times, knit 1 in front and back loop of stitch, knit 1 (= 37-37-43-43-49-49 stitches increased to = 58-58-67-67-76-76 stitches on the saddle shoulder), pick up 16-16-16-20-20-20 stitches inside edge stitch along the other side of saddle shoulder, knit over the 15-15-15-18-18-18 stitches on approx. half back piece and increase at the same time 4-4-4-4-4-4 stitches evenly (= 19-19-19-22-22-22 stitches). There are now 262-262-280-308-326-326 stitches on needle. Knit 1 round. YOKE: Insert a marker thread approx. mid back. NOW MEASURE PIECE FROM HERE! Now work pattern and 4 markers in the piece as follows: 1st marker: Work A.3 over the first 35-35-35-42-42-42 stitches, work the first 3 stitches in A.3, insert 1st marker in next stitch (= half back piece). 2nd marker: Work in stocking stitch over the next 56-56-65-65-74-74 stitches, insert 2nd marker in next stitch (= right sleeve). 3rd marker: Work A.3 over the next 70-70-70-84-84-84 stitches, work the first 3 stitches in A.3, insert 3rd marker in next stitch (= front piece). 4th marker: Work in stocking stitch over the next 56-56-65-65-74-74 stitches, insert 4th marker in next stitch (= left sleeve). Work A.3 over the last 35-35-35-42-42-42 stitches (= half back piece). Move these 4 markers upwards when working; increase at each of these markers. Continue in the round with pattern like this (stitches with markers are worked in stocking stitch), AT THE SAME TIME on the next round the increases for SLEEVE INCREASE and YOKE INCREASE starts, increase as follows: SLEEVE INCREASE: Work in stocking stitch on sleeves. AT THE SAME TIME on next round increase 4 stitches for sleeves as follows: Increase AFTER 1st and 3rd marker and increase BEFORE 2nd and 4th marker – read INCREASE TIP-2 (= 4 stitches increased). Increase stitches on sleeves, and work the increased stitches in stocking stitch. Increase like this every other round 7-10-7-9-6-8 times in total. YOKE INCREASE (applies to front and back piece): Work pattern as before on front pieces and back piece. AT THE SAME TIME on next round increase 4 stitches for yoke as follows: Increase BEFORE 1st and 3rd marker and increase AFTER 2nd and 4th marker – remember INCREASE TIP-2 (= 4 stitches increased). Increase on front pieces and back piece, and work the increased stitches in A.3. Increase like this every other round 0-7-7-7-14-21 times in total. When all increases are done there are 290-330-336-372-406-442 stitches on row. Work until piece measures 19-21-23-25-27-29 cm from marker after neck edge. Now divide piece for body and sleeves. Work next round as follows: Work the first 42-45-47-52-59-66 stitches as before (= back piece), slip the next 64-78-77-85-88-92 stitches on a stitch holder for sleeve, cast on 6-6-8-10-10-10 new stitches on row (= in the side under sleeve), work the next 81-87-91-101-115-129 stitches as before (= front piece), slip the next 64-78-77-85-88-92 stitches on a stitch holder for sleeve, cast on 6-6-8-10-10-10 new stitches on row (= in the side under sleeve), work the last 39-42-44-49-56-63 stitches as before (= back piece). Now finish body and sleeves separately. NOW MEASURE PIECE FROM HERE! BODY: = 174-186-198-222-250-278 stitches. Continue in the round with pattern as before, but over the 14-6-12-10-10-10 stitches in each side (i.e. the 6-6-8-10-10-10 new stitches cast on + 4-0-2-0-0-0 stitches on each side of these stitches) work in stocking stitch. Continue until piece measures 19-19-18-18-17-17 cm from division. Adjust so that the last round is worked as 2nd, 4th, 6th or 8th row in diagram A.3, and work the next round as follows: Work pattern as before, but skip yarn over in every repetition A.3 (= decrease 1 stitch in each repetition A.3), at the same time increase 4-3-6-5-5-5 stitches evenly over the 14-6-12-10-10-10 stitches knit in each side (= 20-24-24-28-32-36 stitches decreased and 8-6-12-10-10-10 stitches increased on round) = 162-168-186-204-228-252 stitches. Switch to circular needle size 3 mm. Now work rib as follows: Work the last 2 stitches in A.1, work A.1 until 1 stitch remains on round, work first stitch in A.1 – English rib stitch in A.1 should fit knit stitches in A.3. Continue rib like this for 3 cm. Cast off with knit over English rib stitches and purl over purl - read CAST-OFF TIP. Jumper measures approx. 46-48-50-52-54-56 cm from shoulder and down. SLEEVES: Slip the 64-78-77-85-88-92 stitches from stitch holder in one side back on a short circular needle/double pointed needles size 5 mm. Pick in addition up 1 stitch in each of the 6-6-8-10-10-10 new stitches under sleeve = 70-84-85-95-98-102 stitches. Work in stocking stitch in the round. When piece measures 21-20-19-15-14-13 cm from division - try the jumper on and work until desired length (approx. 9 cm rib remain until finished measurements), decrease 28-42-40-47-47-51 stitches evenly = 42-42-45-48-51-51 stitches. Switch to double pointed needles size 3 mm. Work A.1 in the round for 9 cm. Cast off with knit over English rib stitches and purl over purl - read CAST-OFF TIP. Sleeve measures approx. 30-29-28-24-23-22 cm from division. Work the other sleeve the same way. |
|||||||||||||||||||
Diagram explanations |
|||||||||||||||||||
|
|||||||||||||||||||
|
|||||||||||||||||||
|
Have you made this or any other of our designs? Tag your pictures in social media with #dropsdesign so we can see them! Do you need help with this pattern?You'll find tutorial videos, a Comments/Questions area and more by visiting the pattern on garnstudio.com. © 1982-2024 DROPS Design A/S. We reserve all rights. This document, including all its sub-sections, has copyrights. Read more about what you can do with our patterns at the bottom of each pattern on our site. |
|||||||||||||||||||


With over 40 years in knitting and crochet design, DROPS Design offers one of the most extensive collections of free patterns on the internet - translated to 17 languages. As of today we count 304 catalogues and 11422 patterns - 11422 of which are translated into English (UK/cm).
We work hard to bring you the best knitting and crochet have to offer, inspiration and advice as well as great quality yarns at incredible prices! Would you like to use our patterns for other than personal use? You can read what you are allowed to do in the Copyright text at the bottom of all our patterns. Happy crafting!
Comments / Questions (65)
Hoi Ik heb een vraag over het aantal garen. Er staat bv voor maat L dat je 225 gr drops silk dat zijn 9 bollen per 25 gr nodig hebt. Is dit genoeg omdat het met 2 draden gebreid wordt? Het aantal halveert door dat je met 2 draden gaat breien, dan zou ik voor de hele trui 4 en een halve bol garen hebben waaruit ik de panden en de mouwen zou moeten breien.
25.08.2022 - 10:06DROPS Design answered:
Dag Clarine,
Ja hoor, de hoeveelheid garen klopt. Het is heel licht garen, met een lange looplengte, dus je hebt minder bollen nodig, ook al brei je met 2 draden.
25.08.2022 - 11:42Hallo, Leider verstehe ich die Zunahme nach den 78 stillgelegten Maschen für die Ärmel nicht. Da steht „= an der Seite unter dem Arm“ 6 Maschen zu nehmen. Was genau heißt das? Danke für die Hilfe
19.08.2022 - 20:06DROPS Design answered:
Liebe Caro, diese 6 Maschen werden Sie in jede der 6 Maschen auffassen, die Sie bei der Verteilung angeschlagen haben - dieses Video zeigt ab Bild 18, B wie man diese Maschen auffasst und strickt. Viel Spaß beim stricken!
22.08.2022 - 09:17Further to my original question. There is no front band on the sweater it is a pull over. Pattern Drops 222-25. I have 280 size large stitch according to the pattern. Perhaps you are looking at a cardigan pattern? PS. Thanks for the quick response.
18.08.2022 - 16:07DROPS Design answered:
Dear Mrs Billard, oops my bad sure, then you wil work; A.3 over 35 sts + first 3 sts (= 38 sts for 1/2 back piece), then knit 1 with a marker, knit 65 (sleeve), knit 1 with a marker, 73 sts A.3 (= 10 repeats of 7 sts + first 3 sts for front piece);, hen knit 1 with a marker, knit 65 (sleeve), knit 1 with a marker, 35 sts A.3 (= 5 repeats of 7 sts for 1/2 back piece = 38+1+65+1+73+1+65+1+35=280 sts. Can this help further?
19.08.2022 - 08:33Yoke: after 4th marker. Reads work A3 over the next 35 stitches, is this correct? Size large reads total of 280 stitches. If you add each section (38, 65, 73, 65 and finally 35 this totals 276. Please tell me what I’m missing.
18.08.2022 - 14:58DROPS Design answered:
Dear Mrs Billard, in size L you should have 293 sts: 5 front band sts + 35 sts A.3 + first 3 sts A.3 (= 43 sts for front piece), K1 with a marker + knit 65 sts (sleeve) + K1 with a marker + 70 sts A.3 + first 3 sts A.3 (= 73 sts for back piece), K1 with a marker + knit 65 sts (sleeve) + K1 with a marker, 35 sts A.3 + first 3 sts A.3 + 5 front band sts (= 43 sts front piece) = 43+1+65+1+73+1+65+1+43=293 sts. Happy knitting!
18.08.2022 - 15:26Previous comment should have gone to questions. Regarding Drops 222-25 pattern. Please let me know if I should repeat it to questions.
17.08.2022 - 21:33DROPS Design answered:
Dear Mrs Billard, the 21 stitches worked and repeat from *-* are the 21 sts you get at the end of the shoulder, you will work kfb each of these stitches + make a yarn over after this increase = there were 21 sts, you kfb = increase 21 sts and make a yarn over = 21sts increased + kfb in the next stitch = 1 st increased = 21+21+1=43 sts increased = there are now 67 sts for the shoulder. Happy knitting!
18.08.2022 - 09:08Drops 222-25. Second paragraph of Saddle Shoulders. I have picked up and increased half the back plus 16 stitches along the saddle should edge, etc but I don’t understand how to repeat between the ** 21 times. There are no more stitches to knit. Do I by chance knit ** back and forth 21 times? Also, is the back of the sweater plain stockinette stitch? No photos show the back.
17.08.2022 - 20:52DROPS Design answered:
Hi Sandra, in each of next 21 stitches you should work this section between stars * knit 1 in front and back loop of next stitch, make 1 yarn over *. It will be pouffe sleeve. Please see the video HERE. Happy knitting!
14.09.2022 - 08:54Hi, I like the pattern and I'd love to make a sweater out of it. However I am not sure about the size. Could you, please, be so kind and give me the bust mesurements of sizes S, M and L ? And how much of the positive easy is the pattern ment to have ? Thank you
18.05.2022 - 14:21DROPS Design answered:
Dear Mrs Alzbeta, measure a similar garment you have and like the shape and compare these measurements to the chart at the bottom of the page, this is the best way to find the matching size and your own and desire ease. Read more here. Happy knitting!
18.05.2022 - 16:46Salve ho difficoltà a capire come devo intrecciare le maglie del corpo, cosa si intende con "Intrecciare a diritto sulla maglia legaccio e a sulle maglie a coste inglesi e con rovescio su rovescio "? Grazie
16.05.2022 - 22:59DROPS Design answered:
Buonasera Sara, grazie per la segnalazione, abbiamo corretto il testo per renderlo più chiaro. Buon lavoro!
17.05.2022 - 19:06Merci beaucoup tout va bien !j'ai trouvé la solution :j'intervertis tous les les 2 rangs les 2 mailles envers avant le point ajouré donc une fois avant le point ajouré comme sur le diagramme et 2 rangs après je place les 2 mailles envers après le point ajouré et celui-ci reste bien centré ...
19.04.2022 - 20:23Excusez moi on commence par 2 mailles envers puis les diminutions avec jeté puis on finit par une maille envers ... Je veux simplement savoir si ce diagramme est exact car le dessin avec les trous est décalé. .. Merci.
12.04.2022 - 18:00DROPS Design answered:
Est-ce que la réponse précédente à votre première question a pu vous aider? Sinon n'hésitez pas à nous indiquer à quel niveau vous bloquez encore dans A.3. Bon tricot!
19.04.2022 - 08:55