
Popular categories
Looking for a yarn?


Comments / Questions (34)
![]() Gul B wrote:
Gul B wrote:
Hi there, the headbands in the pictures seem to be knitted in DOUBLE KNITTING as both the outside and inside of the headband is showing knit stitches, there are no purl stitches. Otherwise I suppose the piece would not be "shaped as tube with openings at each ends". Please advise if my understanding is correct? Thank you.
13.01.2026 - 16:55
![]() Sarah wrote:
Sarah wrote:
How many double pointed needles do I need to use? And how many stitches to cast on for each needle to distribute them?
21.11.2025 - 23:13DROPS Design answered:
Dear Sarah, you can distribute the stitches onto 3 needles and work the with the 4th one or onto 4 needles and work with the 5th one, just a matter of choice. If the number of stitches is not exactly divisible by the number of needles you use, just make distribute them as regular as possible with some more sts on some needles. Happy knitting!
24.11.2025 - 08:21
![]() Victoria wrote:
Victoria wrote:
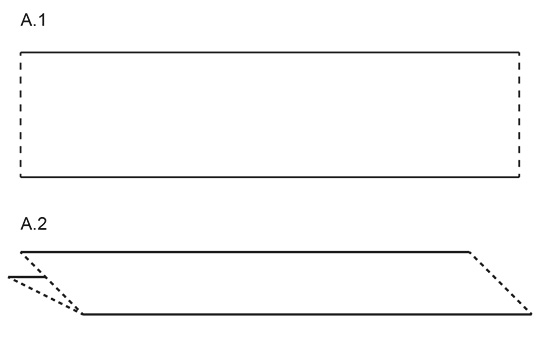
Näht man bei A2 die gefalteten Enden (gestrichelte Linien) auch zusammen? Danke und liebe Grüße 🤗
22.10.2025 - 12:00DROPS Design answered:
Liebe Victoria, die gestrichelte Linie in A.2 ist die Naht, die Sie bereits in A.1 gemacht haben. Die gestrichelte Linie wird nicht noch mal zusammengenäht, Sie halbieren das Rechteck nur längs. Erst in A.5 wird wieder zusammengenäht.
03.11.2025 - 22:59
![]() RichardDok wrote:
RichardDok wrote:
Уборка коттеджей в Санкт?Петербурге — оперативно, внимательно, с органической средствами. Заходите Стоимость уборки дома Скидка на первый визит. Заполните форму — приедем в удобное для вас время.
14.10.2025 - 01:12
![]() MatthewWowly wrote:
MatthewWowly wrote:
Санобработка в СПб! Квартиры, Загородные резиденции, Рабочие помещения. Высококлассный уход по доступным тарифам. Свободное время для хобби! Забронируйте уборку сию минуту! Тапайте Клининг В Спб Уборка Квартир
11.10.2025 - 21:38
![]() Franzi wrote:
Franzi wrote:
Hallo Drops Design, ich möchte das Stirnband gern mit Wollresten stricken. Ich habe nur 40g vom Drops Alpaca übrig, reicht das für ein Stirnband? Wie viel Wolle brauche ich wirklich für die Größe M?
25.09.2025 - 22:24DROPS Design answered:
Hi Franzi, it will be enough. Happy knitting!
26.09.2025 - 07:45
![]() Prodache wrote:
Prodache wrote:
Prodache
03.06.2025 - 10:14
![]() Laura wrote:
Laura wrote:
Ganz herzlichen Dank für dieses tolle und einfach zustrickende Stirnband! Es ist wirklich schön und hält sehr warm. Ganz herzlichen Dank!
30.11.2024 - 11:03
![]() Sharon Hunt wrote:
Sharon Hunt wrote:
Hi, My daughter saw this headband in a drops store. She bought 1 ball of air and 1 ball kids silk. I started this and got the stitch gauge but not the row gauge. I ripped out and started again with the same results. I changed from short wooden needles to metal and nothing changed. What is the solution here? The used air to make this headwarmer so we bought the yarn used. Never thought there woul be a problem. Frustrated. S
10.11.2023 - 17:30DROPS Design answered:
Dear Sharon, this pattern is for 2 threads of group A yarn (Alpaca and Kid-Silk) or 1 thread of group C yarn (like Air, for example). So you could try to work with just DROPS Air. On the other hand, the important gauge is the stitch gauge, not the row gauge. So you could work with your obtained gauge, since all of the measurements are given in cm and not rows. In that case, you may work more or less rows than in the pattern but you will obtain a headband of the same size as here. Happy knitting!
12.11.2023 - 23:11
![]() Bente Pedersen wrote:
Bente Pedersen wrote:
Feil bilde til oppskrift
03.03.2023 - 19:15
|
|
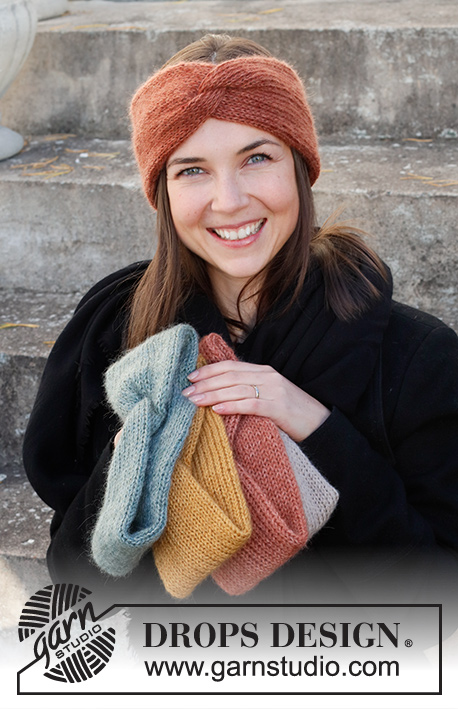
Winter Smiles Headband#wintersmilesheadband |
|
 |
 |
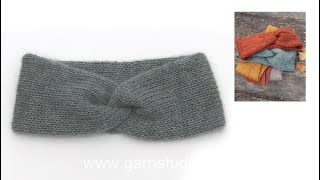
Knitted head band with cable in DROPS Alpaca and DROPS Kid-Silk. Sizes S - XL.
DROPS 214-68 |
|
|
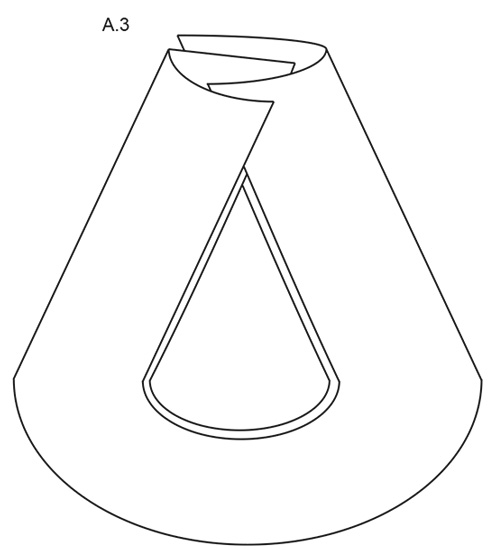
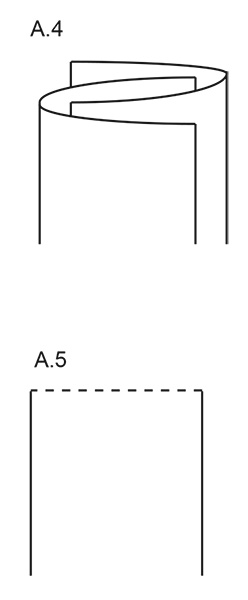
------------------------------------------------------- EXPLANATIONS FOR THE PATTERN: ------------------------------------------------------- DIAGRAM: See diagram A.1 to A.5. The diagrams are used when the head band is to be assembled. ------------------------------------------------------- START THE PIECE HERE: ------------------------------------------------------- HEAD BAND – SHORT OVERVIEW OF THE PIECE: The piece is worked in the round, with double pointed needles in a tube. The ends are then sewn together in such a way as to make a cable mid-front. HEAD BAND: Cast on 36-40-44 stitches with double pointed needles size 5 mm and 1 strand Alpaca and 1 strand Kid-Silk (= 2 strands). Work stocking stitch in the round for 49-51-53 cm. Cast off with knit. ASSEMBLY: The piece is now shaped as a tube with opening in each end, lay the tube flat – make sure that the tube is not twisted. Now close the openings at the ends with a seam on each side, sew in the outermost loop of the outermost stitch so that the seam does not become thick - see dashed lines in diagram A.1. The piece is now a flat rectangle, fold the rectangle lengthwise so that it lies double - see diagram A.2. Now lay the long sides of the head band together in layers without twisting the work - see diagram A.3. The ends of the head band now lies alternately inside and outside each other, and the edges lies edge to edge – see diagram A.4. Now sew through all layers as follows: Sew along the dotted line in diagram A.5 (ie over the edges of the piece), sew with tight whip stitches with 1 stitch in each stitch - it is important that it is sewn through all layers so that the seam do not show when the work is turned inside out. Cut and fasten the thread. Turn the work inside out, so that the seam is on the inside of the headband. |
|
 |
|
 |
|
 |
|
Have you finished this pattern?Tag your pictures with #dropspattern #wintersmilesheadband or submit them to the #dropsfan gallery. Do you need help with this pattern?You'll find 9 tutorial videos, a Comments/Questions area and more by visiting the pattern on garnstudio.com. © 1982-2026 DROPS Design A/S. We reserve all rights. This document, including all its sub-sections, has copyrights. Read more about what you can do with our patterns at the bottom of each pattern on our site. |
|


With over 40 years in knitting and crochet design, DROPS Design offers one of the most extensive collections of free patterns on the internet - translated to 17 languages. As of today we count 324 catalogues and 12285 patterns translated into English (UK/cm).
We work hard to bring you the best knitting and crochet have to offer, inspiration and advice as well as great quality yarns at incredible prices! Would you like to use our patterns for other than personal use? You can read what you are allowed to do in the Copyright text at the bottom of all our patterns. Happy crafting!
Post a comment to pattern DROPS 214-68
We would love to hear what you have to say about this pattern!
If you want to leave a question, please make sure you select the correct category in the form below, to speed up the answering process. Required fields are marked *.