
Popular categories
Looking for a yarn?


Comments / Questions (81)
![]() Breige McShane wrote:
Breige McShane wrote:
Truly I am not getting this and need a very explicit explanation. I have started row 17 with a slip stich which is the first purl stitch. Then I start A1 with the second purl stitch. I complete all of A1 finishing with the first slipped stitch which is the first purl stitch and then I have the second purl stitch to start the row. You show the next row starting with l knit stitch and then one purl stitch.
16.07.2023 - 16:55DROPS Design answered:
Dear Breige, we have slipped the first stitch in order to work the decrease at the end of the last repeat of A.1, where you will work ssk (slip stitch, knit 1 and pass over slipped stitch over knit stitch). Then, we continue the next row as indicated: knit over purl and purl over knit.
17.07.2023 - 13:49
![]() Breige McShane wrote:
Breige McShane wrote:
I have completed row 17 with k2tog, 1yo, k1,yo, k1sl1,psso - I get this and end with the 5 stiches Then on row 18 it says to start with a k1, p1. At the beginning of this row I have 1 purl stitch and then a knit stitch? What am I missing?
12.07.2023 - 00:57DROPS Design answered:
Dear Breige, we have slipped the first stitch in order to work the decrease at the end of the last repeat of A.1, where you will work ssk (slip stitch, knit 1 and pass over slipped stitch over knit stitch). Then, we continue the next row as indicated: knit over purl and purl over knit. Happy knitting!
17.07.2023 - 13:50
![]() Dorte Lindholm wrote:
Dorte Lindholm wrote:
Hej, Str. S Rk. 15 skal mønster forskydes og 1. m. flyttes over på v. p. og den bruges så til at strikke sm. med sidste m. Rk. 16 starter med en retm. vil det så sige, at omgangens start rykkes tilbage igen, så det er den sammenstrikkede m., der pludselig er 1. maske ? Jeg synes, jeg skal blive ved med at flytte min startmarkør - er det rigtigt ? Håber I kan forstå, hvad jeg mener. Hilsen Dorte
22.06.2023 - 08:47DROPS Design answered:
Hej Dorte, det som er vigtigt er at vrangmaskerne kommer ovenpå hinanden ifølge diagrammet :)
22.06.2023 - 14:52
![]() Juliane wrote:
Juliane wrote:
Jeg forstår ikke at i række 19, står der at man i starten skal tage en maske løst af, strikke en ret, tage den løse maske over, altså lave en indtagning. Men i 20. Række, står der at man skal strikke 3 ret til at starte med. Det forstår jeg ikke, når man jo nu her kun har 2 ret tilbage i starten og ikke 3 masker inden de 2 vrang masker.
16.05.2023 - 22:36DROPS Design answered:
Hej Juliane, jo for du har taget retmasker ud (omslag) i den anden side af diagrammet (du har lige så mange udtagninger som indtagninger ifølge diagrammet :)
17.05.2023 - 09:27
![]() Olga Johansen wrote:
Olga Johansen wrote:
Hei. Etter oppskriften er strikkefasthet 21 masker = 10 cm. I M størrelse etter diagram A1 er ferdig, er det 320 masker på pinnen. Det vil si at 320 masker er 152 cm. Er det ikke for stort bærestykke i M størrelse? Skulle det ikke være bare omkring 100cm? Jeg har prøvd å strikke med pinne nr 3 men bærestikke ble digert stor.
06.05.2023 - 21:45DROPS Design answered:
Hei Olga. Strikkefastheten er oppgitt i glattstrikk. Når man strikker etter diagrammet vil mønstret trekke seg noe sammen slik at maskene over mønstret vil ikke være 21 masker = 10 cm. mvh DROPS Design
08.05.2023 - 13:49
![]() Paula wrote:
Paula wrote:
Hej! Gå detta att stica med baby merino? Om det gåf hur ska jag få rätt storlek?
23.03.2023 - 21:40DROPS Design answered:
Hei Paula. Denne toppen er strikket med DROPS Muskat som er et tykkere garn enn DROPS Baby Merino, så du kan ikke bruke DROPS Baby Merino til denne oppskriften. Om du ønsker å strikke med et merino garn, kan du bruke DROPS Merino Extra Fine. mvh DROPS Design
27.03.2023 - 12:58
![]() Kate Andersen wrote:
Kate Andersen wrote:
Hej jeg forstår simpelthen ikke der står diagrammet = 6 masker. Der er da kun 5?? Og med to slåom så er der 7 må næste række osv… jeg plejer ikke have problemer med læse opskrifter/diagrammer men dette giver mig store problemer. Hvordan??
04.02.2023 - 12:44DROPS Design answered:
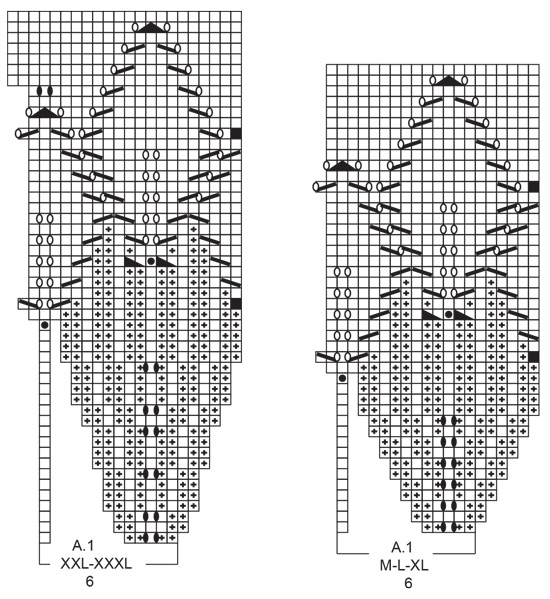
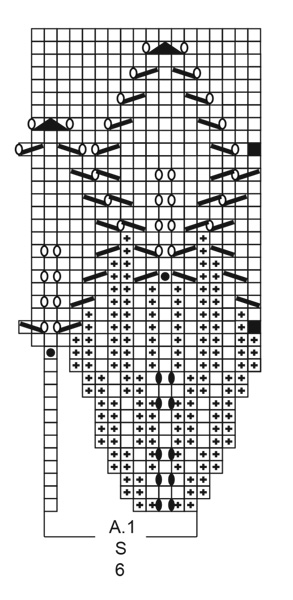
Hei Kate. Jo, det er 5 masker som står sammen, men ta en titt til venstre på diagrammet. Der ser du en "enslig" maske (hvit firkant), den er med i klammen som sier 6 masker. Så 1 rapport av A.1 strikkes slik: 2 vrang - 1 kast - 1 rett - 1 kast - 2 vrang - 1 rett = 6 masker og 2 kast, og på neste omgang er det 8 masker. mvh DROPS Design
06.02.2023 - 09:01
![]() Enid wrote:
Enid wrote:
Help please! I’m stuck on the 17th row of chart A.1 medium on the beautiful 213-22 Lavender Charms Top (aka DROPS Design: Pattern no r-764). Please explain: The round begins with a slip stitch that displaces the round by one. I thought I should just move my stitch markers I set up for each section by one…but now on the following rounds the stitch rows (knits/purls are not lining up. I understand the leaves are off-set but I have no idea where I went wrong. Yikes!
25.05.2022 - 22:49DROPS Design answered:
Dear Enid, you displace this stitch to align the pattern. This stitch is worked at the end of the round. But the pattern should be aligned. Happy knitting!
26.05.2022 - 23:26
![]() Birgith Pedersen wrote:
Birgith Pedersen wrote:
Jeg vil gerne spørge om det er rigtig at mønster på opskrift 213-22 skal læses nedenfra og op, kan ikke få masker til at passe. Håber I kan hjælpe. Tak
02.05.2022 - 18:44
![]() Irene Lundquist wrote:
Irene Lundquist wrote:
Har løst spørgsmålet.
11.04.2022 - 04:25
|
|||||||||||||||||||||||||||||||
Lavender Charm Top#lavendercharmtop |
|||||||||||||||||||||||||||||||
 |
 |
||||||||||||||||||||||||||||||
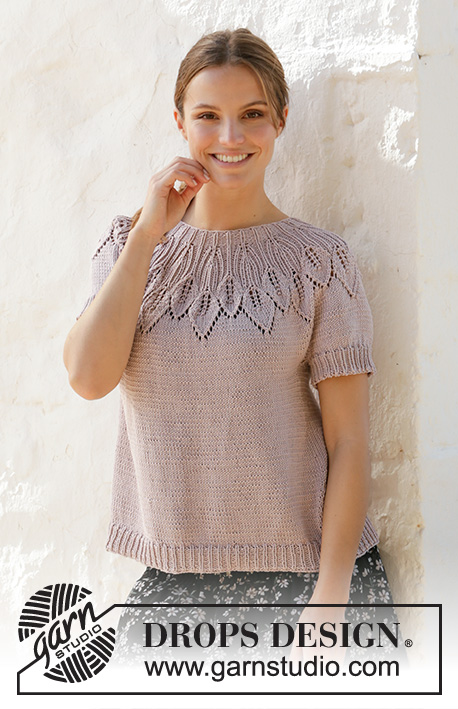
Knitted top with round yoke in DROPS Muskat. The piece is worked top down with leaf pattern and lace pattern. Sizes S - XXXL.
DROPS 213-22 |
|||||||||||||||||||||||||||||||
|
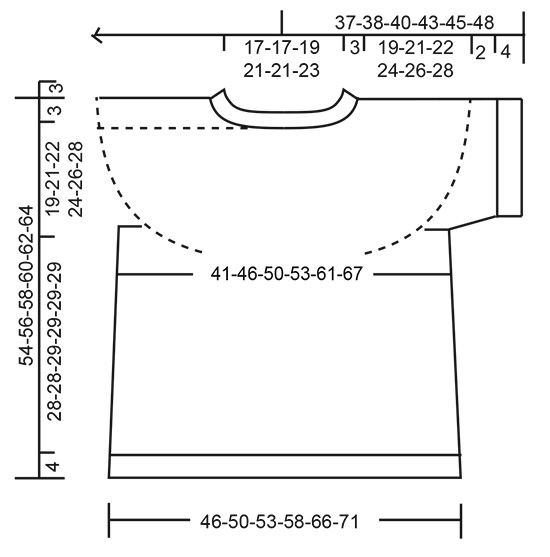
------------------------------------------------------- EXPLANATIONS FOR THE PATTERN: ------------------------------------------------------- PATTERN: See diagram A.1. Choose diagram for your size. INCREASE TIP (for sides of body): Work until there are 2 stitches left before the marker thread, make 1 yarn over, knit 4 (marker thread sits between these 4 stitches) make 1 yarn over. On the next round knit the yarn overs twisted to avoid holes. Then work the new stitches in stocking stitch. DECREASE TIP (for sleeves): Decrease 1 stitch on each side of the marker thread as follows: Work until there are 3 stitches left before the marker thread, knit 2 together, knit 2 (marker thread sits between these 2 stitches), slip 1 stitch as if to knit, knit 1 and pass the slipped stitch over the knitted stitch. CASTING-OFF TIP: To avoid the cast-off edge being tight you can cast off with a larger size needle. If the edge is still tight, make 1 yarn over after approx. each 4th stitch at the same time as casting off and the yarn overs are cast off as normal stitches. ------------------------------------------------------- START THE PIECE HERE: ------------------------------------------------------- TOP – SHORT OVERVIEW OF THE PIECE: The neck and yoke are worked in the round with circular needle, from mid back and top down. The yoke is divided for body and sleeve-edges and the body is continued in the round with circular needle. The sleeve-edges are worked in the round with double pointed needles, top down. NECK: Cast on 96-96-102-114-114-120 stitches with circular needle size 3 mm and Muskat. Knit 1 round. Work rib (= purl 2 / knit 1). When the piece measures 3 cm, change to circular needle size 4 mm. Insert 1 marker at the beginning of the round, mid-back; the yoke will be measured from this marker! YOKE: Work A.1 (= 6 stitches) in the round over all stitches (= 16-16-17-19-19-20 times in width). REMEMBER THE KNITTING TENSION! When A.1 has been worked 1 time in height there are 288-320-340-380-418-440 stitches on the needle and the piece measures approx. 14-16-16-16-18-18 cm from the marker. Knit in the round until the piece measures 19-21-22-24-26-28 cm from the marker. Now divide the piece for body and sleeves as follows: Work the first 40-45-49-53-60-65 stitches (= half back-piece), place the next 63-69-72-84-89-90 stitches on a thread for the sleeve-edge and cast on 6-6-6-6-8-10 new stitches under the sleeve, work the next 81-91-98-106-120-130 stitches (= front piece), place the next 63-69-72-84-89-90 stitches on a thread for the sleeve-edge and cast on 6-6-6-6-8-10 new stitches under the sleeve, work the last 41-46-49-53-60-65 stitches (= half back-piece). BODY: = 174-194-208-224-256-280 stitches. Insert 1 marker thread in the middle of the 6-6-6-6-8-10 stitches under each sleeve (= sides of body). There are 87-97-104-112-128-140 stitches between threads on both front and back pieces. Allow the threads to follow your work onwards; they will be used when increasing in the sides. Knit. When the piece measures 4 cm from the division, increase 1 stitch on each side of both marker threads – read INCREASE TIP (= 4 stitches increased). Increase like this every 4 cm a total of 5-4-4-5-5-5 times = 194-210-224-244-276-300 stitches. When the piece measures 28-28-29-29-29-29 cm from the division, increase 13-12-13-14-15-15 stitches evenly spaced = 207-222-237-258-291-315 stitches. Change to circular needle size 3 mm and work rib (= knit 1 / purl 2) for 4 cm. Cast off with knit – read CASTING-OFF TIP. The piece measures 32-32-33-33-33-33 cm from the division. SLEEVE-EDGE: Place the 63-69-72-84-89-90 stitches from the thread on the one side of the piece on double pointed needles size 4 mm and knit up 1 stitch in each of the 6-6-6-6-8-10 stitches cast on under the sleeve = 69-75-78-90-97-100 stitches. Work stocking stitch in the round for 2 cm. Change to double pointed needles size 3 mm and work rib (= knit 1 / purl 2) AT THE SAME TIME as you decrease, on the first round, 0-0-0-0-1-1 stitch = 69-75-78-90-96-99 stitches. Cast off when the rib measures 4 cm, with knit over knit and purl over purl. Work the other sleeve-edge in the same way. |
|||||||||||||||||||||||||||||||
Diagram explanations |
|||||||||||||||||||||||||||||||
|
|||||||||||||||||||||||||||||||
 |
|||||||||||||||||||||||||||||||
 |
|||||||||||||||||||||||||||||||
 |
|||||||||||||||||||||||||||||||
Have you finished this pattern?Tag your pictures with #dropspattern #lavendercharmtop or submit them to the #dropsfan gallery. Do you need help with this pattern?You'll find 28 tutorial videos, a Comments/Questions area and more by visiting the pattern on garnstudio.com. © 1982-2026 DROPS Design A/S. We reserve all rights. This document, including all its sub-sections, has copyrights. Read more about what you can do with our patterns at the bottom of each pattern on our site. |
|||||||||||||||||||||||||||||||


With over 40 years in knitting and crochet design, DROPS Design offers one of the most extensive collections of free patterns on the internet - translated to 17 languages. As of today we count 325 catalogues and 12298 patterns translated into English (UK/cm). 12298
We work hard to bring you the best knitting and crochet have to offer, inspiration and advice as well as great quality yarns at incredible prices! Would you like to use our patterns for other than personal use? You can read what you are allowed to do in the Copyright text at the bottom of all our patterns. Happy crafting!
Post a comment to pattern DROPS 213-22
We would love to hear what you have to say about this pattern!
If you want to leave a question, please make sure you select the correct category in the form below, to speed up the answering process. Required fields are marked *.