
Popular categories
Looking for a yarn?


Comments / Questions (71)
![]() Torill Fjeldbraaten wrote:
Torill Fjeldbraaten wrote:
Forferdelig rotete oppskrift, blir altfor mange opplysninger. Tenker alltid at plagg med drops oppskrift skal jeg aldri strikke mer. Men så er det så fine modeller 😱 har strikket i 50år aldri problemer med andre oppskrifter.
15.06.2021 - 22:53
![]() Kirsten Meldgaard wrote:
Kirsten Meldgaard wrote:
Hej med Jer. Jeg kunne godt tænke mig at strikke denne trøje. Opskriften er i Alpaca garn, men kan ikke holde ud at bruge uldtrøjer. Jeg synes, at det klør og kradser, og hvis det er bare lidt “langhåret” reagerer min øjne også. Har I et godt alternativ, som jeg kan bruge i stedet for? Mvh Kirsten Meldgaard
06.04.2021 - 20:01DROPS Design answered:
Hej Kirsten, ja du kan også lave den i DROPS Safran som er en dejlig blød bomuld :)
08.04.2021 - 08:45
![]() Bente wrote:
Bente wrote:
Den Rumpfteil habe ich fertig gestrickt und leider rollt sich der glatt rechts gestrickte Teil zur Hälfte nach oben, obwohl ich es nach der Anleitung gestrickt habe. Es sieht unmöglich aus. Was kann ich nun tun? Was kann
18.03.2021 - 23:43DROPS Design answered:
Liebe Bente, Sie können den Pullover mit Stecknadeln auf einer geeigneten Unterlage spannen, anfeuchten (z.B. mit einer Sprühflasche für Blumen) und trocknen lassen, danach entfernen Sie die Stecknadeln, dann sollte sich der Rand nicht mehr rollen.
19.03.2021 - 07:31
![]() Catriona wrote:
Catriona wrote:
How do I work the first round of A.1/A.2? The instructions involve knitting slipped stitches, but no stitches get slipped until round two, Thank you
07.03.2021 - 21:32DROPS Design answered:
Dear Catriona, the first row/ round of the pattern is (according to the diagram) is * P1, then 1 yarn over, slip 1 stitch onto right needle as if to purl. * Happy Knitting!
07.03.2021 - 22:04
![]() Sabrina Sobczyk wrote:
Sabrina Sobczyk wrote:
Dzień dobry, czy okrążenie w którym rozdzielam rękawy (i nabieram oczka na podkroje rękawów) powinno być okrążeniem w którym robię narzuty? Czy też nie ma to znaczenia w którym okrążeniu fałszywego angielskiego oddzielamy oczka na rękawy?
26.09.2020 - 00:23DROPS Design answered:
Witaj Sabrino! Nie ma to żadnego znaczenia, zrób to w okrążeniu, w którym ci wygodnej. Powodzenia!
28.09.2020 - 18:02
![]() Christina wrote:
Christina wrote:
Danke für die schnelle Antwort zur Maschenprobe. Nun lese ich: Korrektur: Die Arbeit wird im falschen Patentmuster gestrickt (nicht im Halbpatent). Ich kann aber kein Video oder Beschreibung von „falsches Patent“ finden. Wie geht es ? In Reihen für die Maschenprobe ? und in Runden für Pullover?
11.06.2020 - 14:19DROPS Design answered:
Liebe Christina, die deutsch Übersetzerin wird das mal prüfen - dieses Video zeigt, wie man Halbpatent strickt/zunimmt. Viel Spaß beim stricken!
11.06.2020 - 16:02
![]() Christina wrote:
Christina wrote:
Ich möchte diesen schönen Pullover stricken, verstehe aber die Sache mit den 2 Maschenproben für das Patentmuster nicht. Gemäß Ihrer Info weitet sich der Pulli beim tragen. Nach welcher Maschenzahl richte ich mich dann beim Maschenanschlag? Muss ich von vornherein weniger Maschen anschlagen? Danke vorab für Ihre Rückmeldung.
08.06.2020 - 20:36DROPS Design answered:
Liebe Christina, Ihre Maschenprobe glatt rechts muss 24 M x 32 Reihen = 10 x 10 cm sein - bei Patentmuster sollen Sie - flach gemessen (dh wenn Sie stricken) 25 M x 24 R = 10 x 10 cm haben. Wenn Sie diese Maschenprobe haben, dann haben Sie 20 M x 24 Reihe beim tragen. Wälen Sie die übliche Grösse, wenn Sie die richtige Maschenprobe haben, dann bekommen Sie die angegebene Massen. Viel Spaß beim stricken!
09.06.2020 - 10:03
![]() Berit Svellingen wrote:
Berit Svellingen wrote:
Eg er klar til å skille bol og ermer. Det står BOL: 204 masker (i str M) Men halve bakstykke har 46, halve forstykke 46 og forstykke 92 .. Det blir 184 (altså 20 masker mindre. ) Så dette sjønner eg ikkje- har det noe med de 10 maskene som skal legges opp under armen? Men de skal jo vere til ermet? Fint om eg får svar, Takk! mvh Berit
10.05.2020 - 01:50DROPS Design answered:
Hej Ja det stämmer, det blir 204 m totalt med de m du la upp under ärmarna. Dessa 10+10 m du la upp under ärmarna fortsätter du att sticka vidare nedover på bolen. Det var de 68 m du satte på tråd på var sida som du senare stickar ärmar av. Mvh DROPS Design
11.05.2020 - 08:54
![]() Andrea wrote:
Andrea wrote:
Hallo liebes Drops Team , in der Korrektur steht falsches Patent. Was bedeutet das???? Vielen Dank für die Antwort und ein großes Lob für die tollen Strickanleitungen . Andrea
28.04.2020 - 21:24DROPS Design answered:
Liebe Andrea, nur der Namen vom Muster wurde korrigiert - Folgen Sie Diagramme und Videos as in der Anleitung beschrieben. Viel Spaß beim stricken!
29.04.2020 - 09:01
![]() Lilli wrote:
Lilli wrote:
Jeg kan ikke se forskel på A1 og A2 udover udtagningen til de 5 masker på hver 8. Pind og er derfor i tvivl om 1 pind efter rullekanten.? Altså strik 20 masker A1. Forstået! Strik 2 masker A2, ikke forstået? Håber i kan hjælpe. Mvh Lilli
09.01.2020 - 14:14DROPS Design answered:
Hej Lilli, Forstår ikke helt dit spørgsmål... Der er ingen forskel på A.1 og A.2 udover udtagningen. Kan du evt sætte et mærke på hver side af A.2, så du tager ud det rigtige sted hver gang?
10.02.2020 - 15:43
|
|||||||||||||||||||
Last Days of Autumn#lastdaysofautumnsweater |
|||||||||||||||||||
 |
 |
||||||||||||||||||
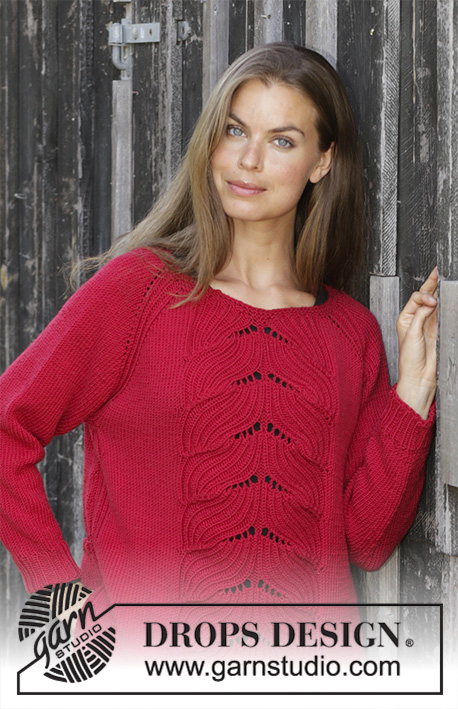
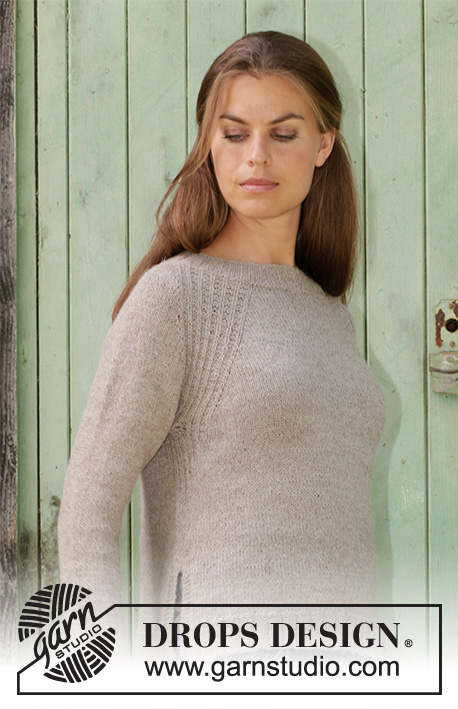
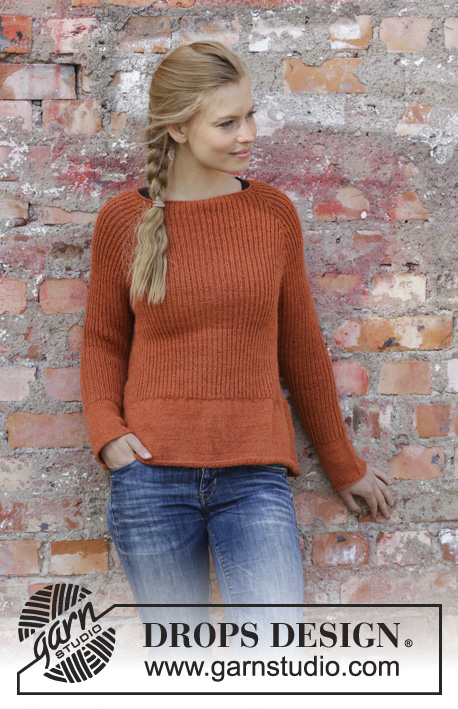
Knitted jumper with raglan in DROPS Alpaca. The piece is worked top down in false English rib and with rolled edge. Sizes S - XXXL.
DROPS 197-2 |
|||||||||||||||||||
|
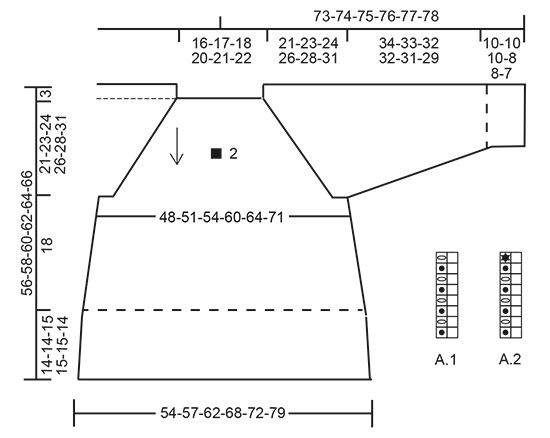
------------------------------------------------------- EXPLANATIONS FOR THE PATTERN: ------------------------------------------------------- PATTERN: See diagrams A.1 and A.2. KNITTING TENSIONS: The texture of the garment will stretch when worn; we have therefore given 2 knitting tensions and 2 sketches. Knitting tension 1 and sketch 1 apply when the garment is worked and lies flat. It is this/these knitting tensions/measurements the piece should have when worked. Knitting tension 2 and sketch 2 are for when the garment is worn. The knitting tension in height is given after the knitted stitch, which is worked over 1 row less than the purled stitch, because the knitted stitch is slipped onto the right needle every 2nd round. In other words, 24 rows in height measured in the knitted stitch on 10 cm are equivalent to 48 rows measured in the purled stitch on 10 cm in height. INCREASE TIP-1 (for sides of body): All increases are made on a round where the yarn over and knitted stitch are knitted together! Work 5 stitches in the stitch and yarn over as follows: Knit the yarn over and stitch together, but wait to slip the yarn over and worked stitch off the needle, * make 1 yarn over the right needle and knit 1 more stitch in the stitch and yarn over worked *, work from *-* a total of 2 times = 5 stitches (= 4 stitches increased). Increase like this by both markers (= a total of 8 stitches increased). The increased stitches are worked into the pattern. INCREASE TIP-2 (evenly spaced): To work out how to increase evenly, count the total number of stitches on the needle (e.g. 216 stitches) and divide these stitches by the number of increases to be made (e.g. 44) = 4.9. In this example, increase by making 1 yarn over after approx. each 5th stitch. On the next round, knit the yarn overs twisted to avoid holes. DECREASE TIP (for sleeves): All decreases are made on a round where the yarn over and knitted stitch are knitted together! Decrease as follows: Work until there are 3 stitches left before the marker thread (without the yarn overs, the yarn overs between the stitches are also slipped), slip the next 3 stitches to right needle as if to knit together: Slip 1 knit stitch + 1 purl stitch + 1 knit stitch (= stitch with marker) = 3 stitches without the yarn overs. Then knit together: 1 purl stitch and 1 knit stitch (= 2 stitches). Now pass the 3 slipped stitches over the stitches that was knitted together (= 4 stitches decreased – not counting the yarn overs). ------------------------------------------------------- START THE PIECE HERE: ------------------------------------------------------- JUMPER - SHORT OVERVIEW OF THE PIECE: The piece is worked in the round with circular needle, top down. The yoke is worked first in false English rib, then the yoke is divided for body and sleeves. The body is continued in the round. The sleeves are worked in the round with double pointed needles. As the garment is worked with a texture which will stretch when worn, we have given 2 KNITTING TENSIONS – read description above. YOKE: Cast on 108-112-116-124-132-136 stitches with circular needle size 3 mm and Alpaca. Work 4 rounds stocking stitch (= rolled edge). Then work pattern as follows: The round starts approx. mid back. Half back piece: Work A.1 (= 2 stitches) over the first 20-20-22-24-26-26 stitches. Right sleeve: Work A.2 (= 2 stitches), A.1 over the next 12 stitches, A.2 over the next 2 stitches. Front piece: Work A.1 over the next 38-40-42-46-50-52 stitches. Left sleeve: Work A.2 over the next 2 stitches, A.1 over the next 12 stitches, A.2 over the next 2 stitches. Half back piece: Work A.1 over the last 18-20-20-22-24-26 stitches. On round 8 (i.e. every 4th round in the knitted stitch) in A.2 increase 4 stitches in each A.2 (= a total of 16 stitches, the increase is drawn in the diagram), the increased stitches are worked into pattern A.1. Continue the pattern like this in height. I.e. you increase a total of 16 stitches every 8th round. REMEMBER THE KNITTING TENSION! Work A.1 and A.2 a total of 12-13-14-15-16-18 times in height. In other words, you have now increased 12-13-14-15-16-18 times = 300-320-340-364-388-424 stitches. Continue working A.1 over all stitches until the piece measures 21-23-24-26-28-31 cm from the cast-on edge. Now divide the piece for body and sleeves as follows: Half back piece: Work pattern as before over the first 44-46-50-54-58-64 stitches. Right sleeve: Place the next 64-68-72-76-80-84 stitches on a thread for sleeve and cast on 10-10-10-14-14-14 stitches under the sleeve. Front piece: Work pattern as before over the next 86-92-98-106-114-128 stitches. Left sleeve: Place the next 64-68-72-76-80-84 stitches on a thread for sleeve and cast on 10-10-10-14-14-14 stitches under the sleeve. Half back piece: Work pattern as before over the last 42-46-48-52-56-64 stitches. BODY: = 192-204-216-240-256-284 stitches. Continue in the round with pattern. When the piece measures 3 cm from where the body and sleeves were divided, insert 1 marker in the middle knitted stitch under each sleeve (= in sides). On the next round (adjust so that the next round is a round where the yarn over and knitted stitch are knitted together), increase in the stitch with the marker under each sleeve – read INCREASE TIP-1. Increase like this every 5-5-4-4-4-4 cm a total of 3-3-4-4-4-4 times = 216-228-248-272-288-316 stitches. When the piece measures 18 cm from where the body and sleeves were divided (adjust so that the last round is a round without yarn overs) continue working in stocking stitch. On first round in stocking stitch increase 44-44-48-56-56-64 stitches evenly on round – read INCREASE TIP-2 = 260-272-296-328-344-380 stitches. When the piece measures 31-31-32-32-32-31 cm from where the body and sleeves were divided, work rib in the round (= knit 3, purl 1). Work a total of 3 rounds. Then knit 1 round before casting off with knit. SLEEVE: Knit up 1 stitch in each of the last 5-5-5-7-7-7 stitches that where cast on under the sleeve, work the 64-68-72-76-80-84 stitches from the thread on one side of the piece and knit up 1 stitch in each of the first 5-5-5-7-7-7 stitches that where cast on under the sleeve = 74-78-82-90-94-98 stitches. Work pattern in the round. When the piece measures 3 cm from where the sleeve was divided from the body, insert 1 marker in the middle knitted stitch under the sleeve. On the next round (adjust so that the next round is 1 round where the yarn over and knitted stitch are knitted together), decrease 2 stitches on each side of the stitch with the marker - read DECREASE TIP. Decrease like this every 5-4-3½-3-2½-2½ cm a total of 7-8-9-10-11-11 times = 46-46-46-50-50-54 stitches. When the sleeve measures 34-33-32-32-31-29 cm from where the sleeve was divided from the body (adjust so that the last round is a round without yarn overs) continue working stocking stitch. On the first round with stocking stitch increase 10 stitches evenly on round = 56-56-56-60-60-64 stitches. Work stocking stitch until the piece measures 43-42-41-39-38-35 cm from where the sleeve was divided from the body. On the next round work rib in the round (= knit 3, purl 1). Work a total of 3 rounds of rib. Knit 1 round and cast off with knit. The sleeve measures approx. 65-66-66-66-67-67 cm from the cast-on edge. Work the other sleeve in the same way. |
|||||||||||||||||||
Diagram explanations |
|||||||||||||||||||
|
|||||||||||||||||||
 |
|||||||||||||||||||
 |
|||||||||||||||||||
Have you finished this pattern?Tag your pictures with #dropspattern #lastdaysofautumnsweater or submit them to the #dropsfan gallery. Do you need help with this pattern?You'll find 20 tutorial videos, a Comments/Questions area and more by visiting the pattern on garnstudio.com. © 1982-2026 DROPS Design A/S. We reserve all rights. This document, including all its sub-sections, has copyrights. Read more about what you can do with our patterns at the bottom of each pattern on our site. |
|||||||||||||||||||


With over 40 years in knitting and crochet design, DROPS Design offers one of the most extensive collections of free patterns on the internet - translated to 17 languages. As of today we count 324 catalogues and 12245 patterns translated into English (UK/cm). 12245
We work hard to bring you the best knitting and crochet have to offer, inspiration and advice as well as great quality yarns at incredible prices! Would you like to use our patterns for other than personal use? You can read what you are allowed to do in the Copyright text at the bottom of all our patterns. Happy crafting!
Post a comment to pattern DROPS 197-2
We would love to hear what you have to say about this pattern!
If you want to leave a question, please make sure you select the correct category in the form below, to speed up the answering process. Required fields are marked *.