
Popular categories
Looking for a yarn?


Comments / Questions (8)
![]() Uschi wrote:
Uschi wrote:
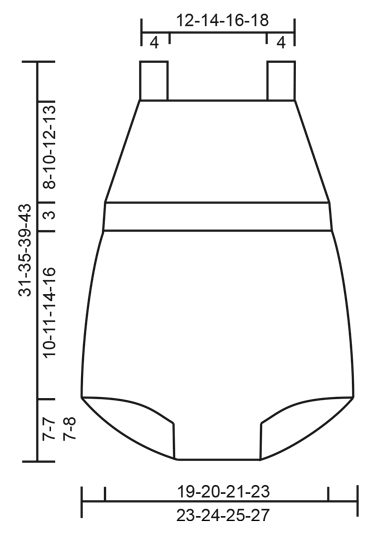
Hallo, warum passen das Titelbild und die technische Zeichnung nicht zusammen ? Ersteres zeigt deutlich Beine , letztere ist ein Body ohne Beine...? Danke für die Antworten Uschi
22.07.2019 - 10:13DROPS Design answered:
Liebe Uschi, die Zeichnung soll schematisch verdeutlichen, wie hoch die Beinöffnung ist, es ergibt sich aber dadurch kein hoch ausgeschnittener Body. Die Beine, die Sie auf dem Foto sehen, ergeben sich aus der Art, wie zugenommen wird. Zuletzt wird ja noch das Rippenmuster um die Beinöffnungen gestrickt, was in der Zeichnung nicht enthalten ist. Gutes Gelingen und viel Spaß beim Stricken!
22.07.2019 - 23:19
![]() Lisa wrote:
Lisa wrote:
Fikk også som mange andre annerledes bein enn ønsket. Synes allikevel det ser bra ut! Laget ekstra lang vrangbord:) det er dessverre en veldig irriterende feil i oppskriften som jeg er veldig lei meg for at jeg ikke oppdaget før etterpå. Stusset på at det var litt liten rillekant øverst på sidene av forstykket men fulgte oppskriften. Det er jo nødt til å skulle være 8 kantmasker .. så forstykket krøller seg og ser ikke riktig ut. Men alt i alt fin bukse!:)
28.04.2018 - 08:55
![]() Christiane wrote:
Christiane wrote:
Hallo meine Lieben, Ich versteh leider nicht wie die Beine an den "Trägerbody" kommen, die Hosenbeine bestehen ja nicht nur aus dem Rippenmusterrand, oder? Danke für die schöne Anleitung
02.04.2018 - 22:09DROPS Design answered:
Liebe Christiane, am Anfang stricken Sie Rücken und Vorderteil (siehe Skizze), dann wird es Bündchen an der beiden Beinöffnungen gestrickt. Viel Spaß beim stricken!
03.04.2018 - 09:52
![]() Caty wrote:
Caty wrote:
Se corresponde la foto del peto con el patrón en si ? es que estoy empezando a tejerlo y me da la sensación que las piernas del peto no son para nada tan largas como en la foto. Gracias
26.02.2018 - 09:45DROPS Design answered:
Hola Caty. La foto corresponde al patrón. La largura de las piernas de peto puede ser engañoso debido a cómo está puesto el peto, pero en realidad son bastante cortas.
04.03.2018 - 17:41
![]() Mariana wrote:
Mariana wrote:
Wie kann ich dieses Strickmuster vergrößern? Ich hätte es gern für 98/104? Liebe Grüße Mariana
22.02.2018 - 21:23DROPS Design answered:
Liebe Mariana, leider können wir nicht jede Anleitung nach jeder individuelle Anfrage anpassen. Gerne bekommen Sie Hilfe von Ihrem DROPS Laden oder Strickforum. Viel Spaß beim stricken!
23.02.2018 - 09:03
![]() Therese wrote:
Therese wrote:
Bildet i oppskriften samsvarer ikke med selve oppskriften. På bildet er det shorts-ben, mens i oppskrifta blir det mer som en romper. Dette er kjedelig for de som ønsker å strikke "snekkerbuksen" som er på bildet.
22.02.2017 - 08:16
![]() Silje Finsrud wrote:
Silje Finsrud wrote:
Hei. Sitter å strikker denne nydelige lekedressen nå. Men lurer på en ting, på bilde Er det shortsben på dressen, men i oppskriften er det rett fra truse til vrangbord. Har jeg misforstått noe?
29.01.2017 - 10:51DROPS Design answered:
Hej Silje. Du gaar direkte til vrangbord efter du har delt op.
30.01.2017 - 16:04
![]() ALLAIN Cindy wrote:
ALLAIN Cindy wrote:
Hoooo troop mignon !!! j'adore ! une fois mon pull fini je me lance dans la réalisation de cette combinaison !
02.09.2016 - 14:55
|
|
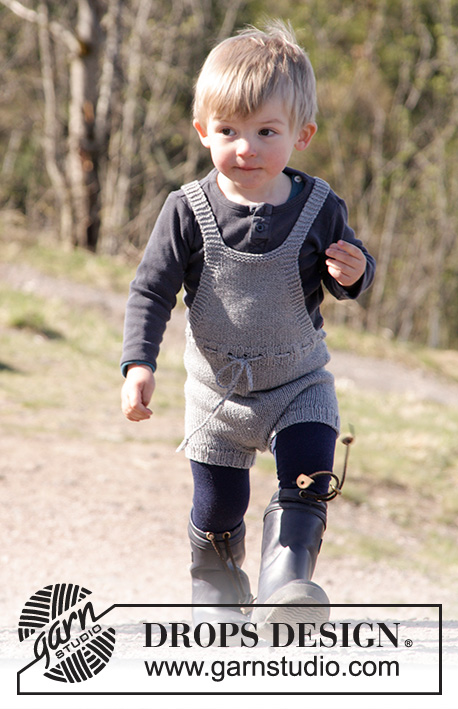
The Little Lumberjack#thelittlelumberjackjumpsuit |
|
 |
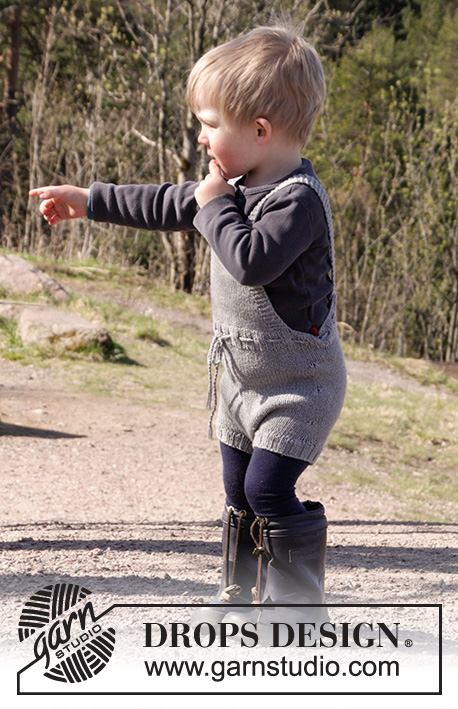 |
Knitted baby jumpsuit in DROPS Cotton Merino. Size 1-24 months
DROPS Children 27-11 |
|
|
DECREASE TIP-1: Work until 3 sts remain before marker and dec as follows: K 2 tog, K 2 (marker is between these 2 sts), slip 1 st as if to K, K 1, psso. DECREASE TIP-2: All dec are done from RS! Dec as follows after 3 edge sts in garter st: Slip 1 st as if to K, K 1, psso. Dec as follows before 3 edge sts in garter st: Beg 2 sts before 3 edge sts and K 2 tog. GARTER ST (back and forth): K all rows. 1 ridge = 2 rows K. ---------------------------------------------------------- PLAY SUIT: Piece is worked back and forth in 2 parts, bottom up, up to after leg opening. Then work piece in the round before dividing at the waist and finishing front piece back and forth on needle. BACK PIECE: Cast on 14-16-18-20 sts on circular needle size 3.5 mm with Cotton Merino and working stocking st back and forth. AT THE SAME TIME cast on 2 new sts at the end of every row 9-9-9-10 times in total in each side = 50-52-54-60 sts on needle and piece measures approx. 6-6-6-7 cm. Put piece aside and work front piece. FRONT PIECE: Cast on 14-16-18-20 sts on circular needle size 3.5 mm with Cotton Merino and working stocking st back and forth for 5-5-5-6 cm. SIZE 1/3 months - 6/9 months - 12/18 months: Now cast on 6 new sts at the end of every row a total of 3 times in each side. SIZE 24 months: Cast on 6 new sts in each side at the end of every row 2 times, then 8 new sts in each side 1 time = 50-52-54-60 sts on needle and piece measures approx. 7-7-7-8 cm. BODY: Slip sts from front and back piece on to same circular needle = 100-104-108-120 sts. Insert 1 marker in each side (= 50-52-54-60 sts between markers) - NOW MEASURE PIECE FROM HERE. Work in stocking st in the round - beg of round = the side. When piece measures 2-3-5-7 cm, dec 1 st on each side of both markers - READ DECREASE TIP 1 (= 4 sts dec). Repeat dec every 2 cm 4 times in total = 84-88-92-104 sts. When piece measures 10-11-14-16 cm from markers (piece measures approx. 17-18-21-24 cm from cast-on edge), work an elevation at the back as follows: K as before over the first 42-44-46-52 sts, i.e. until 2nd marker (= front piece – NOTE: Do not work elevation over these sts), K until 5 sts remain before marker at beg of round, turn and P until 5 sts remain before marker in the other side, turn piece. K until 10 sts remain before marker, turn piece and P until 10 sts remain before marker in the other side, turn piece. K until 15 sts remain before marker, turn piece and P until 15 sts remain before marker in the other side. Turn piece and K back to beg of round (= the side). Switch to circular needle size 3 mm and K 1 round over all sts AT THE SAME TIME adjust no of sts to 80-88-96-104 - NOTE: To avoid holes at every turn pick up loop between 2 sts and K twisted tog with next st on needle. Then work rib as follows: K 1, * P 2, K 2 *, repeat from *-* until 3 sts remain on round and finish with P 2 and K 1. When rib measures 1½ cm, work an eyelet row as follows: K 1, * P 2 tog, 1 YO, K 2 *, repeat from *-* until 3 sts remain on round, finish with P 2 tog, 1 YO and K 1. Work until 1 round remain before rib measures 3 cm. Work next round as follows: Work rib over the first 40-44-48-52 sts (= front piece), LOOSELY cast off the next 40-44-48-52 sts with K over K and P over P (= back piece). FRONT PIECE: Insert 1 marker, NOW MEASURE PIECE FROM HERE! Switch to circular needle size 3.5 mm and work first row from RS as follows: 3 edge st in GARTER ST - see explanation above, 34-38-42-46 sts in stocking st, 3 edge sts in GARTER ST. Continue like this back and forth. AT THE SAME TIME when piece measures 1-0-0-1 cm, dec 1 st in each side - READ DECREASE TIP 2. Repeat dec every 2nd-4th-6th-6th row 7-7-6-6 times in total = 26-30-36-40 sts remain on needle. When piece measures 7-9-11-12 cm from marker (adjust so that next row is from RS), work 3 ridges back and forth over all sts. Work next row as follows from RS: K 8 and slip these sts on 1 stitch holder for shoulder strap, cast off the next 10-14-20-24 sts and K the last 8 sts (= shoulder strap). SHOULDER STRAP: Continue in garter st back and forth until shoulder strap measures approx. 18-24 cm (or desired length). Cast off and repeat in the other side. ASSEMBLY: RIB EDGE: Pick up from RS approx. 50 to 58 sts along one opening for leg on circular needle size 3 mm with Cotton Merino. P 1 row from WS while AT THE SAME TIME inc evenly to 58-62-66-70 sts. Then work rib K 2/P 2 back and forth with 1 edge st in garter st in each side. When edge measures 2-4 cm, loosely cast off with K over K and P over P. Repeat along the other leg. Sew opening between legs inside 1 edge st - -i.e. sew tog one rib edge, then sew seam between leg openings and then the other rib edge. Fasten a button at the bottom on each shoulder strap. Use holes in eyelet row on rib to button. TIES: Cut 2 lengths Cotton Merino yarn of approx. 3 metres each. Twine the strands tog until they resist, fold the string double so that it twines again. Make a knot at each end. Beg mid front and thread tie up and down through eyelet row on rib in waist. |
|
 |
|
Have you finished this pattern?Tag your pictures with #dropspattern #thelittlelumberjackjumpsuit or submit them to the #dropsfan gallery. Do you need help with this pattern?You'll find 25 tutorial videos, a Comments/Questions area and more by visiting the pattern on garnstudio.com. © 1982-2026 DROPS Design A/S. We reserve all rights. This document, including all its sub-sections, has copyrights. Read more about what you can do with our patterns at the bottom of each pattern on our site. |
|


With over 40 years in knitting and crochet design, DROPS Design offers one of the most extensive collections of free patterns on the internet - translated to 17 languages. As of today we count 324 catalogues and 12267 patterns translated into English (UK/cm). 12267
We work hard to bring you the best knitting and crochet have to offer, inspiration and advice as well as great quality yarns at incredible prices! Would you like to use our patterns for other than personal use? You can read what you are allowed to do in the Copyright text at the bottom of all our patterns. Happy crafting!
Post a comment to pattern DROPS Children 27-11
We would love to hear what you have to say about this pattern!
If you want to leave a question, please make sure you select the correct category in the form below, to speed up the answering process. Required fields are marked *.