
Popular categories
Looking for a yarn?


Comments / Questions (68)
![]() Ruby wrote:
Ruby wrote:
Is the chain meant to count as the first row in the "rows worked in total"? I'm making the second size and I've reached the row with stitches (counting the beginning ch5 as individual chains). I'm at 13 rows if you do not count the chain. My lace has 4 dc posts, so if I continue on I will end up on A4 during the rows with the large chains to make the sides. I'm measuring right on the bottom (neck) edge but too short on the top.
16.05.2022 - 08:05DROPS Design answered:
Hi Ruby, No, the chain stitches do not count as a row. Happy crocheting!
16.05.2022 - 08:58
![]() Anita Vogler wrote:
Anita Vogler wrote:
Wie wird genau Rücken angeschlagen? Wie aufgeführt fehlt auf einer Seite 1 Reihe. Immer 6 LM beim wenden, braucht dochkeine Bögen wenn umgehnäht wird?
17.03.2022 - 16:18DROPS Design answered:
Liebe Frau Vogler, Rücken und Vorderteil werden in nur einem Teil zusammen gehäkelt. Siehe Maßskizze. Nach allen Zunahmen, häkeln Sie 27 bis 57 Lm (siehe Größe) beidseitig, so häkeln Sie damit beide 1/2 Rückenteil. Am Anfang jeder Reihe mit Stb häkelt man 5 Luftmaschen, damit die Anfang der Reihen nicht zu eng sind. Sollte es für Sie zu locker sein, können Sie weniger häkeln. Viel Spaß beim häkeln!
17.03.2022 - 17:23
![]() Anka Krol wrote:
Anka Krol wrote:
Het geluid staat niet aan bij de instructie video’s. Alle apparaten geprobeerd, iphone, laptop en computer.
01.07.2021 - 09:01
![]() Nerea wrote:
Nerea wrote:
Buona sera. Sto provando a fare il modello mandarina. La spiegazione del modello ha qualcosa che non torna. Gli aumenti ai lati, nella parte dx sono in un giro, quelli della parte sx nel giro dopo. C'è qualcosa che non torna nella traduzione. Grazie
12.06.2021 - 22:07DROPS Design answered:
Buonasera Nerea, ci può spiegare esattamente qual è il suo dubbio? Buon lavoro!
14.06.2021 - 22:28
![]() Simons wrote:
Simons wrote:
Ik snap niet wat ik moet doen als ik klaar ben met a1,a2,a3 ik begrijp de uitleg niet, is er geen filmpje ocer hoe nu verder of helemaal uitgetekend nadat je klaar bent met die drie stukken
17.05.2021 - 22:52DROPS Design answered:
Dag Simons,
Als je klaar bent met A.1, A.2 en A.3 dan zet je het patroon op dezelfde manier voort. dus met steeds op het eind van de toer 3 stokjes in het laatste stokje van de vorige, keren 5 lossen en 2 stokjes in het eerste stokje en in het midden minder je ook zoals je hiervoor deed, zodat het kantpatroontje in een punt eindigt.
20.05.2021 - 17:01
![]() Dd wrote:
Dd wrote:
Voor je aan de a1,a2a4delen begint staat dat je 35steken hebt, maar de drie delen bij elkaar zijn maar 23steken en in het filmpje wordt a2 maar 1x gedaan dus hoe kom van 35steken naar 23steken? ik krijg het alleen kloppend als ik a2 zeven keer doe, maar dat lijkt me niet de bedoeling
17.05.2021 - 17:18DROPS Design answered:
Dag Dd,
Je haakt A.1 1 keer = 11 steken, A.2 (2 steken) haak je 7 keer = 14 steken, dan A.3 (10 steken). Dan kom ik op een totaal van 35 steken.
20.05.2021 - 16:57
![]() Clara wrote:
Clara wrote:
Buona sera, chiedo un altro chiarimento: quando si fanno le 30 catenelle e poi il motivo sulle 77 maglie e poi di nuovo le altre 30 catenelle il lavoro non risulta allo stesso livello ?Come si fa correttamente? Grazie
09.05.2021 - 23:15DROPS Design answered:
Buonasera Clara, le maglie vanno lavorate tutte di seguito come indicato. Buon lavoro!
15.05.2021 - 22:24
![]() Clara wrote:
Clara wrote:
Salve, io ho seguito le vostre istruzioni e dopo aver lavorato il motivo da A1 ad A3 x 14 righe ho anche le 77 maglie ma nella punta del motivo ho solo 3 archetti, non capisco ???
07.05.2021 - 23:04DROPS Design answered:
Buonasera Clara, il numero di maglie alla fine dei diagrammi è corretto. Buon lavoro!
09.05.2021 - 17:24
![]() Lily wrote:
Lily wrote:
Bonjour ! Je suis censée obtenir 35 ms à la fin de mon premier rang au début de l'ouvrage, mais rien n'y fait j'ai recommencé encore et encore j'arrive à 30 ms. De plus, quand je respecte les instructions à la lettre (soit sauter 1 ml et faire une ms dans les 4 ml suivante) il me reste à la fin, non pas 2ml mais 10ml. Je n'arrive pas à comprendre mon erreur même après plusieurs essais. Ai-je rater une information ? (je commence mon ouvrage avec 44ml)
04.05.2021 - 20:46DROPS Design answered:
Bonjour Lily, effectivement, il me reste 1 ml à la fin du rang, avant de crocheter les 2 dernières ms, sautez 1 ml comme auparavant, autrement dit: 1 ms dans la 2ème ml, 1 ms dans les 4 ml suivantes, *sautez 1 ml, 1 ms dans les 4 ml suiv*, x 7 au total en M, sautez 1 ml, 1 ms dans les 2 dernières ml = 1+4+ 4x7 +2=35 ms (sur 2+4+ 5*7 + 3=44 ml). Bon crochet!
05.05.2021 - 08:31
![]() Evi Desair wrote:
Evi Desair wrote:
Hallo , 1) Als ik begin in maat S ; opzet 42steken , is het dan op het einde 6v achter mekaar of moet daar ook nog een l tss ? 2) Moet ik na het telpatroon elke toer van stokjes nog steeds beginnen met 5 lossen ? Grts Evi
30.04.2021 - 11:55DROPS Design answered:
Dag Evi,
Antwoord 1: Als het goed is heb je aan het eind 2 lossen over waar je 2 vasten in haakt. Je komt dan inderdaad op 6 vasten achter elkaar op het eind. Antwoord 2: Ja, aan het begin van elke toer met stokjes haak je 5 lossen om mee te keren, dus ook na de telpatronen.
04.05.2021 - 20:16
|
|||||||||||||||||||
Mandarina#mandarinatop |
|||||||||||||||||||
 |
 |
||||||||||||||||||
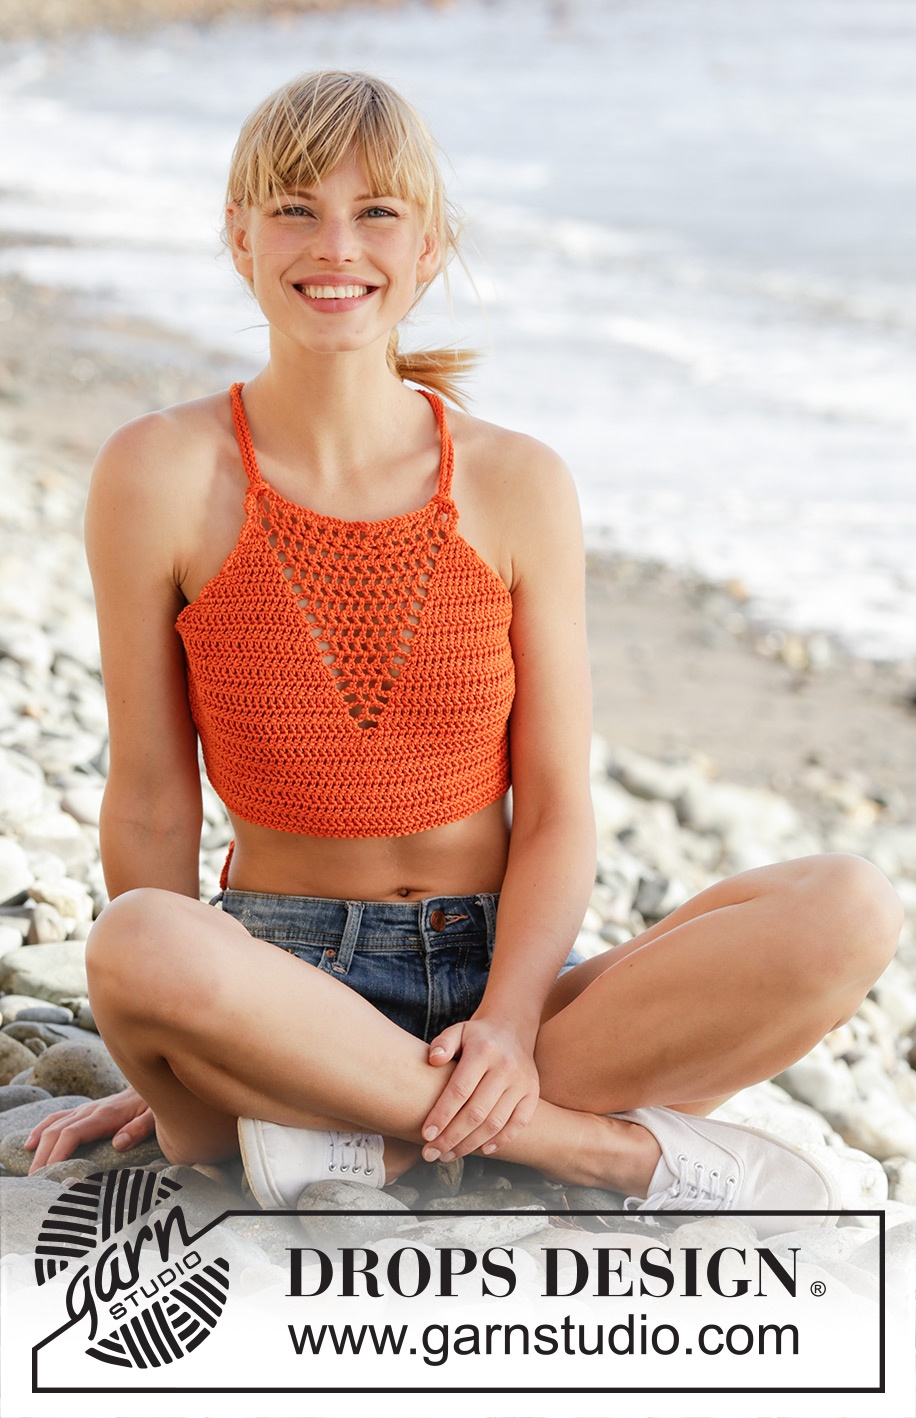
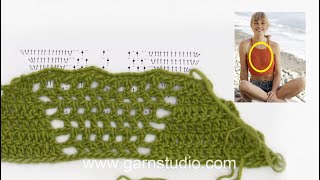
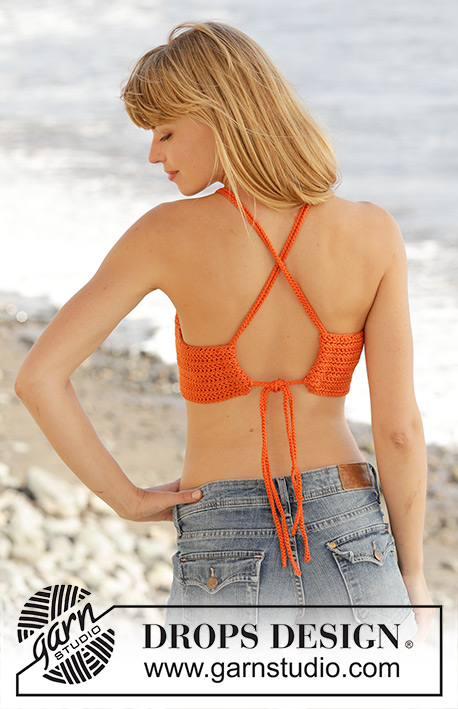
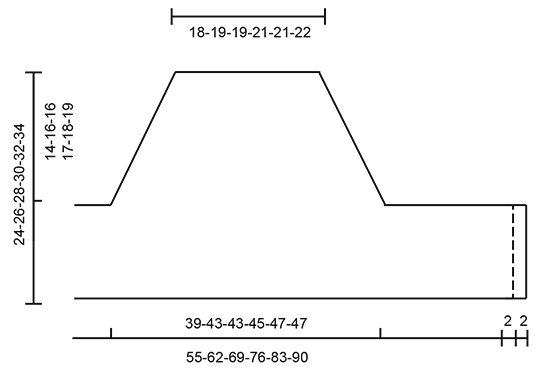
Crochet DROPS top with trebles, lace pattern and ties at the back, worked top down in ”Muskat”. Size S-XXXL.
DROPS 170-16 |
|||||||||||||||||||
|
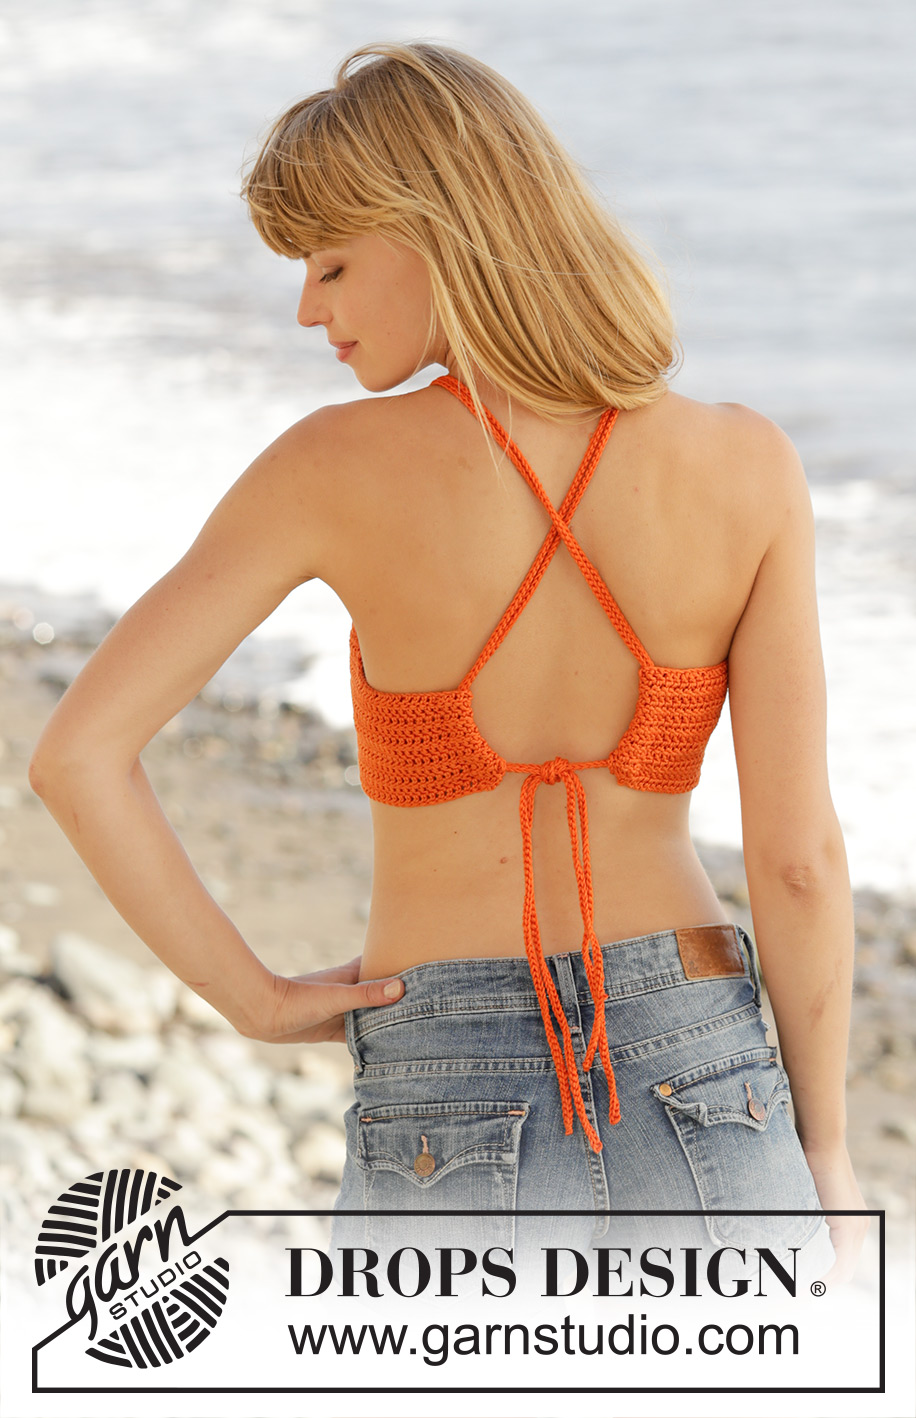
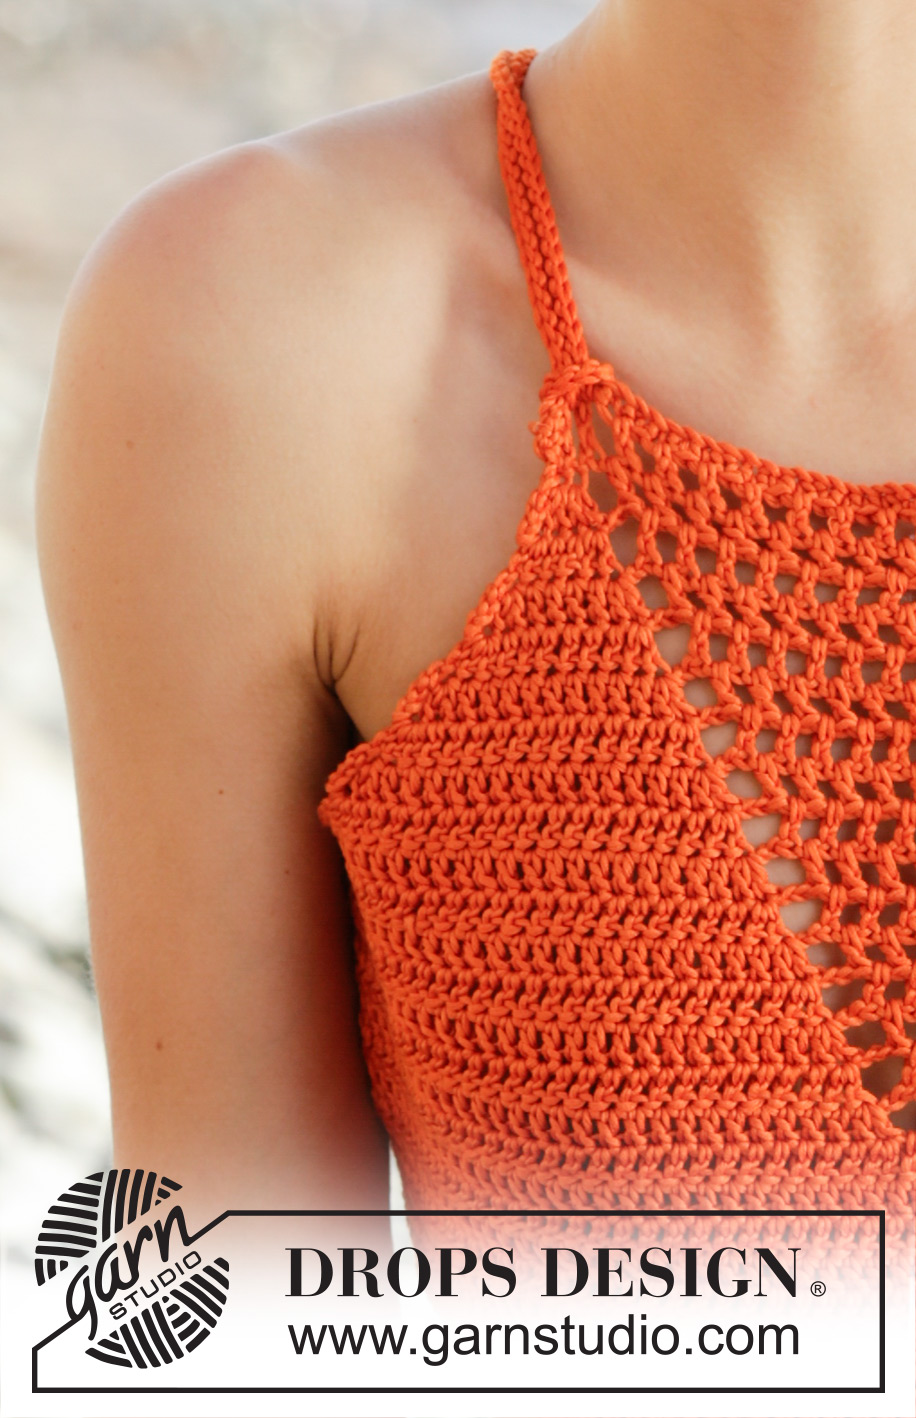
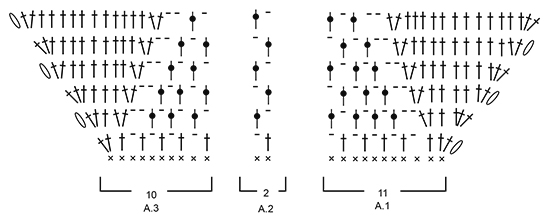
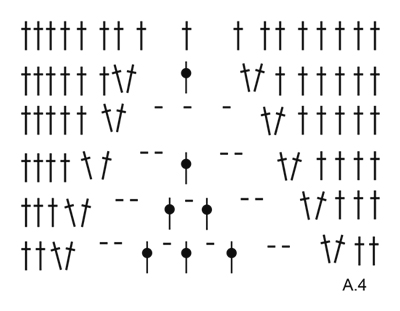
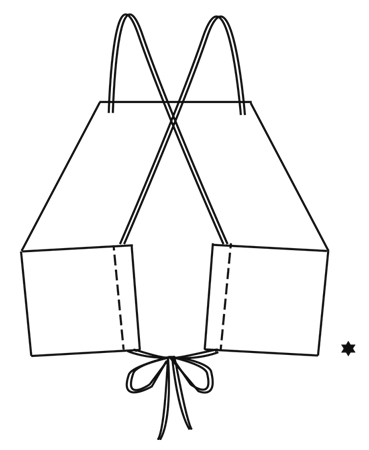
CROCHET INFO: At beg of every row with tr work 5 ch to turn with. These 5 ch do not replace first tr. PATTERN: See diagrams A.1 to A.4. ---------------------------------------------------------- TOP: Worked back and forth, top down. Work 42-44-44-47-47-49 loose ch (incl 1 ch to turn with) on hook size 4 mm with Muskat. Turn and work as follows: Work 1 dc in 2nd ch from hook (= 1 dc + 1 ch to turn with), work 1 dc in each of the next 2-4-4-2-2-4 ch, * skip 1 ch, work 1 dc in each of the next 4 ch *, repeat from *-* 6-6-6-7-7-7 more times, work 1 dc in each of the remaining 2 ch = 33-35-35-37-37-39 dc. Turn and work pattern as follows: Work A.1 over the first 11 dc, A.2 (= 2 dc) 6-7-7-8-8-9 times in width, A.3 over the remaining 10 dc - READ CROCHET TIP! REMEMBER THE CROCHET TENSION! When diagram A.1 to A.3 have been worked vertically, continue pattern and inc the same way until 13-14-14-15-16-17 rows have been worked in total. There are now 71-77-77-81-85-85 tr/ch on row. Inc in each side of A.1 and A.3 is now done but lace pattern continue to decrease inwards into a tip mid front and work as follows: Work 27-30-37-44-49-57 ch (incl 5 ch to turn with), turn and work as follows: Work 1 tr in 6th ch from hook, then work 1 tr in each of the next 1-4-6-3-3-6 ch, * skip 1 ch, work 1 tr in each of the next 4 ch *, repeat from *-* 3-3-4-6-7-8 more times, continue pattern as before over the 71-77-77-81-85-85 tr, then work 27-30-37-44-49-57 ch (incl 5 ch to turn with). Turn and work as follows: Work 1 tr in 6th ch from hook, then work 1 tr in each of the next 1-4-6-3-3-6 ch, * skip 1 ch, work 1 tr in each of the next 4 tr *, repeat from *-* 3-3-4-6-7-8 more times, continue pattern as before over the 71-77-77-81-85-85 tr, then work 1 tr in each of the remaining tr on row = 107-119-131-145-157-171 sts tr/ch. Continue with 1 tr in every tr and continue to dec lace pattern mid front into a tip. When 4 ch-spaces remain, finish pattern as shown in diagram A.4. Then work 1 tr in every tr until piece measures 24-26-28-30-32-34 cm from cast-on edge mid front. Fasten off. ASSEMBLY: Fold the outermost 2 cm in each side in on the back of top and sew small stitches through both layers to make a tunnel to thread the tie through. TIE: Work 1 loose tie as follows: Work ch with Muskat on hook size 4 mm until the tie measures 140-150-160-170-180-190 cm, turn and work 1 sl st in every ch but make sure that the sl sts are not worked tighter than ch. Fasten off. Work another tie the same way. Beg from RS and thread one of the end on tie through outermost hole, around tr and through the other hole (= 2 tie ends out towards RS). Adjust tie so that ends are the same length, then thread the 2 ends through loop on WS and tighten. Repeat in the other side. Then place ties in a cross on the back before threading them through curtain hem - see illustration. Fasten top by making a knot. |
|||||||||||||||||||
Diagram explanations |
|||||||||||||||||||
|
|||||||||||||||||||
 |
|||||||||||||||||||
 |
|||||||||||||||||||
 |
|||||||||||||||||||
 |
|||||||||||||||||||
Have you finished this pattern?Tag your pictures with #dropspattern #mandarinatop or submit them to the #dropsfan gallery. Do you need help with this pattern?You'll find 6 tutorial videos, a Comments/Questions area and more by visiting the pattern on garnstudio.com. © 1982-2026 DROPS Design A/S. We reserve all rights. This document, including all its sub-sections, has copyrights. Read more about what you can do with our patterns at the bottom of each pattern on our site. |
|||||||||||||||||||


With over 40 years in knitting and crochet design, DROPS Design offers one of the most extensive collections of free patterns on the internet - translated to 17 languages. As of today we count 324 catalogues and 12267 patterns translated into English (UK/cm). 12267
We work hard to bring you the best knitting and crochet have to offer, inspiration and advice as well as great quality yarns at incredible prices! Would you like to use our patterns for other than personal use? You can read what you are allowed to do in the Copyright text at the bottom of all our patterns. Happy crafting!
Post a comment to pattern DROPS 170-16
We would love to hear what you have to say about this pattern!
If you want to leave a question, please make sure you select the correct category in the form below, to speed up the answering process. Required fields are marked *.