
Popular categories
Looking for a yarn?


Comments / Questions (63)
![]() Anselma wrote:
Anselma wrote:
Hi all, I have been crocheting this for a while now, just finished the increases. However, I find that the holes for the sleeves are way too large, as for 14 rows I was increasing 4 dc on each sleeve (size S). I tought the pattern called for this. Now I'm not sure if I got it all wrong from the start and misunderstood the increases. I think I might frog this up to row 7-8...did anyone find the same problem? Or is it just me and my bad pattern reading skills? Thank you
10.03.2014 - 18:37DROPS Design answered:
Hi Anselma, in size S you inc 4 dc a total of 14 times (14 rows), then 2 dc a total of 8 times (8 rows). You may adjust if necessary. Happy crocheting!
11.03.2014 - 08:43
![]() Anselma wrote:
Anselma wrote:
Hi all, I have been crocheting this for a while now, just finished the increases. However, I find that the holes for the sleeves are way too large, as for 14 rows I was increasing 4 dc on each sleeve (size S). I tought the pattern called for this. Now I'm not sure if I got it all wrong from the start and misunderstood the increases. I think I might frog this up to row 7-8...did anyone find the same problem? Or is it just me and my bad pattern reading skills? Thank you
10.03.2014 - 18:35
![]() Anisa wrote:
Anisa wrote:
Lovely pattern have the yarn but can't make it because the pattern is really hard to understand and I'm an advanced crocheter.
09.03.2014 - 18:10
![]() Karin Keijser wrote:
Karin Keijser wrote:
Na A3 van de mouw weet ik niet hoe ik verder moet, welke toeren van a3 moet ik herhalen. Of stopt het minderen van A2 dan en moet ik na de 8e toer over op A2?
09.02.2014 - 23:05DROPS Design answered:
Hoi Karin. Als je klaar bent met minderen ga je door volgens A.2 over alle st met de 1 of 2 stk (wat over was van A.3) tot de vermelde lengte vanaf de markeerder.
14.02.2014 - 11:25
![]() Bunny wrote:
Bunny wrote:
Hi again, Thanks for your help. I'm doing fine, finished yoke and body, now doing stuck on sleeves. I don't understand how the sleeve can sew into the armpit area. Specifically, I don't see how the sleeve fits with the part on the body section where the pattern asks you to Ch12 then put 12 DC in the chain space. Your help or a diagram would be appreciated.
12.01.2014 - 17:01DROPS Design answered:
Dear Bunny, after last inc for yoke and raglan, when you get 364-520 tr (see size), work the next row from RS as stated, the 94-116 tr you will skip twice will be worked for sleeve later, and the ch12 you cast on above the skipping sts are for under arm. On next row, just work 1 tr in every tr and 1 tr in each ch under sleeve. Happy crocheting!
13.01.2014 - 09:33
![]() Karin Keijser wrote:
Karin Keijser wrote:
De beschrijving van A1 komt niet overeen met de tekening volgens mij. In de beschrijving komt geen losse voor, voor en na de 5 stokjes, in de tekening wel. Wat moet het zijn?
03.01.2014 - 19:56DROPS Design answered:
Hoi Karin. Je hebt gelijk, we hebben het patroon aangepast. Bedankt voor het melden.
28.02.2014 - 12:11
![]() Mireille Peere wrote:
Mireille Peere wrote:
Goede middag, ik ben al een paar keer begonnen met de opzet van dit vestje. Maar de steekverhouding klopt niet bij de 2 toer. Heb veel vasten over. Wat doe ik fout aub. Groetjes Mireille
03.01.2014 - 12:56DROPS Design answered:
Hoi Mireille. Het patroon zou moeten kloppen, maar als je aangeeft welke maat je haakt, kan ik het narekenen en eventueel uitleggen hoe je moet haken.
06.01.2014 - 13:43
![]() Bunny wrote:
Bunny wrote:
I'm keen to make this but I simply do not understand the instructions. Could you tell me what the shape the yoke section should be for a start and are the sleeves crocheted separately? If anyone has made a chart of this, I would be rather grateful.
26.12.2013 - 22:55DROPS Design answered:
Dear Bunny, this jacket is top down, you first crochet from neck down with inc on each raglan line (inc are different in front & back pieces and for sleeves), then work front piece, skip sts for sleeve and cast on ch for armhole, work back piece and skip sts for sleeve, cast on ch for armhole and finish with 2nd front piece. Happy crocheting!
27.12.2013 - 14:12
![]() Hanne Kornø wrote:
Hanne Kornø wrote:
A1-A3 mønster diagrammet svarer ikke til det der står i teksten. I mønsterdiagrammet er eksempelvis for A1 angivet en luftmaske mellem 1. stang maske og viften af stangmasker i midten - luftmasken mangler i teksten (hæklevejledningen). Det samme gælder for A2 og A3 hvor motivet går igen. Det betyder en del for bredden af arbejdet om der skal være luftmasker mellem viften og de lodrette enkeltstående stangmasker i mømsteret. Glæder mig til en afklaring, Mvh Hanne
26.11.2013 - 17:20DROPS Design answered:
Hej Hanne. Vi har rettet i mönstret. Se under rettelser. Tak for meldingen.
04.12.2013 - 09:54
![]() Leriche. wrote:
Leriche. wrote:
Combien de pelotes dois-je commander? pour la taille 42
16.10.2013 - 03:17DROPS Design answered:
Bonjour Mme Leriche, pour trouver votre taille, vous trouverez en bas de page un schéma du gilet avec toutes les mesures que vous pourrez comparer à un vêtement analogue que vous avez et dont vous aimez la forme. Une fois votre taille trouvée, divisez le montant total en g par le poids de la pelote. Par ex, pour ce gilet en taille L: 450/50 g la pelote Baby Alpaca Silk= 9 pelotes. Bon crochet!
16.10.2013 - 08:46
|
||||||||||
Forget-Me-Not#forgetmenotcardigan |
||||||||||
|
|
||||||||||
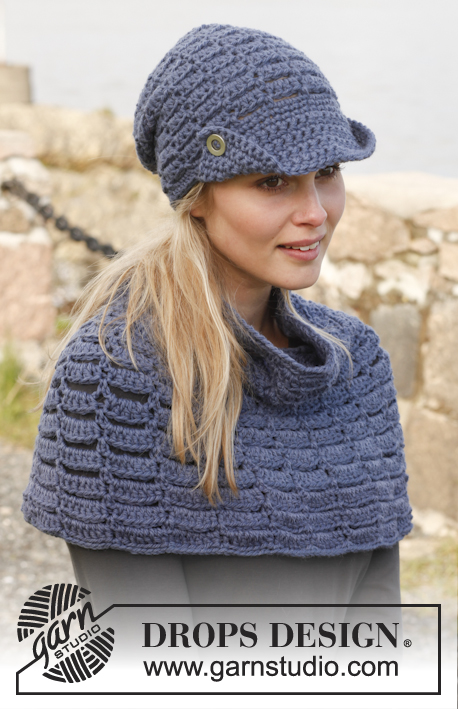
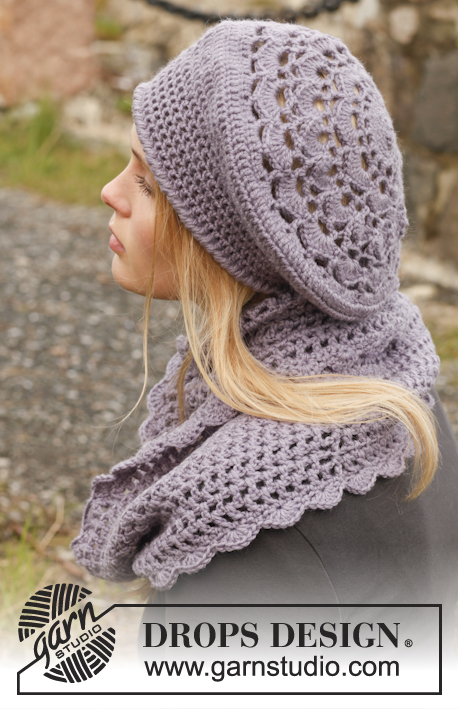
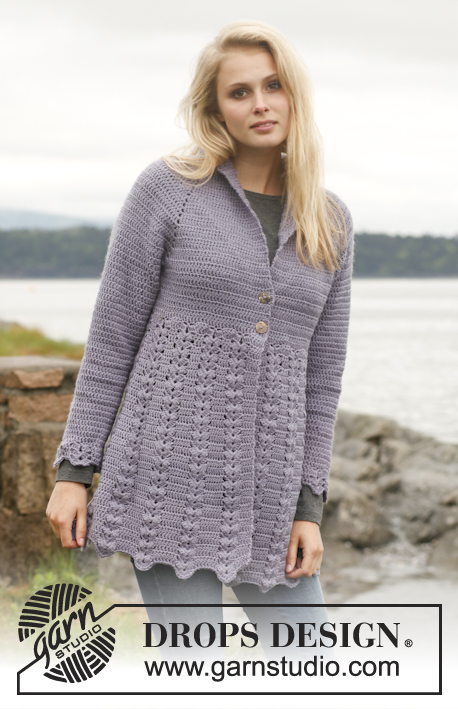
Crochet DROPS jacket with raglan and lace pattern worked top down in ”BabyAlpaca Silk”. Size: S - XXXL.
DROPS 149-19 |
||||||||||
|
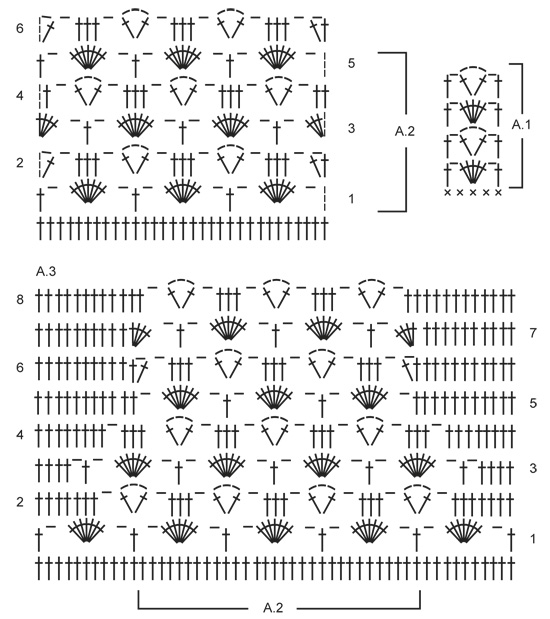
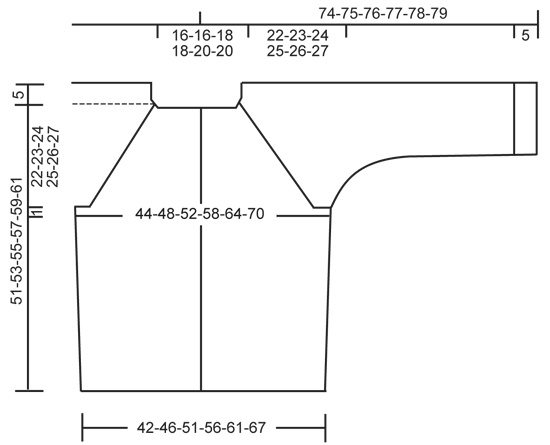
CROCHET INFO: Replace first tr at beg of every tr row with 3 ch, finish row with 1 tr in 3rd ch from beg of previous row. PATTERN: See diagrams A.1 to A.3. INCREASE TIP: Inc 1 tr by working 2 tr in same st. DECREASE TIP 1: Work 1 dc/tr but wait with last YO and pull through (= 2 sts on hook), then work next dc/tr but on last pull through, pull YO through all sts on hook = 1 dc/tr dec. DECREASE TIP 2: Work 1 dc but wait with last YO and pull through (= 2 sts on hook), work next dc but wait with last YO and pull through (= 3 sts on hook), work next dc but now pull last YO through all 4 sts on hook (= 2 sts dec). ----------------------------------------------------------- JACKET: The piece is worked top down. Worked back and forth from mid front. YOKE: Work 166-166-176-176-187-187 ch on hook size 3.5 mm with BabyAlpaca Silk. Work first row as follows from WS: Work 1 dc in 2nd ch from hook, * skip 1 ch, 1 dc in each of the next 3 ch *, repeat from *-* until 0-0-2-2-1-1 ch remains and finish with 1 dc in each of the last 0-0-2-2-1-1 ch = 124-124-132-132-140-140 dc (incl 4 dc in each side towards mid front for band). READ CROCHET INFO and work next row as follows from RS: 3 ch (= 1 tr), 1 tr in each of the next 18-18-20-20-22-22 dc, work A.1 over the next 5 sts (i.e. 1 tr in first dc, skip 1 dc, 1 ch, 5 tr in next dc, skip 1 dc, 1 ch and 1 tr in next dc), work 1 tr in each of the next 18 dc (= sleeve), A.1 over the next 5 dc, 1 tr in each of the next 30-30-34-34-38-38 dc (= back piece), A.1 over the next 5 dc, 1 tr in each of the next 18 dc (= sleeve), A.1 over the next 5 sts and 1 tr in each of the last 19-19-21-21-23-23 dc, turn piece. READ ALL OF THE FOLLOWING SECTION BEFORE CONTINUING AND REMEMBER THE CROCHET TENSION! Continue back and forth with tr and A.1 in every transition between body and sleeves. AT THE SAME TIME on next row (= WS) beg inc for raglan and inc as follows – NOTE: The inc on body and sleeves are uneven: RAGLAN INC ON FRONT AND BACK PIECE: Inc 2 tr before/after A.1 on front and back piece by working 2 tr in each of the last 2 tr before/after A.1 on front and back piece. Repeat inc with 2 tr on every row 1-5-6-11-14-20 more times (= 2-6-7-12-15-21 times in total). Then inc 1 tr before/after A.1 by working 2 tr in last tr before/after A.1 on front and back piece. Repeat inc with 1 tr on every row 19-16-16-12-10-5 more times (= 20-17-17-13-11-6 times in total). RAGLAN INC ON SLEEVES: Inc 2 tr before/after A.1 in each side on sleeves by working 2 tr in each of the last 2 tr before/after A.1 on sleeves. Repeat inc with 2 tr on every row 13-14-15-16-18-19 more times (= 14-15-16-17-19-20 times in total). Then inc 1 tr before/after A.1 by working 2 tr in last tr before/after A.1 on sleeves. Repeat inc with 1 tr on every row 7-7-7-7-6-6 more times (= 8-8-8-8-7-7 times in total). TRANSITION FROM A.1 TO TR: AT THE SAME TIME on last row with inc work 5 tr over A.1 instead of A.1 in every transition between body and sleeves. After last inc, there are 364-392-416-448-484-520 tr on row. Work next row as follows from RS (if next row is worked from WS, cut the yarn and beg from RS): Work 1 tr in each of the first 46-51-55-61-67-74 tr (= left front piece), skip the next 94-98-102-106-112-116 tr (= sleeve), work 12 ch, work 1 tr in each of the next 84-94-102-114-126-140 tr (= back piece), skip the next 94-98-102-106-112-116 tr (= sleeve), work 12 ch and work 1 tr in each of the last 46-51-55-61-67-74 tr = 200-220-236-260-284-312 sts on row. Then finish body and sleeves separately. BODY: Insert 1 marker on row – now measure piece from here. Work first row as follows from WS: 3 ch (= 1 tr), work 1 tr in each of the next 3 tr (= band), work 1 tr in every tr and 12 tr in ch-space under each sleeve until 4 tr remain on row AT THE SAME TIME inc 49-49-63-69-75-77 tr evenly over these sts, finish with 1 tr in each of the last 4 tr (= band) = 249-269-299-329-359-389 tr on row. On next row from RS, work pattern according to diagram A.2 with 4 tr in each side for band, i.e. work 1st row as follows: 3 ch (= 1 tr), 1 tr in each of the first 3 tr (= band), 1 tr in next tr, * ch 1, skip 4 tr, 7 tr in next tr, ch 1, skip 4 tr, 1 tr in next tr *, repeat from *-* 24-26-29-32-35-38 times in total and finish with 1 tr in each of the last 4 tr on row. Continue pattern like this according to diagram A.2 (repeat rows 2-5 in diagram). When piece measures approx. 28-29-30-31-32-33 cm from marker – finish after 3rd or 5th row in pattern, cut the yarn (piece measures approx. 56-58-60-62-64-66 cm from shoulder and down). SLEEVE: = 94-98-102-106-112-116 tr. Worked back and forth. Insert 1 marker on row – now measure piece from here. Work first row as follows from WS: Work 6 loose ch, work 1 tr in every tr on sleeve and finish row with 8 ch, turn piece. Work 1 tr in 4th ch from hook, work 1 tr in each of the next 4 ch, 1 tr in every tr from previous row and 1 tr in each of the 6 ch from beg of previous row = 106-110-114-118-124-128 tr on row. Work next row as follows from RS: 3 ch (= 1 tr), 1 tr in each of the next 6-8-5-7-5-7 tr, insert 1 marker, work pattern according to diagram A.2 over the next 91-91-101-101-111-111 sts, insert 1 marker and continue with 1 tr in each of the last 8-10-7-9-7-9 tr (1st row in A.2 has now been worked). Move the markers downwards when working. READ ALL OF THE FOLLOWING SECTION BEFORE CONTINUING! Continue pattern like this back and forth AT THE SAME TIME work pattern between the 2 markers on the next rows as shown in A.3 (beg on 2nd row in diagram), i.e. replace 1 repetition of A.2 in each side between markers with tr (these tr are in addition to tr outside the markers. Use the markers to help with correct no of sts). AT THE SAME TIME on 2nd row in A.2/A.3 dec 2 tr in each side by working the first 4 tr on row tog 2 by 2 and the last 4 tr on row tog 2 by 2 – READ DECREASE TIP 1. Repeat dec with 2 tr in each side on every row 3-5-3-6-4-6 more times (= 4-6-4-7-5-7 times in total). Then dec 1 tr in each side every 2nd-2nd-3rd-5th-4th-6th row a total of 8-6-7-3-5-3 times. After last dec there is 1 tr on one side of A.2 and 2 tr on the other side of A.2 (A.2 is over the middle 71-71-81-81-91-91 sts). Continue A.2 back and forth with 1 and 2 tr in each side until sleeve measures approx. 39-39-38-38-37-37 cm from marker (NOTE: Shorter measurements in the larger sizes because of wider shoulder and longer sleeve cap). Approx. 5 cm remain until finished measurements, try the jacket on for correct sleeve length. Then work tr back and forth over all sts – NOTE: Over sts in A.2 there should be 53-53-61-61-67-67 tr = 56-56-64-64-70-70 tr on row. When edge with tr measures 5 cm and sleeve measures approx. 44-44-43-43-42-42 cm from armhole, cut the yarn. ASSEMBLY: Sew sleeve seams tog edge to edge in front loop of outermost sts. Sew the openings under the sleeves. Sew on buttons (button between tr on band). ELEVATION IN BACK OF NECK: To make the neckline higher in the back of neck work an elevation as follows: Insert 1 marker in st in each corner in neckline, i.e. at beg of every raglan line. Work on hook size 3.5 mm as follows: Beg in 1st st from mid front at the edge of band and work 1 dc in every dc around the neck until 10 dc remain on row, but work 1 st before every marker as follows: 1 htr in next st, 1 tr in next st (move marker to this st) and 1 htr in next st. Turn, work 1 dc in every st until 10 sts remain in the other side, but over the 3 sts in every corner (i.e. st with marker + 1 st on each side of this), work 3 dc tog – READ DECREASE TIP 2. Turn and work until 18 dc remain on row, turn and work until 18 dc remain on row in the other side. Continue back and forth like this with dc and dec in every corner until edge measures approx. 2 cm at the widest mid back, then work 1 row over all sts with 1 dc in every dc. Fasten off. |
||||||||||
Diagram explanations |
||||||||||
|
||||||||||
 |
||||||||||
 |
||||||||||
Have you finished this pattern?Tag your pictures with #dropspattern #forgetmenotcardigan or submit them to the #dropsfan gallery. Do you need help with this pattern?You'll find 6 tutorial videos, a Comments/Questions area and more by visiting the pattern on garnstudio.com. © 1982-2026 DROPS Design A/S. We reserve all rights. This document, including all its sub-sections, has copyrights. Read more about what you can do with our patterns at the bottom of each pattern on our site. |
||||||||||


With over 40 years in knitting and crochet design, DROPS Design offers one of the most extensive collections of free patterns on the internet - translated to 17 languages. As of today we count 324 catalogues and 12267 patterns translated into English (UK/cm). 12267
We work hard to bring you the best knitting and crochet have to offer, inspiration and advice as well as great quality yarns at incredible prices! Would you like to use our patterns for other than personal use? You can read what you are allowed to do in the Copyright text at the bottom of all our patterns. Happy crafting!
Post a comment to pattern DROPS 149-19
We would love to hear what you have to say about this pattern!
If you want to leave a question, please make sure you select the correct category in the form below, to speed up the answering process. Required fields are marked *.