
Popular categories
Looking for a yarn?


Comments / Questions (63)
Solange wrote:
Hola, necesito consultar por los aumentos: dice aumentar 2 pts antes/después de A1. Lo mismo que para las mantas, pero antes dice que los aumentos son desiguales. Me podrían ayudar, estoy empezando a tratar de hacer algunas cosas con patrones y me ha costado mucho. Ojalá puedan. Desde ya gracias y Saludos, Solange
05.04.2015 - 23:28DROPS Design answered:
Hola Solange. Por lo visto no se guardó bien la respuesta. Los aumentos desiguales se refiere a que se repiten diferente número de veces para el cuerpo y la mangas (es decir, para el cuerpo un total de 2-6-7-12-15-21 vcs y para las mangas un total de 14-15-16-17-19-20 vcs). Te recomiendo leer con atención el patrón entero antes de comenzar el trabajo. Buen crochet!
14.04.2015 - 10:49
![]() Daniela wrote:
Daniela wrote:
I worked all the increases according pattern but ended out with almost 600 dc on row instead of 416. Another thing, should the inc be made on A1 or on dc before A1 dc?
12.01.2015 - 21:47DROPS Design answered:
Dear Daniela, the inc for raglan are done by crocheting 2 in the 2 dc before and after A.1 - and then 1 dc before and after A.1 - You inc for body 2 dc 7 times 2 dc every row (= 8 dc inc per inc row) then 1 dc 17 times every row (=4 dc inc per inc row) at the same time, you inc on sleeves you inc 2 tr 16 times (8 inc per inc row) every row and then 1 tr 8 times (4 inc per inc row) every row. Happy crocheting!
13.01.2015 - 09:37Daniela wrote:
The increases for front/back pieces and sleeves are to be made in every row or just WS?
10.01.2015 - 22:51DROPS Design answered:
Dear Daniela, inc for Raglan on front + back piece and on sleeve are done every row, ie from RS and from WS. Happy crocheting!
12.01.2015 - 09:47
![]() Cristina wrote:
Cristina wrote:
Buongiorno, ho appena iniziato questo modello favoloso, ma sono già alla prima difficoltà: gli aumenti corpo e maniche. Io mi trovo ad avere 4 diagrammi A? Nel primo A aumento 2 m a prima E dopo? E poi? Nel secondo, terzo e quarto A 1. Scusatemi ma non riesco proprio a capire. Dimenticavo: faró una taglia M. Grazie in anticipo
09.12.2014 - 11:10DROPS Design answered:
Buongiorno Cristina. Gli aumenti sono i seguenti: prima del 1° diag, dopo il 2° diag, prima del 3° diag, dopo il 4° diag: deve aumentare 2 m.a ad ogni riga per 6 volte. Poi aumenta 1 m.a ad ogni riga per 17 volte (questi sono gli aumenti sui davanti e sul dietro). Dopo il 1° diag, prima del 2° diag, dopo il 3° diag, prima del 4° diag: aumenta 2 m.a ad ogni riga per 15 volte, poi 1 m.a ad ogni riga per 8 volte (sono gli aumenti sulle maniche). Ci riscriva se non è chiaro. Buon lavoro!
09.12.2014 - 12:02
![]() Cristina wrote:
Cristina wrote:
Buongiorno, ho appena iniziato questo modello favoloso, ma sono già alla prima difficoltà: gli aumenti corpo e maniche. Io mi trovo ad avere 4 diagrammi A? Nel primo A aumento 2 m a prima E dopo? E poi? Nel secondo, terzo e quarto A 1. Scusatemi ma non riesco proprio a capire. Dimenticavo: faró una taglia M. Grazie in anticipo
09.12.2014 - 10:40DROPS Design answered:
Buongiorno Cristina. Gli aumenti sono i seguenti: prima del 1° diag, dopo il 2° diag, prima del 3° diag, dopo il 4° diag: deve aumentare 2 m.a ad ogni riga per 6 volte. Poi aumenta 1 m.a ad ogni riga per 17 volte (questi sono gli aumenti sui davanti e sul dietro). Dopo il 1° diag, prima del 2° diag, dopo il 3° diag, prima del 4° diag: aumenta 2 m.a ad ogni riga per 15 volte, poi 1 m.a ad ogni riga per 8 volte (sono gli aumenti sulle maniche). Ci riscriva se non è chiaro. Buon lavoro!
09.12.2014 - 12:03
![]() Marjolein De Koning wrote:
Marjolein De Koning wrote:
Inmiddels begrijp ik het al, ik zag niet goed hoe de raglan voor mouw en achterpand zat.. Nu begrijp ik dat de buitenste twee patroon a1 voor de mouwen zijn en de middelste A 1 voor het achterpand.. Bedankt in elk geval
24.10.2014 - 09:14
![]() Marjolein De Koning wrote:
Marjolein De Koning wrote:
Ben nu bezig met maat M. Nu ga ik met de meerderingen twijfelen. Is het na de 6e herhaling van 2 steken meerderen als volgt: Stokjes, 2 st meerderen, A1, stokjes, 1 steek meerderen, A1, stokjes, 1 steek meerderen, A1, stokjes, 2 st meerderen? Of juist 1 st meerderen voor eerste A1, 2 steken meerderen voor volgende A1, 2 steken meerderen voor derde a1, 1 st meerderen voor laatste A1? graag uitleg
19.10.2014 - 22:03DROPS Design answered:
U vraag is ons niet helemaal duidelijk, de manier van meerderen staat omschreven voor de raglan; het is ons niet duidelijk waarom er in toer 6 iets anders zou zijn.
21.10.2014 - 11:27
![]() Marjolein De Koning wrote:
Marjolein De Koning wrote:
Welke maat moet ik gebruiken voor maat 40-42, als ik haak met katoen op nld 3 of 3,5?
17.10.2014 - 10:40DROPS Design answered:
Onderaan het patroon staan de maten van het vest als het af is - u kunt deze maten vergelijken met een vest of trui die u goed past.
17.10.2014 - 16:09
![]() Denise wrote:
Denise wrote:
Thanks for your reply but i am stuck again, i have the yoke done and trying to start on the body and sleeves, not really sure about the first row, do you put 1dc in to band of three so i am decreasing? (Work first row as follows from WS: 3 ch (= 1 tr), work 1 tr in each of the next 3 tr (= band), work 1 tr in every tr and 12 tr in ch-space under each sleeve until 4 tr remain on row AT THE SAME TIME inc 49-49-63-69-75-77 tr evenly over these sts)thanks very much
12.06.2014 - 10:40DROPS Design answered:
Dear Denise, remember crochet terminology is different in US or UK English, you continue then in dc (US)/tr (UK) as before with ch 3 for 1st dc(tr) and 1 dc(tr) in next 3 st, and finish with 4 dc(tr) in each of the last 4 st on row - do not decrease on the 4 front band st each side. Happy crocheting!
12.06.2014 - 10:57
![]() Denise wrote:
Denise wrote:
Hi i just started this lovely cardigan, but i am not sure about the increasing, do i increase 2 x 2dc before AND after A1 or do i increase once 2 x 2dc before and in next row after??? can you help pls thanks
09.06.2014 - 16:32DROPS Design answered:
Dear Denise, increase are different for body & sleeves, you will inc first 2 dc before/after each A.1 on body 2-21 times in total (see size) and then only 1 dc before/after A.1 (20-6 times in total). And on sleeve, you will inc before/after A.1 on sleeves 14-20 times 2 dc , then 8-7 times 1 dc. Happy crocheting!
10.06.2014 - 09:43
|
||||||||||
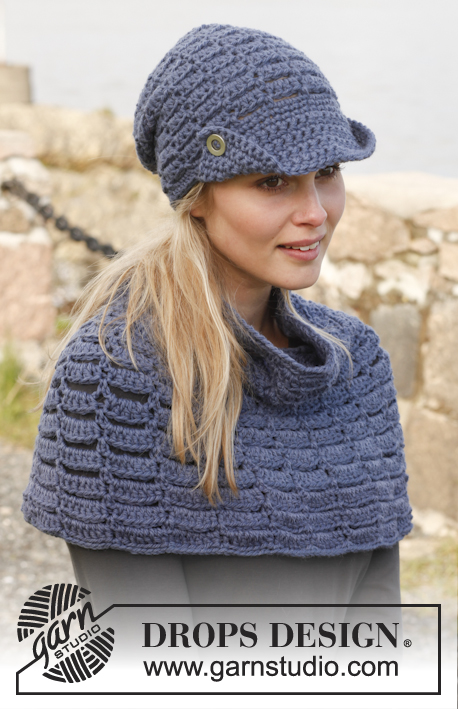
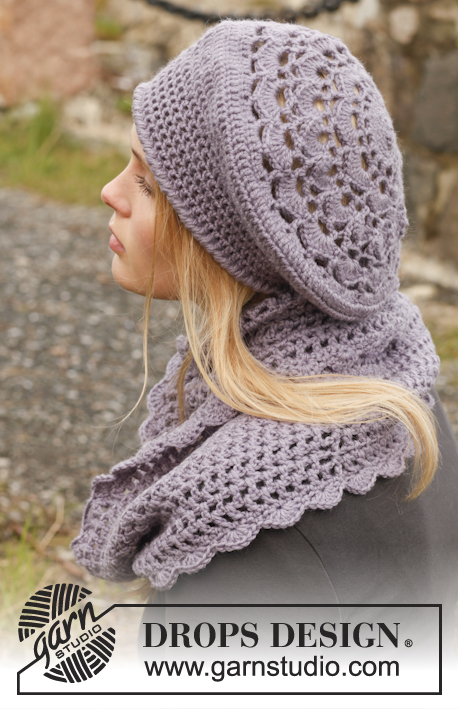
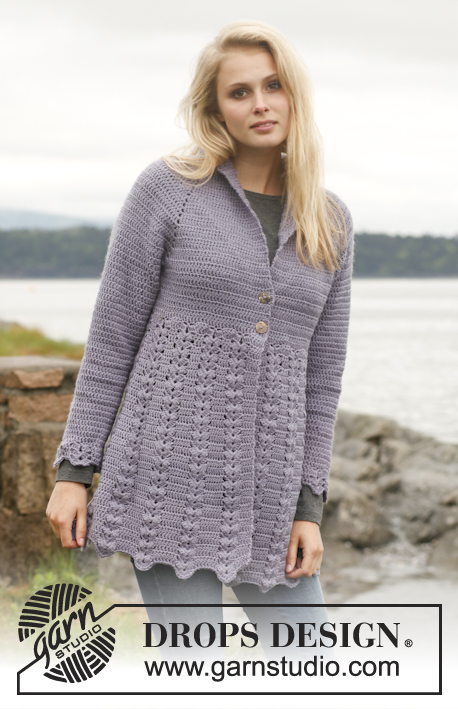
Forget-Me-Not#forgetmenotcardigan |
||||||||||
|
|
||||||||||
Crochet DROPS jacket with raglan and lace pattern worked top down in ”BabyAlpaca Silk”. Size: S - XXXL.
DROPS 149-19 |
||||||||||
|
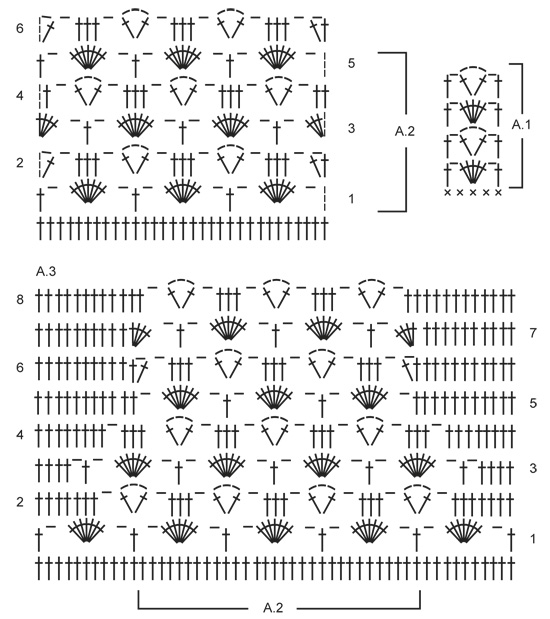
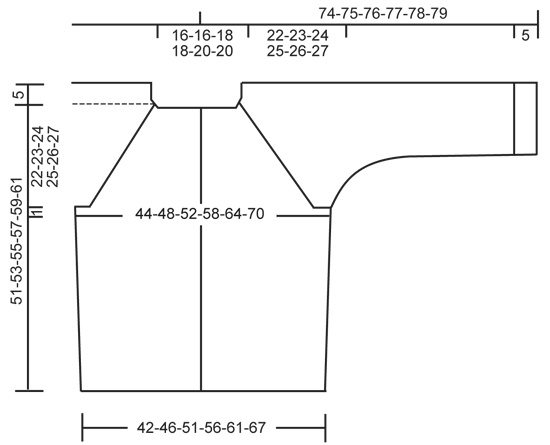
CROCHET INFO: Replace first tr at beg of every tr row with 3 ch, finish row with 1 tr in 3rd ch from beg of previous row. PATTERN: See diagrams A.1 to A.3. INCREASE TIP: Inc 1 tr by working 2 tr in same st. DECREASE TIP 1: Work 1 dc/tr but wait with last YO and pull through (= 2 sts on hook), then work next dc/tr but on last pull through, pull YO through all sts on hook = 1 dc/tr dec. DECREASE TIP 2: Work 1 dc but wait with last YO and pull through (= 2 sts on hook), work next dc but wait with last YO and pull through (= 3 sts on hook), work next dc but now pull last YO through all 4 sts on hook (= 2 sts dec). ----------------------------------------------------------- JACKET: The piece is worked top down. Worked back and forth from mid front. YOKE: Work 166-166-176-176-187-187 ch on hook size 3.5 mm with BabyAlpaca Silk. Work first row as follows from WS: Work 1 dc in 2nd ch from hook, * skip 1 ch, 1 dc in each of the next 3 ch *, repeat from *-* until 0-0-2-2-1-1 ch remains and finish with 1 dc in each of the last 0-0-2-2-1-1 ch = 124-124-132-132-140-140 dc (incl 4 dc in each side towards mid front for band). READ CROCHET INFO and work next row as follows from RS: 3 ch (= 1 tr), 1 tr in each of the next 18-18-20-20-22-22 dc, work A.1 over the next 5 sts (i.e. 1 tr in first dc, skip 1 dc, 1 ch, 5 tr in next dc, skip 1 dc, 1 ch and 1 tr in next dc), work 1 tr in each of the next 18 dc (= sleeve), A.1 over the next 5 dc, 1 tr in each of the next 30-30-34-34-38-38 dc (= back piece), A.1 over the next 5 dc, 1 tr in each of the next 18 dc (= sleeve), A.1 over the next 5 sts and 1 tr in each of the last 19-19-21-21-23-23 dc, turn piece. READ ALL OF THE FOLLOWING SECTION BEFORE CONTINUING AND REMEMBER THE CROCHET TENSION! Continue back and forth with tr and A.1 in every transition between body and sleeves. AT THE SAME TIME on next row (= WS) beg inc for raglan and inc as follows – NOTE: The inc on body and sleeves are uneven: RAGLAN INC ON FRONT AND BACK PIECE: Inc 2 tr before/after A.1 on front and back piece by working 2 tr in each of the last 2 tr before/after A.1 on front and back piece. Repeat inc with 2 tr on every row 1-5-6-11-14-20 more times (= 2-6-7-12-15-21 times in total). Then inc 1 tr before/after A.1 by working 2 tr in last tr before/after A.1 on front and back piece. Repeat inc with 1 tr on every row 19-16-16-12-10-5 more times (= 20-17-17-13-11-6 times in total). RAGLAN INC ON SLEEVES: Inc 2 tr before/after A.1 in each side on sleeves by working 2 tr in each of the last 2 tr before/after A.1 on sleeves. Repeat inc with 2 tr on every row 13-14-15-16-18-19 more times (= 14-15-16-17-19-20 times in total). Then inc 1 tr before/after A.1 by working 2 tr in last tr before/after A.1 on sleeves. Repeat inc with 1 tr on every row 7-7-7-7-6-6 more times (= 8-8-8-8-7-7 times in total). TRANSITION FROM A.1 TO TR: AT THE SAME TIME on last row with inc work 5 tr over A.1 instead of A.1 in every transition between body and sleeves. After last inc, there are 364-392-416-448-484-520 tr on row. Work next row as follows from RS (if next row is worked from WS, cut the yarn and beg from RS): Work 1 tr in each of the first 46-51-55-61-67-74 tr (= left front piece), skip the next 94-98-102-106-112-116 tr (= sleeve), work 12 ch, work 1 tr in each of the next 84-94-102-114-126-140 tr (= back piece), skip the next 94-98-102-106-112-116 tr (= sleeve), work 12 ch and work 1 tr in each of the last 46-51-55-61-67-74 tr = 200-220-236-260-284-312 sts on row. Then finish body and sleeves separately. BODY: Insert 1 marker on row – now measure piece from here. Work first row as follows from WS: 3 ch (= 1 tr), work 1 tr in each of the next 3 tr (= band), work 1 tr in every tr and 12 tr in ch-space under each sleeve until 4 tr remain on row AT THE SAME TIME inc 49-49-63-69-75-77 tr evenly over these sts, finish with 1 tr in each of the last 4 tr (= band) = 249-269-299-329-359-389 tr on row. On next row from RS, work pattern according to diagram A.2 with 4 tr in each side for band, i.e. work 1st row as follows: 3 ch (= 1 tr), 1 tr in each of the first 3 tr (= band), 1 tr in next tr, * ch 1, skip 4 tr, 7 tr in next tr, ch 1, skip 4 tr, 1 tr in next tr *, repeat from *-* 24-26-29-32-35-38 times in total and finish with 1 tr in each of the last 4 tr on row. Continue pattern like this according to diagram A.2 (repeat rows 2-5 in diagram). When piece measures approx. 28-29-30-31-32-33 cm from marker – finish after 3rd or 5th row in pattern, cut the yarn (piece measures approx. 56-58-60-62-64-66 cm from shoulder and down). SLEEVE: = 94-98-102-106-112-116 tr. Worked back and forth. Insert 1 marker on row – now measure piece from here. Work first row as follows from WS: Work 6 loose ch, work 1 tr in every tr on sleeve and finish row with 8 ch, turn piece. Work 1 tr in 4th ch from hook, work 1 tr in each of the next 4 ch, 1 tr in every tr from previous row and 1 tr in each of the 6 ch from beg of previous row = 106-110-114-118-124-128 tr on row. Work next row as follows from RS: 3 ch (= 1 tr), 1 tr in each of the next 6-8-5-7-5-7 tr, insert 1 marker, work pattern according to diagram A.2 over the next 91-91-101-101-111-111 sts, insert 1 marker and continue with 1 tr in each of the last 8-10-7-9-7-9 tr (1st row in A.2 has now been worked). Move the markers downwards when working. READ ALL OF THE FOLLOWING SECTION BEFORE CONTINUING! Continue pattern like this back and forth AT THE SAME TIME work pattern between the 2 markers on the next rows as shown in A.3 (beg on 2nd row in diagram), i.e. replace 1 repetition of A.2 in each side between markers with tr (these tr are in addition to tr outside the markers. Use the markers to help with correct no of sts). AT THE SAME TIME on 2nd row in A.2/A.3 dec 2 tr in each side by working the first 4 tr on row tog 2 by 2 and the last 4 tr on row tog 2 by 2 – READ DECREASE TIP 1. Repeat dec with 2 tr in each side on every row 3-5-3-6-4-6 more times (= 4-6-4-7-5-7 times in total). Then dec 1 tr in each side every 2nd-2nd-3rd-5th-4th-6th row a total of 8-6-7-3-5-3 times. After last dec there is 1 tr on one side of A.2 and 2 tr on the other side of A.2 (A.2 is over the middle 71-71-81-81-91-91 sts). Continue A.2 back and forth with 1 and 2 tr in each side until sleeve measures approx. 39-39-38-38-37-37 cm from marker (NOTE: Shorter measurements in the larger sizes because of wider shoulder and longer sleeve cap). Approx. 5 cm remain until finished measurements, try the jacket on for correct sleeve length. Then work tr back and forth over all sts – NOTE: Over sts in A.2 there should be 53-53-61-61-67-67 tr = 56-56-64-64-70-70 tr on row. When edge with tr measures 5 cm and sleeve measures approx. 44-44-43-43-42-42 cm from armhole, cut the yarn. ASSEMBLY: Sew sleeve seams tog edge to edge in front loop of outermost sts. Sew the openings under the sleeves. Sew on buttons (button between tr on band). ELEVATION IN BACK OF NECK: To make the neckline higher in the back of neck work an elevation as follows: Insert 1 marker in st in each corner in neckline, i.e. at beg of every raglan line. Work on hook size 3.5 mm as follows: Beg in 1st st from mid front at the edge of band and work 1 dc in every dc around the neck until 10 dc remain on row, but work 1 st before every marker as follows: 1 htr in next st, 1 tr in next st (move marker to this st) and 1 htr in next st. Turn, work 1 dc in every st until 10 sts remain in the other side, but over the 3 sts in every corner (i.e. st with marker + 1 st on each side of this), work 3 dc tog – READ DECREASE TIP 2. Turn and work until 18 dc remain on row, turn and work until 18 dc remain on row in the other side. Continue back and forth like this with dc and dec in every corner until edge measures approx. 2 cm at the widest mid back, then work 1 row over all sts with 1 dc in every dc. Fasten off. |
||||||||||
Diagram explanations |
||||||||||
|
||||||||||
 |
||||||||||
 |
||||||||||
Have you finished this pattern?Tag your pictures with #dropspattern #forgetmenotcardigan or submit them to the #dropsfan gallery. Do you need help with this pattern?You'll find 6 tutorial videos, a Comments/Questions area and more by visiting the pattern on garnstudio.com. © 1982-2026 DROPS Design A/S. We reserve all rights. This document, including all its sub-sections, has copyrights. Read more about what you can do with our patterns at the bottom of each pattern on our site. |
||||||||||


With over 40 years in knitting and crochet design, DROPS Design offers one of the most extensive collections of free patterns on the internet - translated to 17 languages. As of today we count 324 catalogues and 12267 patterns translated into English (UK/cm). 12267
We work hard to bring you the best knitting and crochet have to offer, inspiration and advice as well as great quality yarns at incredible prices! Would you like to use our patterns for other than personal use? You can read what you are allowed to do in the Copyright text at the bottom of all our patterns. Happy crafting!
Post a comment to pattern DROPS 149-19
We would love to hear what you have to say about this pattern!
If you want to leave a question, please make sure you select the correct category in the form below, to speed up the answering process. Required fields are marked *.