
Popular categories
Looking for a yarn?


Comments / Questions (47)
DayleSnail wrote:
The increases are confusing me. For S/M size do you mean every 3 rows rather than cm? And is it just an increasing build up of TCs on the edge or at some point is there enough increase to fit more pattern in instead? I wish the diagram showed all the increases and the entire back section so I could be sure. Thanks.
24.07.2014 - 05:50DROPS Design answered:
Dear Daylesnail, you inc for back piece every 3 cm in first size by working 2 tr (UK-English) in 2nd and 2 tr in next to last tr on row (= 1 st inc each side). Happy crocheting!
24.07.2014 - 08:43
![]() Kristyn wrote:
Kristyn wrote:
Thank you for your help with my last question! I have another: I have started the edge piece. I did the chain stitches for the first armhole, then it says "work 1 sc in every sc along bommon edge of back piece but skip 8 sc evenly (= 57 sc)" Where do I skip the 8 sc? There are 75 stitches in the bottom edge of the back piece, and even if I skip 8, that doesn't leave me with 57 stitches.
06.06.2014 - 15:21DROPS Design answered:
Dear Kristyn, crochet 57 sc along the bottom edge of back piece, where you had 65 sc on 1st row for back piece, ie skip 8 sc evenly. Happy crocheting!
06.06.2014 - 17:19
![]() Kristyn wrote:
Kristyn wrote:
For the increase tip when it says "Increase 1 dc in each side by working 2 dc in next to last dc in each side," does that mean 2 dc including the one already shown in the pattern, or 2 extra dc? I have been adding 2 extra in each side. If that is incorrect, will it mess up the piece to the point where I should just start over again?
04.06.2014 - 17:38DROPS Design answered:
Dear Kristyn, you should increase 1 dc each side in the 2nd dc/next to last st of row, ie start with ch3, work 2 dc in next st, continue row in pattern until 2 sts remain, work 2 dc in next st, 1 dc in last dc. Happy crocheting!
05.06.2014 - 09:19
![]() Sevette wrote:
Sevette wrote:
Bonjour, j'aimerai faire ce modèle mais je ne comprend pas trop les explications, j'aimerai savoir par quel diagramme fallait commencer? j'ai commander la laine qui est conseiller pour ce gilet. Merci de votre réponse
20.04.2014 - 09:31DROPS Design answered:
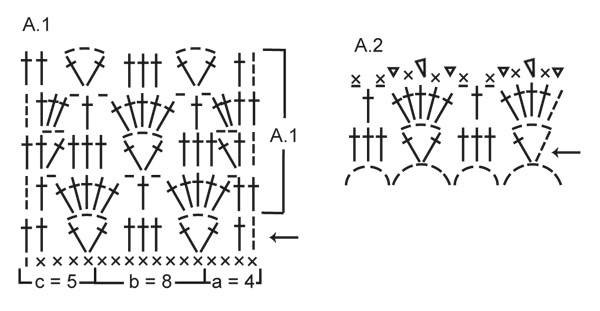
Bonjour Sevette, on commence par le dos en suivant le diagramme A.1 (A.1a = les 4 premières m au début du rang, A.1B = à répéter tout le rang jusqu'à ce qu'il reste 5 m), A.1c = la fin du motif en fin de rang) - sur l'envers, suivez le diagramme de gauche à droite (les 3 ml dans A.1a et A.1c = 1ère B en début de rang). Bon crochet!
22.04.2014 - 09:23
![]() Natascha wrote:
Natascha wrote:
Tror mig ha hittat ett fel i detta mönster i början på kantstycket när man ska virka fastmaskor i nederkanten är det från början 75 m tex i s/m så står det att man ska minska 8 m till 57m men 75m - 8m blir 67 m så antingen ska det ju minskas 18m ist eller ska det vara 67fm??
01.01.2014 - 13:11
![]() Josianne wrote:
Josianne wrote:
Guten Tag, ich häckle das model in Grösse S/M. Habe bei der erster Runde des Ranteil 100 Luftmaschenbogen und nach 15cm nur noch 97, kann das sein ? Kann mich nicht vorstellen wie es passieren konnte. Bei einer ungerade Anzahl Lufmaschenbögen geht es beim Muster A2 nicht auf. Kann mich jemand weiter helfen?
27.10.2013 - 00:03DROPS Design answered:
Liebe Josianne, Sie müssen gut darauf achten, dass Sie keine Maschen abnehmen, sonst geht das Muster nicht mehr auf. Ich kann von hier aus leider nicht beurteilen, wo und wie Sie die Maschen abgenommen haben. Kontrollieren Sie Ihre Arbeit bitte daraufhin.
15.11.2013 - 16:48
![]() Nora wrote:
Nora wrote:
J'essaye de faire un bolero S/M. merci
21.03.2013 - 16:19
![]() Nora wrote:
Nora wrote:
Bonjour, C'est un très joli bolero. Le hic pour moi c'est que j'ai une laine jolie mais fine que je ne peux travailler qu'avec un crochet n°3. je ne sais pas comment faire pour adapter les mesures mon échantillon est 17B=6 cm et 2.5rapports de A.1b=7.5cm. SVP comment faire? merci d'avance
21.03.2013 - 16:17DROPS Design answered:
Bonjour Nora, vous pouvez recalculer sur la base d'une règle de 3, pour toute information individuelle de ce style, je vous recommande vivement de vous adresser au magasin où vous avez acheté votre laine. Bon crochet !
25.03.2013 - 10:51
![]() Vogel wrote:
Vogel wrote:
Super joli! mais n'arrive pas à le printer..???
04.03.2013 - 00:05DROPS Design answered:
Bonjour Madame Vogel, quand vous cliquez sur l'imprimante, une fenêtre pop up s'ouvre, dans cette fenêtre, cliquez sur le lien "imprimer les explications". Bon crochet !
04.03.2013 - 10:09ADRIANA wrote:
ESTA HERMOSO PARA EL VERANO AGRADECERÉ LA TRADUCCION LOS MAS PRONTO
28.01.2013 - 18:28
|
||||||||||||||||
Vivien#vivienbolero |
||||||||||||||||
 |
 |
|||||||||||||||
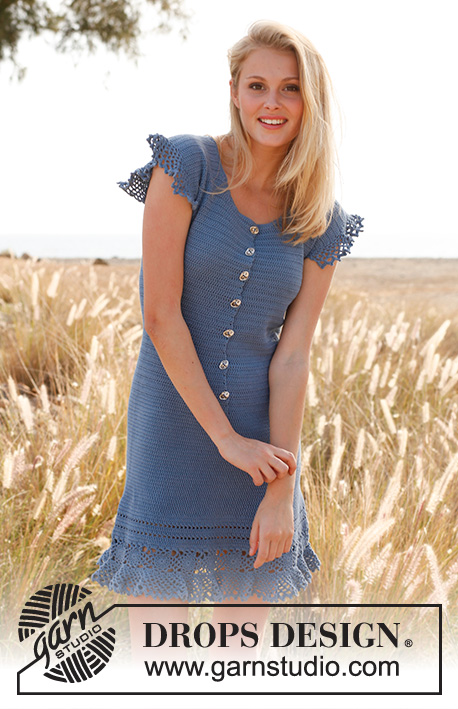
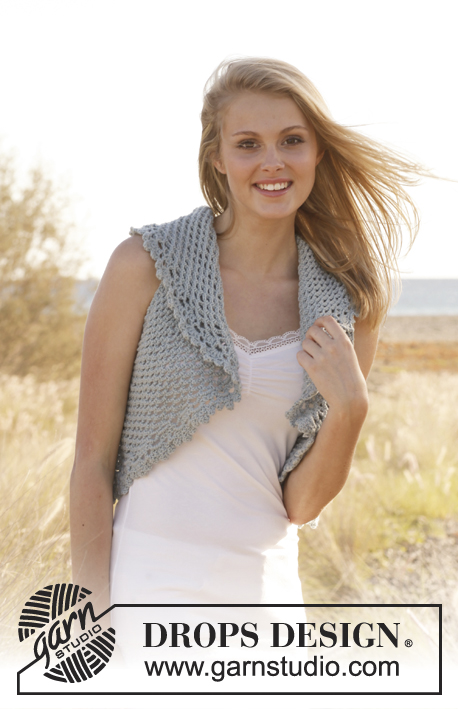
Crochet DROPS bolero in ”Merino Extra Fine”. Size: S - XXXL
DROPS 145-8 |
||||||||||||||||
|
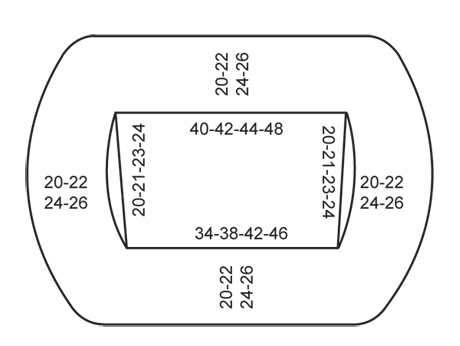
PATTERN: See diagrams A.1 and A.2. INCREASE TIP: Inc 1 tr in each side by working 2 tr in next to last tr in each side. CROCHET INFO: Replace first tr on every row with 3 ch and finish every row with 1 tr in 3rd ch from beg of previous row. -------------------------------------------------------- BACK PIECE: Work 75-84-93-103 ch on hook size 4 mm with Merino Extra Fine. Turn and work as follows: 1 dc in 2nd ch from hook, then work 1 dc in each of the next 3-5-7-3 ch, * skip 1 ch, work 1 dc in each of the next 6 ch *, repeat from *-* the entire row = 65-73-81-89 dc (first ch = 1 dc). Continue with pattern according to A.1 – beg with row marked with 1 arrow as follows: a over the first 4 sts, b until 5 sts remain, then c. There are now 8-9-10-11 repetitions of pattern on row. Repeat the next 4 rows in diagram until finished measurements. REMEMBER THE CROCHET TENSION! At the same time when piece measures 4-5-6-7 cm, inc 1 tr in each side - READ INCREASE TIP. Repeat inc every 3-6-10-10 cm 4-2-1-1 more time – work the inc sts only in tr. Continue the pattern until piece measures 20-21-23-24 cm, do not cut the thread - continue with edge piece. EDGE PIECE: Beg by working 1 row with dc at the top along back piece - work 71-76-79-85 dc evenly, continue with 36-38-41-43 LOOSE ch (= armhole), then work 1 dc in every dc along bottom edge of back piece but skip 8-9-10-12 dc evenly (= 57-64-71-77 dc), continue with 36-38-41-43 LOOSE ch (= armhole), fasten with 1 sl st in first dc at the top of back piece = 200-216-232-248 sts in total, cut the thread. Then beg all rounds in the middle at the top on back piece. ROUND 1: Beg with 1 sl st in middle dc, then work as follows: * 3 ch, skip 1 st, 1 dc in next st *, repeat from *-* around the entire bolero and until mid back again, finish round with 3 ch and 1 sl st in first sl st from beg of round = 100-108-116-124 ch-loops on round. ROUND 2: Work 1 sl st + 1 dc in first ch-loop, * 3 ch, 1 dc in next ch-loop *, repeat from *-* the entire round, finish with 1 sl st in first dc. Then work as 2nd round until edge measures approx. 5-6-7-8 cm. WORK NEXT ROUND AS FOLLOWS: Work 1 sl st + 1 dc in first ch-loop, * 4 ch, 1 dc in next ch-loop, 3 ch, 1 dc in next ch-loop *, repeat from *-* the entire round, finish with 1 sl st in first dc. Continue like this with 3 and 4 ch in every ch-loop alternately until edge measures approx. 9-10-11-12 cm. WORK NEXT ROUND AS FOLLOWS: Work 2 sl sts + 1 dc in first ch-loop, * 4 ch, 1 dc in next ch-loop *, repeat from *-* the entire round, finish with 1 sl st in first dc. Continue with 4 ch in every ch-loop until edge measures approx. 12-13-15-17 cm. WORK NEXT ROUND AS FOLLOWS: Work 2 sl sts + 1 dc in first ch-loop, * 5 ch, 1 dc in next ch-loop, 4 ch, 1 dc in next ch-loop *, repeat from *-* the entire round, finish with 1 sl st in first dc. Continue like this with 4 and 5 ch in every ch-loop alternately until edge measures approx. 15-17-19-21 cm. WORK NEXT ROUND AS FOLLOWS: Work sl sts until middle of first ch-loop (this should be a 5-ch-loop) - also see diagram A.2, this round is marker with 1 arrow in diagram: 6 ch, 1 tr in same ch-loop, * 3 tr in 4-ch-loop, 1 tr + 3 ch + 1 tr in next 5-ch-loop *, repeat from *-* the entire round, finish with 3 tr in last 4-ch-loop and 1 sl st in 3rd ch from beg of round. WORK NEXT TO LAST ROUND AS FOLLOWS: 3 ch + 4 tr in first 3-ch-loop, * 1 ch, 1 tr in the middle of the 3 tr worked in 4-ch-loop from previous round, 1 ch, 5 tr in next 3-ch-loop *, repeat from *-* the entire round, finish with 1 ch, 1 tr in the middle of the last 3 tr, 1 ch and 1 sl st in 3rd ch from beg of round. WORK LAST ROUND AS FOLLOWS: * 3 ch, 1 tr in the first ch made, skip first tr, 1 dc in next tr, 3 ch, 2 tr in the first ch made, skip 1 tr, 1 dc in next tr, 3 ch, 1 tr in the first ch made, skip 1 tr, 1 dc in next ch, skip tr between tr-groups, 1 dc in next ch *, repeat from *-* the entire round, finish with 1 sl st in first ch from beg of round. Cut and fasten the thread. Edge measures approx. 20-22-24-26 cm. EDGE AROUND ARMHOLES: Along the armhole on back piece work as follows: 1 sl st in first tr, * 3 ch, 1 dc in next tr *, repeat from *-*, along front piece work as follows: * 3 ch, skip 1 st, 1 dc in next st *, repeat from *-*, finish with 3 ch and 1 sl st in first sl st from beg of round. |
||||||||||||||||
Diagram explanations |
||||||||||||||||
|
||||||||||||||||
 |
||||||||||||||||
 |
||||||||||||||||
Have you finished this pattern?Tag your pictures with #dropspattern #vivienbolero or submit them to the #dropsfan gallery. Do you need help with this pattern?You'll find 5 tutorial videos, a Comments/Questions area and more by visiting the pattern on garnstudio.com. © 1982-2026 DROPS Design A/S. We reserve all rights. This document, including all its sub-sections, has copyrights. Read more about what you can do with our patterns at the bottom of each pattern on our site. |
||||||||||||||||


With over 40 years in knitting and crochet design, DROPS Design offers one of the most extensive collections of free patterns on the internet - translated to 17 languages. As of today we count 324 catalogues and 12267 patterns translated into English (UK/cm). 12267
We work hard to bring you the best knitting and crochet have to offer, inspiration and advice as well as great quality yarns at incredible prices! Would you like to use our patterns for other than personal use? You can read what you are allowed to do in the Copyright text at the bottom of all our patterns. Happy crafting!
Post a comment to pattern DROPS 145-8
We would love to hear what you have to say about this pattern!
If you want to leave a question, please make sure you select the correct category in the form below, to speed up the answering process. Required fields are marked *.