
Popular categories
Looking for a yarn?


Comments / Questions (47)
![]() Marga Franke wrote:
Marga Franke wrote:
Heel hartelijk dank! Ik maak gewoon een denkfout! Het vestje wordt super! Gr. Marga
05.10.2013 - 22:56
![]() Marga Franke wrote:
Marga Franke wrote:
Bij het minderen van de hals staat in het patroon het volgende: "herhaal dit minderen voor de hals aan elke kant elke 4e nld ( dus om de nld aan de goede kant ) nog 13 keer (maat xl.)" Dit spreekt elkaar tegen, elke 4 e nld is echt niet OM de nld. Kunt u mij vertellen wat het moet zijn??? Maakt voor de lengte en de vorm van de hals nog wel wat uit! Met vr.gr., Marga.
02.10.2013 - 20:18DROPS Design answered:
Hoi Marga. Het patroon is correct. Om de naald aan de goede kant is elke 4e nld (als je de naalden op de verkeerde kant meetelt).
03.10.2013 - 10:53Dana wrote:
2 r. m. i begynnelsen!
01.07.2013 - 18:39
![]() Lajla Gjerde wrote:
Lajla Gjerde wrote:
På mønsteret skal der strikkes kun en rett maske i begynelsen av mønsteret når du snur for og strikke på vrangen det er der jeg ikke får det til og stemme håper forsatt på hjelp.
01.07.2013 - 15:48
![]() Anya wrote:
Anya wrote:
Heeft er iemand duidelijke foto's van dit vestje? Liefst maat S of M. Ben nog steeds aan het vechten met het patroon en mbv een foto moet het hopelijk wel lukken. Vooral de zij-naden zou ik graag beter willen bekijken.
07.06.2013 - 22:37DROPS Design answered:
Hoi Anya. Dit zijn de enige foto's die we hebben van dit model. Dit vestje heeft geen zijnaden (heen en weer gebreid van middenvoor naar middenvoor). Je kan eventueel op Ravelry de projecten van andere gebruikers bekijken.
10.06.2013 - 13:06
![]() Renee wrote:
Renee wrote:
Klopt ik brei maar xl. maar in de eerste regel van A.6 zie ik geen omslag staan pas in regel 2. als ik alle steken van 4xa.5 4x a.6 4xa.7 en 1x a. tel in regel 1 kom ik op 247 steken die ik nodig heb in regel 2 kom ik op 261 steken die ik nodig heb. en ik kan in de eerste regel van de telpatronen dus geen omslagen vinden om aan de missende steken te komen.
24.05.2013 - 15:12DROPS Design answered:
De omslag staat er: Kijk op de teltekening A.6 eerste rij: 3 r, 2 r samen, 1 omslag, 1 r, 1 omslag, 1 st r afh, 1 st r, afgeh st overh, 5 r, 2 av, 1 r, 1 OMSLAG, 1 r, 2 av, 2 r. Je hebt dus 3 omslagen, en maar 2 keer samen breien = + 1 st per herhaling van A.6. Hetzelfde gebeurt in herhaling van A.5
28.05.2013 - 11:58
![]() Rian Braal wrote:
Rian Braal wrote:
Kan ik dit vest ook met gewone breinaalden breien ipv een rondbreinaald , want ik kan niet met zo een ding breien
23.05.2013 - 16:24Rita answered:
Rian,heb dit vestje met 2 pennen gebreid. Er staan wel veel steken op maar het is mij toch gelukt
23.05.2013 - 18:04
![]() Renee wrote:
Renee wrote:
Als ik na de 4cm met het patroon begin heb ik in de 1ste naald 267 steken en in de 2de naald 281 steken. waar haal ik de missende 14 steken vandaan?? ik hoop dat jullie mijn vraag begrijpen
22.05.2013 - 22:04DROPS Design answered:
Hoi. Nee, ik begrijp het niet helemaal. Maar als je hebt 267 st op de nld (maat L of XL) en breit door volgens de beschrijving, dan meerder je in de eerste nld van A.6 een steken door een omslag te maken. Je zal dus meer st op de nld krijgen. Deze st worden weer vermindert in nld 3. Zie op de teltekening.
23.05.2013 - 14:25
![]() Anya wrote:
Anya wrote:
Als patroon heb ik dan 12 x gaatjes patroon en 8x V-patroon. Als het patroon om en om herhaald wordt dan zou ik 8 V patronen moeten hebben en 10 gaatjes patronen. Op de rug zitten 2 gaatjes patronen naast elkaar, maar zitten er bij de zijnaden ook 2 gaatjes patronen naast elkaar? op de foto kan ik dat niet zien. ik hoop dat je snapt wat ik bedoel.
03.05.2013 - 21:28DROPS Design answered:
Als je de motieven breit in de volgorde zoals beschreven in het patroon, dan wordt het ook zoals op de foto. De markeerders voor de zijnaden zitten 1.: na de tweede herhaling van A.6 en net voor de eerste herhaling van A.7 en de 2.: na de tweede herhaling van A.6 op het achterpand en voor de eerste herhaling van A.7 op het voorpand.
14.05.2013 - 10:57
![]() Anya wrote:
Anya wrote:
Sorry, snap het nog niet helemaal. In één naald (228 steken) heb ik 4x A5 (= 40 st.), 4 x A6 (=84 st.) en 4 x A7 (=84 st.)nodig. samen met de boordsteken (2x10 st.) is in totaal 228 steken.
03.05.2013 - 21:27DROPS Design answered:
Ja, volg de beschrijving voor maat S: 10 voorbies st, A.5, A.6 twee keer (markeerder = zijkant), A.7 twee keer, A.5 twee keer, A.6 twee keer (markeerder = zijkant), A.7 twee keer, A.5 en eindig met 10 voorbies st
14.05.2013 - 10:53
|
|||||||||||||||||||||||||
Calista#calistacardigan |
|||||||||||||||||||||||||
 |
 |
||||||||||||||||||||||||
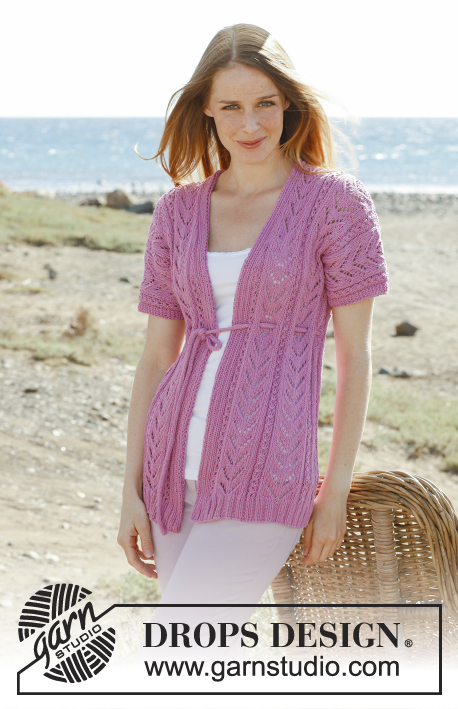
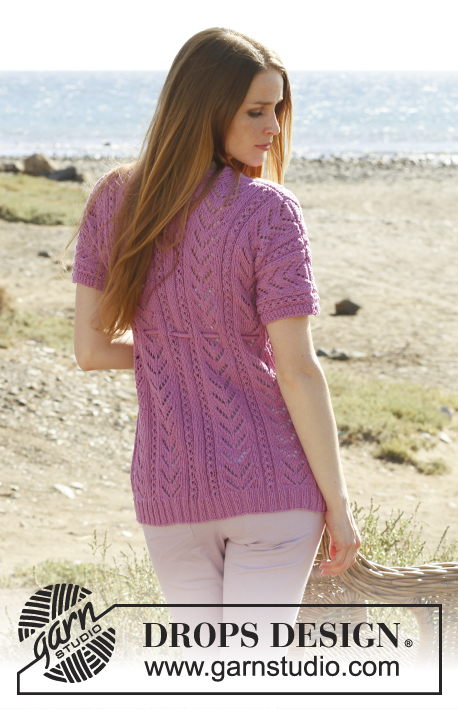
Knitted DROPS jacket with lace pattern in ”Cotton Light” or "Belle". Size: S - XXXL.
DROPS 148-14 |
|||||||||||||||||||||||||
|
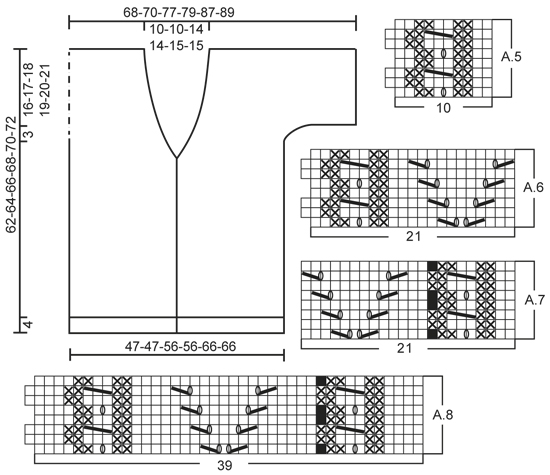
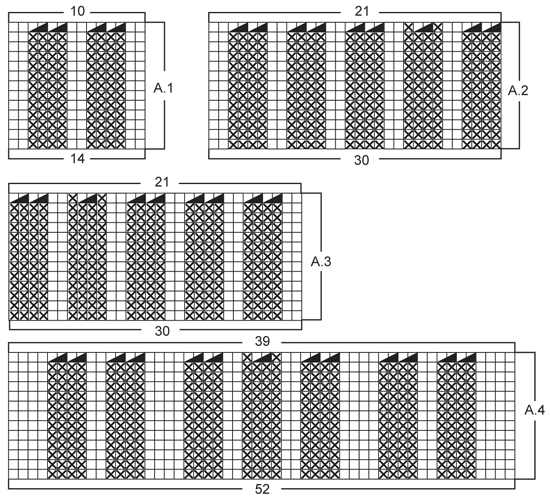
GARTER ST (back and forth on circular needle): K all rows. 1 ridge = 2 rows K. PATTERN: See diagrams A.1 to A.8. Diagrams show all rows in pattern seen from RS. DECREASE TIP (applies to neckline): Dec inside the outermost 11 sts in each side (= band + 1 st). All dec are done from RS! Dec after 11 sts as follows: Slip 1 st as if to K, K 1, psso. Dec before 11 sts as follows: K 2 tog. ---------------------------------------------------------- BODY: Worked back and forth on circular needle from mid front. Cast on 316-316-368-368-436-436 sts (incl 10 band sts in each side towards mid front) on circular needle size 3 mm with Cotton Light or Belle. P 1 row from WS. Work next row as follows from RS: SIZE S + M: 2 sts in GARTER ST – see explanation above, K 2, P 2, K 2, P 2 (= band), work A.1 (= 14 sts), work A.2 (= 30 sts) 2 times in total, insert 1 marker (= side), work A.3 (= 30 sts) 2 times in total, work A.1 2 times in total, A.2 2 times in total, insert 1 marker (= side), work A.3 2 times in total, A.1 one time and finish with P 2, K 2, P 2, K 2 and 2 sts in GARTER ST (= band). SIZE L + XL: 2 sts in GARTER ST – see explanation above, K 2, P 2, K 2, P 2 (= band), work A.1 (= 14 sts) 2 times in total, work A.2 (= 30 sts) 2 times in total, insert 1 marker (= side), work A.3 (= 30 sts) 2 times in total, work A.4 (= 52 sts), A.2 2 times in total, insert 1 marker (= side), work A.3 2 times in total, A.1 2 times in total and finish with P 2, K 2, P 2, K 2 and 2 sts in GARTER ST (= band). Size XXL + XXXL: 2 sts in GARTER ST – see explanation above, K 2, P 2, K 2, P 2 (= band), work A.1 (= 14 sts), work A.2 (= 30 sts) 3 times in total, insert 1 marker (= side), work A.3 (= 30 sts) 3 times in total, work A.1 2 times in total, A.2 3 times in total, insert 1 marker (= side), work A.3 3 times in total, A.1 (= 14 sts) and finish with P 2, K 2, P 2, K 2 and 2 sts in GARTER ST (= band). ALL SIZES: Continue rib like this until diagrams have been worked vertically (move the markers upwards when working), piece measures approx. 4 cm and there are 228-228-267-267-312-312 sts on needle. Switch to circular needle size 3.5 mm, and work 1 row from WS with K over K and P over P. Work next row as follows from RS: SIZE S + M: 10 band sts as before, A.5 (= 10 sts), work A.6 (= 21 sts) 2 times in total, (marker), work A.7 (= 21 sts) 2 times in total, work A.5 2 times in total, work A.6 2 times in total, (marker), work A.7 2 times in total, work A.5 (= 10 sts) and finish with 10 band sts as before. SIZE L + XL: 10 band sts as before, work A.5 (= 10 sts) 2 times in total, work A.6 (= 21 sts) 2 times in total, (marker), work A.7 (= 21 sts) 2 times in total, work A.8 (= 39 sts), work A.6 2 times in total, (marker), work A.7 2 times in total, work A.5 2 times in total and finish with 10 band sts as before. Size XXL + XXXL: 10 band sts as before, work A.5 (= 10 sts), work A.6 (= 21 sts) 3 times in total, (marker), work A.7 (= 21 sts) 3 times in total, work A.5 2 times in total, work A.6 3 times in total, (marker), work A.7 3 times in total, work A.5 (= 10 sts) and finish with 10 band sts as before. ALL SIZES: Continue pattern like this upwards. REMEMBER THE KNITTING TENSION! When piece measures 40-41-42-43-44-45 cm, work 2 rows back and forth only over the outermost 10 sts in one side of piece (i.e. only over band, the other sts are not worked), turn piece, work 1 row pattern as before and then repeat over the outermost 10 sts in the other side (this is done to make the neckline fold nicely). On next row from RS, dec 1 st in each side towards mid front for neck line – READ DECREASE TIP. Repeat dec for neck in each side every 4th row (i.e. every other row from RS), 4-4-14-13-12-12 more times and then every 6th row a total of 6-6-1-2-3-3 times. AT THE SAME TIME when piece measures 43-44-45-46-47-48 cm, divide the piece at the markers and finish front and back piece separately. BACK PIECE: = 104-104-123-123-146-146 sts. Work pattern back and forth on needle as before. AT THE SAME TIME cast on new sts for sleeves at the end of every row in each side as follows: Cast on 5 sts 3 times in total and then 8-10-8-10-8-10 sts 1 time = 150-154-169-173-192-196 sts – NOTE: Work the inc sts gradually in A.6/A.7. When all sts have been cast on, continue the pattern as before but work the outermost 4 sts in each side in garter st (in size S + L + XXL the pattern ends with 2 P inside 4 sts in garter st in each side and in size M + XL + XXXL the pattern ends with 2 K inside 4 sts in garter st in each side). When piece measures 60-62-64-66-68-70 cm, cast off the middle 20-20-29-29-30-30 sts for neck and finish each shoulder separately. Then cast off 1 st on next row from neck = 64-66-69-71-80-82 sts remain on needle. Continue the pattern with 1 st in garter st towards the neck and 4 sts in garter st towards the sleeve (the sts that do not fit the pattern are worked in stocking st). When piece measures 62-64-66-68-70-72 cm, loosely cast off all sts. Repeat on the other shoulder. RIGHT FRONT PIECE: Continue pattern and dec for neck as before. AT THE SAME TIME cast on new sts for sleeve at the end of every row towards the side as on back piece. After all dec for neck, 74-76-79-81-90-92 sts remain on needle (the sts that do not fit the pattern towards the neck are worked in stocking st). When piece measures 62-64-66-68-70-72 cm, cast off the outermost 64-66-69-71-80-82 sts on shoulder = 10 sts remain on needle for neck edge. Continue rib as before but work the outermost sts towards the neck in garter st. When neck edge measures approx. 7-7-9-9-10-10 cm from shoulder, slip sts on a stitch holder. LEFT FRONT PIECE: Work as right front piece but reversed. ASSEMBLY: Sew the shoulder seams. Sew neck edge tog mid back - sew st for st with grafting/kitchener sts and sew neck edge to neckline in the back of neck. BELT: Cast on 4 sts on double pointed needles size 3 mm with Cotton Light or Belle. K 1 row, * move the sts to the right side of needle without turning the piece, tighten thread on the back and K 1 row from the same side as previous row *. Repeat from *-* (working like this forms a round tie in stocking st without working P). NOTE: It is important to tighten the thread on the back to make the tie look nice. When tie measures approx. 150 to 200 cm, cut the thread, pull it through the 4 sts, tighten tog and fasten. Thread the belt up and down through the holes in the pattern - try the jacket on for correct placement. |
|||||||||||||||||||||||||
Diagram explanations |
|||||||||||||||||||||||||
|
|||||||||||||||||||||||||
 |
|||||||||||||||||||||||||
 |
|||||||||||||||||||||||||
Have you finished this pattern?Tag your pictures with #dropspattern #calistacardigan or submit them to the #dropsfan gallery. Do you need help with this pattern?You'll find 17 tutorial videos, a Comments/Questions area and more by visiting the pattern on garnstudio.com. © 1982-2026 DROPS Design A/S. We reserve all rights. This document, including all its sub-sections, has copyrights. Read more about what you can do with our patterns at the bottom of each pattern on our site. |
|||||||||||||||||||||||||


With over 40 years in knitting and crochet design, DROPS Design offers one of the most extensive collections of free patterns on the internet - translated to 17 languages. As of today we count 324 catalogues and 12267 patterns translated into English (UK/cm). 12267
We work hard to bring you the best knitting and crochet have to offer, inspiration and advice as well as great quality yarns at incredible prices! Would you like to use our patterns for other than personal use? You can read what you are allowed to do in the Copyright text at the bottom of all our patterns. Happy crafting!
Post a comment to pattern DROPS 148-14
We would love to hear what you have to say about this pattern!
If you want to leave a question, please make sure you select the correct category in the form below, to speed up the answering process. Required fields are marked *.