
Popular categories
Looking for a yarn?


Comments / Questions (129)
![]() Roz wrote:
Roz wrote:
Sadly, almost as soon as I started this sweater, I ran into trouble. I did the chain and the 1st row; but was directed to "Crochet Info" which said: Finish every round with 1 sl st in 3rd ch from beg of round. Am I connecting the two ends of the yoke of the sweater? A cardigan?
17.07.2013 - 06:29DROPS Design answered:
Dear Roz, this crochet info concerns sleeves, the crochet info you need for body is the one after this one : finish every row with 1 dc in first dc from beg of previous row, that's for body. And don't forget in both case to replace 1st dc on row/round by 3 ch. Happy crocheting!
17.07.2013 - 09:12Greta wrote:
Don´t read them!
06.06.2013 - 19:29
![]() Lisa wrote:
Lisa wrote:
Your patterns are VERY complicated to read, and are SO HARD TO UNDERSTAND !!! very frustrating
06.06.2013 - 17:49
![]() Lisa wrote:
Lisa wrote:
I am stuck. I am finished at mark 20 markers row, that is done. I dont understand if I move the markers as i do rows, and what does " on every other row 6 times " mean? I am not sure how many rows to make and when to do the increasing. please help
05.06.2013 - 22:41
![]() Sarah wrote:
Sarah wrote:
Super facile à réaliser. Très joli. Cependant, à l'attaque des manches, j'ai rajouté 4 brides de chaque coté pour combler le jour entre les 8ml et les 56b (M) de l'emmanchure (puis adapté la répartition des augmentations par la suite). Cela permet d'estomper le coté "bouffant" à cette hauteur sur la manche et qui n'apparait pas sur le modèle.
08.05.2013 - 16:08
![]() Katrin wrote:
Katrin wrote:
Hej! jättefint mönster, gillar alla era mönster. Jag har nyligen börjat virka igen och har lite svårigheter att tolka början av mönstret. Jag förstår inte riktigt hur ökningen på bak och framstycket går till. Vore jättesnällt om ni kunde beskriva det! mvh katrin
11.02.2013 - 21:02DROPS Design answered:
Hej, har du tittat på alla våra virk-videoer, har ser du hur man minskar och ökar mm.
03.04.2013 - 11:26
![]() Jenny wrote:
Jenny wrote:
Hur många varv ska det (hur långt) vara på fram/bakstycke medan man ökar och innan man börjar med ärmen?
03.01.2013 - 19:33DROPS Design answered:
Du börjar med ärmen när arb mäter 37 cm, du behöver inte räkna varven. Lycka till!
29.01.2013 - 10:15
![]() Claudia wrote:
Claudia wrote:
Hola, tienen algun grafico de como tejer el canesu? no entiendo en escrito o sea si son solo 5 veces los marcapuntos o si son 5 aumentos... con un grafico seria mas facil, para mi.... me gusta el modelo y comenze a tejerlo pero quede en un par de vueltas, desde ya muchas gracias
24.11.2012 - 18:30DROPS Design answered:
Claudia, tomemos como ejemplo la talla S: Aumentas 1 p.a. en todos los marcapuntos así: A cada 2 hileras 5 veces y a cada 4a hilera 2 veces - LEER TIP PARA AUMENTO. Resumiendo: (88 p.a. + 95 p.a. aumentados + 38 p.a. aumentados = 221 p.a. en la hilera). Trabajas 1 hilera y, al mismo tiempo, aumentas 14 p.a. distribuidos equitativamente (sin aum sobre los primeros y los últimos 6 p.a. = borde) = 235 p.a.
25.11.2012 - 20:59
![]() Claudia wrote:
Claudia wrote:
Perdon pero sigo sin entender esta parte " 5-6-6-5-5-6 veces en hileras alternas (es decir, a cada 2 hileras) y 2-2-2-3-3-3 veces a cada 4a hilera" 5 veces significa solo 5 aumentos cada 2 hileras? y en la proximas 2° vuelta 6 aumentos? gracias
07.11.2012 - 20:59
![]() Claudia wrote:
Claudia wrote:
No entiendo como tejer esta parte: Trabajar de ida y vuelta con p.a. y, AL MISMO TIEMPO, aum 1 p.a. en todos los marcapuntos de la manera sig: En hileras alternas 5-6-6-5-5-6 veces y en cada 4ª hilera 2-2-2-3-3-3 veces podrian explicarme? gracias
03.11.2012 - 23:44DROPS Design answered:
Hola Claudia! Para aumentar, haces 2 p.a. en 1 p.a., primero de un lado de cada marcapuntos de la hilera y, después, en la vez siguiente, del otro lado de cada marcapuntos de la hilera (ver Tip para Aumento)así: 5-6-6-5-5-6 veces en hileras alternas (es decir, a cada 2 hileras) y 2-2-2-3-3-3 veces a cada 4a hilera = 221-252-264-288-300-350 p.a. según la talla que estés trabajando y la cantidad de marcapuntos correspondiente a cada talla.
04.11.2012 - 06:41
|
|
Chantal#chantalcardigan |
|
 |
 |
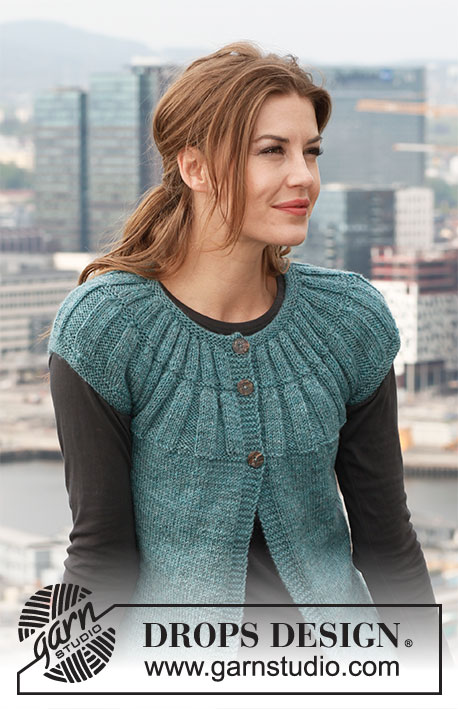
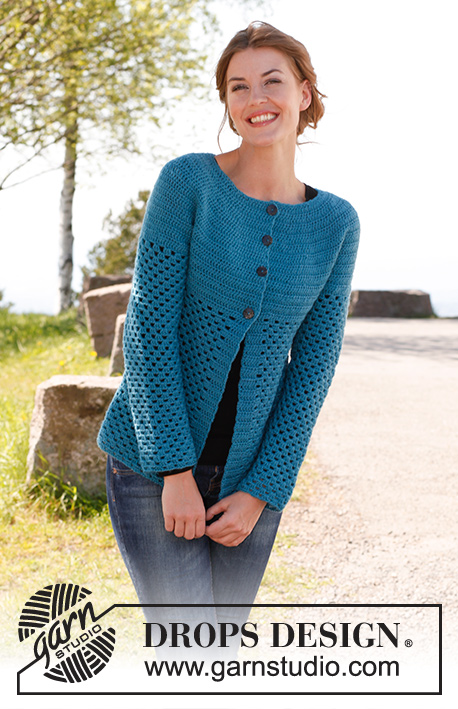
Crochet DROPS jacket in ”Karisma”. Size: S - XXXL.
DROPS 142-6 |
|
|
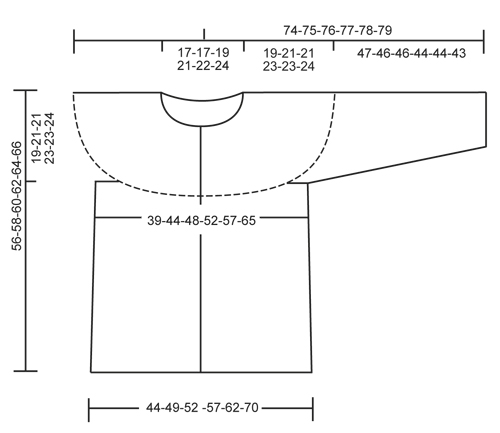
CROCHET INFO: Replace first tr on every round/row with 3 ch. Finish every round with 1 sl st in 3rd ch from beg of round. Finish every row with 1 tr in first tr from beg of previous row. INCREASE TIP: Inc by working 2 tr in 1 tr, first on one side of all markers on row, next time on the other side of all markers on row, continue inc like this. DECREASE TIP: Work 1 tr but wait with last pull through (= 2 sts on hook), then work next tr but on last pull through, pull thread through all sts on hook = 1 st dec. ---------------------------------------------------------- BODY: The piece is worked top down. Worked back and forth from mid front. Work 111-116-121-131-136-146 ch (incl 3 ch to turn with) on hook size 4 mm with Karisma. Work next row as follows: 1 tr in 4th ch (= 2 tr), 1 tr in each of the next 2 ch, * skip 1 ch, 1 tr in each of the next 4 ch *, repeat from *-* = 88-92-96-104-108-116 tr - read CROCHET INFO. Insert 19-20-21-23-24-26 markers in the piece as follows: Insert 1st marker after 8th tr, then insert 18-19-20-22-23-25 markers 4 tr apart, 8 tr remain after last marker. Work back and forth with tr while AT THE SAME TIME inc 1 tr at all markers as follows: On every other row 5-6-6-5-5-6 times and then on every 4th row 2-2-2-3-3-3 times – READ INCREASE TIP = 221-252-264-288-300-350 tr. Work 1 row while at the same time inc 14-7-7-7-19-5 tr evenly (do not inc over the first and last 6 tr = band) = 235-259-271-295-319-355 tr. Work next row as follows: 36-40-43-47-51-58 tr (front piece), 8 ch (= under sleeve), skip 52-56-56-60-64-68 tr from previous row (used for sleeve later), 59-67-73-81-89-103 tr (back piece), 8 ch (under sleeve), skip 52-56-56-60-64-68 tr from previous row (used for sleeve later) and 36-40-43-47-51-58 tr (front piece). Insert a marker and measure the piece from here. Work 1 tr in every tr/ch = 147-163-175-191-207-235 tr. Continue to work as follows: 1 tr in each of the first 6 tr (= band), * 1 ch, skip 3 tr, work 3 tr in next tr *, repeat from *-* and finish with 1 ch, skip 3 tr and work 1 tr in each of the last 6 tr (= 33-37-40-44-48-55 tr-groups with 6 tr in each side). Continue to work as follows: ROW 1: 1 tr in each of the first 6 tr, 3 tr in first ch, 1 ch, * skip 3 tr, 3 tr in next ch, 1 ch *, repeat from *-* until 1 ch and 6 tr remain, finish with 3 tr in last ch and 1 tr in each of the last 6 tr. ROW 2: 1 tr in each of the first 6 tr, * 1 ch, skip 3 tr, 3 tr in next ch *, repeat from *-* until 6 tr remain, finish with 1 ch and 1 tr in each of the last 6 tr. Repeat 1st and 2nd row upwards. When piece measures 10 cm from marker, inc 1 tr-group in the right side as follows: Work 3 tr + 1 ch in the first 8-9-10-11-12-13 ch, in next ch work as follows: 3 tr, 1 ch, 3 tr, 1 ch. When piece measures 17 cm, inc the same way in the left side – inc when 9-10-11-12-13-14 ch remain. When piece measures 24 cm, inc 1 tr-group in the right side, inc in the 10-11-12-13-14-15 ch the same way as before. When piece measures 31 cm, inc in the left side – inc when 10-11-12-13-14-15 ch remain. After all inc are done there are 37-41-44-48-52-59 tr-groups on row. Cut and fasten the thread when piece measures 37-37-39-39-41-42 cm from marker, piece measures 56-58-60-62-64-66 cm in total. SLEEVE: Worked in the round, top down. Beg by working mid under sleeve as follows: Work 1 dc in the 5th ch of the 8 ch worked for armhole on body. Work 3 ch (= 1 tr). Then work 1 tr in each of the next 3 ch. Then work 1 tr in every tr over sleeve, before working 1 tr in each of the remaining 4 ch under sleeve = 60-64-64-68-72-76 tr. Insert a marker mid under sleeve. Continue to work as follows: 1 tr in each of the first 10-10-10-12-12-14 tr, * 1 ch, skip 3 tr, work 3 tr in next tr *, repeat from *-* and work 1 tr in each of the last 10-10-10-12-12-14 tr. Continue with 1 tr in each of the 20-20-20-24-24-28 tr mid under sleeve, in every ch work 3 tr + 1 ch. Continue this pattern AT THE SAME TIME when piece measures 4 cm, dec 1 tr on each side of marker - READ DECREASE TIP. Repeat dec every 3½-3½-3½-3-3-2½ cm 9-9-9-11-11-13 more times = 40-44-44-44-48-48 tr. After all dec, work 3 tr + 1 ch in every ch. Cut and fasten the thread when sleeve measures 47-46-46-44-44-43 cm from marker – NOTE – shorter measurements in the larger sizes because of larger neck and broader shoulder width. ASSEMBLY: Sew buttons on to left front piece – the top button 1 cm from neck edge, the last in the transition between tr and tr-groups. Button the buttons between 2 tr on right front piece. |
|
 |
|
Have you finished this pattern?Tag your pictures with #dropspattern #chantalcardigan or submit them to the #dropsfan gallery. Do you need help with this pattern?You'll find 7 tutorial videos, a Comments/Questions area and more by visiting the pattern on garnstudio.com. © 1982-2026 DROPS Design A/S. We reserve all rights. This document, including all its sub-sections, has copyrights. Read more about what you can do with our patterns at the bottom of each pattern on our site. |
|


With over 40 years in knitting and crochet design, DROPS Design offers one of the most extensive collections of free patterns on the internet - translated to 17 languages. As of today we count 324 catalogues and 12267 patterns translated into English (UK/cm). 12267
We work hard to bring you the best knitting and crochet have to offer, inspiration and advice as well as great quality yarns at incredible prices! Would you like to use our patterns for other than personal use? You can read what you are allowed to do in the Copyright text at the bottom of all our patterns. Happy crafting!
Post a comment to pattern DROPS 142-6
We would love to hear what you have to say about this pattern!
If you want to leave a question, please make sure you select the correct category in the form below, to speed up the answering process. Required fields are marked *.