
Popular categories
Looking for a yarn?


Comments / Questions (129)
![]() Lucia wrote:
Lucia wrote:
Quando finisco i primi aumenti(ogni 2 righe 6 volte) la riga successiva devo cominciare gli altri aumenti(ogni 4 righe 2 volte)? oppure tra l'ultima riga di aumenti e la successiva devo lavorare una riga senza aumenti? oppure devo lavorare 3 righe senza aumenti? grazie.
27.10.2013 - 16:31DROPS Design answered:
Buongiorno Lucia, deve lavorare l'ultima riga dei primi aumenti, poi 3 righe senza aumenti e poi deve aumentare, ancora 3 righe senza aumenti e poi deve aumentare. Buon lavoro!
27.10.2013 - 16:40
![]() Lucia wrote:
Lucia wrote:
Buonasera-nelle INFO UNCINETTO non capisco se devo terminare il giro con una m.bss o con una maglia alta. PER IL CORPO: gli aumenti fatti ogni 4 righe per 2 volte-devo fare il 1° g. di aumenti poi 4 giri senza aumenti-il 2°giro di aumenti poi ancora altri 4 giri di aumenti e nella riga successiva 7 aumenti in modo uniforme. E' giusto cosi'? scusate ma l'uncinetto non e' il mio forte. Grazie.
25.10.2013 - 19:56DROPS Design answered:
Buongiorno Lucia, quando lavora in tondo finisce il giro con 1 m.bss nella 3° cat d'inizio giro, in piano con 1 m.a nella 1° m.a della riga precedente. Per gli aumenti, ogni 4 righe vuol dire: lavora 1 riga di aumenti, 3 senza, aumenta sulla 4°; ogni 2 righe invece vuol dire una riga sì e una no. Ci riscriva se ha altri dubbi. Buon lavoro!!
27.10.2013 - 16:12
![]() Lucia wrote:
Lucia wrote:
Dopo il primo g. di aumenti mi ritrovo da un lato 8 maglie e dall'altro lato (alla fine) con 7 maglie. Dove sbaglio?
22.10.2013 - 20:45DROPS Design answered:
Buonasera Lucia. Provi a verificare se il numero delle m, prima di iniziare gli aumenti, corrisponde con il n° delle m indicate per la taglia che sta lavorando. Poi, provi a controllare di aver posizionato correttamente i segnapunti: dovrebbe avere 8 m prima del primo segno e 8 m dopo l'ultimo. Se al primo giro di aumenti, aumenta dopo il segno, dovrebbe trovarsi con 8 m prima del primo segno e 9 dopo l'ultimo. Ci riscriva se ancora in difficoltà.Buon lavoro!
22.10.2013 - 23:00
![]() Lucia wrote:
Lucia wrote:
Non riesco a capire il suggerimento sugli aumenti.vengono fatti sulla stessa riga oppure uno su una riga e uno suull'altra riga? grazie.
22.10.2013 - 13:56DROPS Design answered:
Buongiorno Lucia, gli aumenti vengono fatti ogni 2 f 5-6-6-5-5-6 volte e ogni 4 f 2-2-2-3-3-3 volte, a seconda della taglia. Al 1° f di aumenti deve aumentare sempre da un lato dei segnapunti, su tutti i segnapunti, al 2° giro di aumenti (dopo 2 f) aumenterà dall'altro lato dei segnapunti. Ci riscriva se non è ancora chiaro. Buon lavoro!!
22.10.2013 - 16:11
![]() Nina wrote:
Nina wrote:
Hur ska jag satta markorerna i fram och bakstycket? Ar det 8 stolpar, sedan markor i den 9e, 3 stolpar och sedan markor i den 4:e (och upprepa) och efter sista markoren sa ska det finnas 8 stolpar kvar? Isafall gar det hela inte jamnt ut pa storlek M (dar man borjar med 92 stolpar)?
29.09.2013 - 23:35DROPS Design answered:
Du sätter markören mellan m: 8m, 1 markör, 4m, 1 markör, 4m, 1 markör osv då går det upp i str M också!
02.10.2013 - 11:02
![]() Christel wrote:
Christel wrote:
Hei! Jeg skjønner ikke hva som menes med "Hekle frem og tilbake med st, SAMTIDIG økes det 1 st ved alle merketrådene slik: på hver 2.rad 5-6-6-5-5-6 ganger og på hver 4.rad 2-2-2-3-3-3 ganger". Har prøvd google translate siden jeg ser at en del har fått svar på sine språk, men det var dessverre ikke så forståelig etter at google hadde gjort sitt.. Hvis det hadde vært mulig å lage en tegning i stedet for bare tekstforklaring hadde det vært supert! Ellers tusen takk for fine oppskrifter!:-)
10.08.2013 - 17:21DROPS Design answered:
Hej Christel. Du hekler nu frem og tilbaka med st (dvs, 1 st i hver st). Samtidig skal du öke 1 st ved alle merketrådene, först på hver 2.rad: 5,6,6,5,5 eller 6 ganger (afhaengig hvilken str du hekler). Derefter öker du 2,2,2,3,3 eller 3 ganger i hver 4. rad (afhaengig hvilken str du hekler). LES ØKETIPS hvordan du skal öke.
23.08.2013 - 10:39
![]() Kiss wrote:
Kiss wrote:
Hi, when working with this many markers, does anyone have any tips on how to move them? thanks ...
21.07.2013 - 08:02DROPS Design answered:
Dear Kiss, in this pattern we use different kind of marker, the one to mark where inc have to be done and other to mark when you will then measure from. Use some threads in a contrasted colours and put them once on RS, once on WS so that you then just have to pull them to remove them. Happy crocheting!
22.07.2013 - 10:21
![]() Tina wrote:
Tina wrote:
Förstår inte riktigt vad det menas med SAMTIDIGT ökas det 1 st vid alla markörerna så här: på vartannat v 5-6-6-5-5-6 ggr och på vart 4:e v 2-2-2-3-3-3 ggr
18.07.2013 - 16:29DROPS Design answered:
Du ökar först på vartannat v antal st enligt beskrivning för din storlek och sedan på vart 4:e varv.
04.10.2013 - 10:14
![]() Roz wrote:
Roz wrote:
Just wanted to say thank you for your response. There are 3 sentences under "Crochet Info" that appear to all address one point. I never would have figured out otherwise. Thank You. You may be hearing from me again.
18.07.2013 - 06:14
|
|
Chantal#chantalcardigan |
|
 |
 |
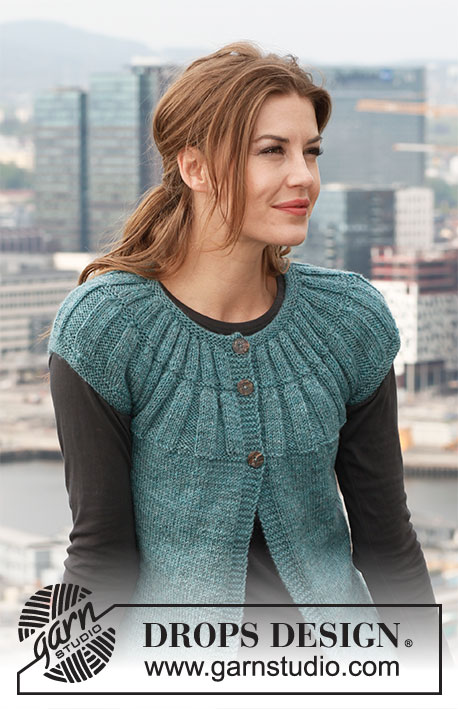
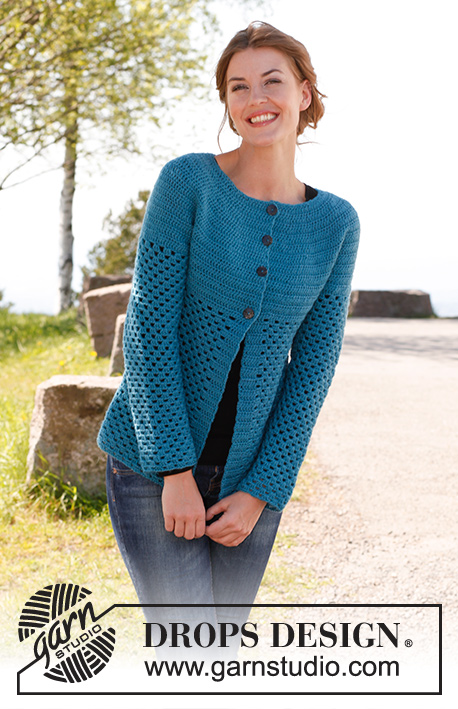
Crochet DROPS jacket in ”Karisma”. Size: S - XXXL.
DROPS 142-6 |
|
|
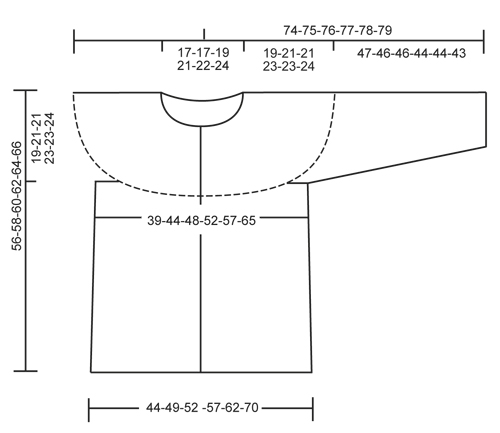
CROCHET INFO: Replace first tr on every round/row with 3 ch. Finish every round with 1 sl st in 3rd ch from beg of round. Finish every row with 1 tr in first tr from beg of previous row. INCREASE TIP: Inc by working 2 tr in 1 tr, first on one side of all markers on row, next time on the other side of all markers on row, continue inc like this. DECREASE TIP: Work 1 tr but wait with last pull through (= 2 sts on hook), then work next tr but on last pull through, pull thread through all sts on hook = 1 st dec. ---------------------------------------------------------- BODY: The piece is worked top down. Worked back and forth from mid front. Work 111-116-121-131-136-146 ch (incl 3 ch to turn with) on hook size 4 mm with Karisma. Work next row as follows: 1 tr in 4th ch (= 2 tr), 1 tr in each of the next 2 ch, * skip 1 ch, 1 tr in each of the next 4 ch *, repeat from *-* = 88-92-96-104-108-116 tr - read CROCHET INFO. Insert 19-20-21-23-24-26 markers in the piece as follows: Insert 1st marker after 8th tr, then insert 18-19-20-22-23-25 markers 4 tr apart, 8 tr remain after last marker. Work back and forth with tr while AT THE SAME TIME inc 1 tr at all markers as follows: On every other row 5-6-6-5-5-6 times and then on every 4th row 2-2-2-3-3-3 times – READ INCREASE TIP = 221-252-264-288-300-350 tr. Work 1 row while at the same time inc 14-7-7-7-19-5 tr evenly (do not inc over the first and last 6 tr = band) = 235-259-271-295-319-355 tr. Work next row as follows: 36-40-43-47-51-58 tr (front piece), 8 ch (= under sleeve), skip 52-56-56-60-64-68 tr from previous row (used for sleeve later), 59-67-73-81-89-103 tr (back piece), 8 ch (under sleeve), skip 52-56-56-60-64-68 tr from previous row (used for sleeve later) and 36-40-43-47-51-58 tr (front piece). Insert a marker and measure the piece from here. Work 1 tr in every tr/ch = 147-163-175-191-207-235 tr. Continue to work as follows: 1 tr in each of the first 6 tr (= band), * 1 ch, skip 3 tr, work 3 tr in next tr *, repeat from *-* and finish with 1 ch, skip 3 tr and work 1 tr in each of the last 6 tr (= 33-37-40-44-48-55 tr-groups with 6 tr in each side). Continue to work as follows: ROW 1: 1 tr in each of the first 6 tr, 3 tr in first ch, 1 ch, * skip 3 tr, 3 tr in next ch, 1 ch *, repeat from *-* until 1 ch and 6 tr remain, finish with 3 tr in last ch and 1 tr in each of the last 6 tr. ROW 2: 1 tr in each of the first 6 tr, * 1 ch, skip 3 tr, 3 tr in next ch *, repeat from *-* until 6 tr remain, finish with 1 ch and 1 tr in each of the last 6 tr. Repeat 1st and 2nd row upwards. When piece measures 10 cm from marker, inc 1 tr-group in the right side as follows: Work 3 tr + 1 ch in the first 8-9-10-11-12-13 ch, in next ch work as follows: 3 tr, 1 ch, 3 tr, 1 ch. When piece measures 17 cm, inc the same way in the left side – inc when 9-10-11-12-13-14 ch remain. When piece measures 24 cm, inc 1 tr-group in the right side, inc in the 10-11-12-13-14-15 ch the same way as before. When piece measures 31 cm, inc in the left side – inc when 10-11-12-13-14-15 ch remain. After all inc are done there are 37-41-44-48-52-59 tr-groups on row. Cut and fasten the thread when piece measures 37-37-39-39-41-42 cm from marker, piece measures 56-58-60-62-64-66 cm in total. SLEEVE: Worked in the round, top down. Beg by working mid under sleeve as follows: Work 1 dc in the 5th ch of the 8 ch worked for armhole on body. Work 3 ch (= 1 tr). Then work 1 tr in each of the next 3 ch. Then work 1 tr in every tr over sleeve, before working 1 tr in each of the remaining 4 ch under sleeve = 60-64-64-68-72-76 tr. Insert a marker mid under sleeve. Continue to work as follows: 1 tr in each of the first 10-10-10-12-12-14 tr, * 1 ch, skip 3 tr, work 3 tr in next tr *, repeat from *-* and work 1 tr in each of the last 10-10-10-12-12-14 tr. Continue with 1 tr in each of the 20-20-20-24-24-28 tr mid under sleeve, in every ch work 3 tr + 1 ch. Continue this pattern AT THE SAME TIME when piece measures 4 cm, dec 1 tr on each side of marker - READ DECREASE TIP. Repeat dec every 3½-3½-3½-3-3-2½ cm 9-9-9-11-11-13 more times = 40-44-44-44-48-48 tr. After all dec, work 3 tr + 1 ch in every ch. Cut and fasten the thread when sleeve measures 47-46-46-44-44-43 cm from marker – NOTE – shorter measurements in the larger sizes because of larger neck and broader shoulder width. ASSEMBLY: Sew buttons on to left front piece – the top button 1 cm from neck edge, the last in the transition between tr and tr-groups. Button the buttons between 2 tr on right front piece. |
|
 |
|
Have you finished this pattern?Tag your pictures with #dropspattern #chantalcardigan or submit them to the #dropsfan gallery. Do you need help with this pattern?You'll find 7 tutorial videos, a Comments/Questions area and more by visiting the pattern on garnstudio.com. © 1982-2026 DROPS Design A/S. We reserve all rights. This document, including all its sub-sections, has copyrights. Read more about what you can do with our patterns at the bottom of each pattern on our site. |
|


With over 40 years in knitting and crochet design, DROPS Design offers one of the most extensive collections of free patterns on the internet - translated to 17 languages. As of today we count 324 catalogues and 12267 patterns translated into English (UK/cm). 12267
We work hard to bring you the best knitting and crochet have to offer, inspiration and advice as well as great quality yarns at incredible prices! Would you like to use our patterns for other than personal use? You can read what you are allowed to do in the Copyright text at the bottom of all our patterns. Happy crafting!
Post a comment to pattern DROPS 142-6
We would love to hear what you have to say about this pattern!
If you want to leave a question, please make sure you select the correct category in the form below, to speed up the answering process. Required fields are marked *.